|
Tamiya's 1/48 scale
Gloster Meteor F.Mk.3
by
Wolf Buddee
|
 |
|
Gloster Meteor F.Mk.3 |

Tamiya's
1/48 scale Meteor F.Mk.3 is available online from
Squadron
Tamiya's 1/ 1/48 Gloster
Meteor F.3 kit was built using Hi-Tech's resin detail set and Eduard's
photo-etch set designed for Tamiya's Meteor F.1 kit.
Fellow Hyperscalers Derek Pennington and Steve Long graciously provided
me with reference drawings and photos and I would like to acknowledge
and thank both these gentlemen for their kind assistance.
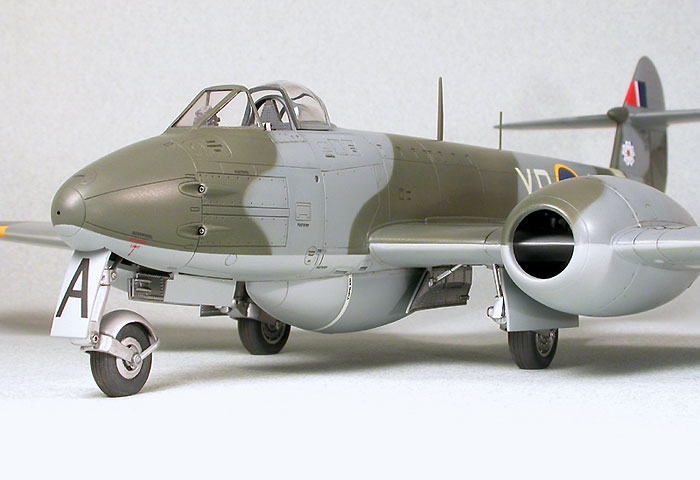
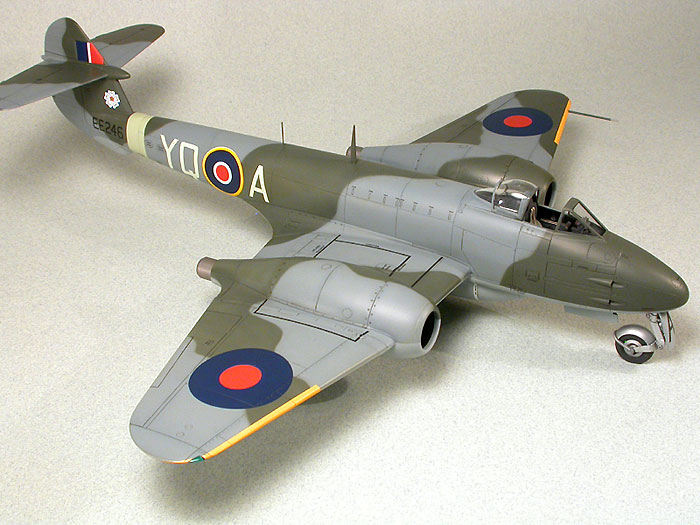
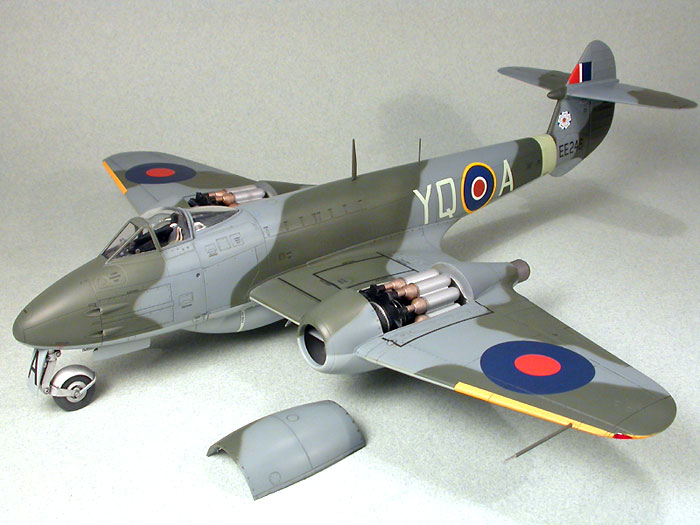
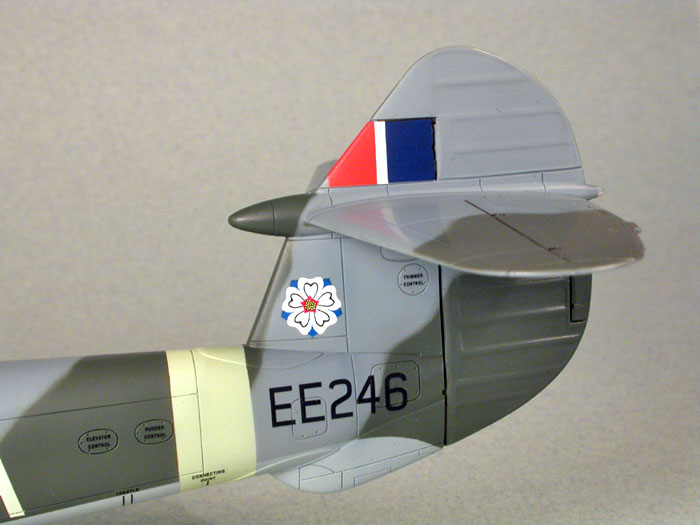
My Meteor is finished as EE246/YQ-A, a No.616 Squadron F Mk 3 Meteor
based in Lubeck Germany, 1945.
Assembly started with
elongating the troughs behind the open gun ports inside the fuselage
halves and gluing in small lengths of Minimecca metal tubing to
represent the gun blast tubes.
The interior nose sections
of the fuselage were then sprayed with MM British Interior Green and the
fuselage halves were glued together. I then added the wing root pieces
to the fuselage. I had read that getting a good fit between the wing
roots and the upper wing sections was tricky so I took extra care here
by dry-fitting everything repeatedly before committing the parts to
glue. I now added the upper wing halves to the one piece lower wing and
epoxyed the kit supplied ballast ( which prevents the model from
becoming a tail sitter) in place on the lower wing. The wing assembly
was now glued to the fuselage. The extra work done in dry-fitting the
assemblies paid off with an almost perfect fit. The only area that
required any real filler was at the rear section of the lower wing to
fuselage join which I filled with CA and sanded smooth.
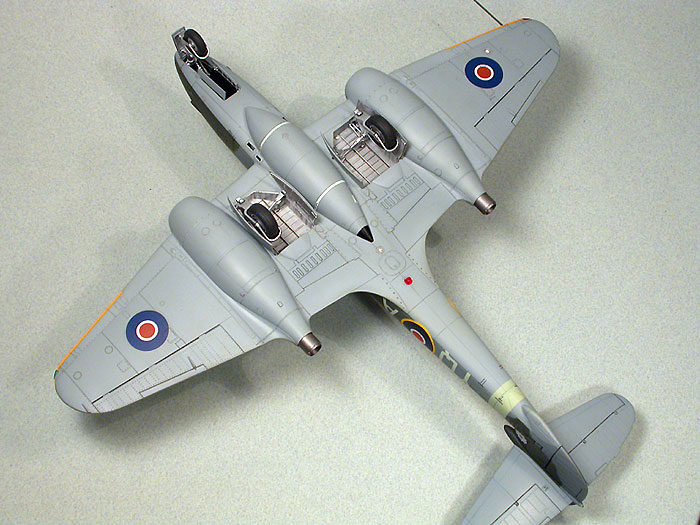
The front engine nacelles
were then added to the wings and any small gaps were filled with Mr.
Surfacer 500. Excess Mr Surfacer was removed with a Q-Tip soaked in
Isopropyl alcohol. The horizontal tailplanes were glued in place, the
ventral drop tank added, and Eduard's photo-etch parts for the wheel
wells were glued on to the otherwise featureless walls. This more or
less completed the fuselage.
A final note here: I was to learn later that the droptank was never
fitted to a Mk 3 Meteor. It was not used until the introduction of the
Mk 4.
It was while checking over the completed fuselage assembly that I
dropped the model. Inspection revealed that the rear extreme of the
bullet fairing on the tail had squashed flat. I repaired it by trimming
off the damaged section of the fairing and gluing on a small piece of
clear sprue which I sanded and polished to form the taillight.
I also cut out the wingtip lights and fashioned new ones from a set of
CMK clear green and red resin lights. These were glued in to place,
sanded, polished, and then removed for installation after painting.
Before final installation I gave them a brushed on coat of future for a
high gloss finish.
A final note here: I was to learn later that the droptank was never
fitted to a Mk 3 Meteor. It was not used until the introduction of the
Mk 4.
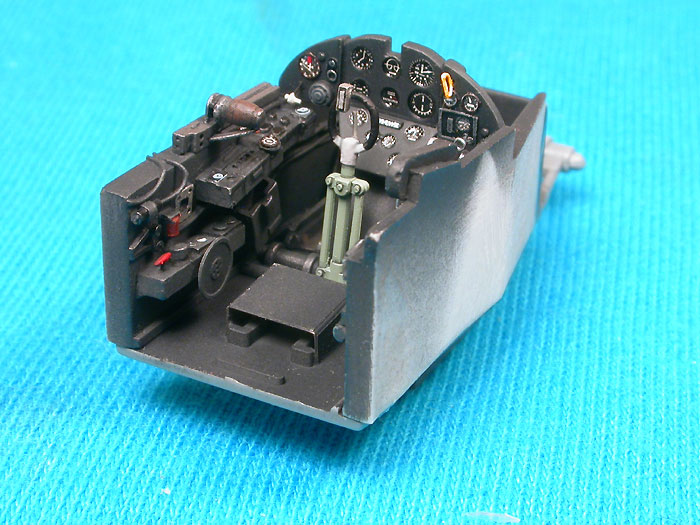
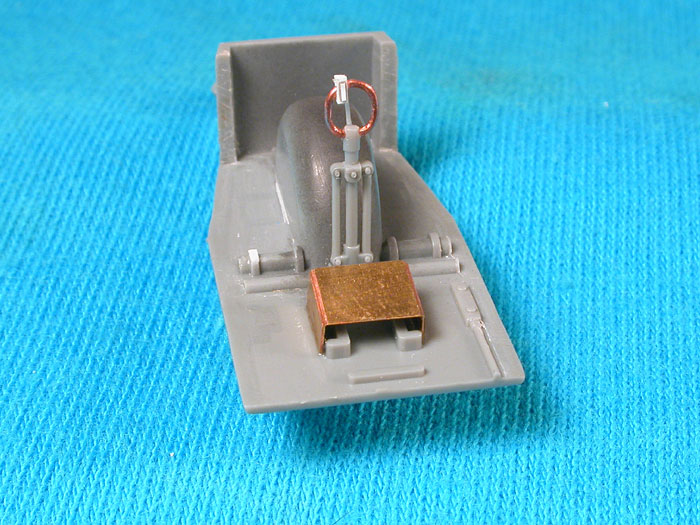
Cockpit
The kit cockpit is
oversimplified in my opinion and adding the beautiful Hi-Tech resin set
made a huge improvement. It appears very accurate when compared to
photos in the Meteor Pilot's Handbook.
I began by cleaning up all
the resin cockpit parts and removing the necessary details from the kit
cockpit. Looking at the pics in the instructions, I guessed that the "Q"
style seat harness fitted through the rear cockpit bulkhead and extended
back in much the same way as in a Spitfire. I drilled out a slot within
the molded detail on the rear bulkhead to accommodate Eduards prepainted
photoetched seat harness. I also noticed from pictures that the control
column spade grip was the wrong shape so the grip portion of the column
was removed. I drilled a hole through the top of the column and
fashioned a new grip from copper wire and added a brake control lever
and gun firing button from plastic.
It was at this point that I realized, to do the cockpit justice, I
needed more info. After a lot of fruitless internet surfing I broke down
and bought the Modelers Datafile book on building the Meteor. This is a
excellent book and I would highly recommend it to anyone building a
Meteor. It revealed that the hole I had drilled in the rear bulkhead for
the seat harness wasn't supposed to be there. The shoulder belts draped
over a small round bar on the rear bulkhead and were secured somewhere
behind the seat. I filled the hole in the bulkhead from behind, removed
the molded on bar and added a new bar from fine stiff wire. Hi-Tech's
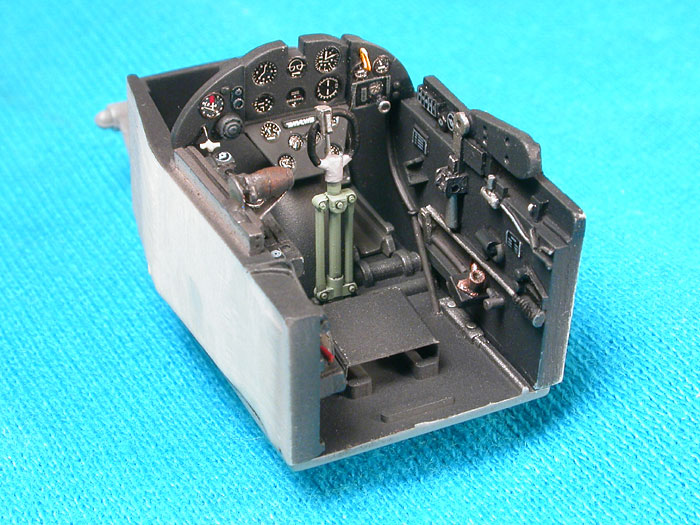
resin seat was used with Eduard's photo-etched mount. I painted the main
cockpit with Aeromaster's RLM 66 Blackgrey darkened with a little flat
black. Details were then painted according to the color drawings and
pics in the Datafile book. When I went to paint the port cockpit
sidewall, I noticed that the throttle detail had somehow broken off.
Hi-Tech's resin was very hard and brittle and some of the pieces were
too small to glue back together. I wound up rebuilding the throttle
assembly with bits of plastic, a piece of brass from a photoetch fret,
lots of CA, filing, sanding, and rescribing. The rudder pedals were
removed from the resin foot troughs and replaced with Eduard's
photo-etched pedals. I also added a missing hydraulic pump handle to the
floor.
I decided to use the kit instrument panel with a few modifications. I
removed most of the raised detail on the left side of the panel and
replaced the flaps indicator with a photo-etched item from an Airwaves
set. A new DR compass indicator was made using a Re-Heat instrument
decal and a Waldron instrument bezel. The undercarriage lever was
scratchbuilt and added. On the right side of the instrument panel, the
fuel gauges were added, again using Re-Heat instrument decals and
Waldron bezels. The oxygen regulator panel was added by cutting it from
Eduard's photo-etched instrument panel and detailing it with an
instrument decal and a small photo-etched knob. The yellow hood jettison
handle was added above the fuel contents gauges.The main instrument
panel was finished using the kit supplied instrument decals.These were
punched out individually with my Waldron punch and die set. Each
instrument was finished off with a small drop of Future floor polish to
replicate the glass faces.
Click the thumbnails below to view larger
images:
I should mention, that the
instrument panel, is still missing 3 instruments. Eduard does a Mk 3
photo-etch set which includes the correct instrument panel. I found this
out later but I probably wouldn't have purchased another photo-etce set
just for the panel.
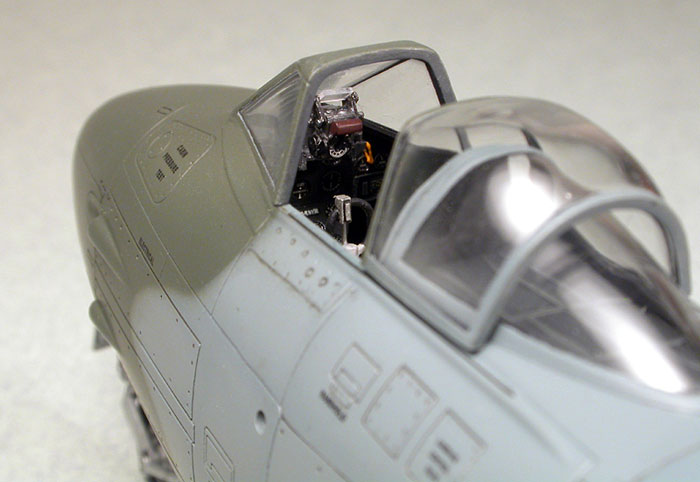
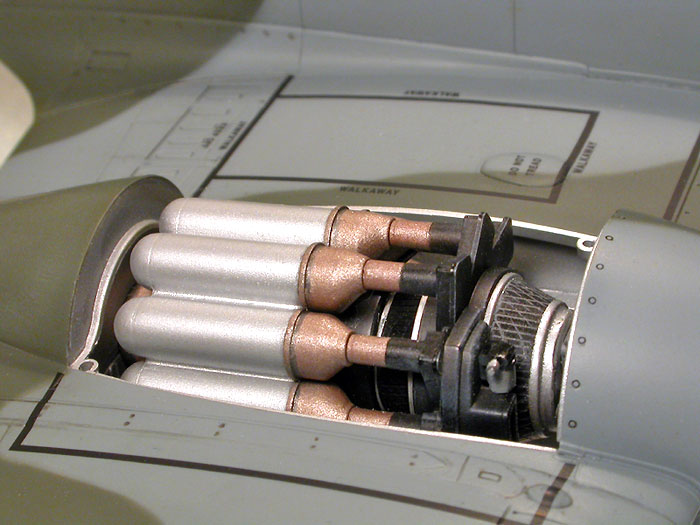
The gunsight supplied in the kit is awful so I ordered a replacement
from Cutting Edge and installed their Mk-9 Acemaker gunsight. While not
completely accurate for this application it is a close representation of
the gunsight used on the Meteor Mk 3. Only a crashpad and the glass
reflector were added to the sight.
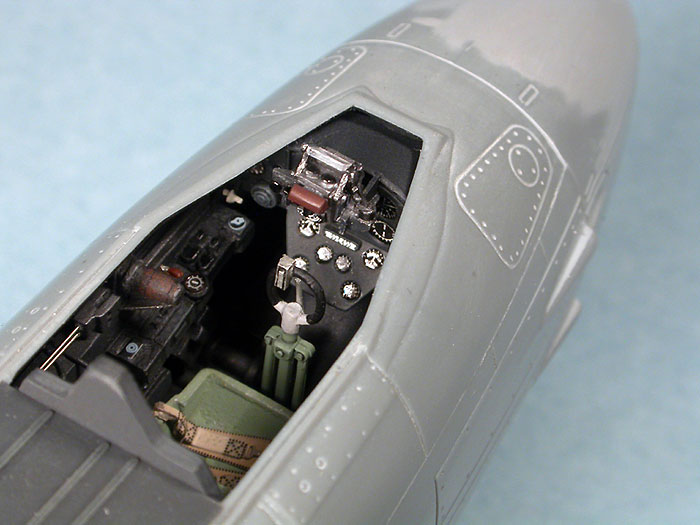
With the painting
completed, the cockpit was assembled with Ca and test fitted in to the
fuselage. The fit was perfect. The cockpit was placed within the
fuselage without glue and the upper fuselage section was glued on
securing the cockpit firmly in place. The reason for not gluing the
cockpit assembly was that the nose wheel doors glued in to holes formed
by the bottom of the cockpit tub. Having a little play here assured I
wouldn't have any alignment problems with the holes when fitting the
doors later. Finally a small coaming was made and glued in place to
close off the area between the instrument panel and canopy windscreen.
The Engines
The engines were built
straight out of the box. The tailpipes were sprayed Testors Metalizer
Burnt Metal and the very front part of the engine painted a dark
metallic gray from Humbrol Metalcote. The rest was painted according to
Tamiya's instructions. Washes were applied using thinned Liquitex Paynes
Grey acrylic paint and all parts were drybrushed with a slightly lighter
shade of the base color.
The front air intakes have
a molded in screen detail which is represented by fine recessed lines
and I gave this a sludge wash made of a mixture of light grey pastel
chalk, dish soap and water. Once dry, any excess sludge was cleaned up
using a slightly dampened paper towel. The recesses are shallow so I had
to repeat the procedure a number of times before I was completely
satisfied.
Tamiya provides the parts to build the engines with the extended exhaust
representative of the first 15 Mk 3 aircraft powered by the Welland 1
W2B/23C engines. What is not mentioned anywhere in the instructions is
that parts are also included to build a Derwent 1 powered aircraft with
the short exhausts and the additional scoops for the engine covers as
found on the 16th and on production Mk 3's. You will have to come up
with your own markings though as I have yet to find a single aftermarket
decal sheet for a Mk 3 Meteor in 1/48 scale.
Landing Gear
The landing gear was built
with very little modification. The kit supplied wheels were replaced
with ones from the Hi-Tech set which were flattened on the bottom, had
very finely engraved tread detail, and over-emphasized wheel bulges. The
bulges were sanded down substantially to keep the tires from looking
grossly underinflated. I added fastener details to the landing gear
struts and retraction arms using my Waldron punch and die set. Eduard
also supply a couple of detail pieces to add to the struts.The strut
assemblies were painted with Testors Metallic Silver decanted from a
spray can and shot through the airbrush. The wheels were then slipped in
to the strut assemblies without glue to finish off the landing gear.
Canopies
The canopy sections were
carefully removed from their sprues and when cleaned up were dipped in
Future. When dry, the fixed sections were masked both inside and out
using Tamiya's masking tape and the inside framework sprayed with the
same RLM 66/flat black mixture I had used for the cockpit. The canopy
sections were then glued to the fuselage using Mirco Kristal Kleer.
For some reason Murphy's
Law would plague me throughout this part of the build and a couple of
times, due to sheer frustration, the model came very close to becoming a
wallflower.
I started by preshading the panel lines with flat black. Next I sprayed
the fuselage tail band with MM Sky, and when dry the band was masked and
the underside was painted MM Medium Sea Grey straight from the bottle.
Next, the bottom was masked off and I started painting the topside with
MM Ocean Grey. Not having this color in my collection of model paints, I
bought a new bottle of MM Ocean Grey and as I began spraying, I couldn't
help but notice that the paint had a decidedly green cast to it. I was
convinced that Ocean Grey should have a bluish tint so I sought advise
from fellow Hyperscalers. After various different suggestions I decided
to buy another bottle in hope that maybe I had gotten either a bad mix
or a mislabeled bottle. No such luck. In the end I made my own Ocean
Grey by mixing MM German Uniform Feldgrau and MM Medium Sea Grey. The
resulting color came very close to my references. I honestly couldn't
tell you what percentage of each color I used but it looked much better.
After spraying the Ocean Grey I made masks from regular lined paper
using the camouflage pattern provided by Tamiya as a guide. These paper
masks were attached to the model with small rolls of masking tape
positioned just inside the edge of the mask. I used MM RAF Dark Green
and carefully sprayed the green pattern. For the most part this worked
very well and I had a nice tight feathered edge between the two
camouflage colors. In a few places I had a bit too much overspray and I
had to touch things up a bit.
Finally it was time to
unmask the bottom. In the process I managed to pull off a few small
patches of paint. This was easy to fix but to my surprise, I found that
there wasn't enough contrast between the Medium Sea Grey and my mix of
Ocean Grey. The Medium Sea Grey straight from the bottle now appeared
too dark. Photos showed a definite contrast between the 2 colors so I
lightened up the Medium Sea Grey with some white, masked off the top and
resprayed the bottom again. This time it looked much better but now
pulling off the masks removed some of the paint from the leading edges
of both the wings. AAARGGGHH! After more masking and repainting both
topside colors along the damaged leading edges, everything looked good.
I clear coated the entire
model with Testor's Metalizer Sealer which dries quite quickly and hard
as a rock. To my dismay it dried, yellowing in patches. I had used this
sealer many times before and had never run in to this problem so I
assumed it was my doing. After further masking and repainting of certain
areas of both greys, (the green looked unaffected), I carefully
resprayed the sealer, and it happened again. After much wailing and
gnashing of teeth, I again repainted the affected areas but this time I
tried Polly S Clear Gloss. It was the first time I had used this brand
of acrylic paint but I was very happy with the results. I could finally
get on with my favorite part of the build, the Decaling and weathering.
I started by applying the upper wing roundels from Aeromaster. I used my
usual Miro-Set/Sol method of applying the decals.The upper roundels were
two part decals, the red center being separate. When I applied the red
center, it looked almost orange on the model. So much so that I removed
it and placed it back on the wet backing paper. Comparing the color of
the dull red center with a half dozen other decal sheets I had, I
reapplied the red center and decided to just let it dry and see how it
looked. In the end it looked fine and I carried on.The tail fin flash
applied with no problems and I moved on to the fuselage roundels and
codes.
I applied the first part
of the right fuselage roundel which included the yellow outer ring and
the white center. While this dried I added the code letters which came
from Xtra-decal and these laid down beautifully. Next I added the blue
portion of the roundel after the first part had fully dried and then
quickly added the red center and left them to dry. I wasn't at all
surprised to see them wrinkle up but I was very surprised to see them
bubble up badly and no amount of coaxing, prodding, setting solution, or
just leaving them alone would get them to settle down. I had never
experienced this before with Aeromaster decals. When dry it looked so
horrible, I decided to remove the decal and try again, but the damaged
decal wouldn't budge. Not even pulling on it with masking tape! I wound
up using a 3200 grit polishing cloth and I literally sanded and polished
the blue and red decal off. I reapplied the blue section of the roundel
using one from another sheet and the same thing happened. I was
beginning to think I was being cursed by some nasty modeling deity. Off
it came again, using the 3200 grit polishing cloth. This time, thinking
I had nothing to loose, I used a roundel from a Watermark decal sheet
and to my surprise, with a little persuasion, the decal laid down
beautifully. Initially the decal looked thick but once on the model and
dry, it looked great. When adding the fuselage roundel to the left side
I experienced the same horrible wrinkling and while trying to persuade
the decal to lay flat, I smudged it beyond repair. Out came the
polishing cloth again. Giving the Aeromaster roundels one more try, the
next decal worked perfectly. I still haven't figured out why I had so
many problems, none of which I'd experienced before.
For the serial numbers I
cut apart the kit decals until I had the numbers I needed and I applied
these using Mr Mark Softer decal solution. It was the first time I had
used this solution and the Tamiya decals reacted very well to it. The
same went for the data stencils. The large wingwalk decals proved
another challenge but again Mr Mark Softer came to the rescue. My
suggestion when using Mr Mark Softer is to apply the solution only to
the top of the decal and avoid getting it on the paintwork. If not
washed off relatively quick, it seemed to waterstain the paint. This
staining disappeared with a gloss coat and was totally invisible after
the dullcoat.
I used the Watermark
decals for the under wing roundels and they preformed wonderfully again
with Microset and a little prodding with the sharp end of a round
toothpick to get them into the panel lines. I would recommend though,
trimming off as much as possible of the clear carrier film.
The letter "A" on the
nosewheel door was made by cutting up the kit supplied letter "H" decal
and carefully applying the individual elements. I finished off by
applying the wing leading edge decals and a custom printed 616 Squadron
emblem on the tail.
To seal the decals, a
final gloss clearcoat was applied but even though I had wiped the entire
model down first, the clearcoat fish eyed over the large wingwalk decal
on the left wing. When dry, the area was polished out and the gloss coat
reapplied with no further problems.
I now mixed a very thin
wash of Liquitex acrylic paint using a 50/50 mix of Paynes Grey and
Burnt Umber with distilled water and a good dollop of dishwashing
liquid. This mixture was carefully painted in to select panel lines to
indicate some grime but I was very careful to not overdo it as these
planes were kept up with a good measure of "spit and polish".
Finally, the model was
sprayed with Polly S Flat Coat and left to dry.
Finishing Touches
The still unpainted wheel
wells were now masked off and sprayed aluminum. I had left this so late
in the build as I was using the wells as a finger hold to handle the
model. The wells were given a wash of the same mixture used for the
panel lines and finally MIG Pigments European Dust powder was applied to
dirty things up a bit.The powder was also applied to the tires and
sealed with dullcoat. The landing gear assemblies and doors were finally
glued in place.
With all the paintwork done, the masks were removed from the canopy
sections and the sliding canopy section was removed. It had been tacked
in place with Kristal Kleer to aid in masking off the cockpit and now
thin strips of Aeromaster RLM 66 decal material were added along the
front and bottom inside edges to represent the inner canopy framing.
This was easier than trying to mask and spray it. The two lights under
the fuselage had their lenses added after using Bare-Metal Foil for the
reflectors. The lenses were secured in place using Polly Scale Clear
Gloss paint. The same was done for the underwing landing light.
Murphy's Law was not finished and I had to endure one final disaster. I
was getting used to things going a bit sideways but I was unprepared for
what happened next. I was gluing the engines in to their nacelles and I
opted to use Ca glue. I have a very thick Ca and a water thin Ca and to
get something in between I mix both together. I placed a small amount of
the thin Ca in to a plastic lid and was adding the thick stuff when the
thick Ca sort of farted out of the bottle. I saw some of the thin Ca
splash out of the lid but thought nothing of it. After gluing in the
first engine, and making sure everything was aligned properly, I noticed
a small wet spot on one of the wings. When I tried to wipe off the wet
spot, I realized it was solid and I soon discovered that the model was
covered in Ca glue splashes. I wanted to swear but I couldn't. In fact I
was speechless. It had sprayed everywhere including underneath.
Thankfully the canopy remained untouched. After the reality set in I
glued in the second engine and then started to scrape, sand, pick off
and polish off the spots of Ca. In some areas I wound up removing paint
and these areas were resprayed, and carefully sanded to level off the
paint work. Gloss coats were reapplied in these areas and then
dullcoated again. I also had to reapply the panel line washes in the
areas that were repainted.
With repairs complete, I reinstalled the antenna mast I had snapped off
earlier and added the IFF antenna which I made from stretched sprue
sanded to a flat airfoil profile.
After all the trials and tribulations I could hardly believe it was
finally finished. I'm glad I persevered because I now have a beautiful
Meteor to add to my collection as a reward.
Click the thumbnails below to view larger
images:
Images and Text Copyright ©
2005 by Wolf Buddee
Page Created 09 February, 2005
Last Updated
09 February, 2005
Back to
HyperScale Main Page |
 Home
| What's New |
Features |
Gallery |
Reviews |
Reference |
Forum |
Search
Home
| What's New |
Features |
Gallery |
Reviews |
Reference |
Forum |
Search