|
Dassault
Mirage IIIC
by
Chris Bowie
|
 |
|
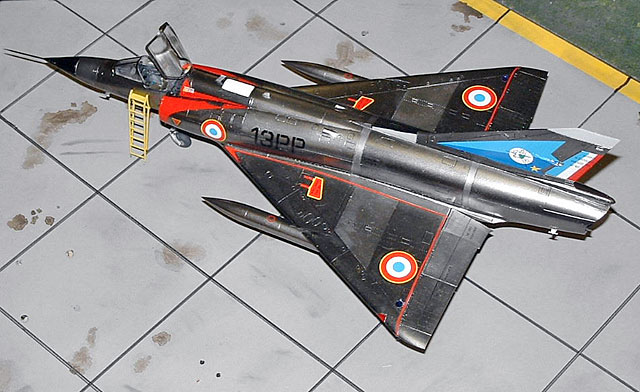
Dassault Mirage IIIC |

Eduard's 1/48 scale Mirage IIIC
is available online from
Squadron.com
The Mirage III has long been one of my favorite
aircraft, but alas, the choices for modeling in 1/48th
scale were pretty poor. Probably the best kit was the
older Heller Mirage kit, but this had raised panel lines
and a weak interior. Then out of the blue comes this
fantastic new kit from Eduard, which gives a whole new
meaning to the “out of the box” kit.
The model comes with sprues of delicately molded plastic
with perfectly engraved panel lines, two decal sheets
for five different aircraft, decal and painting
instruction sheets printed in color, a detailed assembly
manual with excellent painting instructions, a
photo-etched sheet of ejection seat hardware and
seat-belts (painted), a weight sized to fit the nose to
eliminate tail sitting, and a set of painting masks for
the canopy, markings, and dialectric panels. The latter
allows you to paint sections, mask them off accurately,
and then spray the main color coats. All of this is
truly marvelous. If only every other kit offered this
full range of features. Eduard also sells a kit for the
Mirage III CJ variant, which has a number of colorful
Israeli schemes.
I painted the interior dark gray and
washed it with a black wash to highlight the details—in
Mirage IIIs, the interior is black, which turns into a
black hole if you use flat black as the base coat. The
kit provides excellent decals for the instrument panel
and side consoles (along with some additional side panel
markings) that went on well and snugged down tightly
with an application of Microsol. The seat looked great
after adding the photo-etched seat belts and ejection
handles.
This is without question the best Mirage kit there is on
the market. That being said, I found it fairly complex
to assemble—in the end, everything went together and the
fit was quite excellent, but I can’t say that the
engineering was as good as the latest Tamiya kits. In
particularly, I found the intakes quite complex; they
required some careful sanding and etching to make
everything fit. But I guess this indicates that I am
getting truly spoiled when I start to complain that the
kit is too complicated!
|
Natural Metal
Finish and Markings |
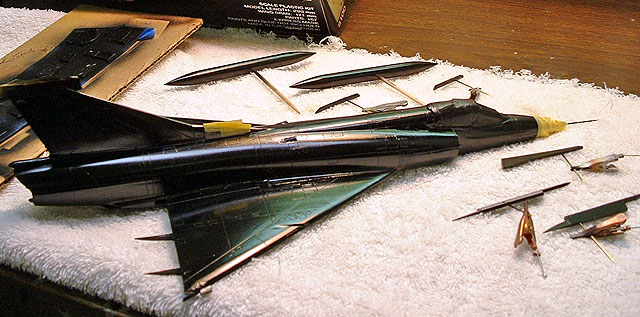
Once it was all put together, I primered
the model, then sprayed appropriate areas gloss red (on
the intake exterior), gloss white (on the top antenna
panel), and grey (for dialectric areas on the tail).
When dry, I masked these off using the pre-cut masks and
sprayed the whole aircraft gloss black using Tamiya X-1
(thinned on a one to one paint to rubbing alcohol
ratio).
The image belowshows the model after
painting with the gloss black (and the radome and top of
the fin dialectric panel masked off.
After drying overnight, I masked off the nose and
sprayed the whole model with two coats of Alclad II
Chrome (see first thumbnail below). When dry (about 15
minutes), I began masking off panel areas and sprayed
with Alclad II Polished Aluminum (see second thumbnail
below). I have found Alclad II Chrome and Polished
Aluminum to be true miracle paints—it seems like I
dipped the whole model in vat of liquid metal. And
durable as well! For me, these paints have
revolutionized the duplication of natural metal
finishes—I now look forward to spectacular paint schemes
with shiny aluminum surfaces.
Click the
thumbnails below to view larger images:
I then removed the pre-cut masks and
then gave the model a wash of acrylic gloss black (one
part Tamiya X-1, 5 parts water, one part dishwashing
liquid) to make the panel lines stand out. When dry, I
removed the excess with water and, where stubborn, a
little glass cleaner (the Alclad is very durable). I
then began applying decals. The instructions were
outstanding, while the decals were exceptional: thin and
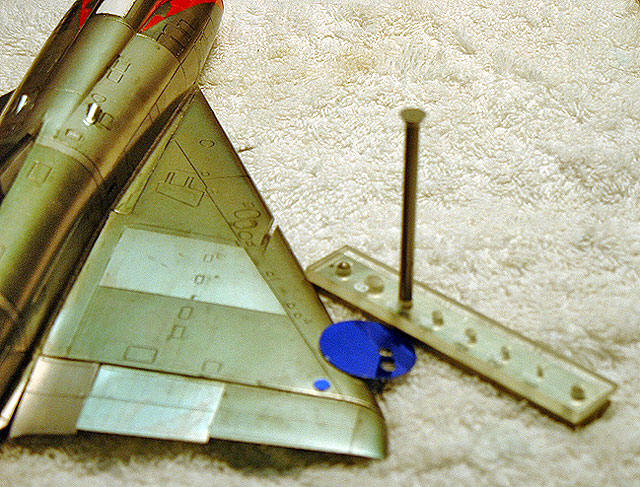
in perfect register. To duplicate the blue circular wing
lights, instead of the kit pieces I used my Waldron
punch press to cut a circle out of a blue splangle
purchased at a local craft store (see Figure 4). As
mentioned in HyperScale, these spangles make great CRT
displays in cockpits and HUD combining lenses as well.
I then attached the landing gear,
various exterior probes, and the kit-supplied boarding
ladder. And with that, I had a lovely delicate Mirage
III to add to my collection. I’m ready to buy the Mirage
III CJ now!
I can highly recommend this kit.
Text, Models and Images Copyright ©
2004 by
Chris
Bowie
Page Created 02 December, 2004
Last Updated
01 May, 2005
Back
to
HyperScale Main Page |
 Home
| What's New |
Features |
Gallery |
Reviews |
Reference |
Forum |
Search
Home
| What's New |
Features |
Gallery |
Reviews |
Reference |
Forum |
Search