|
Mistel 1
Part One - Building
the Ju 88s
by
Floyd S. Werner Jr.
|
 |
|
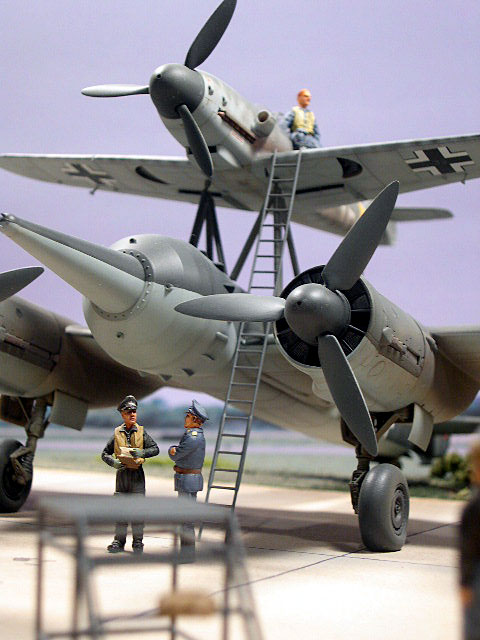
Mistel 1 - Junkers Ju
88A-4 and Messerschmitt Bf 109F-4 |

HyperScale is proudly supported by
Squadron.com
The first Mistels utilizing airplanes was developed
by the British in 1916. The concept was further refined between the
wars with flying boats and then promptly forgotten until WWII. Then the
British thought about using a piggy back airplane for convoy protection,
but nothing ever came of it.
The Germans took notice of the Mistel project
following the British development and refined it into a machine of war.
Initially, the idea of Mistel, or Mistletoe, was looked upon as a way to
increase lift for takeoff of commercial airliners and later as a way to
launch gliders without a tow plane. First experiments in this method
included a Klemm 35 and a DFS 230. It was found that the Klemm did not
have the power to maintain flight so a FW56 was utilized. The FW56
proved successful but not as an effective tactical solution for getting
glider borne troops and equipment on the ground. A Bf-109 was tested
with the DFS-230 as a way to maximize payload at the greatest possible
range. The tests proved successful but some problems did arise. The
increase in the rate of descent in the DFS (with support truss) and
overheating of the 109s engine at the slower speeds while towing.
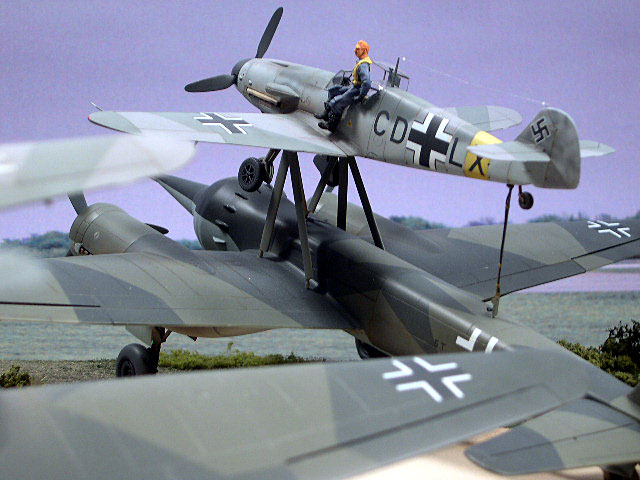
Despite these problems, in 1941 it was proposed to
use war weary Ju-88s as flying bombs with Bf-109s as the control
airplane. This arrangement offered a range of 1500 km with a 3.5 ton
payload. To minimize weight the dive brake hydraulics, anti-dive
mechanism, defensive armament, radio and bomb aiming equipment were
removed. Even with all this removed the takeoff gross weight was in
excess of 20,000Kg. This was right at the weight rating for the Ju-88s
tires. This necessitated takeoffs from runways only, as any
imperfection could spell disaster.
Dual function instruments, indicating engine
manifold pressure and engine RPM were fitted to the 109s cramped cockpit
to monitor the Ju-88. Explosive bolts were used to create the
separation when required.
The Bf-109/Ju-88 warhead combination was designated
the “Mistel 1”. The FW-190/Ju-88 combination was given the designation
“Mistel 2”. Whenever a fully instrumented cockpit was installed the
prefix “S” designating “Schule” (school) or training aircraft was used,
such as Mistel S1. Actual changing of the Mistel from a conventional
cockpit to a warhead could be accomplished in a few hours so the
designation was dependant on the type of nose on the bottom aircraft.
What was a S1 today could be converted into a 1 tomorrow.
In February 1944, the first live test flight was
undertaken with a live warhead, but an electrical problem with the
autopilot caused the Ju-88 portion to crash. Following the huge
explosion and to maintain secrecy a “funeral” was held for the crew of
the errant Ju-88.
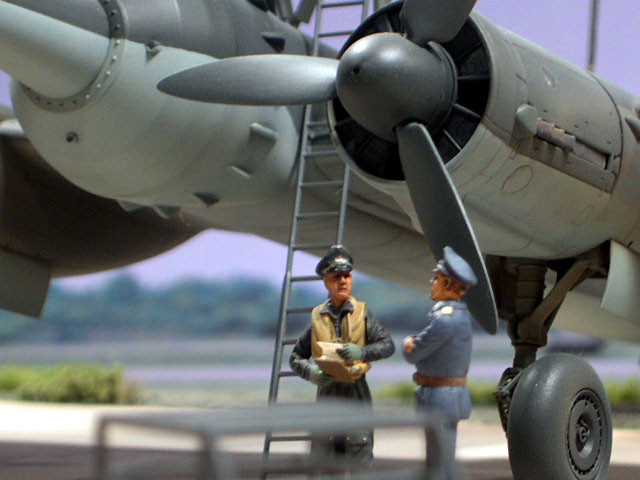
I’d always thought the Mistel aircraft were only
test aircraft or that very few of them actually flew, but I was wrong.
By the end of the war more than 200 Mistels of all types were
completed. The final completed Mistel rolled out on 6 April 1945 and
there were more in the conversion process.
Operational deployment of the Mistels had mixed
results. Occasionally the Mistels were deadly accurate, usually against
bridges, but normally the aircraft were lost to anti-aircraft or
fighters.
Mistel operational units included KG (J) 30, KG 66,
KG 101, and KG 200 so there was a significant amount of deployment of
the type. Despite this outlay of personnel and equipment these odd
aircraft had very little impact on the war.
Proof in the concept of the Mistel was demonstrated
after the war by American and Russian test aircraft such as the launch
aircraft for the Bell X-1 and the Russian DFS-346. Even more recently
by the Boeing 747 and the piggy backed Space Shuttle.
When ProModeler released their Ju-88A-4 in 1998 I
knew I had to make a Mistel 1. Mating the Hasegawa Bf-109F kit with the
ProModeler Ju-88A4 seemed like a no brainer conversion. I figured that
the conversion would be relatively easy utilizing the Dragon Mistel kit
parts on the ProModeler body. I was right. It was easy.
After seeing other Mistels by Sam Garcia and Ian
Robertson, I knew that the Mistel made into a neat looking airplane.
The difference between their aircraft and mine was I wanted to have a
109 as the control plane.
Who would have figured me wanting a Bf-109?
Released by ProModeler in 1999 the Ju-88A-4
utilized the original Dragon kit with a new nose, tail, armament and
cockpit to depict the A-4. Because of this there were some very minor
problems with the molds as they were very well used. Some panel lines
were faint and needed to be rescribed.
As there was no cockpit per se, construction
started with the fuselage, which fitted well. There were a few panel lines
that needed to be rescribed, especially on the belly. The lines were
easy to do as they were all straight. Don’t forget to open up the
appropriate holes for the Mistel supports. Some aircraft utilized the
“catcher” cradle near the tail, but normally only on training aircraft.
The same goes for the nose support which prevented the fighter’s
propeller from cutting into the training Ju-88s cockpit. I’m sure the
pilots of the Ju-88 appreciated it. There are some panels, insulators
and the clear antenna direction finder that need to be filled and
rescribed. Remember to assemble the tail strut before you put the
fuselage halves together. I used the tail wheel from True Details which
is bulged, a lot. Except this time the extra bulge is good as the
Mistel was very heavy.
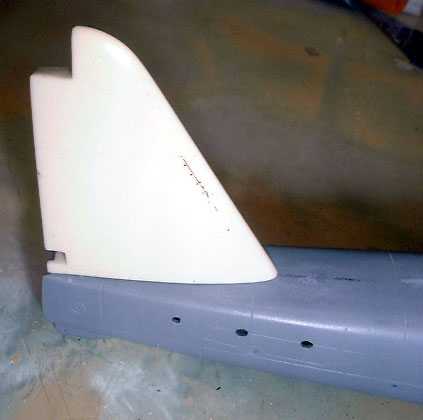 One thing about the ProModeler kit is the rudder
hinge line. It appears that the rudder hinge line is recessed. This is
a function of utilizing the Ju-88G kit as the base kit. I decided to
use the MDC Ju-88A-4 tail on one kit and the kit one on the other. I
hollowed out the attachment point for the resin tail and while test
fitting, it fit so well that I just left it on. It isn’t even glued on
it fit so well. I did reposition the rudder, like my reference photo,
because I could with the MDC set. Kudos to MDC and their tail and
rudder. The kit tail and rudder fit just as well, but you can see the
difference. Attaching the horizontals is a non-event. They fit well
and mated to the fuselage with no problems. One thing about the ProModeler kit is the rudder
hinge line. It appears that the rudder hinge line is recessed. This is
a function of utilizing the Ju-88G kit as the base kit. I decided to
use the MDC Ju-88A-4 tail on one kit and the kit one on the other. I
hollowed out the attachment point for the resin tail and while test
fitting, it fit so well that I just left it on. It isn’t even glued on
it fit so well. I did reposition the rudder, like my reference photo,
because I could with the MDC set. Kudos to MDC and their tail and
rudder. The kit tail and rudder fit just as well, but you can see the
difference. Attaching the horizontals is a non-event. They fit well
and mated to the fuselage with no problems.
Now onto the engines, obviously there are two per
aircraft. The fit is not bad. There are some clear parts (engine
instruments) that are a bit tricky to get correct but nothing that can’t
be done. You can leave the engine fronts off until after painting if
you want. For the exhausts I decided to try a set of Moskit exhausts
for the one aircraft. They fit like a champ. You will have to add some
plastic strip to the exhausts to represent the latch at the aft end but
it is easy and the results are fantastic. The kit exhausts are nice as
well and fit in very snuggly. Some people have had some issues with the
fit of the engine nacelles to the nacelle ring. I didn’t have a big
problem and both engines were set aside until after the wings were
assembled.
Before assembling the wings ensure that you open
the appropriate holes for the Mistel trestle. For a Mistel aircraft
there are no dive flaps or bomb racks on the wings so don’t open the
holes.
Tip of the Day:
for building the Ju-88 kits: Don’t assemble the
wing tips and slide them into the wing. You have just asked for a lot
of filling and rescribing. Instead try this, assemble the appropriate
tip to the appropriate wing before assembly. Make sure the detail side
(the outside or the side with all the panel lines) is aligned and don’t
worry about the gap that will appear at the front of the wing. If you
do this correctly, the wingtips and the panel lines will be lined up and
require no filler. When you assemble the wings there will be a gap on
the leading edge, but this is easily filled and you will lose no detail
and save lots of cussing.
Tip of the Day No. 2:
Ailerons do not move in the same direction on
Ju-88s. When the ailerons are attached they will appear to hinge down
together. This is a model error, don’t do this. It is wrong. The
Ju-88 at Hendon has both of the ailerons down but this is a function of
disconnecting the control stick from the surfaces and gravity taking
over. I’ve seen some great Ju-88s with this done to them. If one goes
up, the other MUST go down. It is aerodynamic that way. I resolved
this by aligning the ailerons straight. You would be wise to do the
same.
This should go without saying but, it is important
that you get the correct wheel assembly to the correct wing. I painted
my landing gear at the same time I did my tail wheel assembly in an RLM
02 with preshaded areas of RLM 66. Once dry I added a wash of Burnt
Umber artist oils.
The engine assembly to the wing fit is not great
but it is easily filled and no big deal.
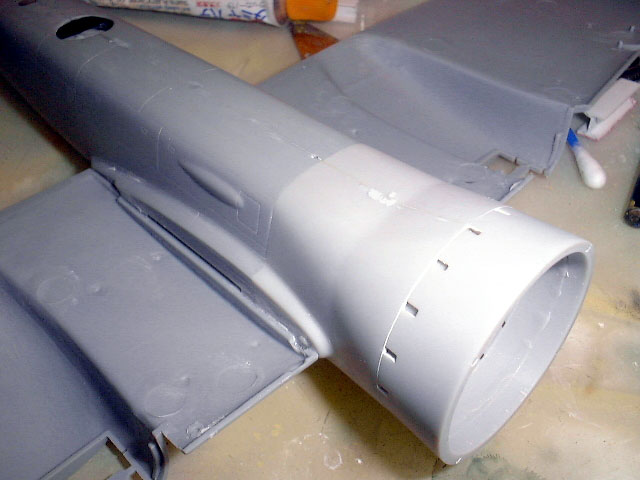
Now it is time to assemble the wings to the
fuselage. The fit of the upper portion will look odd as there will be a
step between them. Don’t fill it or sand it off (like I did) as the
shape is accurate. I noticed it after it was gone and decided the heck
with it. The belly panel fit ok but did require some filler. I now had
a Ju-88 with no nose.
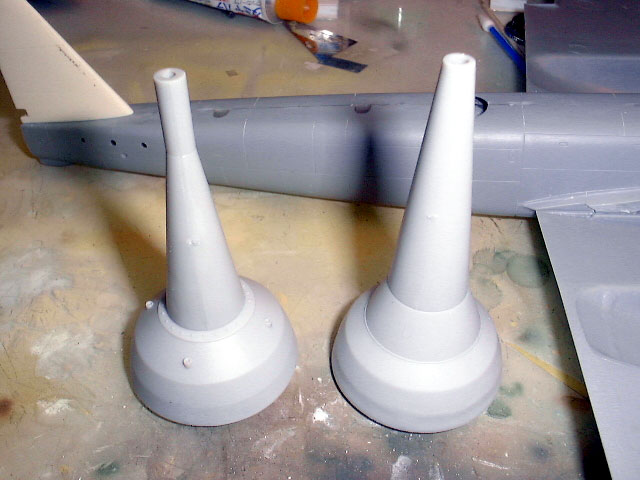
Off to the Mistel kit and pilfer Sprue “L”. This
sprue contains three warheads, as well as, the support structure and
ladder. You will have to decide which warhead you want to use so check
your sources. Mine indicated that the two longer probes were common to
the Mistel 1. You’ll notice that my models have both types of long
warheads for variety. There is another type indicated in the Classic
book that is not available, yet. If you don’t want to attach the
warhead you don’t have to as the fit is excellent allowing you to switch
if you want to. I decided to build the noses before attaching them to
the fuselage. This worked out well as I had room to fill and align the
small fairings around the warhead. I recommend attaching the nose area
as you will have to sand the nose area into the fuselage. Nothing too
drastic but you couldn’t leave it off until later as it would have a
step.
I assembled the props at this stage so that they
could be painted with the aircraft.
After cleaning the struts up I test fit them with a
109 center section. I figured that the struts would have to attach to
the 109s fuselage/wing joint for strength. This required me to drill
some new mount holes on the outer struts for the “V” center mount. I
drilled them approximately 2mm higher. This caused the outer struts to
come closer together so that the mounts attached to the fuselage/wing
joint of the 109 without warping. The tail support was detailed with
plastic card, wire and a length of brass rod (for strength). The tail
support was drilled out before the Ju-88 fuselage was put together. The
brass rod actually slips down into the fuselage assemble and rests on
the bottom. This did two things for me, first it allows me to leave it
loose to tweak the fit of the 109 later. It also provides stability as
it can’t go any lower without breaking the model. This reference is
important later on when I have to align the 109 with the horizontal
plane.
 After a quick wash in Dawn dishwashing soap and
warm water I sprayed the aircraft with some primer to check for flaws.
After fixing what I saw each aircraft was preshaded with RLM 66. After a quick wash in Dawn dishwashing soap and
warm water I sprayed the aircraft with some primer to check for flaws.
After fixing what I saw each aircraft was preshaded with RLM 66.
Then I
tried some different colors on each airframe. For the one aircraft with
“White 5” I used Polly-S RLM 65 for the belly and Gunze Sangyo RLM
70/71. All camouflage lines were masked with Tamiya masking tape. On
“Red 6” the colors I chose were Polly-S RLM 65 and 71 and Floquil RLM
70. I wanted to have a little variety in the paint and to see which
colors looked best to me. The jury is still out.
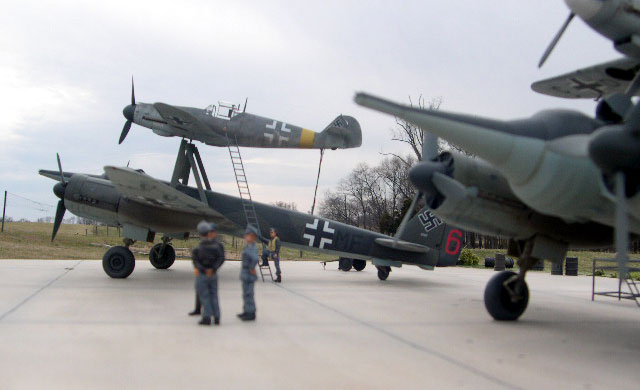
A coat of Future and it was off to do the decals.
The Third Group decals were beautiful. They were opaque and in
register. I wanted to have fuselage codes but they were difficult to
make out so I fudged them. There you got it out of me, I made them up
from an educated guess. Prove me wrong the airplanes are destroyed in
the process. No seriously the aircraft did tend to have codes on the
sides and typically they were all black. Looking through the Classic
book a few codes are mentioned. There is no real consistency in codes,
such as 5F belonged to the Third Group of KG whatever. The airframes
were remanufactured and it doesn’t appear that any new numbering was
used. It appears that whatever the Ju-88 had on it when it went to the
modification center is what it had on when it came out. The larger
numbers actually designated the identification number. I may be wrong
on this, but this is what I found in my research.
Another coat of Future to seal the decals followed
by a coat of Polly-S Flat made the aircraft ready for weathering.
Weathering was primarily kept to the engine exhausts and a few chips
here and there. If I had to do it again I would have faded the paint a
little more. Anyhow, the exhausts were first sprayed with Model Master
Dark Tan thinned about 70%. This was sprayed from front to back
ensuring that the tail was discolored as well. Follow this by adding
Flat Black to the mixture in the paint cup and painting the center of
the exhaust area. You may be wondering if this weathering is accurate
as the Ju-88s were used on a one way mission. The Ju-88s were also used
to train with standard cockpits until it was decided to deploy them on a
mission when the warhead was attached. Hence my Ju-88s did a lot of
training. I like them that way.
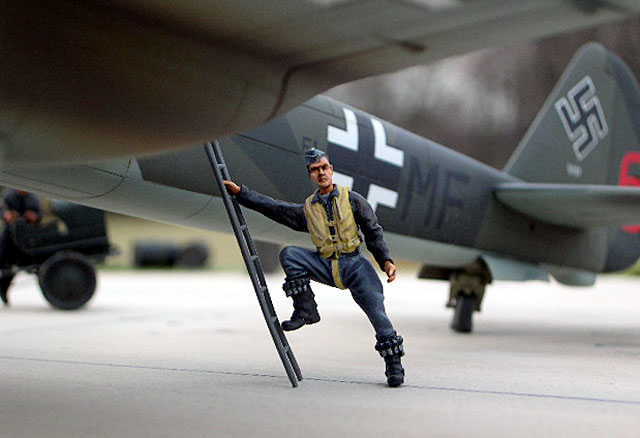
With the lower components completed it was time to
tackle the 109s.
Messerschmitt Bf 109
Modelling Manuals 17 |
|
|
|
|
US Price: $17.95
UK Price: £12.99
Publisher:
Osprey Publishing
Publish Date:
January 25, 2002
Details: 64 pages; ISBN: 1841762652 |
|
|
Model, Images and Text Copyright ©
2004 by Floyd S. Werner Jr.
Page Created 18 April, 2004
Last Updated 18 April, 2004
Back to
HyperScale Main Page
|
Home
| What's New |
Features |
Gallery |
Reviews |
Reference |
Forum |
Search