|
Mistel 1
Part Two - Building
the Bf 109s
by
Floyd S. Werner Jr.
|
 |
|
Mistel 1 - Junkers Ju
88A and Messerschmitt Bf 109F |

HyperScale is proudly supported by
Squadron.com
Part Two -
The Messerschmitt Bf 109F-4s
|
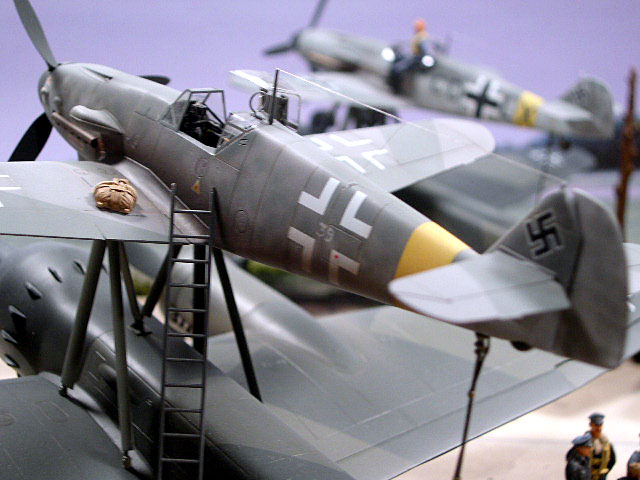
The Hasegawa kits have been out for some time and
build into some nice kits. The kit builds relatively hassle free.
There are some areas that need improvement such as the cockpit and the
spinner/prop arrangement.
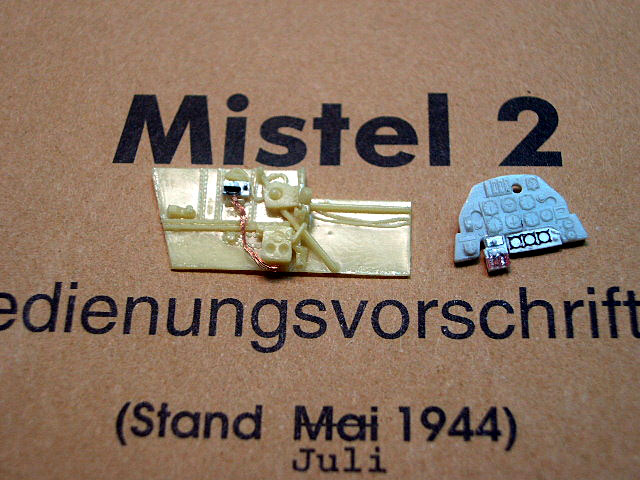
The cockpit for the kit lacks accurate detail so I
decided to use an Aires set in one aircraft and a Cutting Edge set in
the other. Both are very nice sets, but the Cutting Edge is designed
for the Hobbycraft kit and has to be modified to fit the Hasegawa. This
comes as no shock as the instructions tell you this first thing.
Nothing was too difficult and the results were very nice. I actually
liked the resin seatbelts better in the Cutting Edge set and will use it
on my Cutting Edge Bf-109Z conversion set for the Hobbycraft kit.
Click
thumbnails below to view larger images:
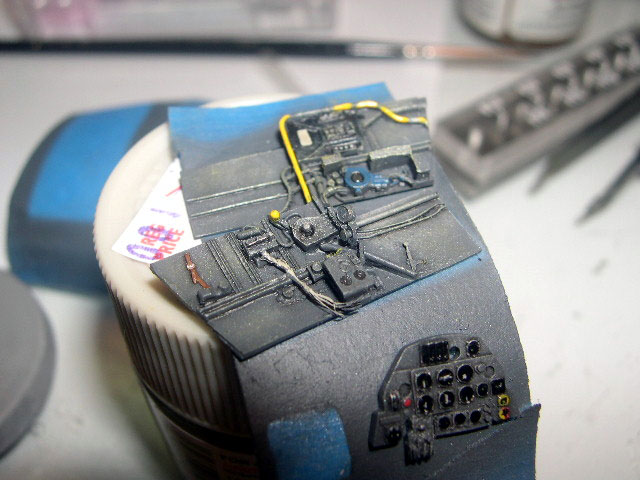
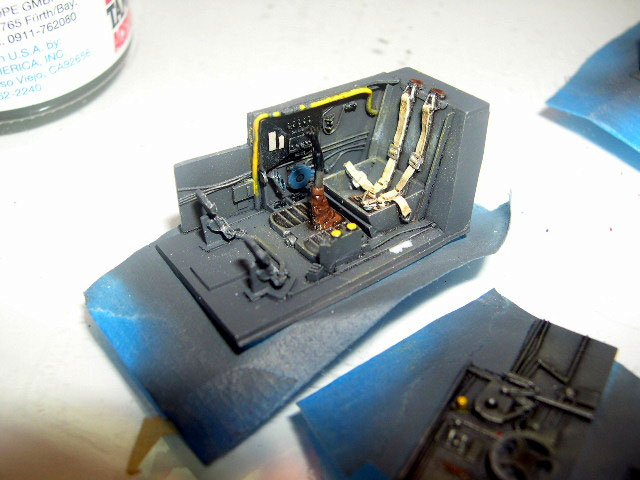
The Aires interior is very nice and is actually
designed for the Hasegawa kit so the fit was very good. I decided to
try to scratch build the cockpit modifications for the Mistel 1 based on
a very dark and grainy picture in a reprint of the Mistel manual
provided by Peter Korbel. I used what I could see and the rest was
based on an educated guess utilizing the FW-190 cockpit controls as
reference. I liked the Aires instrument panel but thought it lacked
depth so I used the kit instrument panel. I actually love the kit panel
and added some detail such as three new gauges and a switch panel below
the main panel. This scratch building was relatively easy utilizing a
Waldron bezel set and a Waldron Punch and Die Set provided by Roll
Models. The results are as close as my research would allow and until I
see better photos I would have to say they the cockpit is the most
accurate one out there. I recommend both sets highly, especially when
used on the kit they were designed for.
Both cockpits were preshaded with Flat Black and
painted Model Master Acrylic RLM 66. A wash of black artist oils and a
dry brush of RLM 02 and Rub & Buff silver, accompanied by some silver
pencil chipping brought each cockpit to life. Some details were painted
RLM 04 yellow, RLM 23 red and RLM 24 blue.
Another area the Hasegawa kit lacks is the spinner
and blades. I decided to use the Cutting Edge spinner and blades for
the late Bf-109F. The difference is amazing. I highly recommend this
correction set.
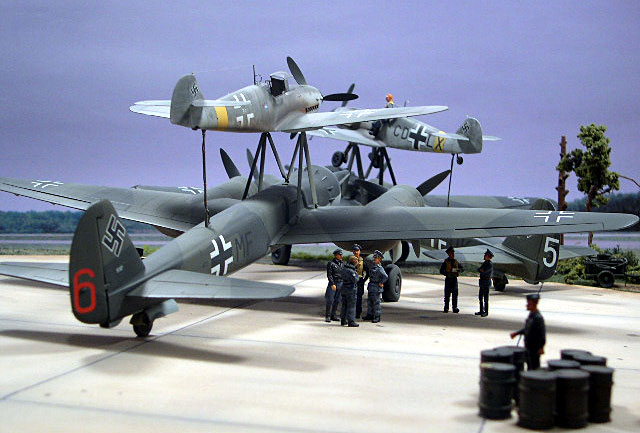
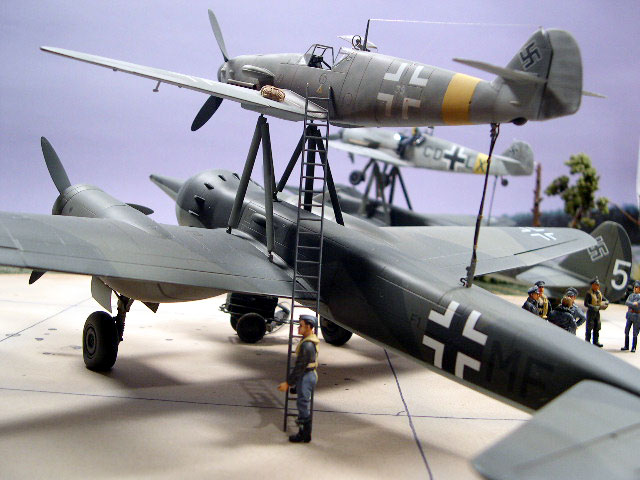
The wings were assembled with no problems. I
decided after looking at the photos of aircraft that had just been
mounted that the flaps should be retracted but the slats should be
deployed. This prevented the mechanics from hitting their heads when
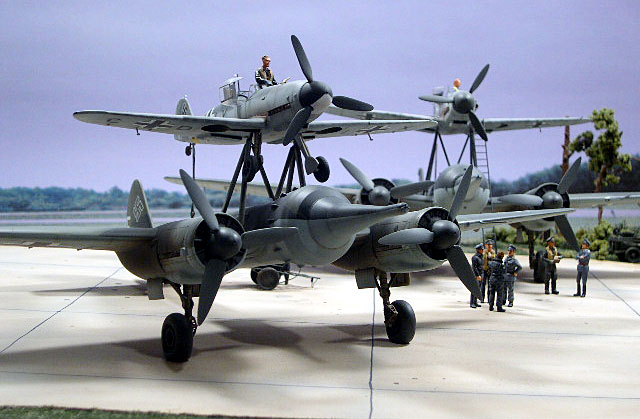
they mounted the 109 on the Ju088. This arrangement was easily
accomplished out of the box. Most photos don’t have the flaps deployed
but if you wanted to it certainly could be supported by photos as well.
I just opted for them up as the clean lines of the airplane could be
readily appreciated on this ungainly coupling.
I used the F-4/Z supercharger intake and oil cooler
as it appeared that the Mistel conversion included these changes. One
other thing that is peculiar to the 109s in the Mistel project was the
addition of cowl scoops similar to those found on a Gustav. These were
salvaged from an old Hasegawa G kit and a Fujimi kit. All these changes
would lead one to believe that a Gustav was used for the Mistel
conversion but the fuel filler port below the cockpit is a dead give
away.
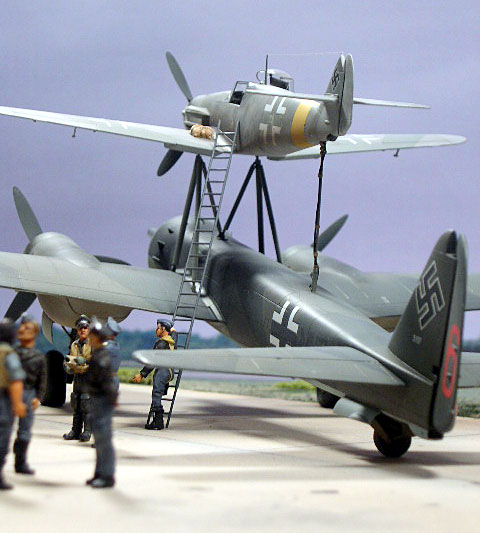
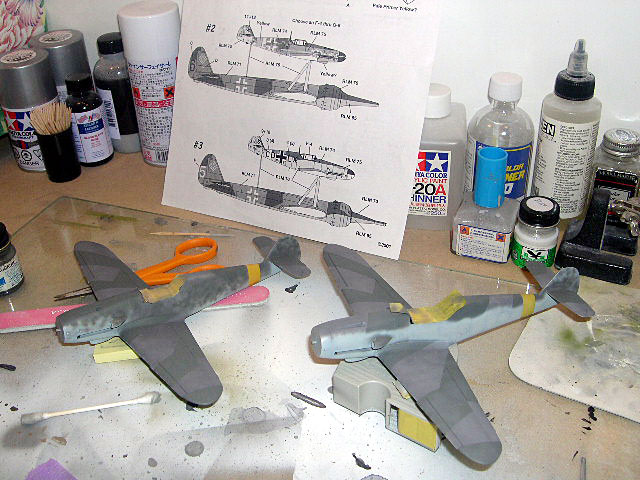
After assembling the wings to fuselage, four holes
were drilled to mount the 109 to the Ju-88, one on each fuselage/wing
area approximately 2mm behind the landing gear attachment point and two
others next to the tail wheel, one for the mount and the other for the
electrical connection.
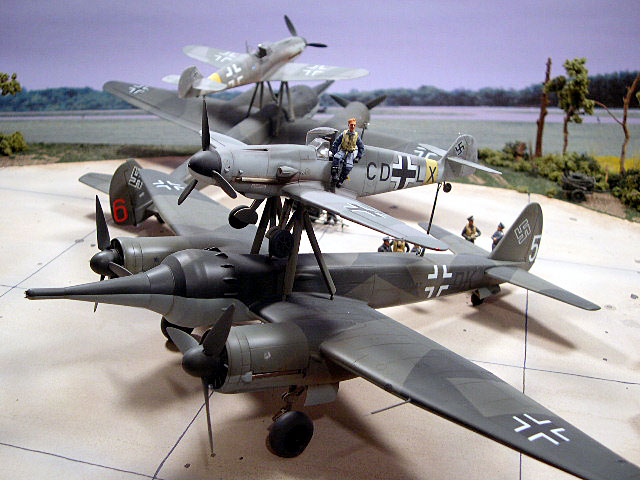
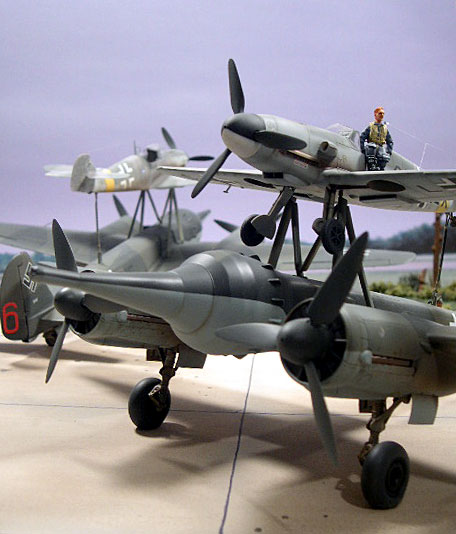
I wanted some variation in my 109s so I decided to
do one with the gear up. Both would have different type paint schemes
to help add interest. The gear up was relatively easy as I just cut the
gear door and added a sheet of .010 plastic to fill most of the area so
that the landing gear attachment point couldn’t be made out. I also did
not attach the landing gear to the wheel. You can’t even tell. The
other thing that has to be done is to thin the wheel on the top of the
wing side. This is easily done with a Dremel tool and cutting bit. The
tail wheel was simply placed in the well with some clay to provide
support. The area between the mount holes and the well opening was
opened to allow the tail wheel to retract.
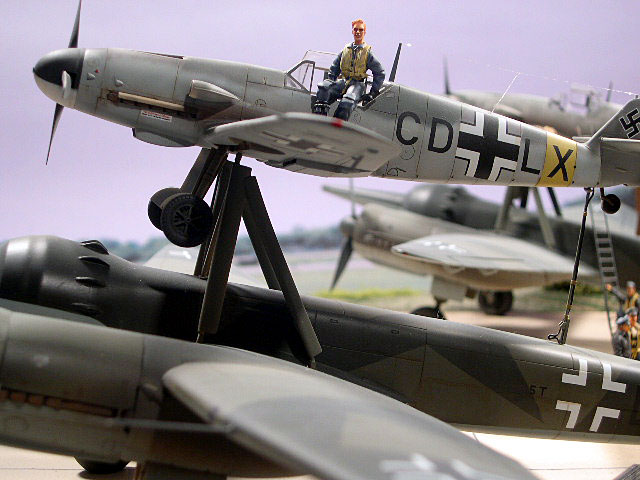
The only other thing left to make a Mistel 109 was
to add a bulged canopy. I thought this would be the hardest part but it
turned out to be relatively easy. I just took the kit canopy and
started to build up the bulge with two-part epoxy. Once I got it built
up equally on both sides and sanded smooth I added a coat of Future to
seal it and get it smooth. I had Scott Bregi use his vacuform machine
to vacuform some canopies. The results were okay, but I wasn’t overly
happy with the results. After talking to Meteor Productions, they took
my masters and will be reworking them with their new clear resin. Look
for them someday soon. Contact Meteor directly if you are interested in
this part and tell them I sent you.
Painting the 109s was relatively easy. I decided
to see how I could paint these aircraft with the same colors and see if
I could get the variations enough to make it interesting. Utilizing my
Tamiya airbrush, both the aircraft were preshaded with Model Master RLM
66.
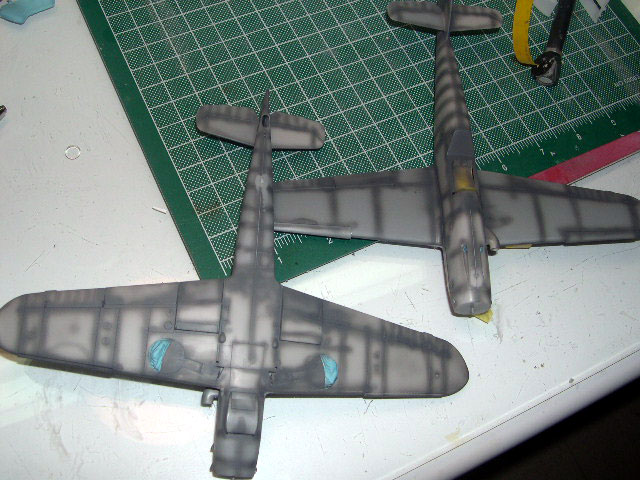
This was followed with Model Master RLM 76. Then
it was onto the Model Master Enamel RLM 75. Following some Hyperscale
tips on pre and post shading, I added a little bit of white to the 75.
This was thinned down some and then it was spotted on the aircraft in
small irregular splotches. The mottled 109 was heavily weathered in the
color photos so I did the process one more time. Some white was added
and thinned even more and the process was repeated. Once that was dry
the camouflage was masked with Tamiya masking tape and the Model Master
RLM 74 was applied. The 74 was post shaded the same way as the RLM 75.
Once the paint had dried for a day a coat of Future was applied to
prepare for the decals.
 The
Third Group Decals were very good and posed no problem. They reacted
well with Micro Sol. Again to make the machines different the crosses
were different variations. I did have one thing that I had to do
different for the one aircraft. On the photo there is a conversion
number of “39” inside the side and bottom crosses. How to do this
perplexed me until I happened to go by an art and craft store and saw
Gel Pens. I picked up one of white and thought I would give it a try.
I just drew it on a decal while it was still on the sheet. I let it dry
overnight. It appeared a little thick, gloppy and very opaque. I
thought what the heck put one on the model and see how it looks. Worse
that can happen is I take it off and try again. Well a magical thing
happened. When the decal was put in the water the large bulky stuff
that had built up fell off and I was left with a lightly “painted”
number on the decal. I could not have planned it any better. I then
applied it as any other decal. Once they had dried a coat of Future
over them sealed them and made the decal film disappear. Then a coat of
Model Master Acrylic Flat was placed over the model to prepare for
weathering. The
Third Group Decals were very good and posed no problem. They reacted
well with Micro Sol. Again to make the machines different the crosses
were different variations. I did have one thing that I had to do
different for the one aircraft. On the photo there is a conversion
number of “39” inside the side and bottom crosses. How to do this
perplexed me until I happened to go by an art and craft store and saw
Gel Pens. I picked up one of white and thought I would give it a try.
I just drew it on a decal while it was still on the sheet. I let it dry
overnight. It appeared a little thick, gloppy and very opaque. I
thought what the heck put one on the model and see how it looks. Worse
that can happen is I take it off and try again. Well a magical thing
happened. When the decal was put in the water the large bulky stuff
that had built up fell off and I was left with a lightly “painted”
number on the decal. I could not have planned it any better. I then
applied it as any other decal. Once they had dried a coat of Future
over them sealed them and made the decal film disappear. Then a coat of
Model Master Acrylic Flat was placed over the model to prepare for
weathering.
Weathering was first started by dry brushing a very
light coat of white to the airplanes upper surface. This was followed
by applying a light wash of Burnt Umber artist oils to the panel lines.
While the current trend seems to be to use Tamiya Flat Black and Red
Brown I just couldn’t bring myself to take that step yet. Umber is Flat
Black and Red Brown already mixed. On the underside I made sure that I
added additional streaks with the Umber and with some Burnt Sienna
artist oils. The wash was streaked front to back and top to bottom.
After that had been allowed to dry a silver pen,
pencil and some Rub and Buff were used on the areas that would be worn.
I added extra wear patterns on the pilot’s side from the leading edge
aft, as the Mistels were entered from the front. After that was
applied, a coat of highly thinned Tamiya Dark Tan was added to the
exhaust areas. The one aircraft shows considerable exhaust streaks in
the photo so I extended the exhaust to the tail. Next a couple of drops
of Flat Black were added and this was added to the inside of the exhaust
area of Dark Tan. This was repeated until I was happy with the
results. To end the exhausts an orange rust type color was applied
immediately aft of the exhaust stacks with pastel chalks. Some other
pastels were used here and there to experiment with some colors. I then
did the final post shading/fading with a highly thinned Tamiya Buff over
everything. Then everything was sealed with a coat of Flat.
The final small bits were added and the kits were
done. I noticed on the one Mistel I built it had the DF loop antenna on
the canopy frame, another Mistel peculiarity. I attached it with some
Future and it worked out just fine. The wire would have been run under
the stiffener on the canopy. Adding antenna wire to the masts brought
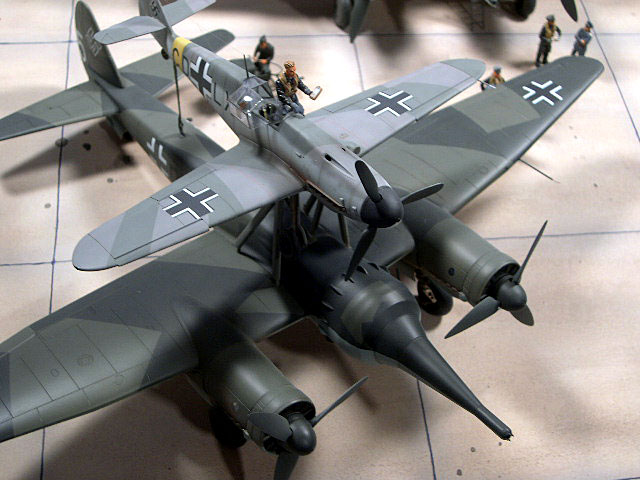
the 109s to a conclusion. Time to join them.
This proved easy thanks to the planning I did in
the early part of the construction. Everything fit fine and lined up
well. I was very happy with the resulting Mistel 1s. The construction
was not hard. A little bit of work to build two airplanes and have only
one model when it is finished is kind of weird. I like the look of the
grey 109s on the green 88s.
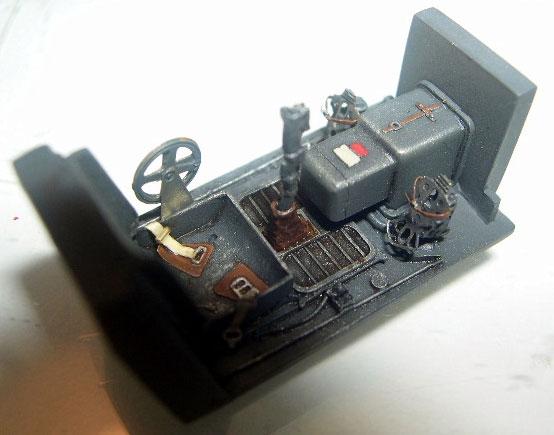
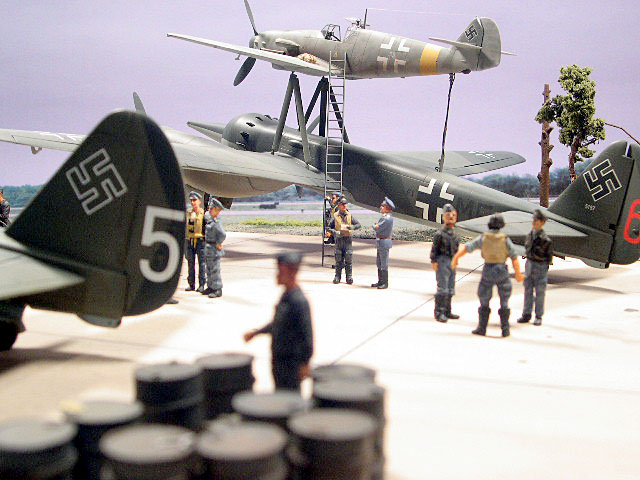
The figures were provided by various manufacturers,
including Airwaves, New Hope Design, Jaguar, Verlinden, and Reheat.
They all were very nice. The ladder is from the Sprue L. The ground
support equipment is from Verlinden. The barrels and boxes were SOL and
Verlinden. The base was provided by Rafe Morissey as was the
background.
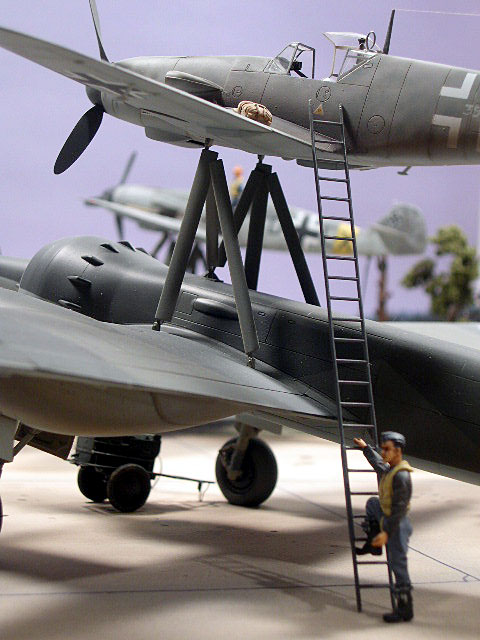
Usually, I like to work outside but with the size
and scope of the kits and figures it was better to take inside shots.
Besides the season and the weather conditions were not what I was
after. I wanted the shots to be busy and a lot of figures were required
so I ended up painting about 10 figures just for this shoot. I’m not a
figure painter by any stretch of the imagination but they photographed
well.
With the release of Dragon’s Me-262 Mistel and the
already released FW-190/Ju-88 Mistel 2 and the Mistels 3, 4, and 5
available from .48 Special you can build almost every version of the
Mistel. Now even the early the only ones can be built now utilizing the
Special Hobbies DFS-230 and the Historic Plastic FW-56 or any number of
Bf-109Es. This is a unique airplane arrangement and a fun model to
build. I recommend anyone undertake it if you have the prerequisite
kits. I highly recommend the Cutting Edge 109 spinner and props, as
well as, exhausts. The highly recommended Aires cockpit is beautiful
and requires no modification. The Cutting Edge interior is also a
beautiful set but use it in the Hobbycraft kit as it was designed and it
is highly recommended. The MDC Ju-88 conversion tail was flawless and
highly recommended. In this case, the True Detail wheels are bulged
properly and highly recommended. I loved the decals from Third Group
and will use the others in my collection again.
In summary, there wasn’t any aftermarket set that I
used that I wouldn’t recommend. I plan on using all of them again and
that is the best endorsement I can say about any set. The results were
well worth the effort and the aircraft offer a unique look to my
collection. Maybe next time it will be an S1 with the Aires engines and
cockpit set for the Ju-88 and an exposed 109 engine compartment. Oh,
the possibilities. Ain’t modeling fun!? If it isn’t, it should be!
Junkers Ju 88A-4
|
Aftermarket Company |
Item # |
Description |
|
|
Model Design Construction (MDC) |
CV020 |
Junkers Ju-88A4 Later Rudder Correction |
|
|
True Detail |
48029 |
Ju-88 Wheels |
|
|
Moskit |
|
Ju-88A Exhausts |
Messerschmitt Bf 109F-4
|
Aires |
4028 |
Bf-109F Cockpit Set |
|
Black Magic |
CEBM48026 |
Bf-109F-2 Canopy & Wheel Masks |
|
Cutting Edge |
CEC48357 |
Bf-109F Corrected Late Style Prop & Spinner |
|
Cutting Edge |
CEC48382 |
DB-605 Detail Exhausts |
|
Cutting Edge |
CEC48383 |
Bf-109G Super Detailed Cockpit |
|
Third Group |
48-063 |
Mistel (#2) 1 & S1 Messerschmitt
Bf-109F-2/4/G-6 & Ju-88A-4 |
-
“Mistel: German
Composite Aircraft and Operations 1942-1945”, Robert Forsyth,
Classic Publications, 2001, ISBN 1-903223-09-1
-
“Mistel: The
Piggy-back Aircraft of the Luftwaffe”, Hans-Peter Dabrowski,
Schiffer Military/Aviation History, 1994, ISBN 0-88740-668-0
-
“Mistel 2
Instruction Manual (Reprint)”, August 1944, Available through Dr.
Peter Korell at Peter.Korell@lba.de
Click on the thumbnails
below to view larger images:
Messerschmitt Bf 109
Modelling Manuals 17 |
|
|
|
|
US Price: $17.95
UK Price: £12.99
Publisher:
Osprey Publishing
Publish Date:
January 25, 2002
Details: 64 pages; ISBN: 1841762652 |
|
|
Model, Images and Text Copyright ©
2004 by Floyd S. Werner Jr.
Page Created 18 April, 2004
Last Updated 18 April, 2004
Back to
HyperScale Main Page
|
 Home
| What's New |
Features |
Gallery |
Reviews |
Reference |
Forum |
Search
Home
| What's New |
Features |
Gallery |
Reviews |
Reference |
Forum |
Search