I do not think that France ever got interested in
the EFA (Eurofighter) project. They decided instead
to pursue the development and production of an
indigenous aircraft on their own. The Dassault
Company pitched and subsequently won a contract for
an aircraft that became known as the Rafale. The
Rafale is a sexy, curvaceous aircraft that has the
look of a real thoroughbred. After a somewhat long
development cycle, production airframes are finally
being delivered to the French Armed Forces.
The Rafale was largely ignored by most of the
model manufactures. A notable exception is the
French Heller company, which produced a model
of the original Rafale A prototype. Having never
seen the Heller kit, I do not know what it is
like. I do not remember ever hearing anything bad
about it, but it was of the prototype, not a
production machine. Eventually, Revell
undertook the production of a Rafale kit. The
Revell kit has been released in two version --
the single-seat naval Rafale M and the
two-seat Rafale B. Both of these are based on
the development aircraft, not full production
aircraft, but they are much closer to production
versions than the Rafale A was. These kits are
excellent. It is a pair of Revell kits that I
have built here.
A friend gave me the Rafale M kit for my birthday
shortly after the kit was released, citing how hard
it is to buy me a gift. Most everything he would get
me, I already have. So, he bought me "a kit I would
never buy for myself". What he did not know is how
close I was to ordering this kit, just the week
before he gave it to me. My friend was very pleased
to hear he had gotten me something I really would
have gotten myself, but that I had not yet done so.
On checking it out, I found the kit to be quite a
gem. It is well molded and fits together quite well,
in spite of having a rather complex outline. In
fact, I was so interested in what I found in the
box, I started building it almost immediately. My
building the model lasted for a couple days until I
ran into some questions concerning paint colors that
I could not easily answer.
| |
|
| |
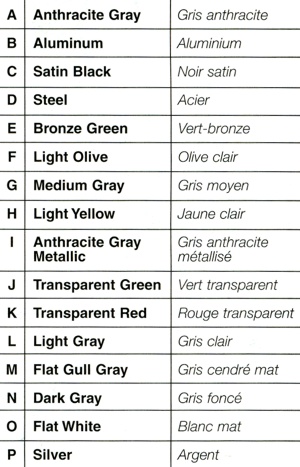
The kit instructions
call for some extremely generic color names with no
matching provided to any form of color standard. All
I could figure out from the instructions is that the
cockpit, wheel wells, and airframe are "some gray".
Gee, thanks Revell. This made it
interesting to decide what colors to paint the
various items. Note the colors in the chart to the
left (scanned from the instruction sheet).
I could figure out
some of the colors, but a few key ones were a
mystery. What exactly are "Dark Gray", "Medium
Gray", and "Light Gray"? I know there is a US color
called "Flat Gull Gray", but is this US color the
color that letter M is referring to? And, how
about the "Light Olive", "Light Yellow", and "Bronze
Green"? Each of these descriptions can cover a wide
selection of colors.
I was left with too much uncertainty over these
colors. In fact, it was this uncertainty that was
the nail in the coffin for re-boxing the kit. Not
feeling up to figuring out the answers for what
colors to use, I chose to re-boxed the kit to await
inspiration to dig it out again.
In a fit of defiance over these unhelpful color
call-outs, I thought to myself, "Why don't I just
make something up?" Then, I started seeing other
Rafale models on various web sites where the
modelers chose to make "what if..." models of their
Rafale kits. I found I was not alone in my
dissatisfaction over the colors named in the kit
instructions.
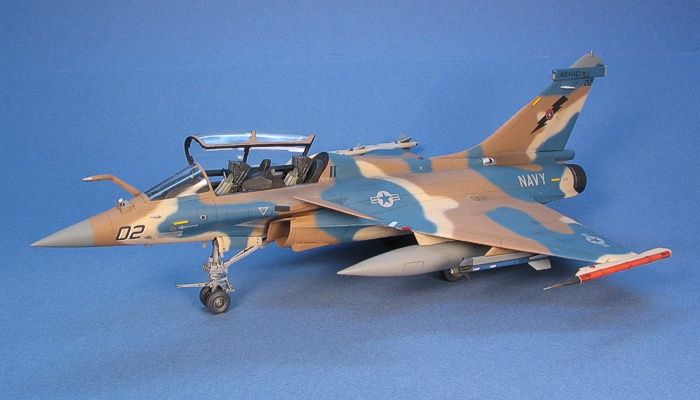
This started my wheels really turning. What if
the US Navy leased some Rafale aircraft from France
for dissimilar air combat training, like they once
leased Kfir aircraft from Israel? They would no
doubt paint the aircraft into camouflages using US
colors, and that would solve my problems with
figuring out the right French colors for the model.
SOLD!!! I dubbed this latest acquisition by
the US Navy the F-55 Rafale. The
single-seat aircraft is the F-55A, the two-seat
aircraft is the F-55B.

With my inspiration re-kindled, I re-opened the
Rafale M box (along with a newly acquired Rafale B
kit) and started working on both of them. This time
I was ignoring the French camouflage and markings
and building some hypothetical F-55 Rafales from the
Naval Strike Aerial Warfare Center (NSAWC). To those
not familiar with this unit, this is what the Naval
Fighter Weapon School ("Topgun") morphed into when
it was disestablished at NAS Miramar and moved to
NAS Fallon.
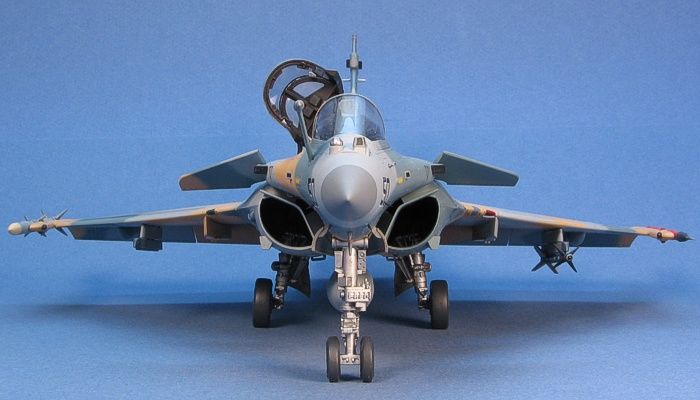
Revell has released a couple 1/48th
scale Rafale kits. I am building one of each in this
posting - a single-seat Rafale M and a two-seated
Rafale B. The two kits are over 75% the same with
only a couple sprues swapped out to make the
specific versions.
The Rafale kits are extremely nice and are on a
level close to Revell's 1/48th
scale F-15E Strike Eagle kits. I consider
Revell's Strike Eagle kits to be the best 1/48th
scale modern jet kits on the market (IMHO). The
Rafale kits are really not much different in their
quality. Revell successfully captured the
complicated lines of the Rafale without making the
kit impossible to build. Everything fits together
great and the overall finished model scales well to
the dimensions of the Rafale I found on the
Internet.
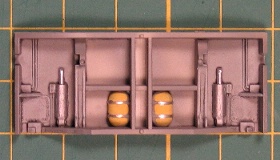
Scribing in the kits is all of the engraved
style. There are a couple minor places that have
raised scribing, but Revell did this because
the raised scribing is more accurate in those
places. One of these places is on the external fuel
tanks. Most external fuel tanks are a welded
construction with weld beads along the outside.
Raised scribing better replicates this detail and
Revell did it this way on the external fuel
tanks.
The only real negative I can give the kits regard
the instruction sheets and their lack of any helpful
painting instructions. See the following images to
see the layout of the parts sprues. Click to enlarge
any of the sprue shots. The letters are just my
assignments to make it easier to refer to specific
sprues in the text. Revell does not seem to
letter the sprues like other model companies do.
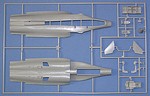
Sprue A
|
This common sprue holds the
main fuselage parts. Through the use of an
insert for the spine, the same fuselage
parts can double for either the one-seat or
two-seat versions of the kit. |
|
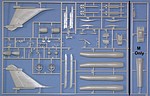
Sprue B
|
This common sprue holds the
vertical tail, wing details, engine details,
external fuel tanks, and some weapons (AAMs).
In the Rafale M kit, this sprue has an
extension on one end that provides the
single-seat spine, cockpit insert, and
canopy insert. |
|

Sprue C
|
This common sprue holds the
main wing parts, along with the engine
intakes. |
|
Sprue D and E
|
These sprues are only found
in the Rafale B kit. They provide the less
bulky land-based landing gear, the second
cockpit with details, and extended weapons
stores options. Interestingly, the smaller
pointy fuel tanks seem to be the only ones
used by operational aircraft. You need the
Rafale B kit to get them. |
|
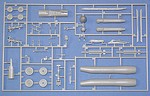
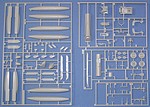
Sprue F
|
This sprue is only found in
the Rafale M kit. The main things found here
are the beefed up landing gear for carrier
operations. A third large size fuel tanks is
present, as well as some additional missiles
and a nicely molded Lightning pod.
|
|
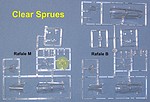
Sprue G
|
These are the clear sprues
from both kits. The part highlighted by the
yellow dot is the main instrument panel of
the Rafale M. This part does not come in the
Rafale B kit. Note that since the windscreen
is the same between the versions, and since
the windscreen comes with the single-seat
canopy, you get both canopies in the Rafale
B kit. |
The specialized
parts sprues provide a wide array of pieces, making
the two Rafale releases (the two-seat "B" and the
single-seat "M") very different. To get the smaller
fuel tanks that are more typically seen on
operational aircraft, you must get the two-seat
Rafale B kit. As seen on the tabs molded at the
corners of some of the parts trees, Revell is
also planning the release of a Rafale C in the
future (sometime).
I have found that sprue trees A and B
have been tweaked between the original Rafale M
release and the later Rafale B release. These
tweaked moldings are nicer with more details and are
only found in the Rafale B kit. The tweaked A
tree provides a few minor updates to the upper
fuselage scribing and a couple newly added antennae.
The tweaked B tree provides the four
triangular vanes on the lower forward nose which the
Rafale M kit did not include. Also changed on the
B tree was the vertical tail with an added heat
shield under the rear radome and a revised antenna
pod on the upper tail.
|
As for the kit
decals, both of the two kits provide
markings for the respective development
aircraft as well as a best guess at what
unit markings could have looked like. Bear
in mind that both kits were released prior
to the aircraft reaching operational units.
From what I have seen in on-line images, the
operational markings on these decal sheet
are not really to close to being correct for
either the Rafale B or the Rafale M. |
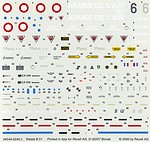
Rafale B Decals |
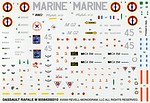
Rafale M Decals |
The Revell
1/48th scale Rafale
kits are great. You can buy them with confidence and
build them with pleasure.
As with most aircraft
kits, construction started in the cockpits. I chose
to break from the instructions a little and mounted
the instrument hoods into the fuselage ahead of
time. This allowed me to take care of any glue
marks, then paint the cockpit sills and instrument
hoods all together as one. While I was at it, I also
attached the spine pieces.
The beauty of "what
if..." is the freedom to paint things the way you
want and ignore whatever references you don't like.
I found a couple images of Rafale cockpits on-line.
It was tough to tell which images belonged to which
aircraft. But, in all of them, it appeared the
cockpits were gray with gray panels and black
buttons/dials. I much rather prefer the US style of
gray cockpits with black panels and gray
buttons/dials. So, since I was making a "what if..."
US Rafale, I chose to use US color patterns. I
justified this to myself by saying the aircraft were
fitted with US instrumentation in place of the
French instruments, so the colors would shift in
this way.
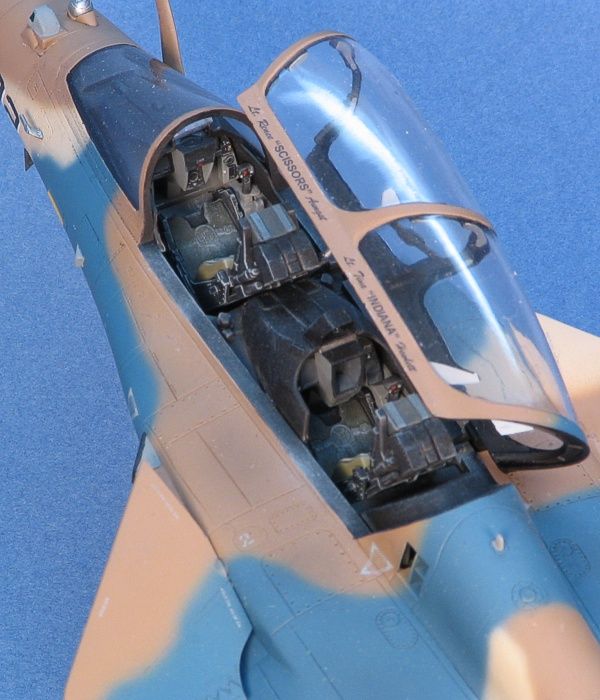
The cockpits are painted overall D.Gull Gray
(F.S.36231). This closely resembled the French
interior color, anyway. The instrument panels are
Interior Black. The buttons are D.Gull Gray with
highlights in L.Ghost Gray (F.S.36375), silver,
yellow, and red. Right or wrong, this looked good to
me.
The ejection seats on real Rafale aircraft seem
to be split between gray and black. Operational
aircraft all seem to have black seats. Since I like
the look of black, I painted the ejection seats
Interior Black. The seat pans are Green Drab
(F.S.34086) and the back cushions are SAC Bomber Tan
(F.S.34201) with an Israeli Sand (F.S.33531) pads
and harnesses in Intermediate Blue (F.S.35164). I
know, fabric items do not have standard numbered
colors, but these are the colors I used. Other
details of the seats were painted in white and
silver.
| |
 |
|
| |
The wheel wells and
landing gear gave me a bit of a problem. While I
could explain away the cockpit color changes, I saw
no reason why the wheel wells would ever get
re-painted to the US standard of Gloss White. So, I
left the wheel wells in gray. I chose Neutral Gray
(F.S.36270) for these areas. The landing gear was
also left in the French standard of unpainted metal,
which I chose Steel metalizer for the purpose. A
wash with thinned black paint and some light dry
brushing picked up the details of these areas quite
nicely.
With the interior
areas painted, I assembled the fuselages. The engine
intakes have no ducting or even a blanking plate,
thus letting you see into the inside of the model if
you look inside them. I chose not to mess with this
as the intakes are deep enough as provided to look
fine when the model is just sitting on the display
table.
Assembling the fuselage brought up a decision
point regarding the forward canards. As provided in
the kit, they are interconnected to each other and
need to be inserted as you assemble the fuselage.
This will put them in the way later when doing the
camouflage painting. So, I chose to cut them apart
and would insert them later after I finish the
camouflage painting. Fortunately, I found the holes
for the canards were a tight enough fit that the
finished models do not need to have these glued in
place.
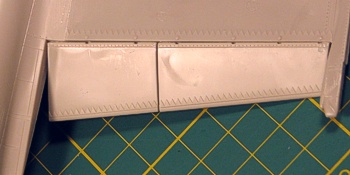
One of the few changes I made on the kits was to
cut and droop the wing flaperons. The kits provide
these molded onto the wings in the neutral position.
I like the look of them drooped, and almost all the
images I could find on-line of Rafales on the flight
line showed drooped flaperons. So, I separated them
from the wings before attaching the wings to the
fuselage. Some minor filing to bevel the leading
edges of the flaperons allowed them to droop without
leaving too large a gap on the top of the wings. The
drooped flaperons then required a cut and change to
the flaperon actuator fairings under the wings.
 |
 |
Another minor change
to only the two-seat aircraft involved some parts
swapping with an extra Rafale M kit. As I was
building two naval aircraft, I thought they both
should have naval landing gear and other
accessories. I cross-kitted the landing gear and
other details (like the arresting hook and vertical
tail) from another Rafale M kit so that I was really
building a two-seat naval Rafale M instead of a
land-based Rafale B. I do not think there is such an
aircraft as a two-seat Rafale M at this time, but
hey, this is my fantasy.
As a side note, this parts swapping will not
waste the "donor" Rafale M kit. The B landing gear
and other pieces will convert the Rafale M into a
Rafale C. I plan to build this other kit sometime in
the future as another "what if..." subject.
I assembled and attached the tails on top of the
fuselages; I attached the fairings between the
engine exhausts; and I attached the nose cones to
complete the fuselage assemblies.
To simplify some painting, I also chose to attach
a bunch of details so I could deal with any glue
marks before I did painting. To that end, I attached
the long weapons pylons under the inboard wings and
fuselage center lines. I attached the arresting
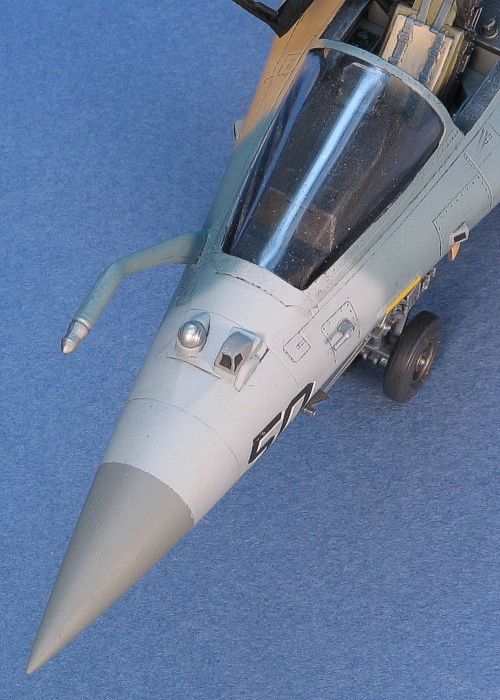
hooks under the rear fuselage. I also attached all
the navigation lights. The aerial refueling probe
gave me some grief as Revell did not mold the
attachment end with the right contour. I filed the
attachment end so the probe was at the correct
angle, then drilled and pinned the probe to the
right side of the nose with some brass wire.
At this time, I built-up the engine exhausts, but
I did not attach them to the fuselage. I was waiting
until after I painted before I attached them. What I
found when I dry-fitted the exhausts to the kit was
that the right engine exhaust did not fit into the
fuselage on either of the kits I was building. The
left side fit fine on both kits. I either made the
same mistake twice, or the kit has a minor flaw with
the right rear fuselage. A little work with an X-Acto
blade opened the rear fuselage enough to accept the
engine exhaust.
The last construction item was to permanently
attach the windscreens and "loose mount" the
canopies for painting. I finished painting the
details of the instrument hood areas, attached the
HUD glasses, then attached the windscreens using
liquid cement. The canopies were "loose mounted" as
outlined in my
Masking Cockpits posting, then the canopies were
masked using
Parafilm-M. It was now time to paint the
camouflages.
I used all Testors Model Master enamel
paints and metalizers. I tossed the color
recommendations on the kit instructions out the
window and painted everything in US colors as would
be found on something like the VFC-13 F-5s at NAS
Fallon. Take that, Revell!
Click to
Enlarge |
|
|
Click to
Enlarge |
|
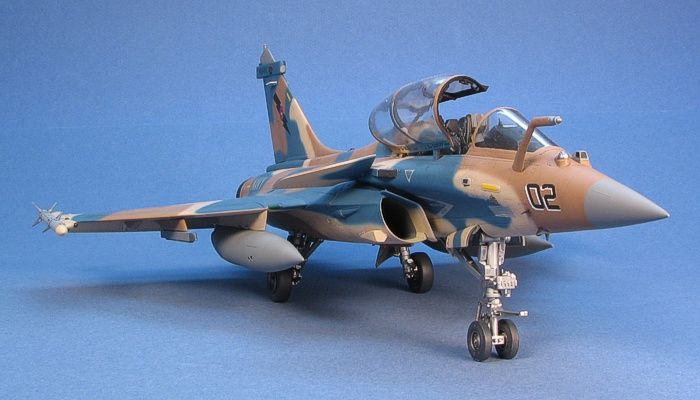
I got so fired up over
creating my own camouflages for the Rafale that I
created no less than 54 different camouflage
patterns using all sorts of colors. Click
here to see a small selection of the camouflages
that I came up with. I've created many more since
this time -- I am up to over 165 camouflages, now.
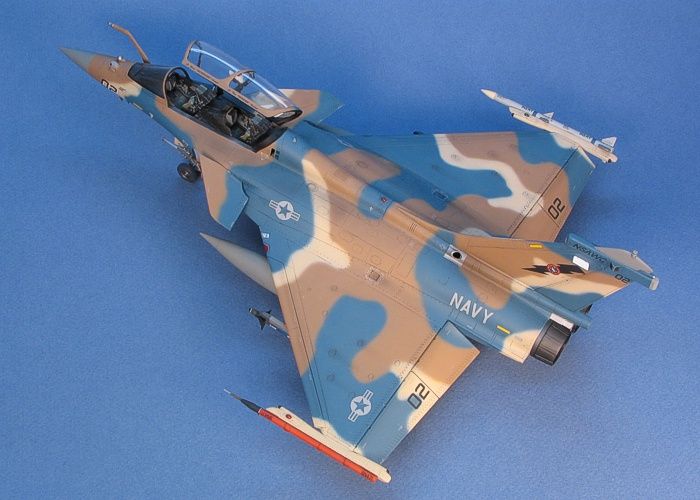
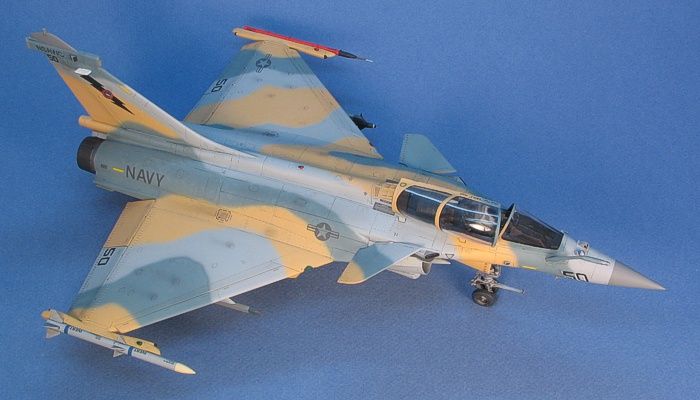
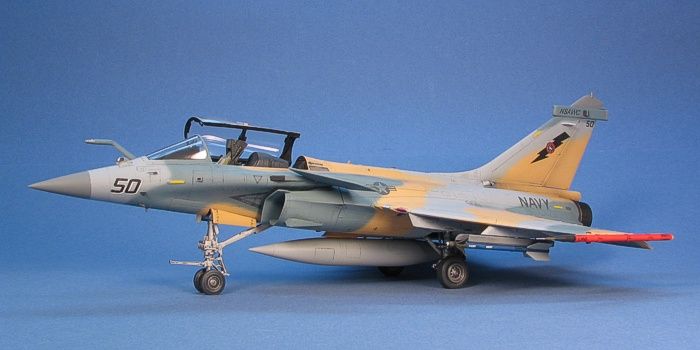
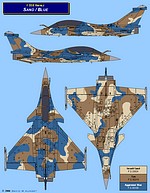
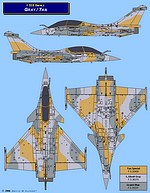
The images to the
left show my final choices for the camouflages of
the models. It was not an easy choice sifting
through 54 camouflages to come up with two (and only
two) winners to apply to these models. I narrowed
the choices down to only a few, then posted a
question on the HyperScale forum to get a definitive
final choice. Voting was fierce with a tie coming
between the blue scheme shown to the right and an
all green scheme (10 to 10). I allowed my wife to
cast the deciding vote and the blue scheme won
(sorry, Wookie). The colors for the camouflages are
stated in the diagrams. These are all standard US
Navy aggressor colors that I could get straight out
of the bottles from the Model Master paint line.
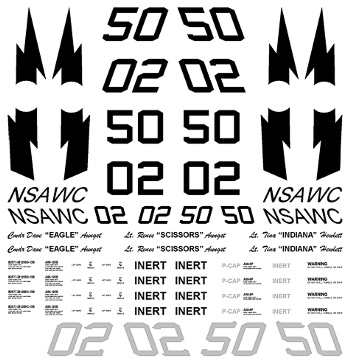
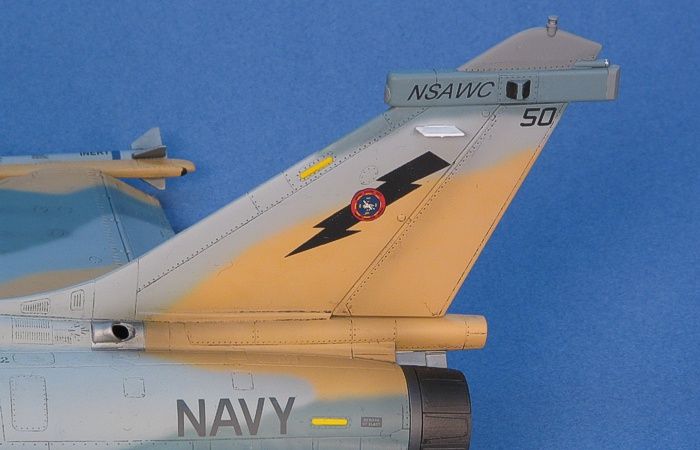
For the aircraft markings, I sourced the decals
from both after-market decals and custom printed
decals. I custom printed the unit markings since
they were mainly in black. See below to see my art
work (reduced in size to save space). Note that the
gray markings in this image are printed in white.
I scanned the NSAWC markings from some TwoBobs
NSAWC decal sheets. Since black is easy to print,
there was no reason to waste the TwoBobs sheets on
the Rafales. The lightning bolts are from the F-18
sheet (48-002), which are larger than the ones on
the F-16 sheet. The "NSAWC" writing, however, is
from the F-16 sheet (48-069) as it is smaller and
fit the Rafale tail better.
The block numbers are
from a US Navy font I bought from
TLai Enterprises.
Other standard computer fonts provided the rest of
the writing. I used some built-in functions in MS
Paint to skew/slant the numbering as needed. I was
on the fence about white-shadowing the nose numbers,
so I included the large white numbering as separate
decals so I would have the option to shadow or not.
Yes, that is my name
on the middle left side of the custom decals. I am
the pilot in the single seat aircraft. My wife
(since she picked the camouflage) with one of her
friends are the pilots of the two seat aircraft (my
wife is tickled to be such a permanent part of the
model). Since my wife is a hair stylist, it was a
natural to pick "Scissors" as her call-sign (thanks,
Skip, for the suggestion).
The bottom quarter of the decals are devoted to
the weapons. As no one makes decals for practice
weapons, I needed to make some for myself. I got a
little carried away with twelve little decals on
each AIM-120 and eight more on each Sidewinder. What
can I say? I like data markings.
The after-market decals for the project came from
the following sheets in my stash.
- I obtained the NSAWC badges from a spare
blue splinter Tomcat TwoBobs sheet (48-007).
- I wanted light gray aircraft data on the
blue aircraft. I got this data from a SuperScale
F-18 sheet (48-338). These are printed in a
light gray very closely matching L.Ghost Gray
(F.S.36375).
- I wanted dark gray aircraft data on the
orange aircraft. I got this data from a
different SuperScale F-18 sheet (48-331). These
are printed in a dark gray very closely matching
European Gray (F.S.36081).
For weathering, I kept it light. I lightly
black-washed the panel lines and followed that with
some light air brush shading. I also did a
black-wash and brown wash of the landing gear and
wheel wells to better highlight the kit detailing of
these areas. For a more complete discussion of what
I do to weather my models, see my posting on
"Weathering Aircraft".
With the camouflages and decals completed, I
turned my attention back to construction and
attaching of detail parts. First things to do were
to pop off the canopies and unmask the glass.
Parafilm-M did its thing and the glass looked good.
I placed the canopies aside to detail and attach as
the final items that would finish the projects.
Next up was to attach the landing gear and wheel
well doors. Following the kit instructions, these
fit on with mostly no troubles. There is a "Y" brace
on each of the main landing gear that I could not
for the life of me get to go into place, so I left
them off. They would not really be visible on the
model, anyway. The landing gear is quite solid on
the finished models. Also, the wheel well doors all
have positive alignment and bracing to hold them in
place. This is nice as I have built too many models
where the doors are hanging by just a fragile
edge-on super glue joint.
| |
 |
| |
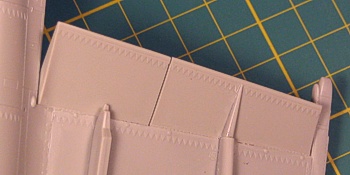
Looking through on-line
images pointed out the need to have four small
triangular strakes under the nose. Comparing the
Rafale B and Rafale M kits, the Rafale B kit
provides these while the Rafale M kit does not. The
trouble was that the ones provided in the Rafale B
kit were too thick, and I needed two sets of the
four strakes. Eduard makes a photo-etch set
for the Rafale M kit that includes these strakes. I
quickly ordered a couple Eduard sets from
Squadron. After Fed-Ex lost the first shipment, I
finally got a replacement shipment and added the
strakes to the models.
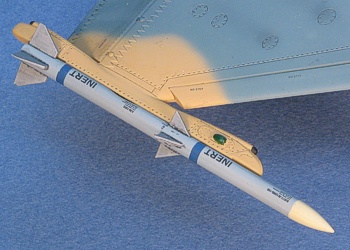
The weapons loading
became my next issue. I find it hard to believe
NSAWC would use French weapons, even in training.
Thus, US weapons were needed to replace the kit
provided French weapons. Also, NSAWC seldom carries
live weapons, so I needed to paint and decal the
weapons as practice rounds (using blue) and include
Air Combat Maneuvering Instrumentation (ACMI) pods.
After some thought about replacing the French launch
rails on the wing tips, I decided to keep this
simple and just applied the US weapons to the
existing rails.
The ACMI pods come
from the Hasegawa weapons set "D". The AMRAAM
and Sidewinder missiles come from a spare
Hasegawa F-16 kit in my stash. While these
AMRAAMs are not truly accurate, they are close
enough for my purposes on this project. I filed off
the rollerons on the Sidewinder rear fines to have
them better represent practice missiles.
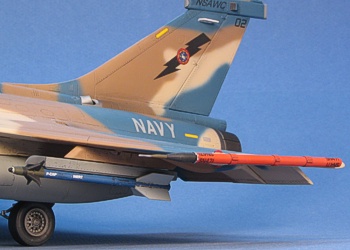
I chose the loading positions on the aircraft
with an eye toward balancing the aircraft. I figured
that the ACMI pod and Sidewinder together on one
wing would be a good counterbalance to the AMRAAM on
the other wing, so I hung them that way. Also, the
Sidewinder missile bodies were a bit too small
(thin) to fit the wing tip rails properly. Hanging
the Sidewinder from the under wing missile rails
worked better.
Since the NSAWC aircraft do a lot of ACM
training, I chose to keep the rest of the weapons
loading light with only some fuel tanks. I went with
only a center line tank on the single-seat aircraft,
but I figured the space occupied by the rear cockpit
likely took away internal fuel capacity, so the
two-seat aircraft got two wing tanks.
As is usually the case for me, adding the
ejection seats and detailing / attaching the
canopies concluded the projects.
Everyone should toss accuracy to the wind once in
a while and just build something that does not have
any chance of existing, but would be so cool if it
did. I thoroughly enjoyed this trip down the "what
if..." path. I built these models to take a break
after a very involving build of a Testors
U-2S. The break was very enjoyable. Perhaps I should
cap off this project by making a full diorama of a
section of the NAS Fallon flight line so the models
can be seen "in their element".
|
 Home
| What's New |
Features |
Gallery |
Reviews |
Reference |
Forum |
Search
Home
| What's New |
Features |
Gallery |
Reviews |
Reference |
Forum |
Search