|
1/35 scale MRC + Cutting Edge
OH-58D Warrior “Thugs”
by
Floyd S. Werner Jr.
|
 |
|
OH-58D Warrior “Thugs” |

HyperScale is proudly sponsored by Meteor
Productions
History
The history is not on the Kiowa Warrior but on my experience with it.
I was first introduced to the Kiowa Warrior in 1995 when the last of the
unarmed versions were transferred to my unit in Germany. They were great
little helicopters with power and easily maintainable in the field. I
first flew one of these aircraft in Bosnia in 1996 and loved it. It
wasn’t my Cobra but it was a fun helicopter to fly. When we turned in
the aircraft and deactivated the unit in Hungary in 1996 I was asked
which aircraft I wanted to fly, Warrior or Apache. Now I was only four
years from retirement and as a maintenance test pilot I thought to
myself, “Self if you go with the Apache you get big guns, rockets, and
Hellfire missiles as well as lots of maintenance time and you’ll have to
work long hours for little return. Or I can fly Kiowa Warriors and have
a smaller gun (relative term), still have rockets and Hellfire and not
work nearly as hard. Work hard or fly a lot?” In the voice of the knight
from Indiana Jones and the Last Crusade, “I chose wisely.”
Learned to fly and maintain the helicopter and then it was off to Ft
Hood, TX to 1st Squadron, 7th Cavalry, 1st Cavalry Division. I was
familiar with this unit as I served in it during Desert Storm flying
Cobras. Interestingly, my Cobra (79-23221) was still there when I
arrived but I never got a chance to fly her again. Once we turned in
those Cobras it was time to train up on the Warrior. The training was
interesting and fun. Wish they would have let me shoot more gunnery but
hey I at least had a job.
I flew the OH-58D(R) version of the Kiowa. It was equipped with the then
Allison C250R3 engine and it was the latest and greatest Kiowa Warrior
yet. We worked out lots of bugs which was fun and interesting. It was
during this time that I built my first Kiowa Warrior; see my earlier
article at
http://www.kitparade.com/features00/Warriorfw_1.htm and also my
article with photos from my Bosnian adventure
http://www.clubhyper.com/reference/bosniafw_1.htm .
After being certified (not certifiable) as being qualified as a unit we
trained hard and a lot. Eventually we went off to Bosnia in 1998. It
seems that the Apache unit was having a hard time keeping up with the
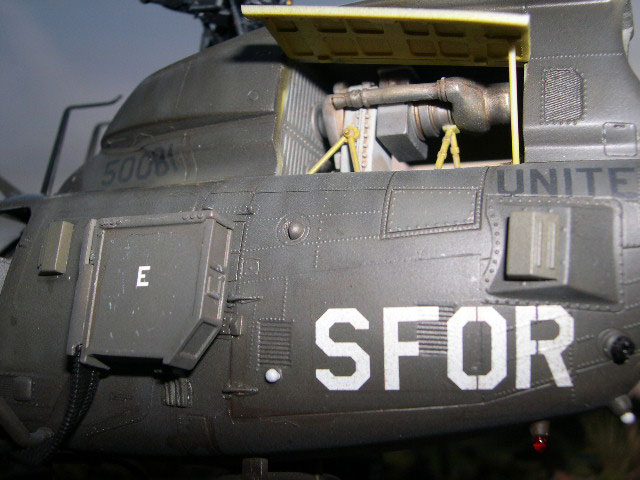
OPTEMPO. As we prepared to deploy I was the Production Control Officer
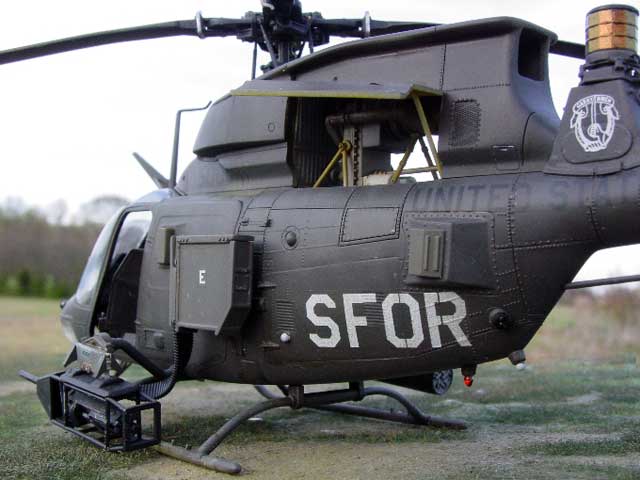
(PC Officer) so I made the stencils for the SFOR and made sure that they
were positioned the same for everyone. After all I was a model builder
and would have to model this helicopter in the future.
Bosnia proved that the Warrior was a deployable and dependable
helicopter. Our overall mission rate for the year was over 95%. We only
were late for one mission do to material failure and none from
maintenance. Lest I forget that not all of the time was fun and games.
During the initial training we lost a Warrior (95-00017) that crashed
into a tree during gunnery, no injuries. While deployed we lost another
one (95-00013) again no injuries.
Why build this model now?
|
MRC 1/35 scale
OH-58D Warrior “Thugs” and the
Cutting Edge Update/Upgrade Set
Reviewed by
Floyd S. Werner, Jr.
IPMS# 26266 |
Well that is a two part story. The first being that I had a customer
who wanted one. Not just any customer, but the Kiowa Warrior Project
Manager who helped me when I was the PC Officer. He was a great help and
a good friend. I felt I owed him at least something.
The other was more poignant. As a senior warrant officer it was my
responsibility to interview and recommend people for flight school. One
of my first interviews was one of my armament dawgs, SGT Wells. He was a
motivated, articulate and professional soldier. I heartily recommended
him to be a warrant officer. He went off to flight school and he elected
to fly Kiowas. In 2004, a friend told me that SGT Wells had been killed
in Iraq, one of the first Kiowas downed over there, leaving a wife and
two lovely children.
During the same phone call I was informed that a very close friend, CW3
Cody Sharp had been shot down and was at Ft Sam Houston undergoing his
13th operation. Cody was flying right seat as the Pilot in Command and
was just entering a right turn when AK-47 fire erupted into the cockpit.
The first round penetrated his right forearm. Another round took off
part of his left thumb. The left seater quickly took the controls as
Cody’s right arm was useless and that is the one that controls the
cyclic. Despite being wounded in the arm himself the copilot was able to
land the helicopter and get Cody out of the helicopter. They had been
supporting a Stryker unit and the Stykers quickly secured the crew. The
helicopter had to be destroyed. Cody is doing better but may never fly
again. To show you the amount of support that the troops have, Cody is
from Texas and Ross Perot offered to have his personal surgeon do the
operations at no cost to Cody. General Cody, who led the first Apache
mission during Desert Storm, offered Cody Sharp a job on his personal
staff if he couldn’t fly again. It seems Cody Sharp was the General’s
pilot when he was a young battalion commander and he never forgets good
people. Cody Sharp is only two years from retirement. My model is
dedicated to these great Americans who I had the privilege to serve with
and who gave everything they had.
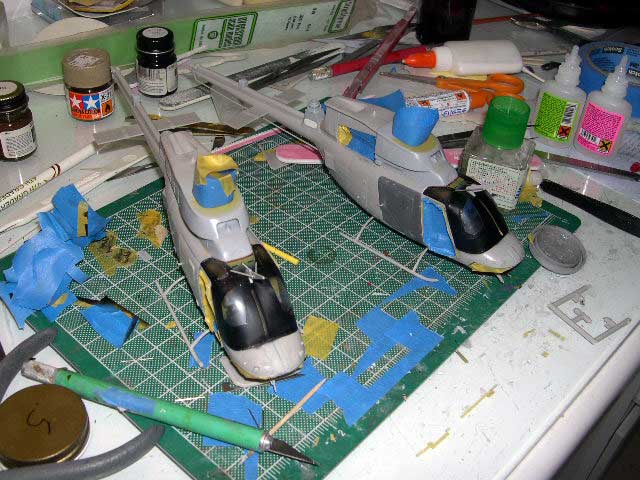
The Model
The MRC model is based on the earliest version of the Kiowa Warrior.
It is accurate for the early version based on the 1985 time frame. It is
molded in light grey plastic with lots of rivet detail and recessed
panel lines. The Thugs gives you the option of building any of the
armament options that a Kiowa Warrior carries. The Black Death offering
is exactly the same except that you don’t get the ATAS or rockets. There
are large clear parts for the windscreens and various lenses. A small
decal sheet is included. A PVC piece of gun chute is provided for the
.50 caliber option.
The Cutting Edge Update/Upgrade set
I cannot be objective to this update set as I designed it.
All versions of the modern Warrior contain the new inlets so I
mastered the inlets. You be the judge if you think they turned out well
(of course they did). Besides the new inlets you also get a new ALQ-144
pedestal and mount, armored side panels, IR lights, APR-39 antennas,
Engine Barrier Filter (EBF), mount for one of the IR lights and a GPS
antenna.
The instructions are illustrated with our aircraft in Bosnia so there
is no question on how this stuff is suppose to look on the real thing.
Let’s get started
I am going to walk you through the assembly process so that you can
correctly update your Kiowa.
Step 1-Everything is flat black, very boring so add variations and
detail paint the circuit breakers and switches. There are of course
variations of flat black through out the cockpit. Don’t attach the
anti-glare panel yet. Wait until you get the window on. If you don’t it
could create some serious issues with the windscreens later on. Don’t
use part B-72 or B-73. They create a fit issue with the fuselage and
doors. You won’t see them anyhow. The back doors are always closed
except during maintenance. I recommend that you don’t have them open.
The boxes in the back seat are not too accurate but do approximate the
busy feel of the stuff back there. I did add some buttons to the cyclic
and collective with white glue. I used some Tamiya Clear Green for the
MFD (Multi-Function Displays) in front of the pilots and Tamiya Smoke on
the screen on the top center of the instrument panel, forgot the name.
Must be getting old.
Step 2 has you finish off the front cockpit. I made a first aid kit out
of epoxy for the right side of the pedestal, opposite of the fire
extinguisher. This was painted a light green and attached.
Step 3-Don’t use part B-66. It does not fit and can’t be seen anyhow.
Everything back here is Flat Black as well. Most of this stuff is not
seen even if you are an IPMS judge with a flashlight.
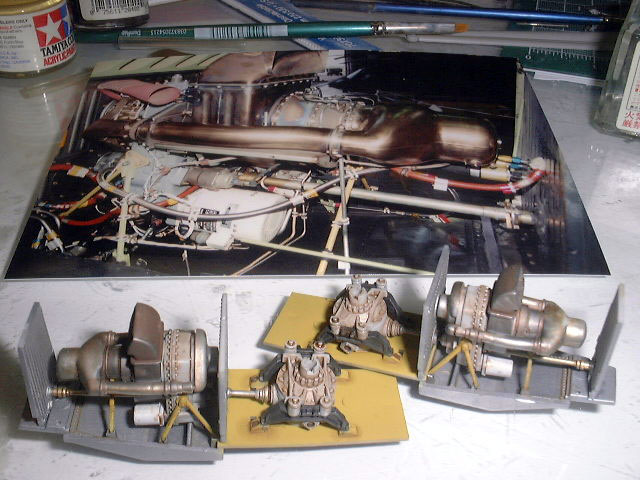
Step 4-Is the engine and transmission compartment. Wow, this is a little
gem? The engine is a great place to super detail but I elected not to go
overboard. I just painted it and weathered it appropriately. Before you
assemble the transmission add the assembly to the cockpit and fill the
area where the mount pins come up from the bottom. The actual color for
the epoxy coating for the area under the transmission is a fluorescent
green I’ve never seen anywhere else. I used Tamiya Yellow Zinc and
called it close enough.
Step 5- Assemble this as per the instructions but don’t add it to the
model yet. Wait until after you have the complete rotor system built up.
You may want to leave off part B-29. This will help you during
transportation. Part B-34 is light grey but the rest is, you guessed it,
Flat Black. I dry brush with a light grey artist oil to bring out the
highlights. Look at the picture of the completed assembly carefully.
Remember part B-44 should be facing aft.
Step 6- is the pilot figures and I left them out. They look pretty good.
That is your call. The flight suits could be sage green, desert tan, or
woodland colored. Check your operational theater. Boots may be black or
tan.
Step 7- has everything on the inside being brought together. The fit is
very good. After everything was assembled I added some bent metal on the
back of the seats to represent the seatbelt channel. I also used the
Cutting Edge USAF/USN Ejection Seat Poseable Harness Set, CEC32099, to
represent the seatbelts. These are perfect for this aircraft and the
scale. Remove them from there flimsy backing with a sharp knife and
slightly undercut them. Cut by pressing down numerous times. Do not draw
the blade over the surface as you will rip and tear the material. The
belts can be posed as you want which added a sense of realism. I painted
mine with a very light tan color, Tamiya Deck Tan, if I remember
correctly. I then added some Floquil Old Silver to the buckles and Model
Master Leather under the belt latches. I threaded the seatbelt over the
back of the seat and tacked it down with superglue. Then I posed them as
I wanted them to look and used superglue to tack them down in the front.
I was very happy with the results and will use these belts again,
especially on a large scale airplane. Nothing looks as good.
I added some weight under the instrument panel area. It was a large
round lead weight that I smushed (technical term) and then carved to fit
in the open area which would be under the front part of the fuselage. Be
careful not to interfere with the fit of the instrument panel. The area
won’t be seen when the chin bubble is painted. Test fit this with the
fuselage half.
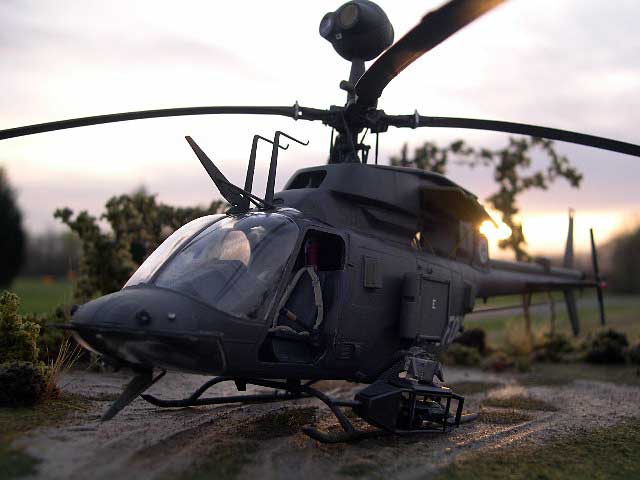
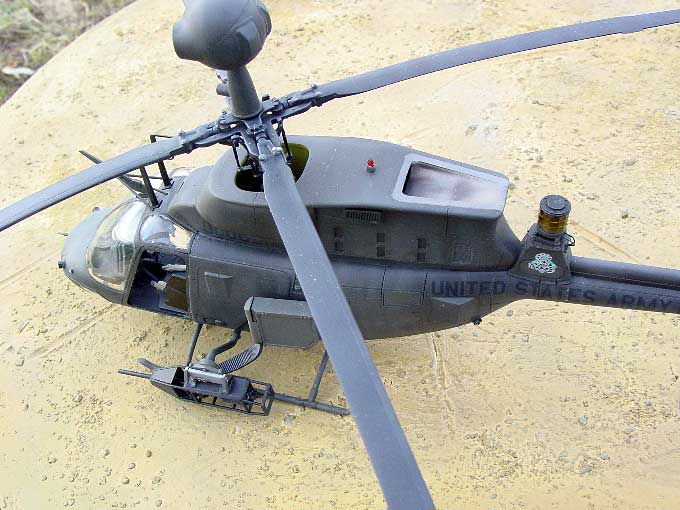
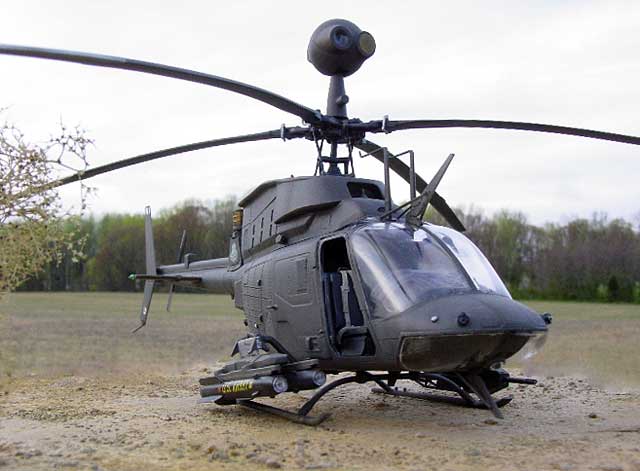
Step 8-One of the best things about this kit is the rotor system. It is
EXACTLY the same as the real thing. Care and test fitting will be
rewarded with an excellent representation of the real thing. A few words
of caution though. Caution 1-The Pitch Change (PC) links are offset 45
degrees from the pitch horn. This is not pointed out very well. Caution
2-The blades are the correct shape but for some reason they molded a
recessed panel line on the trailing edge of the blade, on the top and
bottom. This should be filled in with your filler of choice, mine was
super glue. Advice 1-Before filling the blades it is a good idea to get
the droop on them. I used really hot water on the blades, cook for one
minute in water that is real near to boiling. I then removed them and
taped them to a 12 inch skillet around the outside. Once I had them all
on there I ran the pan under cold water to set everything. I liked the
way my droop looks. It is very realistic and adds to the models appeal.
Caution 3-The Quick Release pins, part C-42, are painted silver but they
are not placed on the same place on each blade. That is they are not
always on the leading edge pin or trailing edge pin. Check your
references, but if I remember correctly, the green pin is on the rear
pin and the rest are on the front.
Step 9- is a little overwhelming. Lots of stuff has to go on here. First
off, before you do anything else it is time to use the Cutting Edge
Upgrade set. Follow the instructions very carefully and remove the
forward cowling. This is fairly straight forward. Use a BAF, to true the
aft surface once the cut has been made. What is a BAF? A Big Ass File,
of course. I have a large file that I’ve learned to love. Don’t forget
to remove the flashed over center of the cowling. This is easily carved
out and cleaned up with some sandpaper. This part will be added later
but you have to cut it out now.
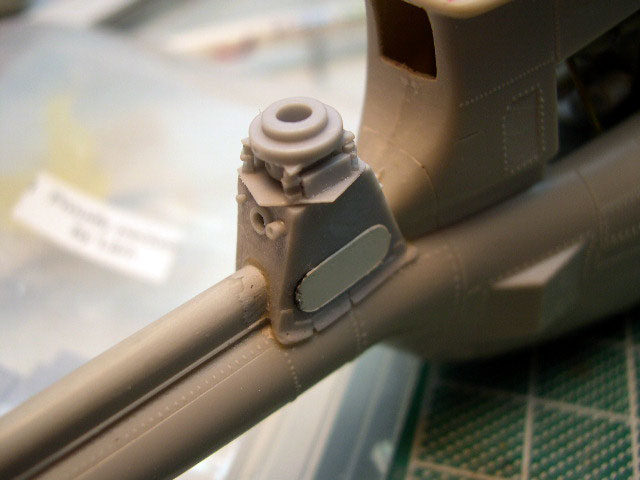
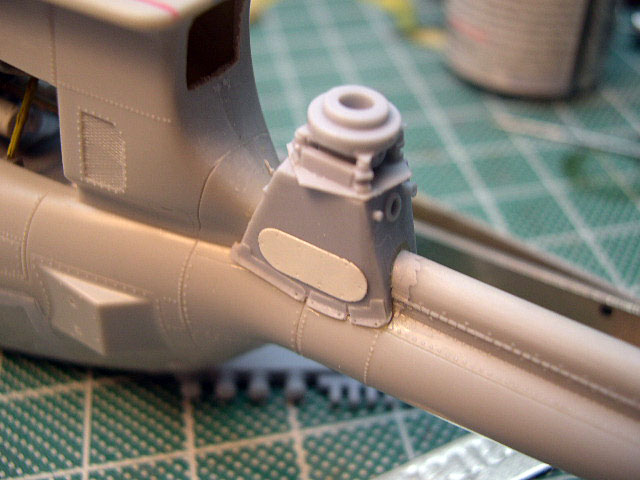
The next big thing is the ALQ-144 mount. The kits is not accurate. The
Cutting Edge set provides the pedestal, the mount and the base for the
ALQ. They also provide a picture of the blanking plate in case you opt
not to put on the ALQ from the kit. I did forget to add the oval access
panel on both sides of the pedestal. Sorry about that. I added mine out
of .005 plastic. The cut of the kit is the hardest to get correct. I
feel it is better to cut into the kit mount and then sand as necessary
to get it to fit. I ended up cutting too much on both of mine and added
plastic and then carved it to fit under the pedestal. This is really the
hardest part of the upgrade so go slow. Do not use part D-21 which is
the base of the ALQ. The part is reproduced in the upgrade to have the
open slots and mounts. The assembly should go like this; pedestal,
mount, and base, then kit clear parts. Check the reference photos from
the upgrade set for the correct orientation it is not squared off but
offset a bit. Holes are provided for you to add wire if you so desire.
Attach the ALQ pedestal with superglue and then it is time to bring
everything together.
Part 40 is not used on current aircraft. It is the Doppler antenna and
since the introduction of the GPS antenna is not mounted.
When you make the rear avionics compartment you will have to break off
the top part of C-32 or it won’t fit. Again this is an area that is
representative of an early version but not current. You have to assemble
it as it keeps the door aligned but it really isn’t too important. While
you have the door in your hand there are two cutouts, one on the bottom
and one on the aft part of the door, these need to be filled in. Leave
the cooling grills but fill the round recessed areas. These were for the
original aircraft when they were experimenting on things.
If you are going to build an Operation Iraqi Freedom aircraft don’t open
the holes for the AVR-2 antennas, part D-31 and D-32. These antennas are
laser detectors and were removed from every unit’s aircraft that I know
of.
For an OIF aircraft leave off the clothesline antenna under the tailboom.
It is the holder for the HF antenna and is not used. Just cut some
square styrene to cover the holes. If you are building a Bosnian
aircraft leave it on. If it gets bent or crooked this is actually
preferred. The real things were hollow and frequently bent from handling
and crew chief backs hitting it while walking under the tailboom. We
left ours on more as a way to protect the APR-39 blade antenna on the
tailboom than for anything else.
Leave off the front doors unless you have an aircraft that is flying in
the winter. The greenhouse effect makes it very hot inside relatively
quickly so the doors were removed to facilitate cooling plus visibility
is markedly improved with them removed.
I recommend that you don’t add the UWP (Universal Weapons Pylons) Part
19 & 20 until after painting the fuselage.
Before you assemble the fuselage I recommend that you add some strips of
styrene on the bottom such as you would do for a vacuform. There is a
lot of play if you don’t you will have some issues as the area is
flexible.
Time to bring it all together. If you did everything properly you should
have no big problems closing it up. Once everything is good to go, add
the forward cowling after you paint the inside a yellow zinc color or
the fluorescent green. You may have to fill a little bit. I recommend
super glue. I built two and the two of them needed a little filler in
different spots. Nothing too drastic though.
Once you have everything filled rescribe the line where the forward
cowling fits to the model. There is another area that needs to be
scribed and that is around the exhaust area. This area is titanium and
broken into two separate parts. You will have to look at reference
photos to determine the shape but it roughly fits the shape of the open
area. Look at the model photos. Don’t be too concerned with how big the
area should be. I have seen some that had lots of metal on top and
others that had about a 2 inch area, which is the most common. Now check
my pictures and you will see the other panel lines that need to be
scribed, including the one that goes laterally through the exhaust area.
Most of the panel lines are pretty straight and not a big issue.
OK I screwed up. I didn’t realize until I was building my kits that I
forgot a mod for the armed version of the Kiowas. The aft doors have a
cutout. I have since made this and have provided it to Meteor
Productions. If you bought this set and it didn’t have it write or call
them and they will provide it. My fault totally. Completely missed it.
The doors were modified when armament was added because you didn’t have
access to the avionics because the door would hit the UWP. At first you
had to pull the pins on the hinges and then remove the whole door.
Finally they just made a cut out that allowed you to open the door
normally. The new doors and cutout are a drop in replacement that did
not need any cleanup.
I left my vertical tail off until after painting. It tends to hit
everything and will break off or break the skid. Speaking of skids, I
used pins to mount them for support. The horizontal stabilizers should
be flat on top and rounded on the bottom. They provide negative lift in
forward flight to extend the CG range.
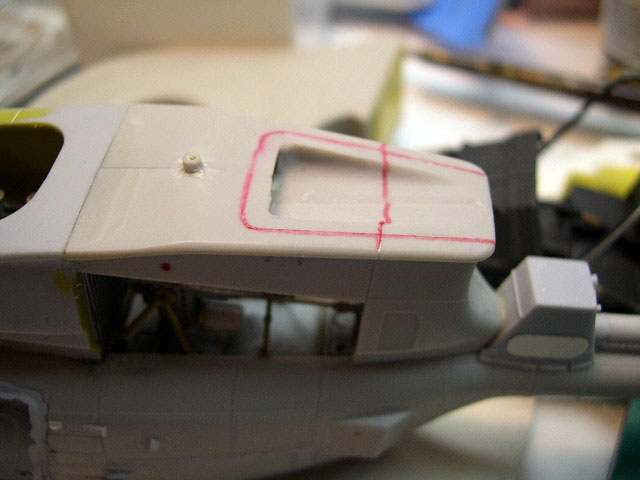
After the entire cleanup is done, I recommend adding the windscreen and
chin bubble including the Wire Strike systems. I used liquid cement,
sparingly, and white glue to attach the windows. This will aid the
masking stage. I then added the glare shield and the instrument panel
from the outside. You want to do this as it is easy to get a tighter fit
without causing any problems with the windows.
I used the Cutting Edge Black Magic Canopy Masks CEBM35001 for this kit.
There are some areas that are very hard for the Black Magic to conform
to but overall they worked well. I highly recommend them.
Add the IR formation lights to the appropriate areas. Don’t forget to
add the mount to the base of the fuselage before adding the light. I had
to add a bit of filler with Tamiya putty and then used Mr. Thinner to
smooth it in.
Use caution when removing the GPS antenna from the mold block. If you
are careful there is a circle under the block that needs to be kept. Add
the GPS antenna to the tailboom. Ensure the hole is on the left side
just in case you want to add the wire that comes out and goes into the
tailboom.
If your aircraft has the Engine Barrier Filter now is a good time to
install it. Check the photos on the instruction sheet.
Now is a good time to decide what kind of a weapons load you want to
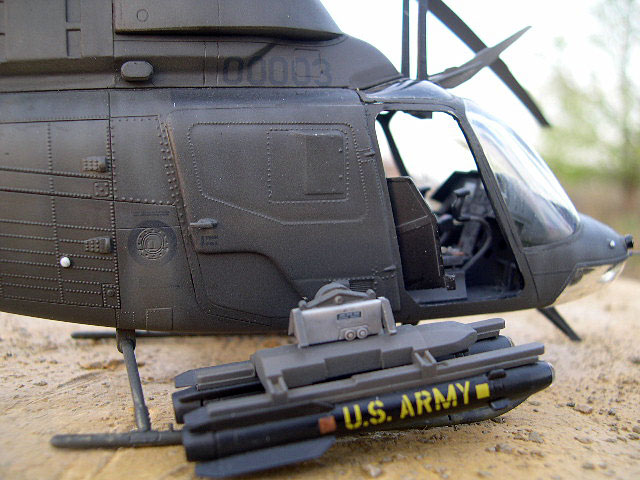
use. Check your references, but a common load is .50 Cal and rocket
pods. Another is .50 and Hellfire. Frequently the .50 Cal ammo box is
carried regardless of the weapon on the left side. A word of caution, if
the Hellfire is to be carried it will always be on the right side. The
.50 Cal can only be mounted on the left side. The rockets can be loaded
any way, within the limitations of the Hellfire and .50 Cal, or on both
UWPs.
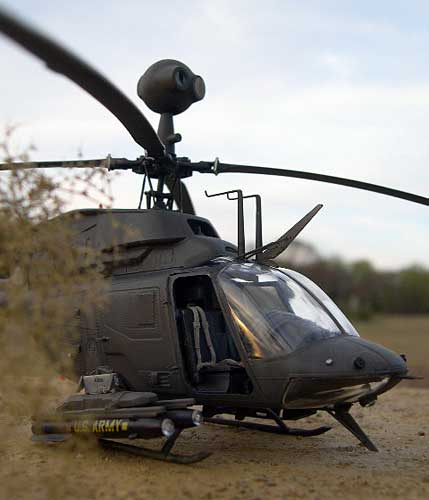
Painting
 I
preshaded the model with flat black as I needed it to paint the rotors
anyhow. I
preshaded the model with flat black as I needed it to paint the rotors
anyhow.
I said this before and I’ll say it again. The only accurate color for
a modern US Army helicopter is Model Master ACRLYIC US Army Helicopter
Green. The enamel is too grey, but it has its uses. I used the enamel to
weather my aircraft. The whole aircraft gets the acrylic green. I then
streaked the enamel in a vertical movement to simulate the weathering
caused by servicing the engine.
I painted my AVR-2 antennas Model Master Green Drab.
The blades are flat black aft of the line, gloss black on the inboard
side and titanium on the leading edge about a third of the way to the
tip. Check the photos of the model and references. The tail rotor is
flat black with about half of the leading edge being silver, but can be
overall flat black. Both the tail and main rotor blades were then
streaked front to back with Tamiya Buff and a light grey.
I painted my IR lights RLM 77 and the GPS antenna is flat white. A coat
of Future made the model ready for decals.
Decaling
 The
kit decals are okay but not great. They have a glue substance on the
back the looks bad going on but will dry clear. I used Solvaset because
of all the rivets. The
kit decals are okay but not great. They have a glue substance on the
back the looks bad going on but will dry clear. I used Solvaset because
of all the rivets.
I wanted to do an aircraft that Cody and I flew in with 1-7 but there
were no decals available for the SFOR, 1st Cav, Garryowen, or Bounty
Hunter emblems. I also didn’t have decals for the 2-17 Cav aircraft. I
did have pictures though. So I had some decals made. I didn’t realize
until I was decaling that they were about 50% too big. What to do? I
just had received some gorgeous AH-1G decals from Joseph Osborn at
Fireball Modelworks (http://www.fireballmodels.info/) A begging and
pleading email went out explaining what had happened and what I needed.
Joseph was able to work magic with the photos. After a few emails to
tweak the size and the fonts and literally within a couple of days I had
perfect decals. They worked well and reacted well to the Solvaset.
Thanks Joseph you saved my butt. They looked perfect. I am working with
Joseph to get some more additional markings for this kit. So look for
more from Fireball in the future.
A coat of Future and a Model Master Acrylic Flat made the model ready
for weathering.
Weathering
I used a Burnt Umber artist oil wash over the panel lines. I followed
that up with some Polly-S Mud on the skids and ammo box. I used silver
pencil to chip the paint at various locations including the skids. I
also used the silver pencil to “peal” back the area on the silver part
of the main rotor blades as these took a beating, especially in the
desert. I used the enamel helicopter green to simulate the fuel spilled
around the filler cap. An overcoat of heavily thinned Tamiya buff from
directly overhead lightens up the top of the model. I used some pastels
on various panels and in the exhaust areas. Another flat coat sealed
everything.
Special attention
I need to talk about some areas that required special attention in
regards to painting. First is the MMS, the Mast Mounted Sight, ET, or
the thing that gives the Kiowa big balls, no sorry that is the pilots.
The small opening is the side for the TVS system. I glued a light blue
transparent bead to the inside. This was followed up by painting the
area inside of the area for the clear part the Acrylic Helicopter Green.
Once that was dry I added Future in multiple applications until it was
level with the face of the sight. For the TIS (Thermal Imaging System) I
tried something a little different. This side is opaque and reflective.
I painted it gloss black and then used a thing called Pearl-X (available
at Wal-Mart) Iridescent Gold. It is a powder that is rubbed on the
paint. Well it looked great and was exactly what I was looking for.
The ALQ-144 is a multi-faceted IR jammer. I decided to try Alclad red to
gold paint. I painted the gloss black and then the Alclad. I found the
color pigments to be too big but decided to go with it anyway. I then
applied the Pearl-X. It looks good but not great. I then added some
Tamiya Clear Orange and Red. I was happy with the results but I think it
could have been better. If I had to do it again I would skip the Alclad.
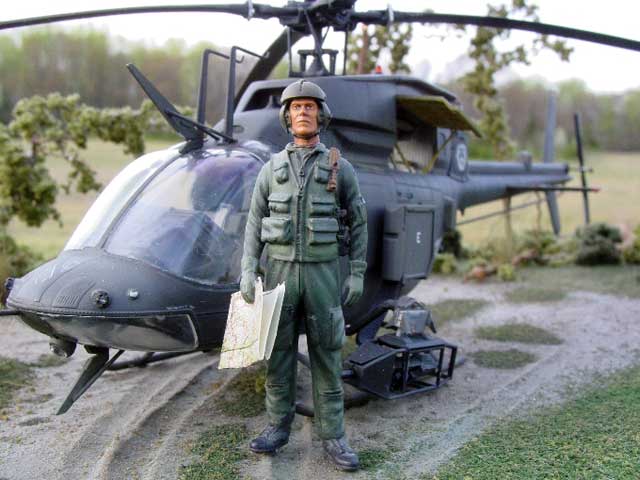
Final steps
I removed the masks and polished the canopy with Tamiya polish. There
was a marginal bit of overspray that was removed with a toothpick and
some Aeromaster Paint/Decal remover and some careful patience.
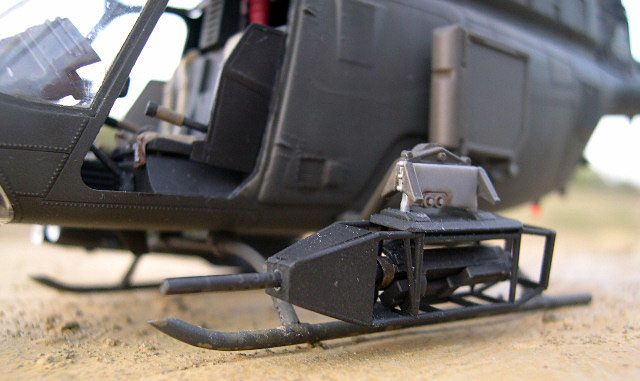
I had no big problem in assembling the weapons. A tip for gluing the
ammo chute to the gun, use vinyl glue available at Home Depot. Comes in
a small tube and works great. The .50 Cal was painted flat black and
then dry brushed with some silver. The cage around the gun was painted
semi-gloss black. The ammo box got the aircraft green color.
The Hellfire launcher got the helicopter green for the launcher. The
missiles were flat black and after a gloss coat were decaled as shown.
Remember that live missiles have a brown square at the aft end. This
indicates a live motor. The yellow on the tip indicates a live warhead.
The rocket pods were assembled as the instructions showed. I did elect
to fill the seams on the end pieces as well as the halves. The end caps
were painted Magnesium. The rockets themselves were Olive Drab.
Finally everything is brought together at the UWPs. I did have an issue
with the angle of the UWPs. They cause the ordinance to be angled in too
far. A little angle is ok but this is too much. I haven’t figured out
how to fix it yet.
Wow! That took a long time. From the time I mastered the original
cowling to finishing both kits was about a year and a half. I’m happy
with the way they look though. They are impressive. I feel the upgrade
is essential and makes the difficult task of converting the Warrior to
modern standards exponentially easier. I will not make a recommendation
on the upgrade. You will have to make your own conclusions.
The kit itself is a challenge but not something most builders couldn’t
master. It is the perfect vehicle for super detailing. There is a lot
more things I would like to do next time. I wish the UWPs were better
angled but that is my biggest gripe.
The masks were very useful and made that task a lot easier. Highly
recommended.
The poseable seat belts were wonderful and easy to use. Highly
recommended.
The decals from Joseph were a Godsend. Thanks again for the help.
Without you these models would be unfinished. Highly recommended. Check
out his Cobra decals. We are discussing doing a few of the AH-1F Cobras
I flew.
References are rare on this vital helicopter. The internet is best
resource. I hope to put together a walk around book on the Kiowa Warrior
if I can find an interested party and if the demand is there. I have
lots of photos that I took and I still know lots of people in the Army
who are willing to help.
This little helicopter and the men and women who fly them are always out
front in harms way. I would like to think that SGT Wells would be proud
of the finished results.
I know he would yell “ Garryowen, Sir!”
Click on the thumbnails
below to view larger images:
Model, Images and Text Copyright ©
2005 by Floyd S. Werner Jr.
Page Created 18 June, 2005
Last Updated 17 June, 2005
Back to
HyperScale Main Page

MRC's
1/35 scale OH-58D Warrior is available online
from Squadron.com
|
 Home
| What's New |
Features |
Gallery |
Reviews |
Reference |
Forum |
Search
Home
| What's New |
Features |
Gallery |
Reviews |
Reference |
Forum |
Search