|
Trumpeter's 1/32 scale
Curtiss P-40B
by Jeffrey Oliveira
|
 |
|
Curtiss P-40B |

Trumpeter's
1/32 scale Curtiss P-40B is available online from Squadron.com
The Curtiss P-40 series is legendary and needs no introduction so I
won’t repeat the history here. I did choose this subject and color
scheme however due to it being both attractive and a turning point in US
aviation history.
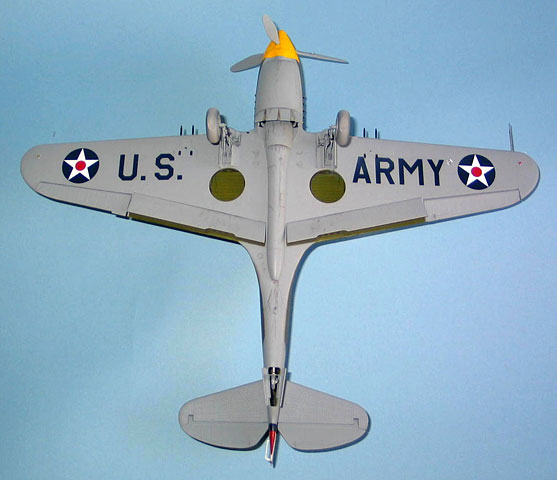
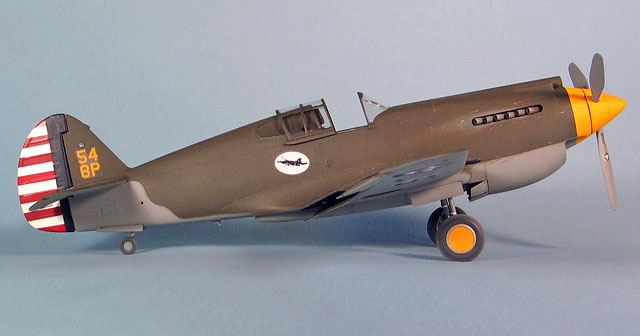
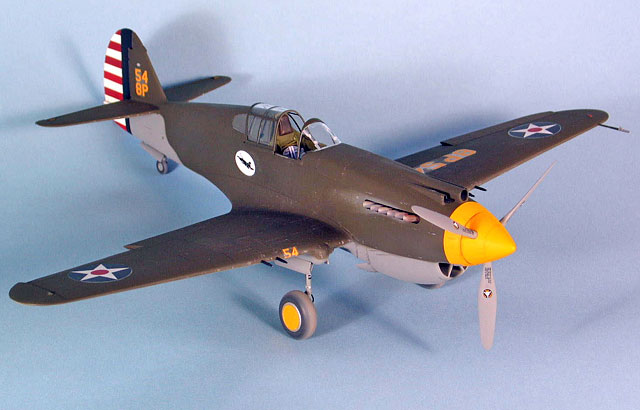
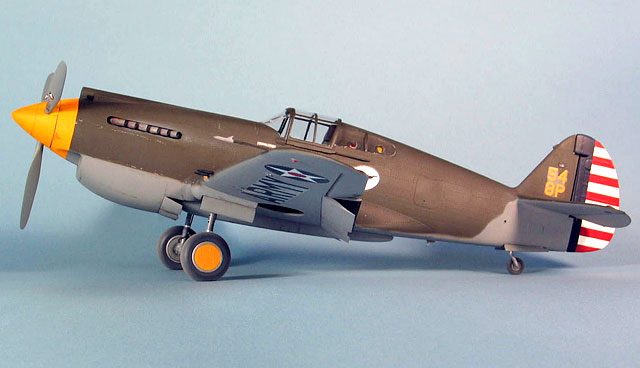
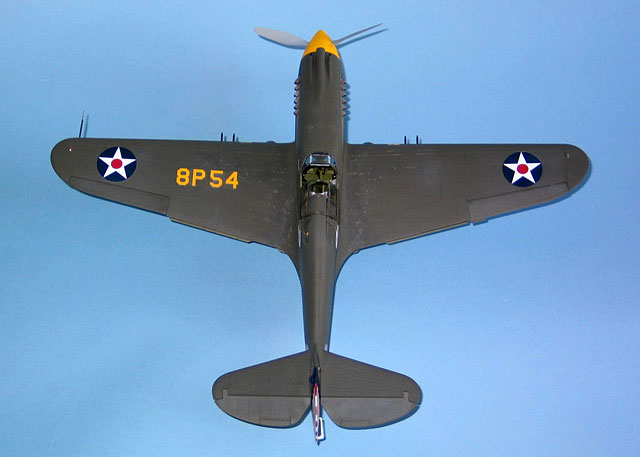
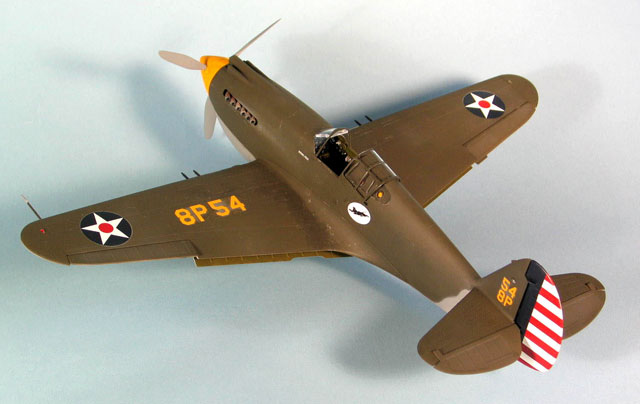
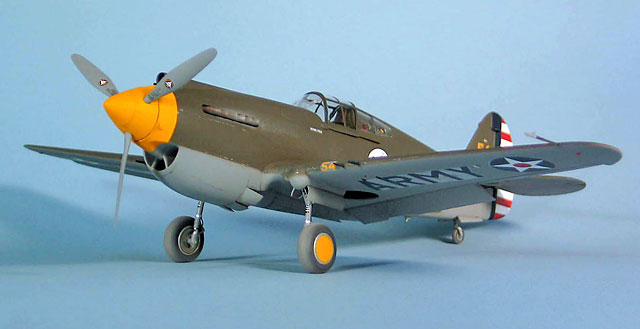
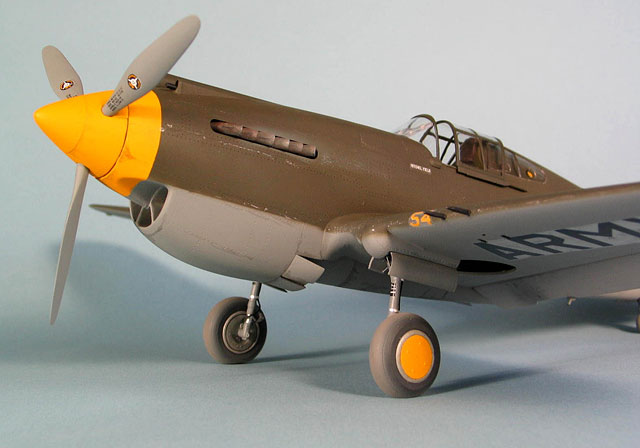
The aircraft represents an early prewar P-40 which shows the colorful
squadron nose color, red and white rudder stripes, the large squadron
insignia on the fuselage and the bold and dramatic US ARMY under the
wings.
With the gathering war clouds in 1941, the airplane also has the
future standard Olive Drab upper surfaces and Neutral Grey paint on the
lower.
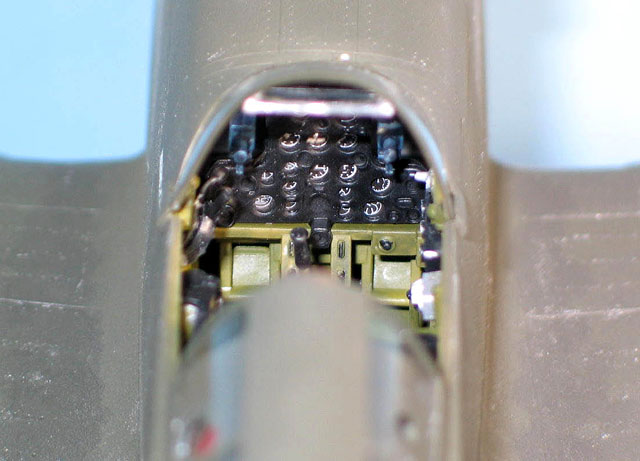
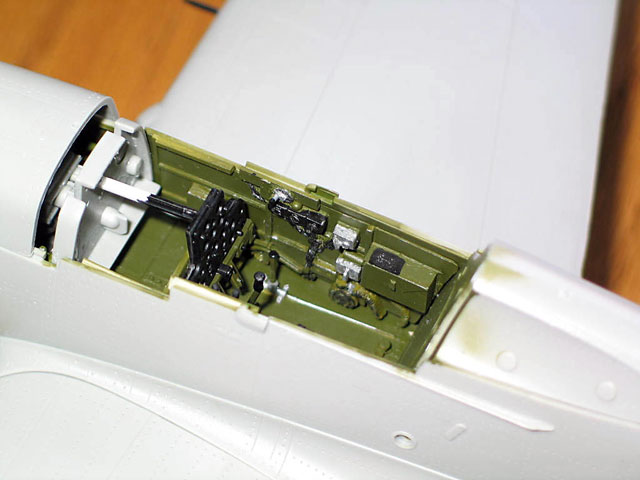
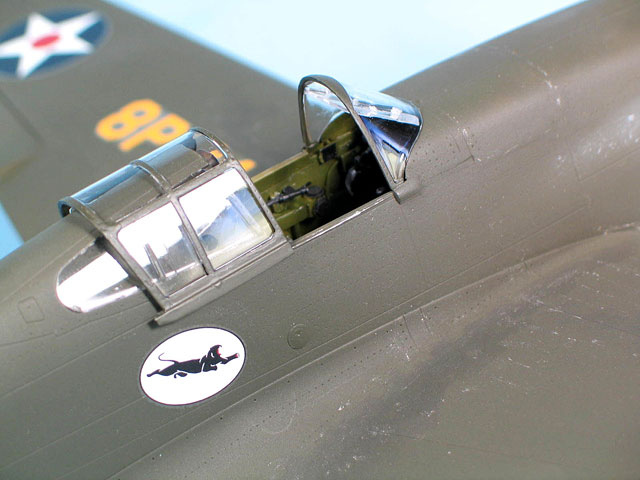
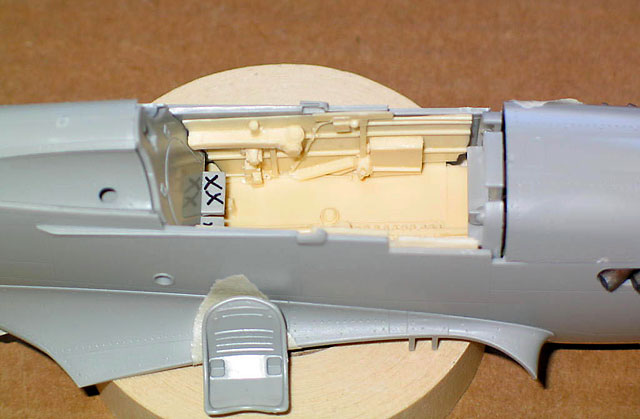
Cockpit and Cowl
The Trumpeter 1/32 kit is overall excellent but with a few problems
already discussed on HyperScale. The cockpit is WAY too shallow. A Jerry
Rutman resin cockpit from a P-40E was modified and installed instead. It
worked well. I had to cut the cockpit seat in half at the bottom of the
vertical back and add sheet styrene to make it work. There are now other
aftermarket items available to correct this problem which is the worst
aspect of the kit.
Click on the thumbnails
below to view larger images:
The kit also has fit problems at the wing root on the left hand side.
The wing assembly is actually super with an ingenious interlocking
series of internal tabs that give alignment and strength but some
careful filling will be required.
I also didn’t like the gaps and seams so visible around the nose lip and
the upper cowling. The upper cowling is designed to be removable to view
the superbly detailed engine but I was looking for smooth contours on
the wonderfully aggressive look to the nose design so I filled and
sanded away. This improved the look of the finished kit a lot.
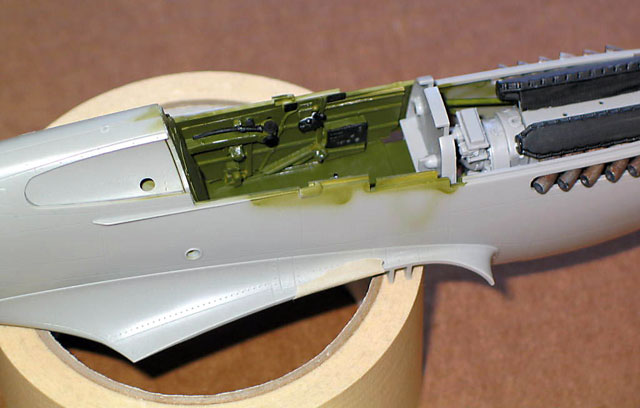
The engine is a kit in itself and also very accurate but to fully
view it the modeler will have to also cut open some side access panels.
I only built up the engine enough to look fine from the exterior of the
airplane. There is much more detail than is shown in the photos that I
left off since it wouldn’t be seen.
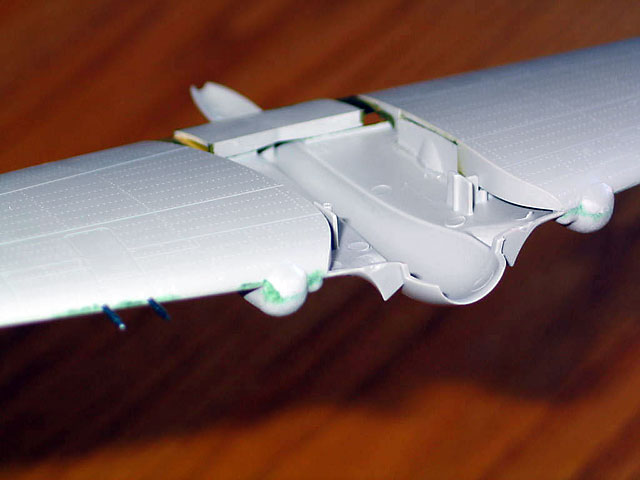
Wings
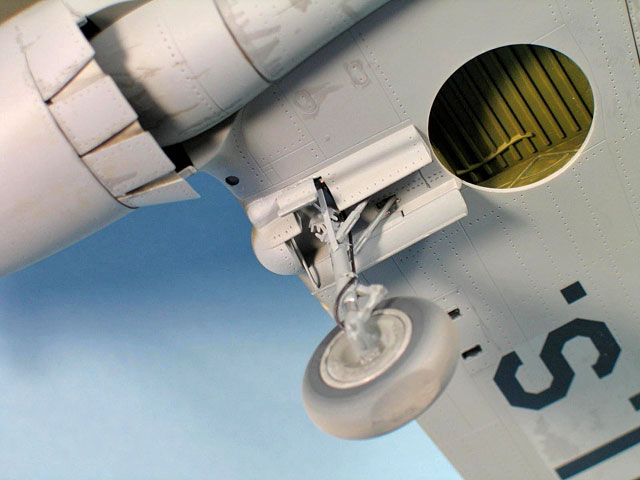
I built the wings pretty much out of the box and did not make main
wheel well or tail wheel dust covers so the detail would be visible. The
flaps can be built up or dropped. Note that the flaps had a lot of
ejector pin marks that had to be tediously and carefully filled. I had
to do a bit of tab shaving on the ailerons to get one up and one down as
per the real airplane.
The kit provides nice machine guns but you will have to do some cutting
and scratch building to show them in open gun bays. I used the kit’s
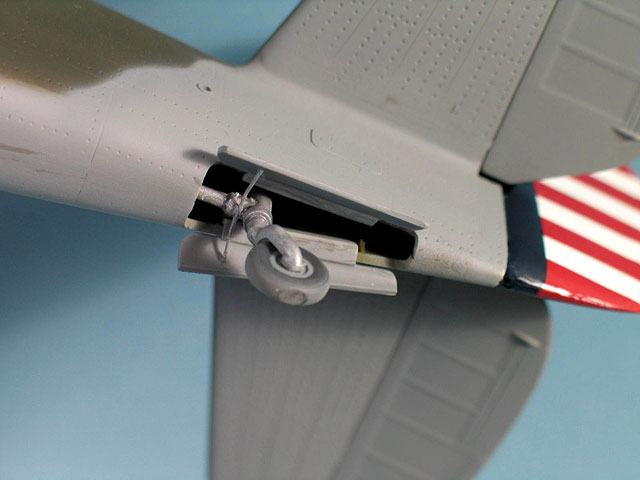
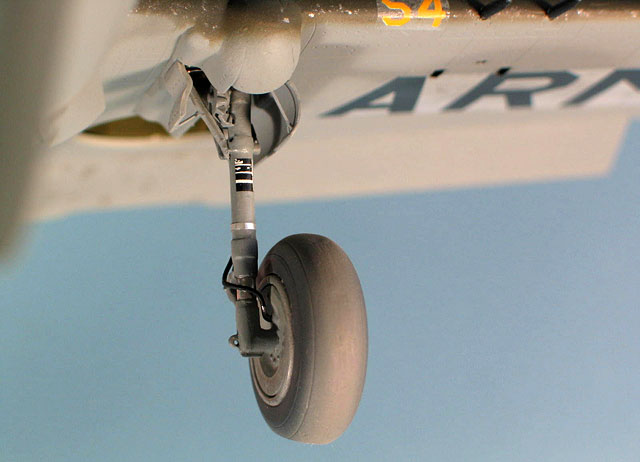
landing gear doors which are accurate and thin enough. I detailed them
with stretched sprue actuator rods to complete the kit’s parts. I
detailed the landing gear main struts with wire brake lines, foil line
clamps, drilled out the tiny hold down lugs, and added strut info decals
from the scrap box.
For the wheels, I used the kit parts, not resin. The kit parts are fine
and are plastic, not rubber thankfully, but be careful gluing the tires
so they sit straight. I also did the usual tire flattening. Don’t overdo
this. Remember the tires DID have air in them! I also scribed a new ring
on the wheel cover disc to conform to the real parts so you can see the
rim as well as the rim cover. The rim cover was detailed with four tiny
screw heads made of dots of white glue and painted the yellow squadron
color. The white glue method applied with a tooth pick can be used
anywhere you need a few rivets. If it doesn’t look right simply wipe it
off and try again. It lasts for many years on models and will take
enamel paint with no problem.
All yellow on the model was applied after flat white prime coats to
brighten the yellow.
I always enjoy doing running lights now that they are clear plastic.
Some modelers like to use transparent paint but I drill very small holes
in the back of the lenses and add a tiny dot of red or green paint which
fill the drill starts and look just like a bulb. For the landing light I
glued a bit of the high gloss side of some aluminum foil to the back of
the lens with Future and then glued the lamp in place on the wing. Try
this. It looks very convincing!
Fuselage
I have noted the problems but otherwise the buildup was pretty
straightforward. I used the kit control panel which is very nice with
instrument faces on acetate and a nice control panel face to go over
them. The tail wheel assembly is nice and solid when built as well. The
tail wheel strut could vary in height according to reference photos but
the kit stance is accurate. The rudder is not like the kit’s other
control surface attachments, it is the dreaded pin and photo etch hinge
type. The rudder doesn’t sit correctly with this and also flops around
so I glued it in place and had to trim the rudder forward face to do it.
It does fit very well now.
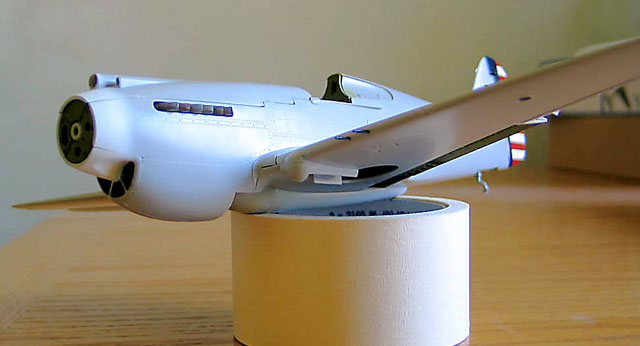
Before assembling the fuselage, the engine assembly and accessory
section must be completed since it goes into the fuselage as an
assembly. I did find serious fit problems with the left hand exhaust
stack halves. Oddly the right side parts were OK. You will be doing some
awkward sanding and filling on the small stacks. Otherwise the fit is
very good.
During construction handling, I damaged the right hand rudder decal
stripes which I had put on before assembly to better align them. I put
out a distress call on the HyperScale Plane Talking forum and was
quickly answered by a very gracious Mr. Keith Sherwood of High Wycombe,
England. He had extra rudder stripes from the Cutting Edge sheet CED
32052 I was using and kindly mailed them to me. He sent them all the way
from England to me in California and shows the wonderful spirit of the
modeling community. Thank you again Mr. Sherwood.
It is also worth remembering how the internet age has helped us all,
sharing information, helpful tips, research websites, online shopping,
and making the cottage industry of decal makers, resin pourers, photo
etch burners, etc have a viable international market to keep them going.
And we can read about it daily on our international internet magazine
Hyperscale! It’s hard to believe some people still avoid computers.
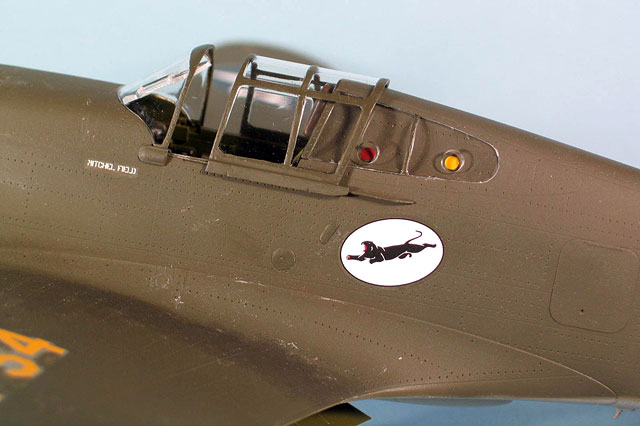
The fuselage had a couple of other minor issues. The baggage door and
hand holds are way too thick so I shaved and sanded them down for more
scale effect. Trumpeter usually has an almost trademark odd ball feature
on a number of their kits. This kit has a clear light to be painted blue
on each side of the exterior of the cockpit. I couldn’t find any photos
of this on early P-40s so I filled it in and painted it along with the
fuselage. I used my usual Testor’s Model Master enamels with the upper
NOT being Olive Drab but a more accurate looking Green Drab FS 34086 on
the uppers with Neutral Grey FS 36270 for the lower surfaces. Note that
the prop is grey, not black or aluminum. It is also per color photos of
the time actually a lighter shade than the Neutral Grey so I mixed the
prop color myself until it looked very close.
Painting,
Markings and Finishing Touches
|
I used both my Badger 350 airbrush for the larger areas and my Badger
150 for the fine work with a compressor. I sprayed very thinned light
grey over the airplane for fading with a bit more on the ailerons and
elevators to show they would fade faster. I also did the same light
overspray of the decals when they were applied (insignia fades too).
I didn’t go crazy with weathering and chipping since there were few
airplanes in the prewar Air Corps and they were well taken care of. I
did show a bit of oil and fluid leaking from the propeller hub to other
areas including the engine area and lower fuselage and wings. I did a
lightly applied grey colored exhaust stains around the stacks using
photos as a guide. On the wings I also added discoloration from GI boot
marks as seen in period color photos. Again, I took it easy with this as
these airplanes were not flogged by heavy constant combat operations as
later WWII airplanes were.
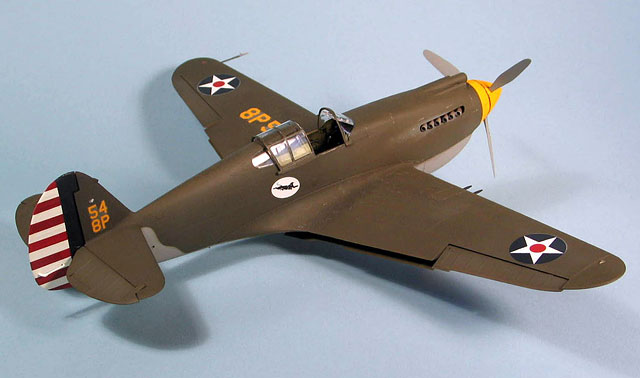
The interior color is Interior Green but I always dull it with some Raw
Umber for a more accurate look. The nose is Testors Insignia Yellow and
contrasts nicely with the Green Drab fuselage color.
The canopies are dipped in Future then hand painted with painters’ blue
masking tape being used for masking. I don’t mask all of the canopies
frames for painting. Only the hard to get areas then hand paint the
edges. Beware, the clear parts in this kit are VERY brittle and will
crack or break on you. Go very carefully when taking them off the sprues.
One thing nice is the canopy can be placed in position and opened and
closed as desired. This will allow viewing by your friends who will
swoon over your masterpiece (or not) then allow it to be closed to keep
dust out.
The kit provides photo etched ring and bead gun sights for the top of
the cowl but photos only occasionally showed them in use so I left them
off. I reduces the danger of breaking them off which is sure to happen.
 The
decals are all Cutting Edge sheet CED 32052. They worked and sat down
beautifully with a little MicroSol. The register is outstanding and even
fine print is readable. I did get a small bit of silvering but I didn’t
spray the model with Future first. I am still experimenting with that
process ( I am mainly at the dipping stage now). The silvering you see
in the photos look much worse than in reality since I was blasting the
model with 750-1000 watts of flood lights and that brings it out. I
highly recommend the decals. The
decals are all Cutting Edge sheet CED 32052. They worked and sat down
beautifully with a little MicroSol. The register is outstanding and even
fine print is readable. I did get a small bit of silvering but I didn’t
spray the model with Future first. I am still experimenting with that
process ( I am mainly at the dipping stage now). The silvering you see
in the photos look much worse than in reality since I was blasting the
model with 750-1000 watts of flood lights and that brings it out. I
highly recommend the decals.
Everything was overcoated with Testor's clear flat applied by
airbrush.
I also had to do some minor filling and sanding where the horizontal
stabilizers contact the tail but it wasn’t too bad. Some people don’t
like the outline of the stabilizers but I think they are very good.
This is a great kit.
I am glad that Trumpeter and others are really making an effort to
supply 1/32 kits which have been too long neglected. The kit has
problems that might have been avoided by Trumpeter but nothing is major
and the finished kit is great looking.
The test for me is, does this really look like a P-40B? It does. The
profile is very close and only a very critical modeler would have a
problem with it. It does have plenty of rivets but with paint they look
fine.
Also keep those 1/32 aftermarket decals coming!
Now on to my next project - Trumpeter’s 1/32 P-38.
I mainly used Detail and Scale P-40 Warhawk Part 1 by Bert Kinsey.
This is so complete it’s really all you need. Kinsey has done modeling a
great service over the years with his many highly informative books.
They are required reading if you are building a particular type of
airplane accurately. Thanks Bert!!
I did also use Squadron’s P-40 Warhawk Walk Around. Also very important
were many color P-40 shots from the internet, various books and magazine
articles which should always be referred to for really accurate
painting. I know the color shade changes with the light, but you can get
invaluable decal placement, demarcation lines and chipping and
weathering info from these sources.
Click on the thumbnails
below to view larger images:
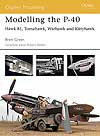
Modelling the P-40
Hawk 81, Tomahawk, Warhawk and Kittyhawk
Osprey Modelling 15 |
|
|
|
|
Author: Brett Green
US Price: $17.95
UK Price: £12.99
Publisher:
Osprey Publishing
Publish Date:
January 10, 2004
Details: 80 pages; ISBN: 1841768235 |
|
|
Model, Images and Text Copyright ©
2004 by Jeffrey Oliveira
Page Created 28 December, 2004
Last Updated 28 December, 2004
Back to HyperScale
Main Page
|
 Home
| What's New |
Features |
Gallery |
Reviews |
Reference |
Forum |
Search
Home
| What's New |
Features |
Gallery |
Reviews |
Reference |
Forum |
Search