|
Hobbycraft's 1/48 scale P-40B
AVG Hawk 81
by Dale Cleary
|
 |
|
Curtiss Hawk 81
(P-40B)
American Volunteer Group, China |

HyperScale is proudly supported by
Squadron.com
Here is my Hobbycraft P-40 Tomahawk in AVG markings I built back in
2000.
I used the Cutting Edge resin cockpit, and Verlinden 1/48 PE ring and
bead gun sights. Decals are from the Academy version of the same model.
I will discuss these decals at a later time..
The Hobbycraft 1/48 scale P-40 is a fine kit, although not without its
faults. The first fault that evident is the incorrect frame work on the
windshield. The Tomahawk had the earlier, curved windshield seen on the
Curtis Hawk. This framework needs to be removed, or replaced, if one
wants a somewhat accurate P-40 Tomahawk.
The other fault is the external trim tab on the port aileron. This needs
to be sanded off and a correct tab needs to be scribed into aileron in
its proper dimensions. The air intake above the cowling can also use
some reduction, being that it appears to extend too far forward. This at
least is how it appeared to me.
The cockpit supplied in the kit is basic, although does contain enough
equipment to make it passable with a set of PE seat belts.
Construction began with my Dremel tool being used to thin the
sidewalls in preparation for the Cutting Edge resin cockpit. When this
was done I commenced sanding the framework from the kit windscreen. This
was going well until I became too complacent and snapped it in two! I
couldn t be bothered sending away for a new one, so I just went and
bought an Academy Tomahawk and began, more carefully, to remove the
frames. Happily this went as planned, and after the frames were removed
I then polished the clear plastic with toothpaste and it came up a
treat.
I then fashioned a bullet proof, glass plate from clear plastic sheet
and attached it to scratch built frame and installed it within the
windshield and set it aside.
I then painted and assembled the Cutting
Edge cockpit. This was most enjoyable because this particular set is
lovely. This was painted interior green and the various details were
painted using colour references. Seat harness was painted off white with
buckles detailed in silver. The instruments were detailed with artist s
pencils and ClearFix was used to emulate glass on the dials. Various
wires were installed here and there around the dashboard and butts
representing the cowling machine guns were fashioned and installed to
complete the job.
The next task to accomplish was to correct some panel lines around the
cockpit. (I can t remember exactly which panel lines these were at this
later stage. However it was done.) With this complete the cockpit was
fitted and the fuselage cemented together. The nose machine gun barrels
were then drilled out and fitted to the model. I also made a blank sheet
to fit in the rear of the chin intake so that one could not see straight
up into the model from underneath. This was painted black.
Next the exhaust stacks were drilled out and fitted.
Wing assembly followed. I had considered fitting canvas covers into the
wheel bays, but then in mad build decided on another aeroplane that
possibly saw harder work, I decided to leave them out. As a consequence
the bays were painted in the standard interior colour and weathered.
Wings were then cemented together and the fit was perfect. The kit
undercarriage was lacking some struts for the rear undercarriage doors
and these were fashioned from sheet plastic to await final assembly. I
drilled out the kit wing gun barrels at this time and they were bagged
and set aside.
Construction then moved apace with no real problems being discovered.
The next step was painting. I had
originally intended to build this aeroplane as an RAAF machine fighting
in North Africa. I had made my own decals, read up on my references etc
in preparation for this, but a book changed my mind. While I was working
on this P-40 I had picked up my old copy of Col Robert Scott s book God
is my co-pilot, detailing his adventures with the AVG. The RAAF idea was
ditched rather quickly after that, and armed with a couple of photos of
an AVG machine covered by Academy s decal sheet, I was all set and
bursting with enthusiasm.
Unhappily the shots I had at this time must have been slightly soft
focus, because I could have sworn the camouflage was soft edged. Not to
worry, I had fully intended to go for atmosphere, more than straight out
accuracy on this kit anyway. I had the idea that I wanted to show the
hard work evident in Scott s history of the AVG. This kit was going to
be heavily weathered. Right down to the rubber surrounding the wheel
rims being frayed.
I used Gunze Sangyo and Tamiya paints for all painting on this model.
Aside from the metal base coat and propeller, which was Model Master
Aluminium, and MM exhaust. Here is how it was done, in fact how I always
paint.
The fabric covered areas were first painted linen, followed by a dull
red to represent a factory base coat. Once this was done they were
masked and the metal frame of the aircraft was sprayed Model Master
Aluminium. This showed up any areas in need of attention. Happily
everything was okay and I was able to continue.
The rest of the airframe was then given the dull red undercoat used
earlier on the fabric surfaces. When this was complete I painted the
underside Gunze RAF Sky.
Tamiya Dark Earth was used on the upper surface areas, as was Gunze Dark
Green. The masking was done with the Blu-Tak technique and went
according to plan.
I then masked off the areas where the original RAF roundels had been on
the wing tops, and began to weather with exposed paint work. I used a
number of methods when doing this. I mixed about 6 shades of each colour
and then set about fading the camo . I also used pastels to both
lighten, and darken, areas exposed to harsh sunlight. The fabric
surfaces received the same treatment.
When all of this painting and nearly to the point of being complete, I
began to rub the paint work back in order to thin it. I utilised
sandpaper to thin and expose the undercoat. This was done to places
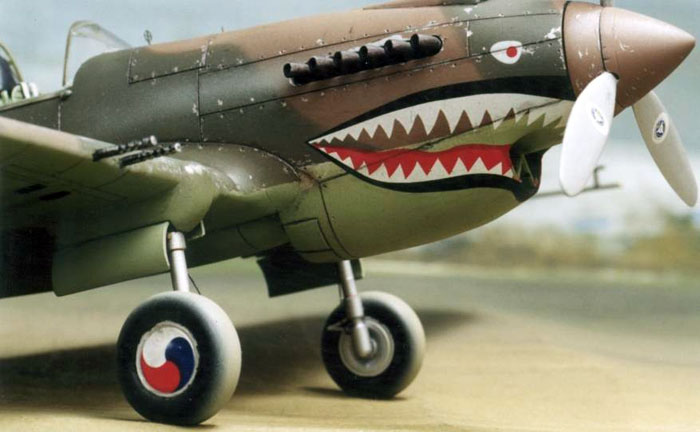
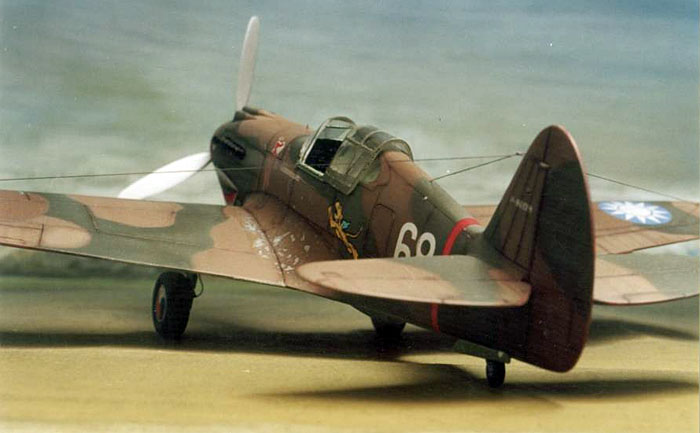
where harsh ware and tear show themselves. You can see this in the
photos, especially around the fabric surfaces.
I then gave the model a clear coat of Gunze gloss in preparation for the
decals.
Having decided on the Hell s Angels , AVG version, I began to use the
Academy decals. These decals were like cardboard, in fact the thickest
decals I have seen. I had to assist these decals by using Mr Mark
Softer, and pressure from a damp clean cloth. Believe me when I say that
in order to get these things to sit properly, I literally spent hours
watching over them and helping them settle. I am happy to say that after
much effort they did in fact settle, and there was no silvering. The
model was then given a clear flat coat and the weathering was completed
using artist s pencils, an oil paint wash of burnt umber around the
engine, and pastels. The exhaust was sprayed on using a diluted Gunze
light grey mixed with clear flat. Exhausts were painted Model Master
exhaust and dry brushed with Model Master gunmetal. I then exposed some
metal around areas that see wear and tear when pilots and ground! crew
walk on aircraft. This was done using a scalpel. A scalpel was also used
to expose the metal coat underneath around the cowling. The model was
then given a coat of Gunze Flat Clear.
The undercarriage was completed next,
painted Model Master Aluminium and then set in place. Complete with the
scratch built struts attached to the rear undercarriage. I then painted
the wheels and applied the decals. After this was done I then attacked
the rubber around the rims with a thin brush. I had been studying a beat
up car on the street and wanted to represent the frayed rubber around
the rims. This can be seen to good effect in the shot from below the
front port quarter. I also left things I would normally have corrected,
such as the areas where the spinner connected to the sprue. I decided
that when painted, they looked like dents. You can also see these in the
aforementioned shot. I quite like the effect. I even attached the brake
lines as if they were in need of help. Looking rather ragged really,
just as I'd wanted.
The final things added were the Verlinden ring and bead sights, an
aerial made from invisible mending thread and then sprayed gunmetal. And
wing gun barrels and the tail wheel.
The kit was later entered in an IPMS contest, and I was most pleased
when one of the judges told me he thought it was going to take off!
Of course later I was to get a better
quality photograph and was saddened to see that the original camo was
hard edged!
Oh well, it was an enjoyable project and
I would recommend both the Hobbycraft P-40 and the Cutting Edge cockpit
set without hesitation.
World War 2 US Army
Fighter Modeling
Modelling Masterclass |
|
|
|
|
Authors: Jerry Scutts, Brett Green
US Price: $29.95
UK Price: £19.99
Publisher:
Osprey Publishing
Publish Date:
September 25, 2003
Details: 128 pages; ISBN: 1841760617 |
|
|
Model and Text Copyright ©
2004 by Dale Cleary
Images Copyright ©
2001 by Pieter Stroethoff
Page Created 07 September, 2004
Last Updated 08 September, 2004
Back to
HyperScale Main Page
|
 Home
| What's New |
Features |
Gallery |
Reviews |
Reference |
Forum |
Search
Home
| What's New |
Features |
Gallery |
Reviews |
Reference |
Forum |
Search