"As you know, you go to war with the army you
have, not the army you might want or wish to have"
U.S. Secretary of
Defense Donald Rumsfeld
Although this quote is recent, the sentiment is an
equally valid characterization of why, six decades earlier, the P-40 was
pressed into battle on every front despite its lackluster performance.
It is also a poor excuse for the state of affairs of the U.S. Army Air
Corps prior to Pearl Harbor even though the drums of war had been
beating for years and Britain was not yet out of her times of toil,
blood, sweat and tears. I have an old book that I picked up at a small
town public library liquidation sale for a nickel. It is titled
Victory through air power, written by Major Alexander P.de Seversky
and published in 1942. Many of you may recognize his name as the one
legged WWI ace fighter pilot, a Russian emigree, visionary, holder of
numerous world’s speed records, and founder of Seversky Aircraft
Corporation which became Republic Aircraft Corporation, the builders of
the P-47 Thunderbolt, the first American fighter to measure up to the
Axis fighters. From Major de Seversky’s writing I have compiled the
following poignant passages which I now quote,
The national genius of
supersalesmanship played a sad trick on the American people, betraying
them into complacency. For years they have been lulled into the belief
that their military aviation was not only equal but superior to any in
the world. In the light of what airmen knew than, and even laymen know
now, it is shocking to recall, for instance, that in the autumn of 1939
a national magazine boasted that “Our War Birds Are Best.” Only our
sedative adjectives, alas, were best....
The P-40's - called
Tomahawks by the British -had been widely hailed as our first line of
defense in the skies, and cumulative evidence of their inferiority in
action has been openly resented on this side of the Atlantic. They
consequently offer a fair test of American standards of realism in
relation to aircraft production. American newspapermen confirmed what
aviation men knew in advance: that the P-40's were lamentably inferior
to the British pursuits. Hundreds of these craft sent to England were
not even uncrated for months, despite that nation’s lie-and-death hunger
for fighter planes. They were adjudged obsolete and put “on ice” for
possible auxiliary uses. When some of them were assembled in England as
trainers with the Army co-operation force, American publicity tried to
convey that they were being used with the regular Fighter Command over
the British Isles!
For nearly a year the
British did not know what to do with these pursuits. Finally they sent
them to Libya, where they proved a match for the obsolete French and
Italian airplanes. In the British offensive in North Africa in the
winter of 1941-42, the P-40's served well enough as a kind of cross
between pursuit and attack airplanes, flying at low altitudes and
dealing with Stuka dive-bombers and other inferior Axis aircraft.
What had been advertised
as the very backbone of our pursuit forces thus turned out to be a mere
accessory of the land forces, useful within a most limited scope. It
was a left-handed compliment, indeed, which General George H. Brett
paid this plane when he declared, in a London interview, that “the
present operations in Libya at least ought to prove the quality of our
material for that theater of war.”
de Seversky makes another points regarding the sad
state of affairs of the Army Air Corps and they include the fanatical
and hard headed decision to only accept liquid cooled engines as the
power plant de rigeur for fighters despite the fact that proven
air cooled engines were available delivering almost twice the
horsepower. He also assailed the anemic armament, the lack of armor, of
self sealing tanks, the lack of hard points for bombs and rockets, and
the short range of American airplanes. His words of admonishment were
accompanied by his own solution to the problems he had listed, the P-47,
an airplane with the biggest, most powerful radial supercharged
air-cooled engine available and bristling with guns from wing tip to
wing tip, with a range that allowed it to escort bombers behind enemy
lines, and enough armor to protect the pilot. His bitter complaint was
that he had proposed the Thunderbolt to the Army in 1938 and had been
rejected off hand because it had the wrong engine.
The original P-40 had no armor plating, no bullet
proof windshield, had two 50 caliber nose guns and only two 30 caliber
machine guns on the wings and lacked self sealing tanks and thus were
considered unsuitable for combat. The P-40B was a catch-up design that
made the original design suitable for combat with the addition of more
armor, self sealing tanks and two more wing guns. The P-40C was another
stop-gap measure based on the existing P-40B to address some of the
deficiencies pointed out by de Seversky and only 193 were built; it had
a 52 US gallon belly drop tank and the internal tankage was increased to
correct the short range limitation of the original P-40B; also,
improvements were made to the self-sealing fuel tanks. By late 1943 the
Tomahawks had been designated as “limited standard” and were relegated
to stateside training units. Despite its lack luster performance, the
aircraft was rugged and well built and it fulfilled its duty in far away
fronts where the enemy didn’t have front line fighters.
To be or not to be, that is the famous line from
the Bard that applies to so many things in life, and it aptly applies
when deciding to built an early P-40, Monogram or Academy. I wrestled
with these two kits for hours, looking at them in their boxes and trying
to decide which one was the lesser of two evils. My Monogram kit is a
late incarnation: the plastic is too thin, the wings are warped, the
detail is soft, and the alignment of the parts is disastrous. The fact
that it has engraved panel lines and rivets doesn’t bother me but the
flimsy and deformed plastic does.
The Academy (Hobbycraft clone) has much better
quality plastic and a superb fitting plus it has recessed panel lines -
the thing begs to click together. The problem is that this kit’s
shortcomings make it into a toy more than a true contender: the wing’s
angle of incidence (or attack) is too high making the wing’s leading
edge ride too high on the fuselage and worst of all, it gives the
airframe a rather sleek look belonging more to a late variant P-40
whereas the early P-40 had a pudgier look with a deeper fuselage.
Talking about bellies, the Academy belly belongs to a later P-40 variant
and it is not a B/C belly, and some of the panel lines are either
missing or in the wrong place, the windscreen is wrong, and on and on.
There is an article right here in HyperScale
written by Rick Barnds on
how to apply
surgery to the Academy/Hobbycraft kit to lower the wing’s
leading edge, the worst offense, and to rework the bad belly. I printed
the article and I read it and reread it cringing at the idea of doing
all that cutting so I decided to build the Monogram kit and use bits
from the Academy. At least the Monogram kit is correct in every shape
and panel line. After I glued the Monogram wings together I noticed that
the bad fit would take serious effort to fix, that the alignment tabs
were so deformed that they didn’t click together, and that the wings
were still warped.
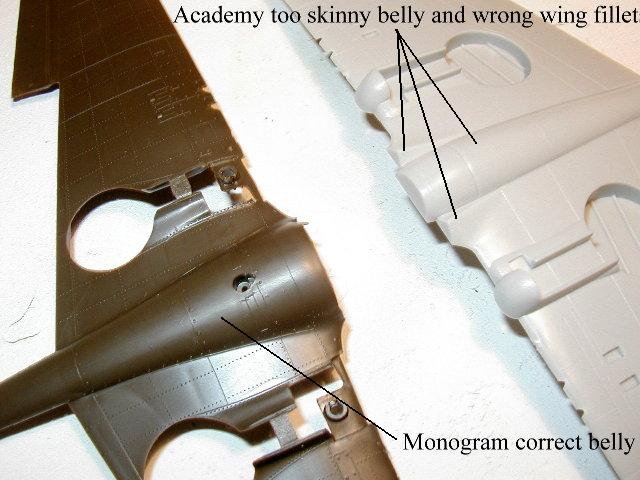
Back to the Academy kit. At this point I had
determined that I had two worthless kits so if I were to slice and dice
and glue back things together and fail, I wouldn’t lose two kits but two
headaches and I would get to keep the decal sheets. With the
determination of a man who has nothing to lose I cut the belly out of
the Monogram kit, cut the belly out of the Academy one and grafted the
green Monogram belly into the gray Academy wings. To my surprise, the
implant actually fitted like a glove. By that I mean that after some
putty and sand paper, both parts matched rather well.
Now I had an Academy wing with a correct P-40B/C
belly. This cut and paste stuff isn’t so hard, I told myself, so I
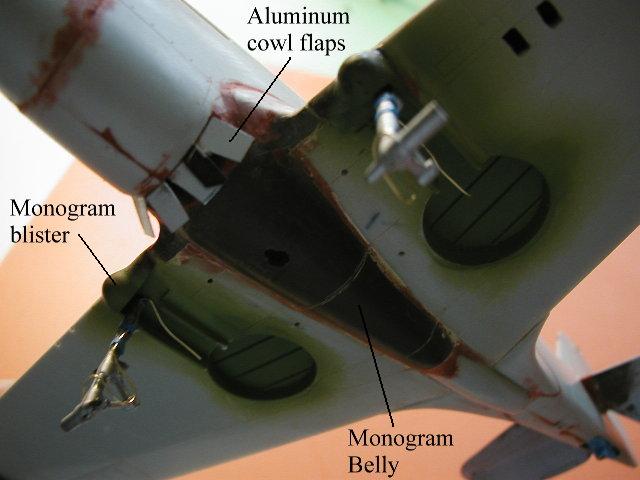
decided to do more surgery. In order to close the gap between the bottom
end of the fuselage cowl and the start of the belly, I cut one Monogram
tire halve in half and I glued it to the beginning of the belly to give
this area a rounded and flush look. Because I had trouble placing the
wing with the new belly onto the fuselage, I removed the molded in
closed cowl flaps and rebuilt them open using beer can aluminum after
the wing was in place.
The main landing gear pods on the Academy wing have
a funky shape and ride too high on the wing’s leading edge. These
blisters should be below the wing and mesh with the wing’s leading edge;
they don’t go over. I hacked the Academy’s blisters off and grafted the
ones cut out from the Monogram kit. Again, to my surprise, the fit was
very good. Now I had an Academy wing with the correct wheel well
fairings and belly. Being on a roll, I used the Monogram kit as a guide
to erase bad panel lines and scribe correct ones in the Academy
airframe. I have never done scribing before so this was a good learning
experience for me.
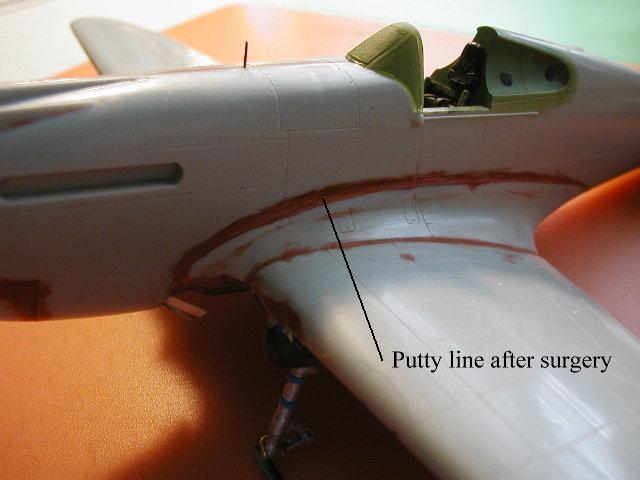
Inebriated with success I decided to really do some
damage so I followed the instructions in Rick Barnds’ article and cut
the wing /fuselage roots from the fuselage using my newly discovered
scribing tool. Before that I had to obliterate all cockpit detail inside
the fuselage halves, but not to worry because I had a True Detail
cockpit on standby. I glued the cut out wing/fuselage roots to my wing.
Following Mr. Barnds’ advice, I thinned down the
wing/fuselage fillets so they could blend with the new scratch built
fuselage sides that would fill the void left when the leading edge of
the wing were glued to the fuselage in a position lower than Hobbycraft/Academy
had intended. This new location gives the model a deeper fuselage and
captures the fatter look of the B/C series.
After all this cutting and grafting this kit had
more Bondo that my first car in college and I spent a good amount of
time sanding, refilling, sanding again, refilling and sanding again to
get all the scars out. If you have an aversion to putty filler and are
in a hurry, please do not attempt to build your own Frankenstein; treat
yourself better and go buy a Tamiya or Hasegawa kit.
The pundits say that the Academy/Hobbycraft spinner
is not pointy enough so I used the Monogram spinner and propeller
attaching it to the nose with a brass tube shaft. I had to sand down the
nose around the spinner a little bit to flush the spinner to the
fuselage.
I used the Academy/Hobbycraft exhausts pipes after
drilling out the holes. These pipes look too big but I had no choice;
when I tried to use the Monogram pipes, which seemed to be in the right
scale, they were so out of round and deformed that they were useless.
Moskit pipes are always the best but this Frankenstein kit didn’t
deserve the expense of fancy parts; it was more like graveyard parts for
this project.
The Academy horizontal tail has no panel lines
while the Monogram is full of them, albeit engraved, and has the texture
of a porcupine with all those rivets on it. I decided to use the thinner
Monogram tail and, still tipsy with my previous successes, I cut the
elevators off with the scribing tool and repositioned them in the down
position. I sanded away all engraved stuff and re-scribed the panel
lines.
The main landing gear legs and doors are from
Monogram and the leg bracing is from Academy plus a few scratch built
parts made out of brass wire. Despite their age, the Monogram gear legs
and doors are better molded than Academy’s.

I decided to build a P-40C whose looks can be
differentiated from a B only by the presence of the belly tank; the
other differences are internal. There is irony to ponder here; Monogram
labels its kit as a B but comes with the belly tank. Academy labels its
kit as a C but has no belly tank. I used the Monogram belly tank and I
drilled holes in the tank and the belly and added sway braces and a fuel
line built out of brass wire. Now the Academy kit does look like a
P-40C.
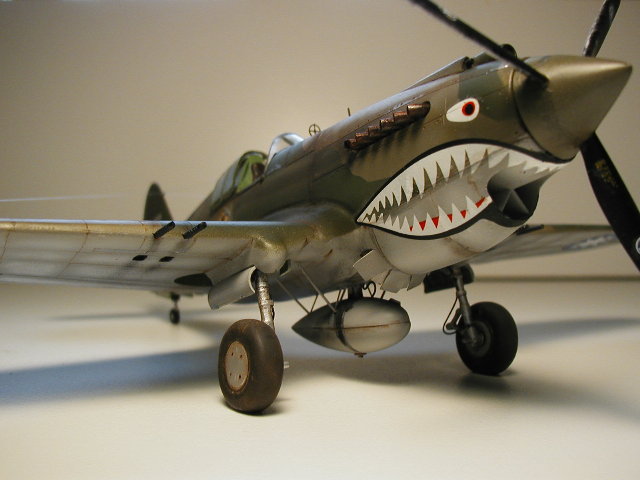
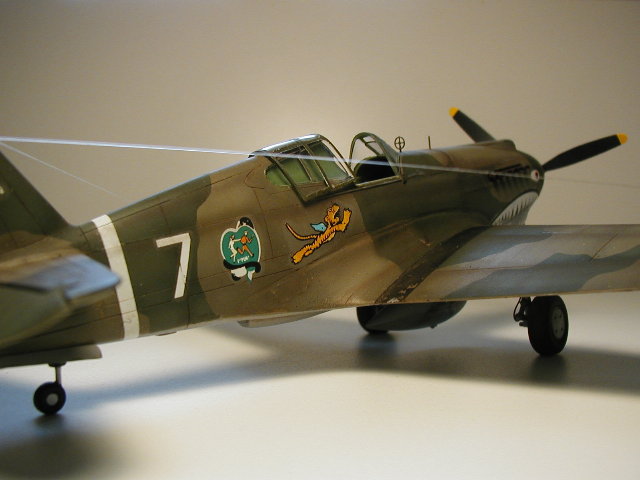
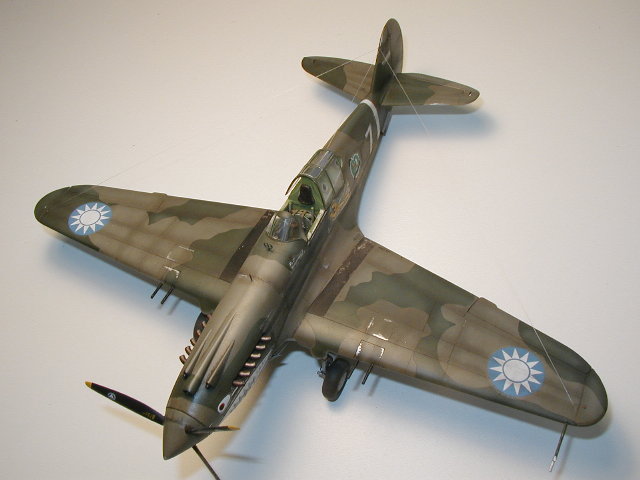
I went for the A.V.G. aircraft belonging to Robert
H. Neale, 1st Pursuit Squadron “Adam and Eves”, June 1942,
that came with the Academy’s decal sheet. The other option was for
another A.V.G. plane flown by Charles Older, the famous White 68. When
it comes to painting A.V.G. camouflage there are as many paint recipes
as chicken recipes. The original colors were Dupont enamels that tried
to mimic the standard RAF camouflage colors. For my P-40 I went with
Tamiya Sky Gray for the bottom and Model Master acrylics, field drab
FS30118 and green FS34079 for the top colors. Are these the right
shades? I don’t know and your guess would be as good, or as bad, as
mine.
I used Cutting Edge Black Magic pre-cut masks (
CEBM48153) for the Hobbycraft/Academy kit. These masks are a time saver
and I highly recommend them but don’t do what I did: when applying the
base top color don’t try to guess where the darker color is going to go
because you, like I did, will guess wrong and will miss some areas.
Paint the whole top in the base color (in my case the field drab) and
don’t try to save paint. I had to go back and retouch the bold spots.
This time I tried a new painting technique. First
I sprayed the colors as they came out of the bottle. Second, I mixed
the base color with a little bit of white (that famous 10% reduction for
scale effect) and sprayed this mixture in the center of all panels
leaving the original paint on the edges. This produces a checkered
look.. What I really like about this is that if the final effect is too
garish because the dark and light colors are too contrasting, it is
really easy to come back with the original base color diluted with
thinner and spray the whole thing with it. Layers of this thinned down
coat will blend the colors and eliminate the excessively checkered look.
The weathering was done using the usual techniques:
Future clear coat, decals, wash with acrylic paints diluted in soapy
water, dull coat, more oil stains and chips and finally, a dusting with
MIG powder pigments. I used MIG pigments to simulate smoke stains, dust
and dirt.
About the Academy decals, I swear that I will never
used them again. They are thick, they don’t react too well to solvents,
they silver, and their glue is too strong. Placing the decals in place
is like throwing pancakes on a table from across the room and hoping
that they will land right on the breakfast plate; if you miss, they are
almost impossible to relocate.
I used a neat trick to tie the three antennae at
the top of the vertical fin. I cut a sawing needle and inserted the
head with the eye in the fin so I could thread the monofilament lines
through it. This embedded needle head provided a strong anchoring point
that let me tight the antennae without fear of breaking anything.
Did I miss anything? Sure I did, as usual. There
is a retractable landing light under the port wing. I missed making the
kit’s original round panel into this light and to add insult to injury,
a decal covers half of it. Next time I may remember to drill it out,
put a backer plate behind, add some aluminum foil and fill the hole with
Kristal Klear.
Monogram or Academy. Which kit would I recommend?
I would recommend neither.
If you can find an old issue of the Monogram kit,
the closer to its original birth date of 1964, the better off you are,
then buy it and build it. Before the molds wore out the Monogram kit was
a masterpiece but today’s kits are so badly deformed that they are not
worth messing with. The Academy/Hobbycraft will build with no fuss and
make a good looking model but will not stand close examination by
anybody who knows anything about P-40’s; so if you build it, don’t show
it to your modeling friends (let it be your dark secret, tucked away in
the back of your model shelf).
Trumpeter’s new P-40B is the newer and best hassle
free option. I don’t have a kit yet because I have a few other kits that
I want to build before starting another P-40B but the on line reviews
that I have read and the pictures that I have seen make me believe that
the Trumpeter has become the king of the hill; not because it is
flawless but because it is not as bad as its competitors.
The issues with the Trumpeter offering such as big
rivets, shallow cockpit, small horizontal tail feathers and too wide
vertical fin chord are nothing compared with the modeling shenanigans I
had to go through to kit bash a Monogram and an Academy together in
order to get something that resembles an early P-40. At least the
Trumpeter kit has the correct belly and the fuselage is deep like the
real thing so despite any other surgery it may need, it cannot be as bad
as what I had to go through.
References
World War 2 US Army
Fighter Modeling
Modelling Masterclass |
|
|
|
|
Authors: Jerry Scutts, Brett Green
US Price: $29.95
UK Price: £19.99
Publisher:
Osprey Publishing
Publish Date:
September 25, 2003
Details: 128 pages; ISBN: 1841760617 |
|
|
 Home
| What's New |
Features |
Gallery |
Reviews |
Reference |
Forum |
Search
Home
| What's New |
Features |
Gallery |
Reviews |
Reference |
Forum |
Search