|
Hasegawa's
1/48 scale
Curtiss Kittyhawk Mk.I
by Fernando Rolandelli
|
 |
|
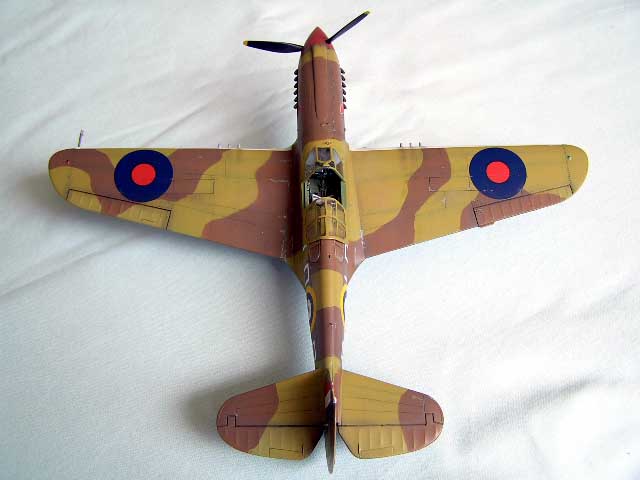
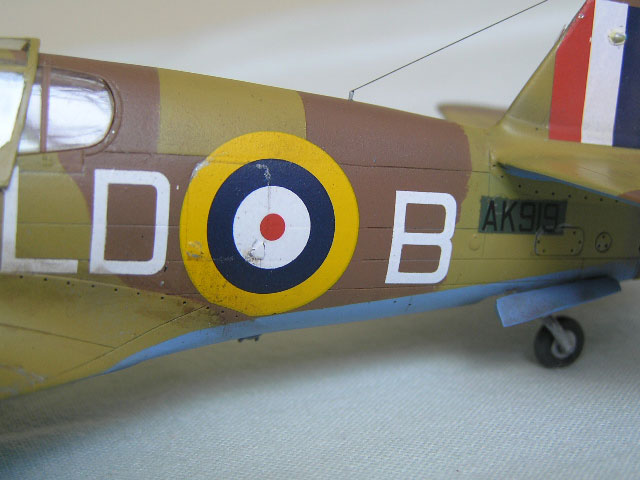
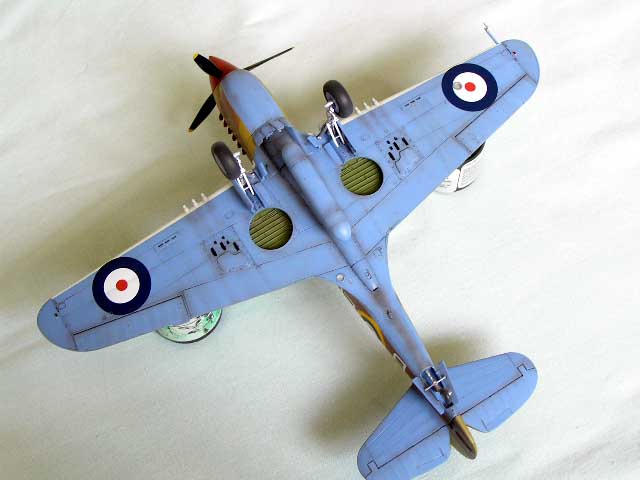
Curtiss Kittyhawk Mk I
AK919 LD-B, Sq. Leader Mike T. Judd, 250 Sqn. “Sudan”, RAF,
Western Desert, May 1942. |

Hasegawa's 1/48
scale P-40E Warhawk is available online from Squadron
Nowadays, American
experts are undoubtedly willing to rehabilitate the P-40, formerly one
of the “culprits” of the 1941-42 debacles , as a rugged and reliable
machine which, though outclassed by first-class fighters every where,
could do its job to a fair degree of efficiency.
No doubt the yeoman
services of Tomahawks and Kittyhawks in the Western Desert, flown by
Commonwealth pilots in the early days, and of the USAAF Warhawks later
in the campaign, have contributed to this reappraisal.
Still in the pure
fighter role (the first “Kittybomber” squadron, the famed 112, was
declared operational in the fighter-bomber role later that month), nº
250 Sqn took part, on May 10th, 1942, in a long-range
interdiction mission on German air supply lines, a forerunner of the
better known operations later undertaken by USAAF Warhawks. Ten
machines, fitted with Hurricane external fuel tanks, set out seeking
German transports over the Mediterranean. Finding some 16 Ju-52 escorted
by three Bf 110, they promptly shot down most. Flying AK919, Sq. Ldr.
Judd, though not leading the squadron this time (the honor fell on Wg.
Cdr. H. Mayers) claimed two transports as his first victories. He went
on to claim two more kills with the squadron, while a fifth came while
serving in Europe.
The Kit
Of course, it is the
now well-known Hasegawa 1/48 kit. One arising mixed feelings; it’s been
proclaimed as “kit of the year” by some as well as declared
“unbuildable” by others. As often happens, truth lies in between.
The kit makes extensive
use of multi version molds, making impossible, among other things, to
quote the exact number of pieces involved! More important, in trying to
serve as many versions as possible, the parts breakdown is unnecessarily
complicated. It must be said that the “normal” assembly joints, i.e.,
wing to fuselage, tail planes, fuselage halves, etc., are very good. It
is the self-induced complexity which gives trouble, and has incensed the
modeler community. Having by chance bought the “Dragon USA” boxing, a
little, but very useful, PE set including a good US type harness was
included.
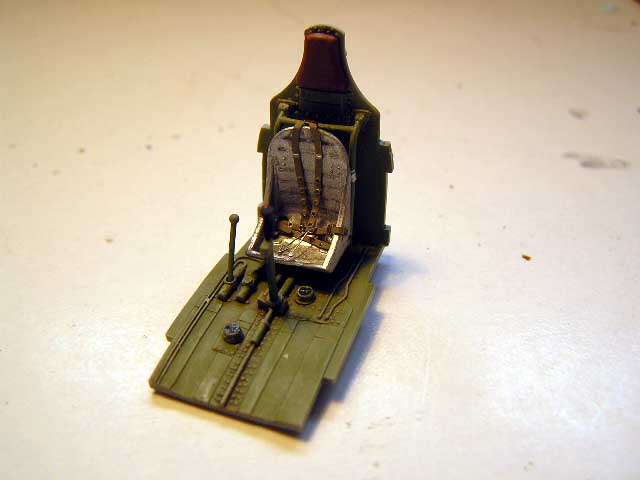
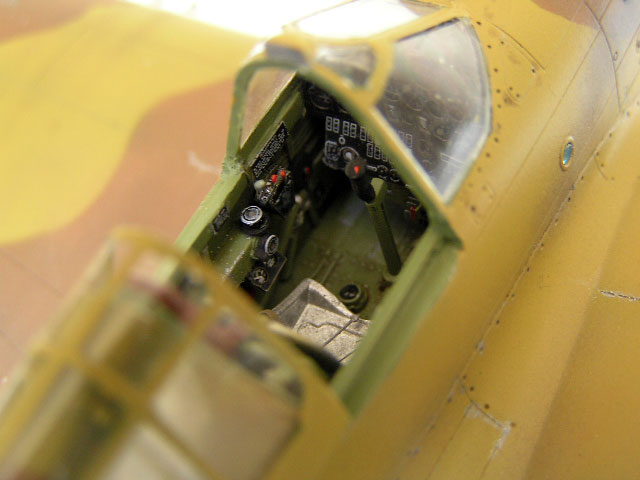
The Cockpit
It is of the “bathtub”
type of engineering. It prevents sink marks on the outside where the
internal detail is, but the resulting cockpit is normally a bit
undersized. This is the case, and it shows in the instrument panel,
small and “compact”. Otherwise, the cockpit detail is very good, though
if you are a hard-core detailer you may be left wanting. I chose to add
a cheap Eduard Pre-painted Zoom set, nº FE 241 which, though designed
for the AMTech kit (I would not rate it as “enough” for that one!) adds
very interesting and colorful details. The instrument panel is a work of
art, though some clever cuts in the cramped cockpit must be done for it
to fit. The panel lacks a coaming, and the kit faithfully reproduces
this; I simply added all the detail –and then some more- to the back of
the PE panel, and replaced the solid gun sight glass for an acetate bit.
The mounting frame behind the seat is too tall –nobody else reported
this, so may be my sloppy assembly- so I cut the braces to size. The
radiator ducting has some nasty seams which are difficult to eradicate.

Click
the thumbnails below to view larger images:
The interior was
painted “Curtiss-Berry Green”, as per the latest fashion, made by mixing
normal Xtracolor Interior Green with some undefined Light Grey. The
radiator bath –where PE facings were placed- and the wheel bays were
also painted this way. The seat was painted NMF; the harness is a Sutton
Hoo type sourced from somewhere else and painted Khaki.
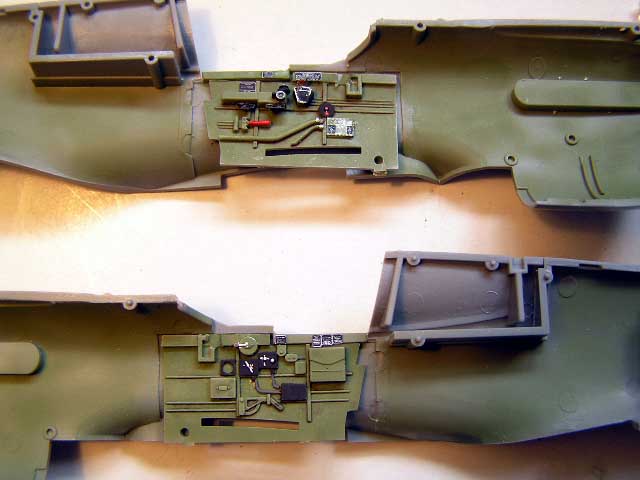
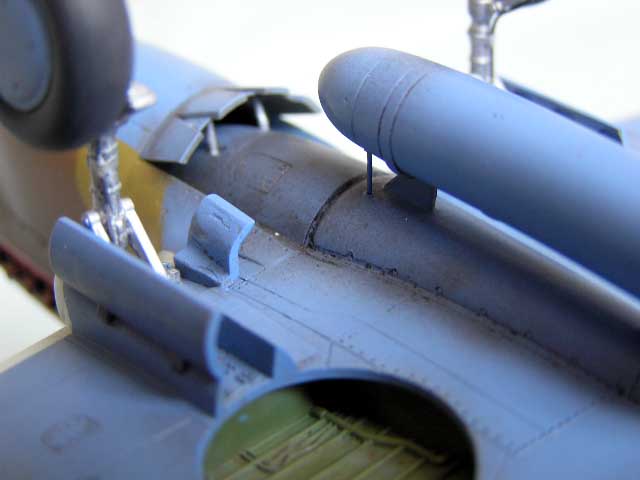
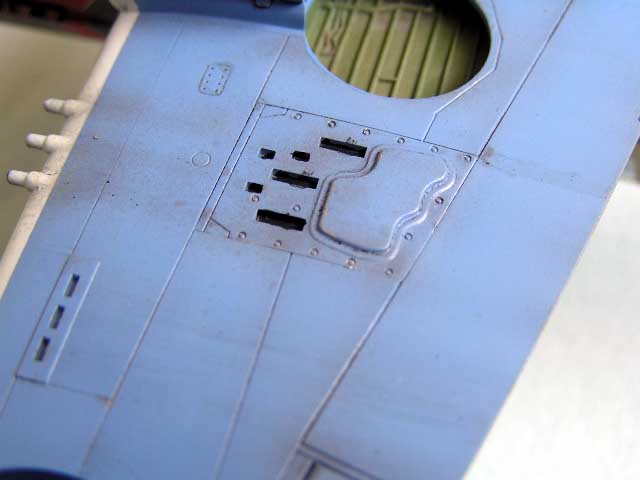
The Airframe
I opted for
“rebuilding” the fuselage halves and then gluing them. It worked with
the rear insert, but not with the quarter light one. I assembled the
fuselage halves and then the quarter light pieces, one by turn. After
much puttying and sanding and priming and rescribing, the assembly
joints seemed OK. The same with the small inserts in the cheek louvers
and the carb intake. After all that fuss I am happy to report that the
wing to fuselage joint was very good, though, of course, I needed some
putty. The spent cartridges exhaust ports insert fitted very well, also,
being the only part of the kit I did not. The tail plane assembly was
also very positive, as was the rudder (though I fitted it at a much
later stage).

At this point I made
the mods needed to depict Judd’s machine. I obliterated the ventral rack
slot (a mistake) and did not open the holes for the braces. Instead I
scratch built the mountings for the Hurricane tank (the front one could
have gone inside the slot, adding to its strength…) I did not have a
proper tank, but I had a SAMI-provided Spitfire “torpedo” tank, which
seems very similar, so it was earmarked for use. The hole for the
missing antennae mast (or it is for a navigation light?) is clearly
shown in pictures of both AK919 and AK846, as is the short antenna
wire.
The canopy is also an
issue. The quarter light windows are reported to be ill-fitting, but I
found no problem with them, provided you sand the ugly rivets in the
recesses. Painting the edge helps eliminate the ugly shiny effect. The
windscreen fits wonderfully. The hood is another thing: it has that
funny angled cuts in the front frame, to accommodate the molded in
triangular reinforcement plates. Why the people in Hasegawa has designed
it that way is beyond my limited comprehension; it means that the hood
can only be posed closed –the thickness wouldn’t allow an option,
though- but even so, it would be incorrect for the early machine the kit
is meant to represent. Anyway, I had bought the usual Squadron
vacuformed replacement, so I hacked off the small plate and that was
it.
This job done, the kit
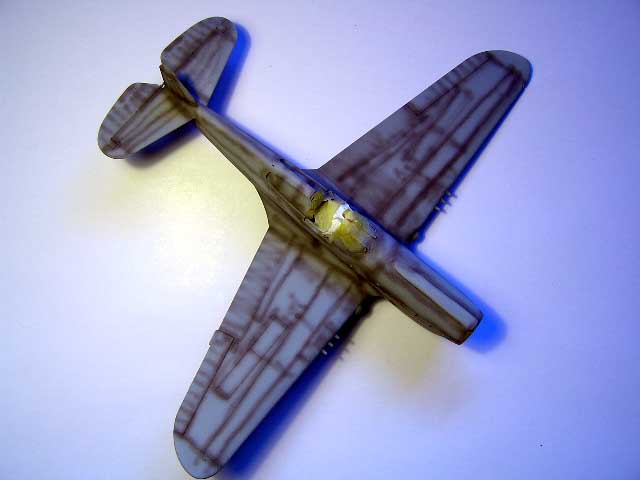
was primed and preshaded.
Camouflage
Painting
What is straighter than
RAF Desert Scheme? But my hopes of a relaxed painting were unfounded.
First, I should decide if this particular machine was one of those
delivered in Temperate Scheme and repainted. It seems that ALL
Kittyhawks Is and IAs were so no much problem with that. But then the DE
should be the infamous one in the DuPont range, and not standard RAF’s!
And the serial number on the port side should be in a DG (again, Du
Pont) rectangle. Still not much of a problem. But a picture of this very
machine in the timeframe I intended to represent showed two things: some
extensive repainting in the rear fuselage –hardly surprising-, as well
as a light painted leading edge! Now, it is common knowledge that the
Yellow IDs were not applied to Desert Scheme Kittyhawks as a norm
(though there are exceptions). Even so, the whole leading edge from
fuselage to where the picture showed was painted (the Yellow ID should
start from the outer gun muzzle) What’s more, the contrast of the
leading edge against the Middlestone was very stark (Yellow tends to
blend, as the outer edge of the fuselage roundel in the same picture) I
opted for biting the bullet and painted the whole leading edge White,
albeit without any confirmation from any other source. It certainly
looks like the picture. The quarter light recesses were painted as the
camouflage goes. Current opinion is that so they were finished at the
factory. Were they repainted with the rest of the airplane, or were they
left in the original colors? In some pictures they do show a uniformly
dark shade…
The only unsolved part
of the puzzle is the color of the undersurface. Would it have been left
in Sky Grey (Du Pont range) even after repainting? Would it have been
painted in some of the elusive Sky Blue shades? In the picture it does
seem quite light, but that can be an illusion. Following Color Police
rules (“deviations from standard must be thoroughly proved”) I stuck to
the standard Azure Blue, though it does seem darker that what the
picture shows.
In modeling terms, all
paints came from the Xtracrylix range. They work wonderfully and have a
glossy finish. If you spray full strength, thick coats, you would be
able to put decals on them without problems. I usually spray rather thin
coats, so the finish is satin, but it accepts gloss varnish easily. Main
disadvantage is that they clog the airbrush tip fairly quickly. I used
normal Middlestone and Azure Blue, and mixed my own Du Pont Dark Earth
with part of FS 30219, part of 30140 (Polly Scale) and RAF Dark Earth.
The Red spinner is a mix of RLM 23 and Black. The model was weathered
with oils, a postshade glaze, and pastels.
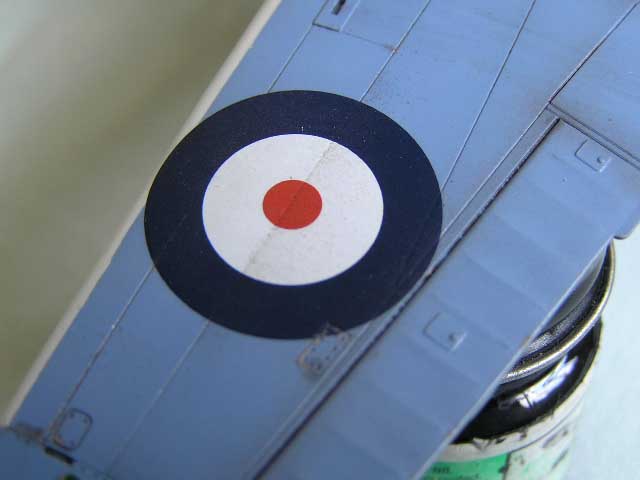
Decals
The kit’s decals are
the slightly better quality Hasegawa ones of recent issue. They are well
printed and seem accurate for the two machines depicted. The camouflage
schemes do not:
1)
I’ve seen no picture of Maj. Rector’s plane, but, if indeed a
two-tone camouflage example (the contemporary and better known 23rd
FG commander Col. Scott’s is an OD/NG machine), it should be painted in
Du Pont DE/DG over Sky Grey. That means approximately FS 30219 and 34092
(both mixed with some of the original RAF shades) over 36473. The
fuselage roundel would be the American one, over painted in… OD nº 41?,
and of course there should not be over painted roundels on wings.
2)
Though there is a picture of Lt. Vaught “Rob’s Robin” showing a
couple of suspiciously darker areas, there is another showing a
perfectly normal OD/NG camouflage. Of course both can be right and the
additional paintwork may have been done after repairs. I would go for
fresh OD instead of Black, then. But upper camouflage color should in
any case be OD nº 41, never FS 34102. Obviously, the reinforcement
triangle in the canopy sill is clearly absent in this early machine.
In my case, I used the
excellent, aftermarket quality AMTech decals, most of which went without
a glitch over the glossy surface. Some images are a bit big, however, a
common occurrence with high-quality decals. The troublesome looking Red
Arrows were cut over the cut-outs in the rear exhausts and the gaps
completed with some Red paint. A big hole was carved around the fin
formation light in the flag marking, which was then filled with White
paint. The lights themselves were first painted Silver and then in the
appropriate color from the Tamiya Clear range (I did not use the clear
replacements provided, but you could) Propeller decals came from a
Superscale P-40E sheet.

After that I proceeded
to fix all the small pieces, undercarriage, quarter light windows and
propeller. The ring and bead sight came from the Eduard PE. The exhaust
stacks were manually bored. Of course I used the provided cranked pitot
tube. I placed the mirror on the centerline as per the picture of AK919
I have, but I suspect it was not a standard one. The picture shows very
clearly the short aerial and another to the wingtip, which I left off,
due to the travel from Nairobi to Buenos Aires the model will hopefully
face in the foreseeable future.
The kit certainly poses
some construction challenges, but, once finished, it looks great.
Problem is, when had
you imagined this would be said of a Hasegawa kit, instead of about some
Czech limited run contraption?
The separated spine is
a classic in modern P-40 kits; even the small Academy 1/72 one has them
(but not the P-40E, which has a wholly new fuselage) Some sort of
multiple cheek sections is also present in the AMT/Ertl or AmTech kits.
But the leading edge inserts for the gun muzzles are very odd. In the
rare event of wanting desperately to build a four-gun P-40N-1-CU, I’d
rather have the appropriate gun as a separated tube and an optional
blanking stub, or even hack it off! Worst idea are the separated spent
cartridges ports panel; only the 22 P-40Ds had their four gun armament
matched by four exhaust port panels. They fit great so I shan’t
complain. But the notched canopy sill is pure insanity. Anyway, if you
sort through the obstacles, you will be rewarded with a very accurate,
well detailed, great looking representation of a P-40E.
I would build several,
and of course cross-kitting would produce a long tailed K or M. But I
wouldn’t replace the Am Tech Es, or the Mauve/Eduard Ns I already have.
-
“P-40 in Detail and Scale Part 2”, Bert Kinzey;
-
“Tomahawk and Kittyhawk Aces of the RAF and Commonwealth”, Andrew
Thomas, Osprey Aircraft of the Aces
-
“Curtiss P-40”, MBI Publications
-
“Warhawk Aces of the Pacific” Carl Molesworth, Osprey Aircraft of
the Aces
-
Hyperscale website Forum (various threads)
-
IPMS Stockholm (P-40 variants research document)
Click
the thumbnails below to view larger images:
Modelling the P-40
Hawk 81, Tomahawk, Warhawk and Kittyhawk
Osprey Modelling 15 |
|
|
|
|
Author: Brett Green
US Price: $17.95
UK Price: £12.99
Publisher:
Osprey Publishing
Publish Date:
January 10, 2004
Details: 80 pages; ISBN: 1841768235 |
|
|
Text and Images Copyright ©
2005 by Fernando Rolandelli
Page Created 20 October, 2005
Last Updated
20 October, 2005
Back to
HyperScale Main Page |
 Home
| What's New |
Features |
Gallery |
Reviews |
Reference |
Forum |
Search
Home
| What's New |
Features |
Gallery |
Reviews |
Reference |
Forum |
Search