|
AMT's 1/48 scale
P-40K-5 Warhawk
by Tom Dungan
|
 |
|
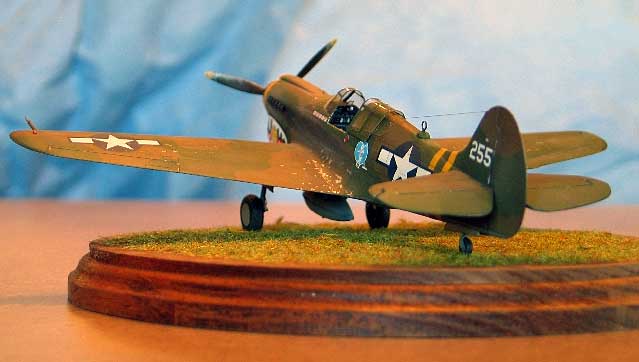
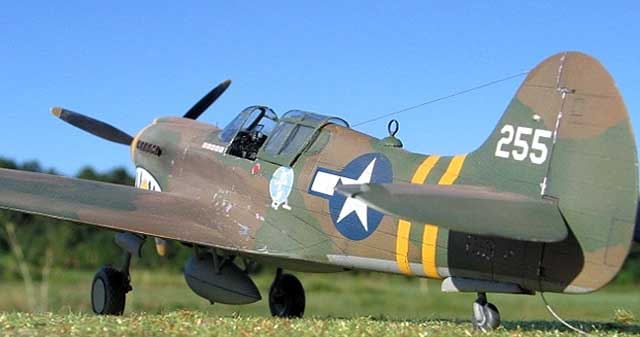
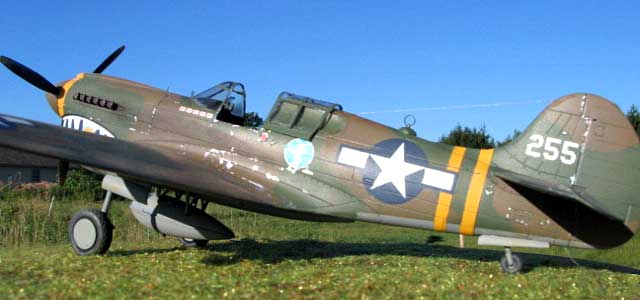
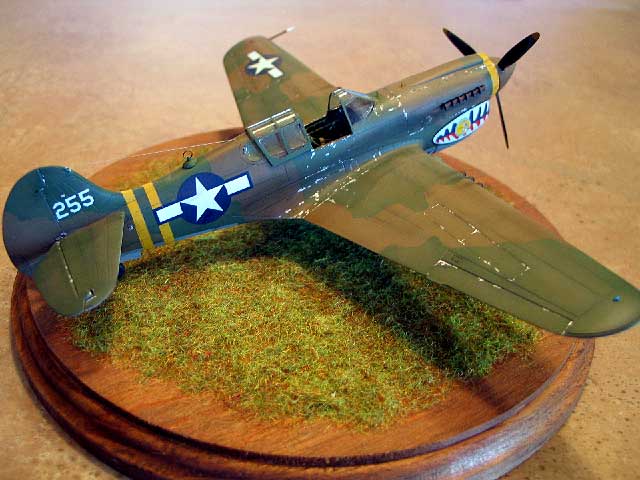
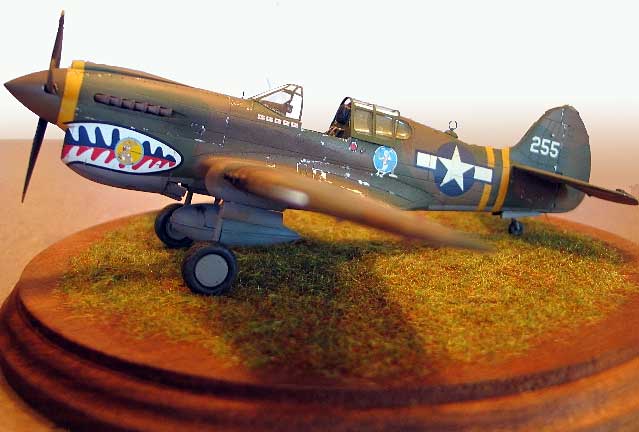
Curtiss P-40K Warhawk |

HyperScale is proudly supported by
Squadron.com
How Decisions Get
Made
After doing a number of builds
specifically for this or that contest, I really wanted to work on
something relatively easy, without pressure. If you are like me,
sometimes the stash of kits waiting to be built becomes so large that I
am afflicted with “Project Selection Paralysis.” Thinking it might be a
good chance to involve my wife in my hobby, I enlisted her help to
resolve the impasse.
“What would you like to see me put together this time?” I asked,
dragging her to the closet to view the stack of boxes.
“How about this one?” my wife asked, pulling out a 1/48 Classic
Airframes ‘Walrus.’
Not exactly the “something relatively easy” I was looking for.
“Er….how about we pick something else,” I gulped.
“Well if you don’t want me to pick, then why did you pull me in here?”
“Come on….just please pick something else.”
After a few more moments (and comments muttered under her breath), she
pulled out the AMT P-40K kit.
“Do this one. I like the rabbit on it,” she said, referring to the
pilot’s personal insignia depicted on the box art.

Rabbits are to my wife what aircraft are to me, so this seemed like a
perfect match of interests. Building the P-40K would be “without
pressure,” because I don’t really care all that much about the aircraft,
other than it looks cool. Accuracy, I thought, would be distinctly
secondary. As a bonus, the kit looked like “something relatively easy.”
We’ll see how that worked out in a moment.
“And no buying aftermarket,” she added. “I don’t want you buying a bunch
of stuff for a plane that isn’t one of your favorites.”
The gauntlet had been thrown, and it seemed like a good chance to show
that I could beat Advanced Modeler’s Syndrome (AMS).
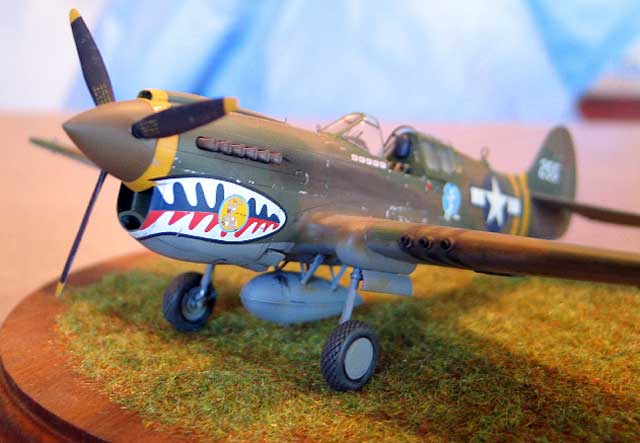
“The Name’s Nollmeyer….”
The AMT kit contains only one decal
option – for Major Ed Hollmeyer of the 26th FS (51st FG), based in China
during 1943/44. Since this kit was being done because of Hollmeyer’s
rabbit, that was no bad thing.
A web search uncovered that this fellow’s real name was almost certainly
Edward M. Nollmeyer, not Hollmeyer. Two books, 1 decal sheet, and the
internet said Nollmeyer, while another decal sheet and the kit said
Hollmeyer. Majority rules – and if the internet says so, it must be
true..
As an additional resource, I borrowed a Squadron P-40 Walk-Around
reference book to add to the Histoire & Collections profile book I
already owned. Strangely, I could not find a single photo of the entire
aircraft, but certainly there must be one somewhere. Figuring I’d find
that photo about two weeks after finishing the kit, I forged ahead.
Background
I’ll spare you all the background
information, since this aircraft needs no introduction. Likewise, the
AMT series of P-40 kits has been reviewed in numerous articles, so I
won’t go into much detail except to provide a refresher.
The AMT P-40K kit features fine recessed detail, but is basically their
generic P-40 kit with a new sprue featuring parts for the larger tail on
the –K. Unfortunately, this is the only –K specific item included in the
kit, which resulted in a number of details needing to be scratchbuilt or
refined, as we will see. The plastic is soft and workable, which was a
good thing for this project. My particular example had a lot of flash on
some of the smaller parts.
Construction and
Compulsion
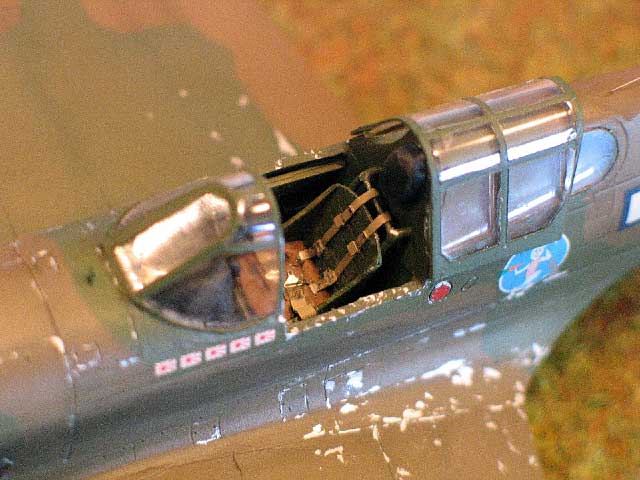
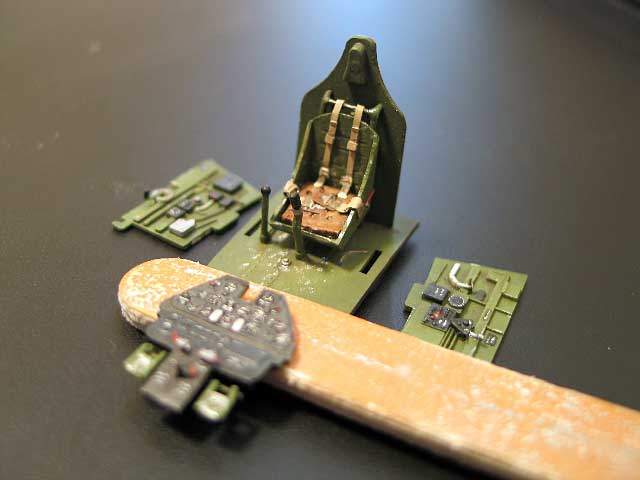
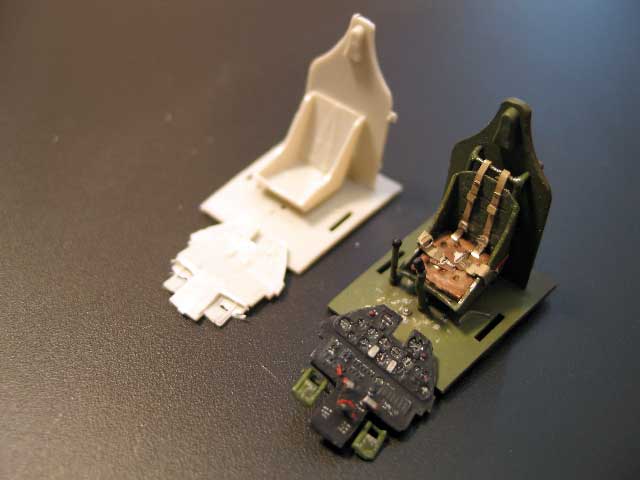
The cockpit provided has decent sidewall
detail and instrument panel, but the pilot’s seat and its mount really
needed some work. My thoughts turned to aftermarket solutions, but with
the gauntlet thrown down, I decided to work with what the kit provided.
The seat mounting was fabricated from brass rod and styrene strip, using
Squadron walk-Around reference photos. The seat itself needed to be
re-sculpted and downsized, and I also added some recessed detail in the
seat back with a Dremel tool. A seat cushion was fabricated from
Milliput, and seat belts came from an Eduard WWII US Belt set (I know, I
know, it’s aftermarket, but I already had them and they seemed so very
necessary!)
Various levers and control thingies for the sidewalls and instrument
panel were added using scraps of metal, and some basic “plumbing” from
fuse wire. The rudder pedals were partially rebuilt using rod &
rearrangement of the kit parts. With detail painting, I realized that an
aftermarket cockpit wasn’t really needed after all. You can see how it
all turned out vs. the original parts in the accompanying photos.
This assembly was set aside to focus on what I anticipated would be the
most difficult aspect of the kit – fuselage and tail assembly.
The original P-40F (?) tail must be cut from each fuselage half. Chain
drilling along the indicated panel line was performed, and the
irreversible cut made.

The tail halves were offered up to the
cut fuselage for a session of dry fitting and sanding. Once satisfied
with the alignment, I reinforced the fuselage with styrene “tabs” to
facilitate locating and bonding of the tail unit. Each tail half was
separately glued to each fuselage half, and then the complete fuselage
halves were joined. Despite all the pre-work, there were still some
areas that were not properly blended between the fuselage and tail –
filler and sanding would be needed.
Of particular concern was the area where the new big tail faired into
the top of the fuselage. Again, despite all the dry fitting and
pre-work, this fairing didn’t blend well. On my example, this seemed to
be a limitation of the way the plastic fairing tapered to a point (or
rather failed to!) Milliput was used to reshape the fairing and fill the
gaps, although the reshaping probably distorted some of the original
outline and profile.
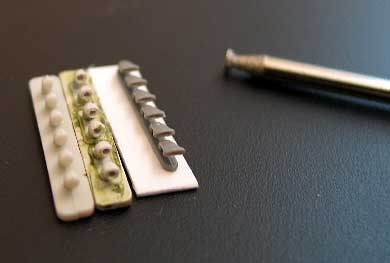 I
wasted some time drilling out the kit exhausts and congratulating myself
on a job well done, then realized that the “curved tube”-style kit
exhausts are wrong for the –K. I pulled some spare “fishtail” exhausts
from a Spitfire kit and used those instead – close enough. The Dremel
tool seen in the photos was then used to drill out the fishtail exhaust
– the first use for this particular strangely-shaped item in the
toolbox. I
wasted some time drilling out the kit exhausts and congratulating myself
on a job well done, then realized that the “curved tube”-style kit
exhausts are wrong for the –K. I pulled some spare “fishtail” exhausts
from a Spitfire kit and used those instead – close enough. The Dremel
tool seen in the photos was then used to drill out the fishtail exhaust
– the first use for this particular strangely-shaped item in the
toolbox.
At this point I realized that I was backsliding into a full-blown case
of AMS (as you no doubt already have, dear Reader). Sleepless nights
were spent agonizing over whether to just slap the rest of the kit
together as originally intended, or to continue down the path of
improvement and accuracy. Meetings at work were spent daydreaming of how
to rebuild those over-simplified wheel wells. I was losing the battle.
With no AMS support group at hand, the die was cast, and it was on to
the wheel wells. These were boxed in with sheet styrene drilled with
lightening holes. Plumbing was added per photos in the Walk-Around
(these Walk-Arounds are really a big part of the problem, aren’t they?).
Fortunately the P-40 is a fairly simple beast in this area.
Now everything was ready for airframe assembly, which was completed with
reasonable success. A lot of dry fitting of wings and fuselage saved
some effort here.
As the kit’s detail parts were added, so other details were added to
them in turn:
-
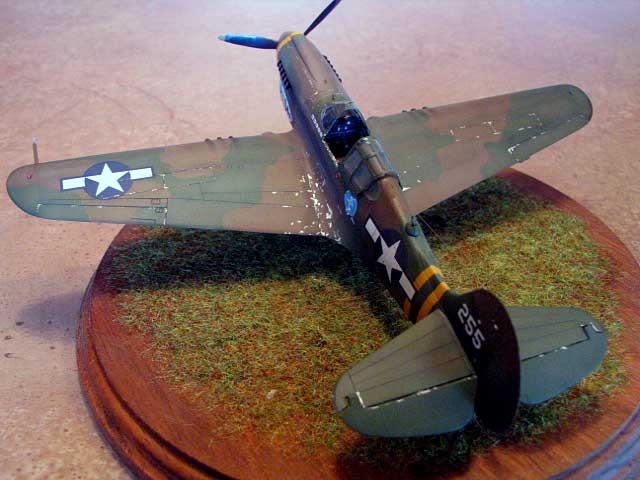
Tail surfaces were separated and
dropped, but flaps were not, as I couldn’t find any photos of
airworthy P-40K’s with dropped flaps
-
Cooling flap actuators were made from
rod and scrap metal bits
-
The kit’s gun barrels and shrouds
were cut off and new shrouds installed using brass tube (more on
this later).
-
Kit canopy was replaced with a
Squadron vacuform item (I already had it in hand, honest), although
the fuselage windows were left in the original clear plastic because
the vacs were too hard to trim to fit flush with the fuselage.
Painting and
Deliberating
 Now
it was time to think about colors and markings. Normally, I do quite a
bit of research before beginning a project, but since I didn’t care
about this P-40... Now
it was time to think about colors and markings. Normally, I do quite a
bit of research before beginning a project, but since I didn’t care
about this P-40...
Unfortunately, the Squadron Walk-Around
book again bedeviled me, as it contained a profile of the aircraft from
the AMT kit, but in an overall Olive Drab on Neutral Gray scheme instead
of the two-tone topside in the kit’s instructions. Which was right?
Inquiring minds had to know!
After an internet and book search, it seemed that the Walk-Around was
the outlier in describing this specific aircraft, and Far East-based
P-40K’s generally, as OD/NG. The general scuttlebutt sounded like
P-40N’s were universally OD in the CBI, but not necessarily –K’s.
Further, it seemed likely that the CBI camouflage would have been a
British or British-equivalent green sprayed over existing olive drab,
rather than spraying a second dark earth color. At least that was my
interpretation of the few sources I checked.
The Histoire & Collections P-40 book includes a COLOR photo on page 43
allegedly showing Nollmeyer’s P-40K, although there are no details
visible that support that specific identity. You would think that the
photographer might have bothered to include the rabbit art in the photo
to clear things up for us, but they just don’t make it easy, do they?
This photo clearly shows a faded drab & medium-ish green application
with hard edges.
Taking stock of the available markings,
it was obvious that the kit’s decals were not up to snuff – with a funky
blue color used for national insignia, and fuzzy, unconvincing unit nose
art. Fortunately, I had other options, as by luck I had these same
markings on TWO other decal sheets. Now, I know what you’re saying: “Uh,
didn’t you say you didn’t really care about the P-40?” Well, that’s
true, but I’m still a sucker for a nice paint scheme and colorful
markings, so I have a few in stored in a box.
Superscale has produced two versions of these markings. One would think
this is the result of improved research and access to information, but
perhaps not. The original sheet (#48-18) shows a two-tone upper camo
with the Stars & Bars outlined in red. The newer sheet (#48-635) shows
solid OD on neutral gray with plain Stars & Bars. Lingering doubts over
the color scheme crept in, but I forged ahead, using the decals from
48-635 on the color scheme from 48-18.
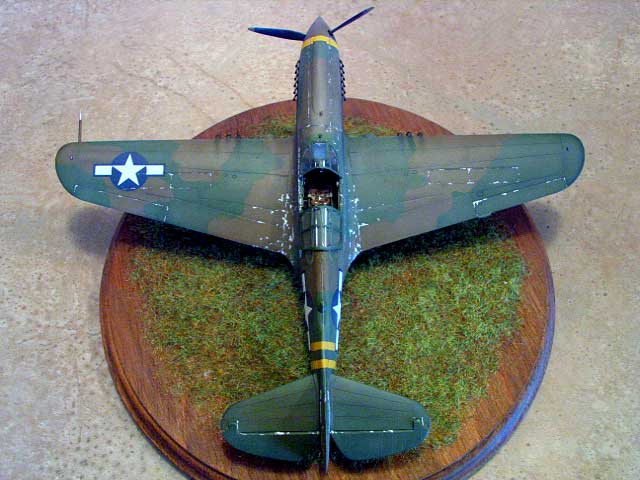
With the Histoire & Collections color photo in hand, I mixed up some
homebrewed colors using the Modelmaster Enamels range, using a Field
Drab/Faded Olive Drab mix, and a Euro Dark Green/Medium Field Green mix.
Unfortunately, I didn’t write the specific mix down, and when it came
time to make some more for touch-up work, I never could get it back
exactly right – so always write down your custom mixtures!
I pre-shaded all the panel lines with black paint, and proceeded to
build up layers of the colors, starting with Neutral Grey on the
undersides, then working up to the OD mix for the topside. Once the OD
was dry, I used Maskol to paint on a mask. This was my first time using
this stuff for hard-edged camo demarcation, and I thought it was darned
near the best thing since sliced bread. Once the green color was sprayed
and dry, I just rubbed off the Maskol. At the end of each color step, I
added a bit of white and tan to the mix and sprayed a bit in the center
of each panel to give a more faded look. Lastly, the yellow fuselage and
nose stripes were painted in a tricky masking session.
Gloss coat was applied, followed by the decals, and then another
protective layer of gloss. A wash of thin burnt umber acrylic was
painted into most panel lines and quickly wiped away. Dull coating was
followed by addition of fluid stains using Tamiya Smoke.
Details and Detours
After so much back-and-forth on paint, it
seemed like I was in the home stretch as I began to attach all the
detail bits.
It seemed like a good time to insert the brass tube gun barrels into the
brass tube gun shrouds already installed in the wing. After a number of
frustrating attempts trying to get a clean cut of brass tube, I finally
had 6 suitable tubes, and proceeded to slide them into the shrouds. As
you might expect, it’s very difficult to position the tubes with a
consistent, proper length standing proud of the shrouds. This is
definitely something that I should have done BEFORE installing the
shrouds in the wing. One tube stuck out too much and wouldn’t budge – at
least until I pulled it out with pliers. One tube stuck out too little
and wouldn’t pull back out at all. One tube disappeared into the shroud
and was not seen again. Eventually I gave up and cut all the offending
barrels down to the shroud using a cutting wheel. Then I used styrene
rod to create 2mm long barrel openings to glue onto the shrouds. Finally
– gun barrels the hard way.
Next I went to affix the radio antenna mast. “Hmmmm….these profiles show
a loop antenna mounted on a fairing, not a mast!” I should have just
said to heck with it and jammed the mast antenna on with the spirit of
most normal modelers out there. But AMS is a cruel mistress, so out came
the filler and I proceeded to fill the mast hole, then build up a loop
antenna fairing out of Milliput. A loop was fabricated from scrap metal
and rod, and touch-up painting ensued.
It was at this point that I rued not writing down my paint mix, because
I had to remix to do this touch-up job, and it took several tries before
I was happy with a matching result. Then, as I removed the Tamiya
masking tape from around the touch-up area, the starboard national
insignia peeled up with the tape! Arrrrgh! “Relatively easy and without
pressure” was becoming anything but!
The search for a matching decal was dicey, but after rummaging through
several kits, and my box of decals, I found a correctly-sized
replacement Stars & Bars, which went on over the original. More gloss
coat, more waiting.
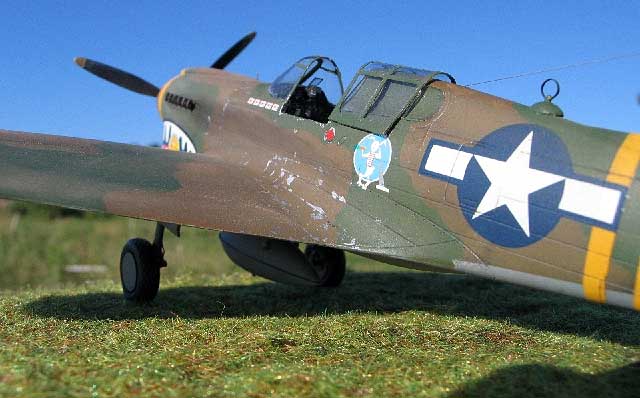
The landing gear went on without incident. I used True Details P-40
wheels to replace the featureless kit items (Again – I already had
them!). Antenna was made from fine fishing line. Paint chipping was done
with MM aluminum and a fine brush. Pastels were used for gun residue and
exhaust, and a little on some panels.
And it was done.
Was it enjoyable? Well, perhaps not
exactly as I had intended, but I ended up testing and refining some
modeling skills, and I like the end result. So does my wife!
Hopefully you enjoyed a story about a difficult build – I like to hear
about the challenges others face and their mental process for building.
It makes us mere mortals feel better to hear that the “pros” do the same
stupid things, and that somehow we are all together in this battle
against plastic.
I do ask myself why I couldn’t just leave some things well enough alone.
The bounty of information now available in print and on the internet
related to our hobby is both a blessing and a curse. It sets the bar
pretty high for what constitutes an accurate model (and I’m not saying
this P-40K is accurate), and therefore compels the more ana…er…AMS-afflicted
among us to attempt to meet it.
AMS may have won this round, but I’m hoping I have an ace up my sleeve
that will stop the madness. Instead of that Classic Airframes Walrus,
next up is another seaplane: the Revell AG 1/72 Be-6 “Madge.” With only
28 non-transparent parts and no worthwhile detail to speak of, it should
just be a passing weekend of fun without the shadow of AMS.
Or will it?
-
“Curtiss P-40 From 1939 to 1945”,
Planes & Pilots Series, A.Elbeid & D.Laurelut, Histoire &
Collections, 2002 (history, line drawings of all versions, huge
numbers of profiles, some photos)
-
“P-40 Warhawk Walk Around #8”, Lou
Drendel, Squadron/Signal, 1996 (B&W photos, good detail coverage
using photos of restored and wartime aircraft, some profiles)
-
Various internet sources
Click the thumbnails below to view
the images full-sized.
Use your browser's Back Arrow to return to this page:
Modelling the P-40
Hawk 81, Tomahawk, Warhawk and Kittyhawk
Osprey Modelling 15 |
|
|
|
|
Author: Brett Green
US Price: $17.95
UK Price: £12.99
Publisher:
Osprey Publishing
Publish Date:
January 10, 2004
Details: 80 pages; ISBN: 1841768235 |
|
|
Model, Images and Text Copyright ©
2005 by Tom Dungan
Page Created 06 September, 2005
Last Updated 05 September, 2005
Back to
HyperScale Main Page
|
 Home
| What's New |
Features |
Gallery |
Reviews |
Reference |
Forum |
Search
Home
| What's New |
Features |
Gallery |
Reviews |
Reference |
Forum |
Search