|
Academy's 1/48 Scale
P-47D Thunderbolt
by
Floyd S. Werner Jr.
|

|
|
P-47D Thunderbolt |

Academy's 1/48
scale P-47D Thunderbolt is available online from Squadron.com
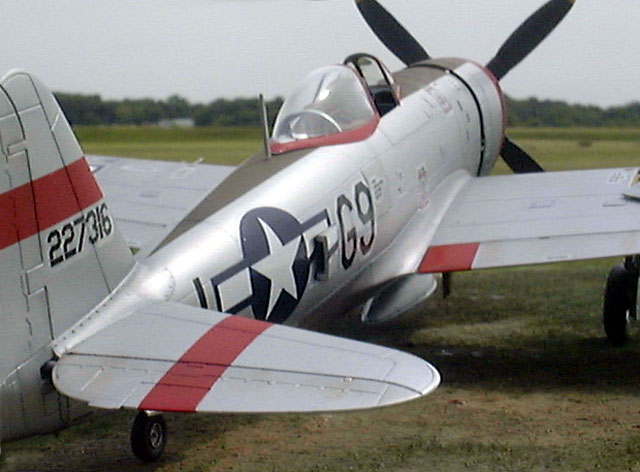
The P-47 was designed as an evolution of the Seversky P-35 and then
the P-43 Lancer. Originally conceived in 1939, the new plane was to
incorporate the new Pratt & Whitney R-2800 and the new turbosupercharger
that had been built for the B-17. This and the eight .50 cal machine
guns caused the Thunderbolt to become the heaviest fighter in the world.
Even though it was heavy, it still was one of the first aircraft to
exceed 400 mph straight and level flight. The initial flight was made on
May 6, 1941. With WWII looming, the Army Air Corps placed an order even
before all the bugs were worked out of the airframe.
The first unit to receive the new fighter was the 56th Fighter Group.
They worked most of the bugs out before being sent to Europe. Even
though the 56th was the first unit with the P-47 it was not the first in
combat with the new fighter. That honor went to the 4th Fighter Group by
two weeks. Where the 56th loved the Thunderbolt the 4th despised it. The
4th was lamented to say that the aircraft had better be able to dive
because it sure couldn't climb.
Because of the design changes to the airframe the P-47 was often called
the Jug because of its resemblance to a milk jug of the time. One of the
benefits of the airframe designs and engine selection was the ability to
take enormous amounts of damage. A drawback of the P-47 was its lack of
range. This was helped by the addition of a keel to the bottom of the
airframe and eventually drop tanks for the belly and the wing shackles.
The P-47 was designed as a fighter interceptor, however, it really came
into it’s own as a ground attack airplane. The P-51 took over the escort
duties and the Thunderbolt was relegated to ground attack. The big
radial engine could take the damage and bring the pilot home. Nowhere is
this more evident than in the MTO where the P-47s destroyed ground
targets in Italy as part of Operation Stranglehold. The P-47 could carry
a variety of armament, including bombs, rockets, and napalm. The P-47
proved itself again in the Normandy operations where the 9th Air Force
took out every type of enemy equipment and transportation system that it
met.
The P-47 was still being used by the 56th until the end of hostilities
in Europe. The 56th accumulated the most air-to-air victories by any
unit in the Army Air Corps using the P-47 exclusively.
The P-47 soldiered on in the Pacific until the end of hostilities. After
WWII the Thunderbolt was quickly relegated to the National Guard.
Finally being taken off the active Air Force roles in 1949.
Next to the B-24, the P-47 Thunderbolt was the most numerous built
aircraft for the US during WWII.
Academy's 1/48
Scale P-47D
|
Upon opening the box you are greeted with five sprues of light gray
plastic that includes two sprues with just about every type of ordnance
that the P-47 ever carried.
There is a clear sprue and a well-printed decal sheet.
The instructions are nicely set up with plenty of assembly
illustrations. Panel lines are nicely engraved and are very delicate.
Let’s get started:
Cockpit
As usual the construction starts in the cockpit. The cockpit consists
of ten parts. Initially, I was going to use the Black Box interior, but
it was designed for the Hasegawa kit and it really would have been a lot
of work to fit properly. So I opted for the kit cockpit, which really
was nice. I did use the seat from the Black Box set as it had molded on
seatbelts. I did have to add some supports to the bottom of the Black
Box seat but nothing that was too drastic and the improvement in the
looks was well worth the time spent there.
The kit seat was nice but didn’t include the seatbelts.
The sidewalls are adequately detailed and when painted look very
good.
I chose to paint my cockpit Tamiya Yellow Zinc Chromate. This was
weathered with Burnt Umber Artist Oils and dry brushed with white and
silver. The details were painted in a semi-gloss black. Details on the
instrument panel were picked out with white. When everything was dry I
applied Krystal Clear to all the gauges. With the addition of the Black
Box seat the interior looked very convincing. You could paint the
cockpit Bronze Green but I liked the look of the Yellow Zinc Chromate
because it just weathers real well.
Fuselage
Once the cockpit is glued together it fits nicely in the fuselage
halves. I did flat sand the one fuselage side to get a perfect fit. I
was amazed at how well the fuselage halves fit together. There was
really no need for filler, but as a practice I always run a bead of
super glue around the fuselage seam. I thought that would be especially
important on this aircraft as this would be my first natural metal paint
scheme.

After the superglue had some accelerator applied I sanded and
polished everything down. Again the fit was perfect to begin with. Now
it was easy to see the milk jug look that gave the P-47 it’s name. The
one area that is annoying is the turbosupercharger exhaust, which had a
1/8-inch gap. This was taken care of with a .005 sheet styrene patch.
Once installed no problem.
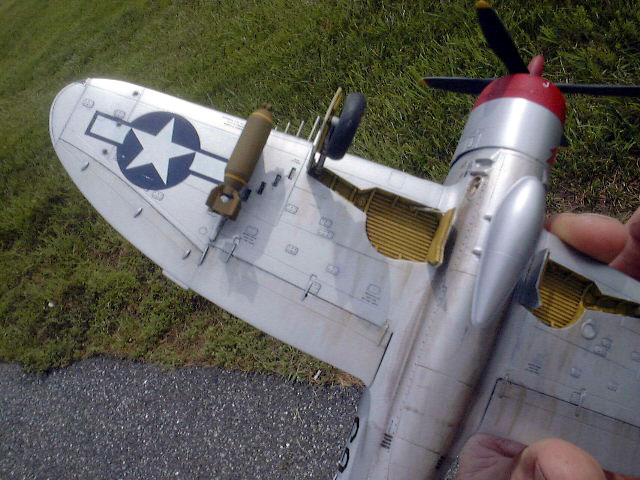
Wings
Before assembling the wings you have to decide what you want for
underwing ordnance. You will have to open up the appropriate holes.
Don’t forget to put the clear parts into the bottom wing panels before
you attach the top wing surface. I used Tamiya Clear Green, Red and
Amber for the identification lights. The landing light got a coat of
chrome on the inside. Another thing you will have to decide on is if you
want to have the gun bays open. I chose to open only one side. I
cemented the gun bay cover on the other side. The guns themselves are
simplistic but they do look nice. I ended up painting the guns Model
Master Gun Metal then the gun trays Aluminum with the bullets Tamiya
brass. While they looked good the gun trays end abruptly at the end of
the bay instead of continuing into the adjacent bay as on the real
thing. See the photos for how I took care of this. The wing halves
themselves fit perfectly again. They required no filler but again I run
a bead of superglue as a matter of practice. The seams are cleaned up
and the gun tube panel is added. Make sure you grab the correct ones
from the sprue. The sprue also has the P-47N gun panel, which does not
fit well. I tried to drill out the gun barrel that is included on the
gun panel and I muffed it up. So I ended up having to remove the gun
barrel and eventually replacing it with tubing. I added these after the
aircraft was painted and weathered.
 Tail Tail
The horizontal tail surfaces represented no big deal. The halves were
joined and sanded and the fit was perfect.
Bring it all together
Joining the wings to the fuselage proved to be the biggest problem
with the whole kit. The fit was not good and required some filling, but
nothing that any model builder with the basic skills couldn’t take care
of. I still felt a little sick to my stomach at this point, after all
this is a natural metal airplane and the filler would be difficult to
work with. On top of that the seam went through the wheel well too. I
flat sanded the wings and fuselage to get the best angle and fit that I
could. Once satisfied with that I then glued the wings on with liquid
glue and let them set for a day. After that I filled the resulting gaps
with 3M Acryl-Blue Glazing Putty. This was initially smoothed out with
acetone I sanded and polished the area. I was quite happy with the
finish, but would wait until I applied a primer coat before claiming
success.
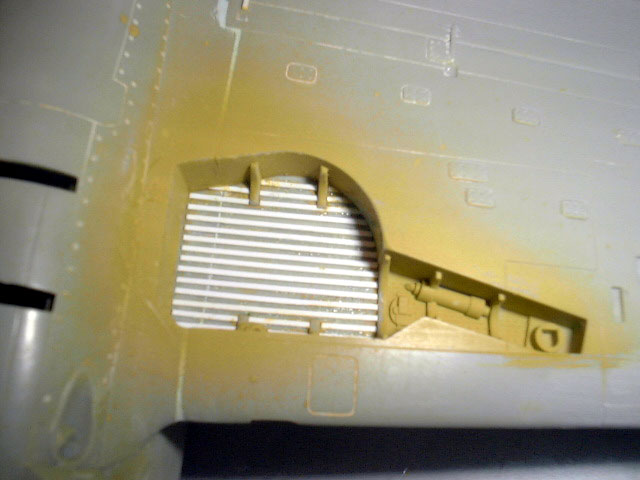
The wheel wells have molded in detail that once sanded with a sanding
stick removes this detail. Now that the detail from the wheel well floor
is gone it is time to put it back in. I used Evergreen .010 by .020
sheet styrene strips. The key to this method is to make sure the first
one is straight. After that I used a scrap piece of the .010 by .020 to
ensure the spacing between each strip was uniform. You will have to cut
pieces to take into account the vertical stiffeners and the shape of
wheel well. I was happy with the way the wheel wells turned out. I then
painted the area with Tamiya Yellow Zinc Chromate and weathered.
The tail surfaces were added with liquid glue. You have to decide if you
want the intercooler exhausts open or closed and attach them.
The Engine
Academy provides you with a nice looking engine right out of the box.
A coat of Model Master Magnesium for the cylinder heads and Tamiya
Neutral Grey for the crankcase made the engine look very convincing. The
pushrods can be black but I opted not to do them.
The engine cowling is a three-piece affair. I elected to fill the inside
seams with the Acryl-Blue. Some minor clean up with sand paper and a
quick coat of green zinc chromate. Then the air scoop, which I painted
neutral gray, was added. The wole cowling is attached by a small area on
the bottom so make sure you let it dry completely.
Getting Ready for Paint
About this time I had to deviate from the instructions and added the
sway braces to the belly. Next to the wings this was the only other
problem area I had. It required filling, which wouldn’t be a problem
except that the sway braces prevent sanding. Using the Acryl-Blue I did
the best I could with acetone and sand paper. Once happy with the
results it was time to prime.
If you have not tried Tamiya Fine Surface Primer (L) it is the cats
meow. It is only available in a spray can form. I know you are saying
you didn’t spray the airplane with a spray can. I did. The primer is
wonderful. It lies down like an acrylic but it bites the plastic and
superglue real well. It sticks real well to fingers too. The benefit of
this primer is that it provides a uniform finish to the kit. Typically
in the past I’ve had a problem with the superglue or filler showing up
when paint is applied. The Tamiya Surface Primer takes care of this
problem. After it dried for a day, I sanded the finish with 3200
sandpaper to get a smoother finish. I wasn’t after a factory fresh
finish so I didn’t sand it totally smooth, but just enough to knock off
any rough spots. I did have to clean up a little bit on the top of the
fuselage. This required another coat of primer but it feathered in
perfectly.
Paint
I try to learn something new on every model and for this airplane it
was using Alclad paints. I had never painted a natural metal airplane
before. I have done some panels but not a whole airplane so I was a
little nervous about it. One of the benefits of belonging to IPMS is the
meetings and classes taught by pros. Dave Powell from the IPMS DC
chapter had just taught a class on using Alclad II. So I contacted him
for some one on one instruction. Dave has some of the best-looking NMF
aircraft I have ever seen. So who better to learn from?
With a natural metal finish surface prep is essential. Dave suggests
either Future or Tamiya Surface Primer. The Future will provide a
smoother “jet” finish. Even though Alclad does not recommend spraying
directly on the plastic it can be done.
Spraying Alclad is not the same as painting flats paint. It is more
exacting and requires more finesse. Dave recommends spraying at a
90-degree angle and in the direction of airflow. First shoot a misting
coat and then a slightly heavier coat and finally a heavy coat. Ensure
that you overlap your coats.
Another difference is the speed of spraying, spray a little bit
slower. What I mean by this is don’t move your hand as fast over the
surface. You want full coverage so slow down. Dave recommends rubbing
the whole aircraft with cotton balls. This takes care of any slight
overspray and smoothes everything down. Dave also pointed out that if
the overspray is more than the cotton balls can handle then use a
polishing stick. Use the white sanding stick and the buffer to smooth
things out. I thought this would create marks but it doesn’t. Dry sand
and then buff again with cotton balls. You can then repaint whatever
needs it. I ended up having to spray my Jug’s wings about five or six
times. I ended up getting the fuselage perfect on the first pass but the
wings eluded me for quite some time.
I finally got what to me looked good. Perfect? No, but for me it was
what I was after.
After spraying the whole aircraft Alclad Aluminum it was time to add
some variations in the panels. Next time I will try to prepaint some
panels to see how that works out. This time I masked off certain panels
and painted them with an overspray of Dark Aluminum. This was also done
to all the control surface front sides. The key is not to build it up
too much just to get a difference. If you do spray too much of the dark
color then just go back with the Aluminum and overspray the offending
panel. I did spray the turbosupercharger with Model Master Burnt Metal.
Once done with the metal colored paints it was time to mask the Olive
Drab panel.
Using Tamiya masking tape, I painted the OD panel with Tamiya Olive
Drab. While the paint was still in my paint cup I added one or two drops
of white. I then carefully sprayed the center of the panels. I followed
this up by adding one more drop of white and two drops of red to the
paint cup along with more thinner. This was randomly sprayed on the
panels. The effect is very nice and is the first time I have painted OD
to my liking.
The red areas were masked off in a manner similar to the OD. I used
Tamiya Flat Red for my identification bands and cowling covers. The
Tamiya is normally able to take a decal without silvering. Of course,
whenever I spray a primary color I inevitably get overspray somewhere.
In this case it was on the tail and by the canopy area. I tried to sand
it off with the polishing stick but it didn’t come off. I then sprayed
another coat of Aluminum to the affected areas and marveled at the way
the Alclad blended perfectly.
Decals
The kit decals are slightly off register with the white but it is
only slight and barely noticeable. The decals are thin and have good
opacity. The only place that I noticed the decals being ever so slightly
transparent was over the red nose.
As this kit is advertised as “Nose Art”, the two choices are quite
colorful. The first aircraft is Big Ass Bird II from the 513th FS, 406th
FG. While this aircraft is colorful I didn’t think the decals would lay
down well and totally cover the nose. I didn’t think they would be able
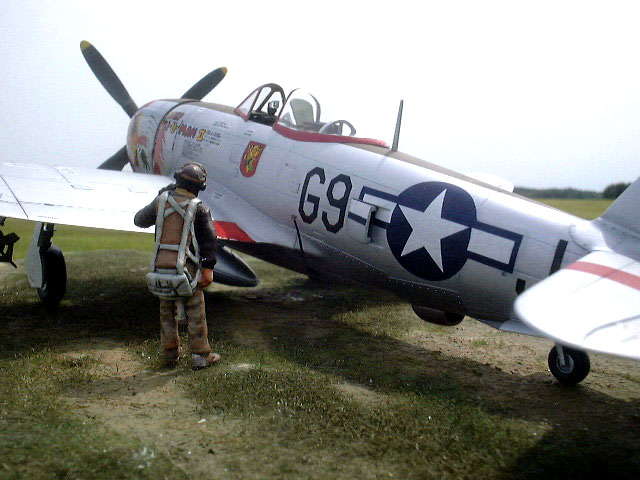
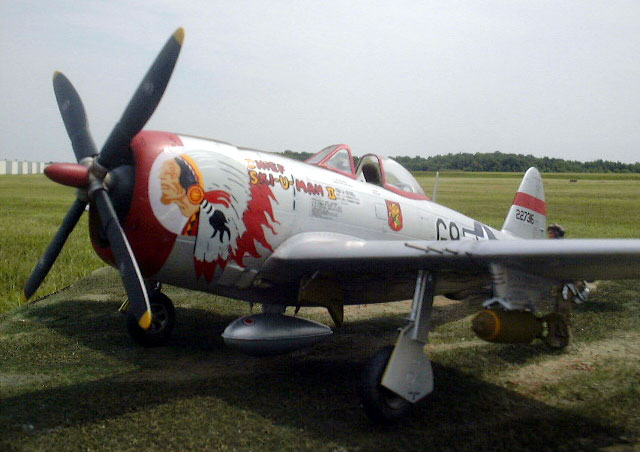
to conform to the complex curves of the kit. So I chose the second
aircraft which is Chief Ski-U-Mah II of the 509th FS, 405FG. This
aircraft with its big Indian chief head on the cowling was quite
colorful.
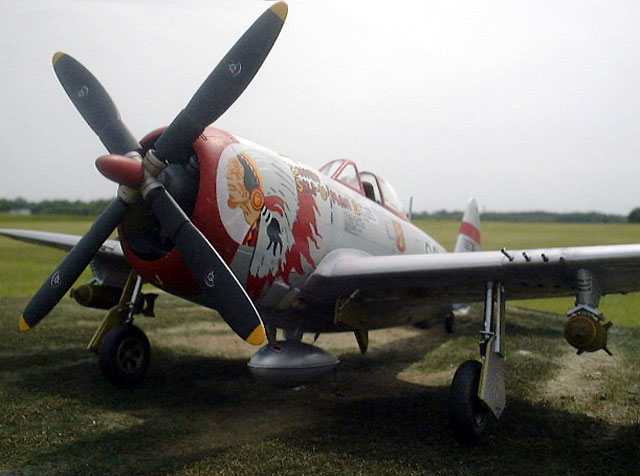
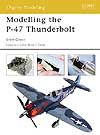
I did trim the Indian head decal on the front to minimize the
possibility of silvering on the flat red. I did have to apply a few
coats of decal setting solution to get the decal to settle down. I
started out with MicroSol and then switched to Solvaset. It wasn’t
perfect but once touched up it looks pretty good. The rest of the decals
didn’t cause any problems and were thin enough to be convincing. See the
photos. I did forget how many servicing stencils were on American planes
though.
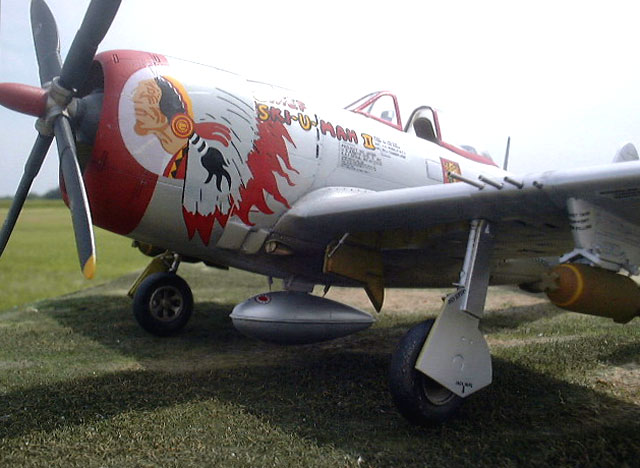
Final Details
While the decals were drying I cleaned up and painted the landing
gear, tires, props and canopy frames. I masked the canopy frames with
Bare Metal foil. When I removed the foil there was plenty of adhesive
residue left. I cleaned it up with Goo-Gone on a cotton swab. Everything
was added and the model was finished except for underwing stores. I’ve
always liked the 75-gallon drop tank so I added one of these to the
centerline and two 500 lbs bombs to the wings. The final touch was using
hypodermic tubing for the gun barrels. It took some time to get them
straight and to stagger them properly but the end result is worth the
effort.
Weathering
I like to weather my aircraft. I think that a model looks real when
it is dirty and used. I was a little nervous about weathering a natural
metal airplane. I started the weathering by using Payne’s Grey artist
oils for all panel lines. This gray has a blue tint and just adds to the
Alclad finish. Once that was dry I used Lamp Black for the control
surfaces and vents. There is a picture in Bodie’s book on page 357 that
shows a dirty underside and that was my model for the underside
weathering. I used Burnt Umber artist oils and various pastels to get
the exhaust and oil streaking I was after. I like the final results a
lot. With that the model was finished.
Academy provides the basis for an accurate P-47D. It is not a shake
and bake kit. There are some modeling skills required. If you are an
assembler then this kit isn’t for you. If you are a model builder then
this kit is well worth the money. Ultimately, it looks real when built.
I’ve built the Otaki and the Hasegawa offerings. I would rate this kit
very well in comparison. For the MSRP of $25.00 it is a good value,
costing half of the Tamiya kit and a third less than the Hasegawa one.
The Nose Art is interesting but tricky to play with. It can be done
though. The wing to fuselage join could have been better and the slight
bit of work for the wheel wells require some skills but again nothing
that a model builder with moderate skill can’t do. I would build this
kit again and that is one of the highest praises I can give a kit.
The kit is available through most hobby shops. I would like to thank
Academy for the review sample.
-
Aero Detail 14: Republic P-47
Thunderbolt, Dai Nippon Kaiga Co., Ltd, 1995, ISBN 4-499-22648-1
-
Republic’s Thunderbolt: From Seversky to
Victory, Warren M. Bodie, Widewing Publications, 1994, ISBN
0-9629359-1-3
-
P-47 Thunderbolt in action, Larry Davis,
Squadron/Signal Publications, 1984, ISBN 0-89747-161-X
-
Walk Around- P-47 Thunderbolt, Lou
Drendal, Squadron/Signal Publications, 1997, ISBN 0-89747-375-2
Click on the thumbnails
below to view larger images:
Modelling the P-47
Thunderbolt
Osprey Modelling 11 |
|
|
|
|
Author: Brett Green
US Price: $17.95
UK Price: £12.99
Publisher:
Osprey Publishing
Publish Date:
July 25, 2004
Details: 80 pages; ISBN: 1841767956 |
|
|
Model, Images and Text Copyright © 2004 by
Floyd S. Werner Jr.
Page Created 20 March, 2004
Last Updated 03 October, 2004
Back to
HyperScale Main Page
|
 Home
| What's New |
Features |
Gallery |
Reviews |
Reference |
Forum |
Search
Home
| What's New |
Features |
Gallery |
Reviews |
Reference |
Forum |
Search