|
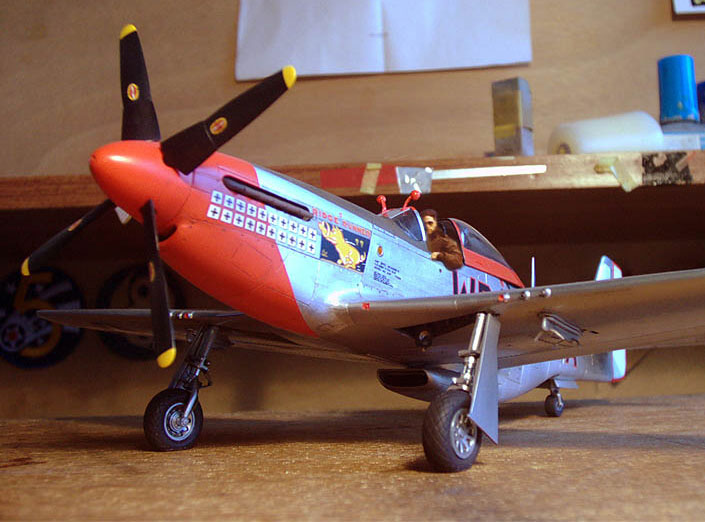
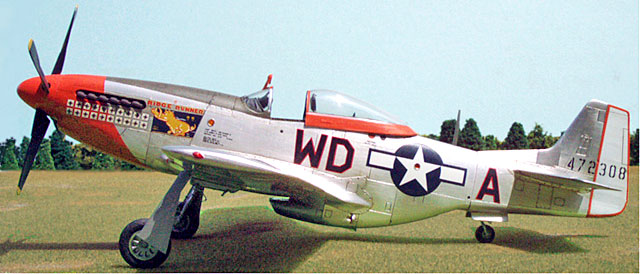
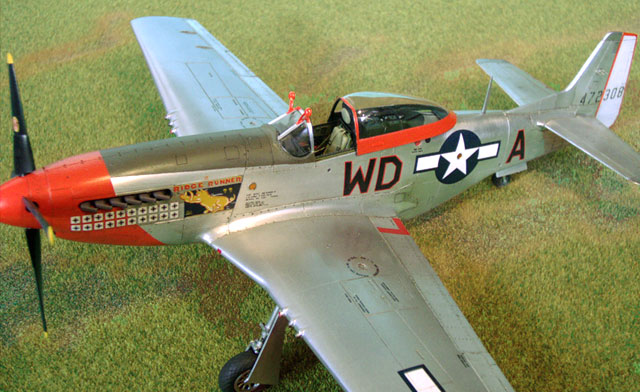
Pierce McKennon’s Ridge
Runner III
P-51D Mustang
by Bucky
Sheftall
|
 |
|
North American P-51D Mustang |

Tamiya's
1/48 scale P-51D Mustang is available online from Squadron.com
This Tamiya 1/48 P-51D completes my foil “Victory Triptych” of the
Big Three USAAF fighters.
As far as quality goes, Tamiya’s kit is still the jewel it was when I
bought it in 1996. In fact, I was so intimidated by the pressure of
wanting to do it justice that it sat near or at the top of my “Immediate
To-do Pile” for the next eight years, taunting me every time it came
into my field of vision (which was often, as it was right over my work
table!). But I knew that I had to wait for the right combination of
factors before I could start chopping sprue – i.e., good refs, great
decals (in this case a potpourri of Cutting Edge CED 48113, Superscale
stenciling and IPMS-USA 1999 sheet, thanks to Chris Bucholz), a nice
Eduard PE set and a Squadron “Dallas” vac canopy.
However, most important of all was the right motivation package.
Finishing my Bubbletop Jug in January, I was eager to do another foil
job, and was also beginning to get some radical ideas about foil/Alclad
II combinations after successful experiments on old models with this
popular lacquer metalizer. The sublime moment of inspiration for
building Ridge Runner III came when I was thumbing through Motorbooks’
“Fighter Command” while listening to the “Best Years of Our Lives”
soundtrack (highly recommended for WW2 modeling, btw). Turning a page, I
came upon the large shot of McKennon gunning RRIII’s engine for the
cameraman just as my CD hit the dramatic “End Title” music (in the film,
right where Dana Andrews kisses Teresa Wright at Homer’s wedding).
And that, as they say, was that.
I used the Eduard P-51D PE set in conjunction with Waldron placards
and some scratched control knobs for the cockpit. Eduard pre-painted
seat harness belts were also used. Radio equipment was wired up with
hair-thin zinc wire twisted/bundled into cable and painted light gray.
The wiring eventually leads back to the radio frequency selector on the
starboard cockpit wall, though this is nearly impossible to see in the
photos I have provided with this article.
Converting the Tamiya kit to the specs of McKennon’s mount required some
selective chopping and/or filling. Biggest pain-in-the-you-know-what was
puttying the panel lines on the wings prior to painting them silver, as
per North American Aviation policy at the time RRIII was manufactured.
Of course, the idea of puttying over perfectly good panel lines set off
all kinds of mental alarm bells for this modeler, but facts and
photographic evidence won out over instinct in the end. Still, the
process did involve something of a leap of faith.
Other RRIII requirements included removing the small cooling duct on the
fuselage near the port wing fillet (an operation required for all
WW2-era ‘Stangs), and fairing over the perforated carburetor cooling
vents in the lower cowling (a nasty little exercise in frustration that
could have been made much easier by following Tony Bell’s suggestion to
drill the holes through before filling, in order to let trapped air out
the back).
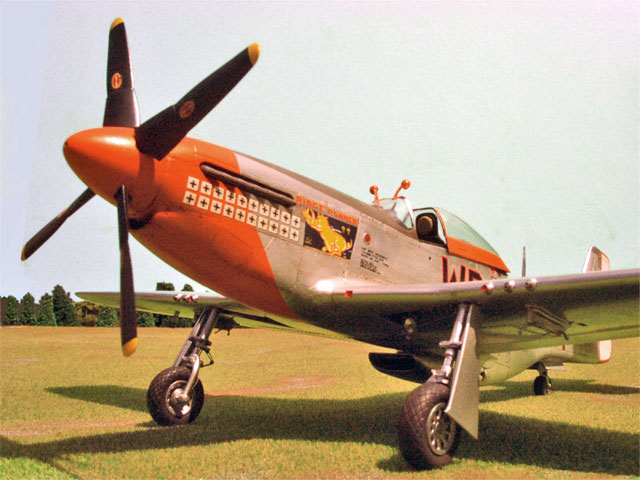
Other scratched items include AN/AP-13 rear warning radar made with zinc
wire stripped from old electrical cord and twin “Spitfire” rearview
mirrors from the spares box (in this case, modified mirrors from Tamiya
Jugs faced with Waldron-punched foil discs). The formation lights found
on the occasional European Theater Mustang in 1945 were represented with
dial faces from the Eduard WWI instruments set and more punched foil
discs covered over with punched Tamiya Clear Orange-tinted decal film.
Kit machine guns and fairings were replaced with telescoped brass
microtubing.
Wheels were “sagged” slightly with heat and sanding.
The Squadron canopy is a beautiful little piece of vacforming, and from
the start I knew I wanted to use the rear section. However, preliminary
test-fitting showed that the Squadron front canopy section – which I had
initially shied away from in favor of the kit part– was definitely
doable. One obstacle here is that the depth of the “trough” where the
instrument panel cover meets the fuselage canopy line is cut to
accommodate the relatively thick kit piece rather than thin vac-formed
vinyl. I got around this problem by lining the bottom of the trough with
0.3mm solder wire painted black. It provided a perfect backing to push
the lower canopy edge flush up against the fuselage.
Scale thickness for the aft edge of this piece was achieved by several
layers of black electricians tape cut into thin strips. Inside canopy
frame was colored with cut strips of black decal. This was repeated for
the forward edge and internal framework of the rear canopy section. One
problem I ran into with the rear section was that the black tape facing
on the inner frame showed right through the “Debden Red” decal strip I
wanted to use to cover the outside frame. The solution, I surmised,
would have to involve something completely opaque, yet close enough to
white not to compromise the nice red of the decal material. Answer? When
in doubt, whip the foil roll out! The front canopy was glued in place
with 30-minute epoxy, while the rear section is resting on the slide
rails (nice Eduard pieces), with no use of adhesive.
Before foiling, the fuselage was riveted using my watch gear ponce
wheel.
As RRIII, like all NMF ‘Stangs, involves a fairly large anti-glare
section, I decided to spray the OD lacquer (Gunze 12) directly on to the
plastic before foiling and Future’ing rather than risking too much
painting over bare foil on this critical area (paint over foil, even
with a good Future primer, is fragile at best). First, I masked right up
to the edges of the as-of-yet-imaginary line where the OD would meet NMF
on the finished model. This provided me with a foiling guide. After foil
was applied, I cut carefully along this line, then peeled back the tape
and burnished the foil edge down as hard as I could without damaging the
plastic. Later, when it was time to paint the OD, I masked with very
weak tack, transparent vinyl artist’s masking material, again laying the
tape right up to the edge of what would soon – hopefully – be the OD
anti-glare section. If your masking material is transparent or at least
sufficiently translucent to distinguish bare foil from plastic under the
tape, this job is not as difficult as it sounds. If you must err here,
err on the side of overspray on the foil, for when the spray job is
done, all you need to do to get a nice clean division between the OD and
NMF is to run the edge of a toothpick (or even your fingernail) along
the un-Futured, oversprayed foil and the paint sloughs right off.
In order to make my canopy framing decal material and, of course, to
paint the famous 4th Fighter Group red nose, I stirred up a batch of
“Debden Red” following Tom Cleaver’s tip on using Gunze Lacquer “Shine
Red 79”, which I toned down very slightly with a drop of off-white in
the airbrush mix. The cowling area was carefully masked with the
above-mentioned weak tack tape and sprayed at an oblique angle with
layered light coats (to prevent masking “ridges”) of Gunze Base White
before laying on the red.
Red-bordered white rudder was done with white paint and more Debden Red,
touched up with fine brush where the masking didn’t do the job.

As Ridge Runner III only had a service life of a month or two (before
McKennon’s squadronmate pranged it in a non-fatal but mechanically
disastrous landing mishap), I chose to approach weathering on this model
with a very, very light touch. In fact, the only panel-line darkening I
did was some oil streaking around the engine area and wing fillet, and
to accent working ammo bays, access hatches and control surfaces.
Everything else was just left up to the reflective qualities of the
foil, and in this case, as with my Jug, I found simple contrast of light
and shadow was good enough without excessive help from washes, etc.
Blackening all of the panel lines on the model would have looked grossly
overdone, and worst of all, unrealistic.
Tail wheel area was hit up with heavily thinned Light Earth.
After puttying and buffing, the wings were painted with Alclad “White
Aluminum”. A nice heavy application of Future gave this a sufficiently
“silver-painted” quality to distinguish it from the NMF of the fuselage
and control surfaces, again, just as on the real plane.
All foiled areas were washed with soapy warm water and primed with
Future prior to weathering and decaling.
Alclad Polished Aluminum was used in areas I have found problematic for
foil (OK! So I cheated!), notably wing and both horizontal and vertical
stabilizer tips. I also found this prudent for the ventral air scoop
intake area, as well as for the curved section in the vertical
stabilizer fairing. Hardcore Alclad advocates who insist that all we
ever need for NMF can be had from a bottle will note the noticeably
darkened appearance of the Alclad-ded areas compared with adjacent foil
areas. To echo the old Bare Metal Foil ad for the hundred-thousandth
time, “nothing looks more like aluminum than…” blah-blah-blah… Of
course, crinkly, curling aluminum around a wingtip looks like poo-poo,
too, so we must sometimes search for the happy medium – modeling, like
life, being a series of compromises…
Last major painting operation was to give the entire airframe a final
light overspray of matte clear to tone down the crassest excesses of the
aluminum glare before setting the rear canopy down on the slide rails
and calling it a day.
Photos were taken with my Casio QV-2100, with the model in my trusty
“Wauchop Box” and illuminated by sunlight.
Pix were darkened and yellowed slightly in Photoshop to simulate the
effect of the aged Kodachrome photographs of RRIII in Fighter Command.
References &
Acknowledgements
|
-
P-51 Walkaround (Walkaround Number 7)
Squadron/Signal Books
-
Fighter Command by Jeffrey L. Ethell
and Robert T. Sand, Motorbooks.
-
Aero Detail 13: North American P-51
Mustang, Dai Nippon Kaiga Books
In closing, I would like to thank everyone, in addition to those
mentioned here by name, who gave help and valued advice during this
project.
Click the
thumbnails below to view larger images:
P-51 Mustang
From the RAF to the Mighty Eighth
Special Editions (Aviation) 1 |
|
|
|
|
Author: Michael O'Leary
US Price: $10.95
UK Price: £6.99
Publisher:
Osprey Publishing
Publish Date:
September 15, 1997
Details: 128 pages; ISBN: 1855327147 |
|
|
Model,
Text & Images Copyright © 2004 by
Bucky Sheftall
Page Created 16 July, 2004
Last Updated
16 July, 2004
Back to
HyperScale Main Page |
 Home
| What's New |
Features |
Gallery |
Reviews |
Reference |
Forum |
Search
Home
| What's New |
Features |
Gallery |
Reviews |
Reference |
Forum |
Search