|
Revell Germany's 1/72 scale
RF-4E Phantom II
by
Mike
O'Hare
|
 |
|
McDonnell-Douglas RF-4E Phantom II |

HyperScale is proudly supported by
Squadron
Is there anything that really needs to be said about the F-4 Phantom?
One of the most successful jet aircraft from the western world, the
more than 5 000 aircraft built have served with over a dozen countries.
Now in its fifth decade, the type still serves a vital role in 7 of
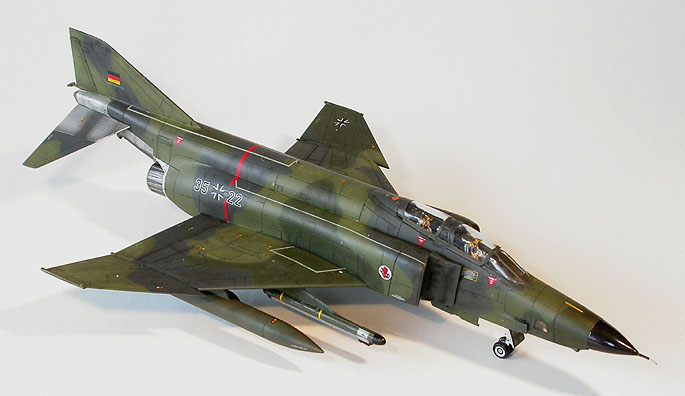
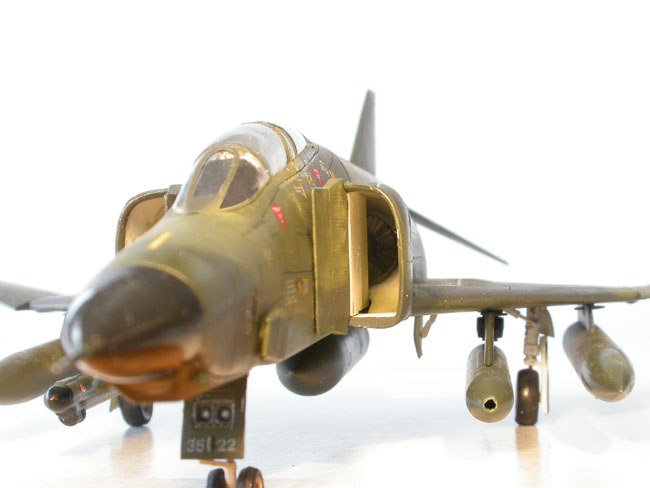
those countries today. They type modelled here is the RF-4E, a
reconnaissance version built for the export market, merging the RF-4C's
camera systems with the F-4E's fuselage.
Although most RF-4Es lacked the ability to carry weapons (though some
Luftwaffe examples were later modified to carry cluster bombs), it's
arguably one of the most interesting versions from a modelling
standpoint, as it has worn many of the more colourful Phantom camouflage
schemes.
Revell Germany's
1/72 scale Phantoms
|
Revell Germany's newly tooled Phantoms are certainly up to the high
standards of their other recent releases. Fine recessed panel line and
rivet detail, nicely rendered wheel well and landing gear detail along
with enough cockpit business to make the average 1/72 modeller happy.
It is worth noting that the kit is essentially a scale-down of their
1/32 F-4 series, not unlike the 1/32 and 1/72 Tornados. And just as with
those 1/32 kits, the instrument panel detail in the RF-4 isn't quite as
nice as that in the F-4F kit. Both accurately depict their subject
matter well, and both are of the raised type, but the instrument panels
in the RF-4 are just a bit flatter, with raised bezels and switches on
the panels, while the F-4F kit has ever so slightly heavier detail, and
depicts bezels on raised instrument boxes, on top of the panels. It's
not a concern at all, more of an odd quirk.
Breakdown of the kit is similar to that of Hasegawa's F-4 family,
with a few notable differences. First and foremost, Revell's Phantoms
include engine turbines on a bulkhead inside the fuselage. There is no
intake trunk, but it is better than Hasegawa's short, flat bulkheads in
my opinion. Revell also include the auxiliary engine vents between the
main landing gear bays; a nice touch, as these doors are usually seen
open on Phantoms at rest. Revell don't, however, include the optional
photo-flare buckets above the exhausts. Shape-wise, the kit is quite
good, however the tail cap is canted a bit too far forward. Simple to
fix with some filing, but an odd mistake nonetheless.
As well, the canopy angle is a bit flat, in my opinion, and should
slope down more. Opening the canopies goes a long way towards hiding the
problem, but it does mean the forward fuselage appears slightly heavy;
this is really only noticeable if the kit is displayed next to a
Hasegawa Phantom, as Hasegawa have nailed the F-4's shape.
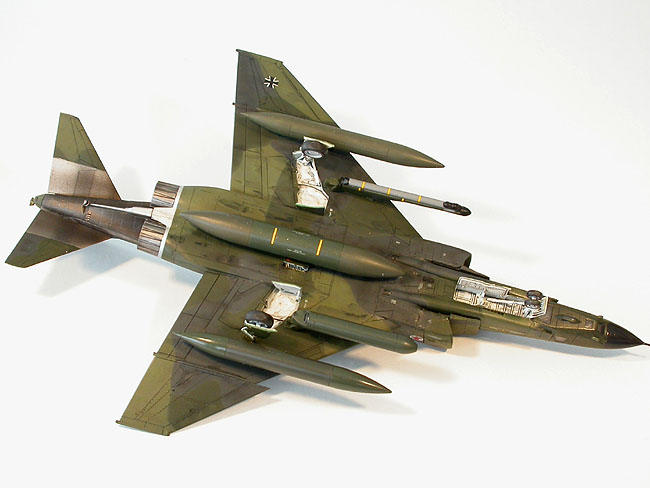
Also worth noting, Revell's drop tanks are quite tubular, with
bullet-shaped end caps mounting to cylindrical centre bodies. Every
other F-4 kit's drop tanks are more curved. I can't say whether they're
right or wrong, and it's entirely possible that German F-4s used a
slightly different tank design, but it does look a little bit unusual.
The RF-4E is moulded in green plastic, while the F-4F release, which
swaps out the forward fuselage sprue to depict a gun nose, also adding
missiles, slatted outer wings and the new instrument panels, is done in
grey.
Decals are included for two different Luftwaffe RF-4Es. One is a recce
meet special scheme, in overall black with a large badge underneath,
thankfully broken down with cut-outs for the gear doors to ease
application. The other is a regular service aircraft in the Norm '83
scheme, the subject seen here. As a minor nit-pick, it would have been
nice to see Revell include decals for both recce squadrons and a few
spare number decals to depict other jets, but the decal sheet is quite
large as it is.
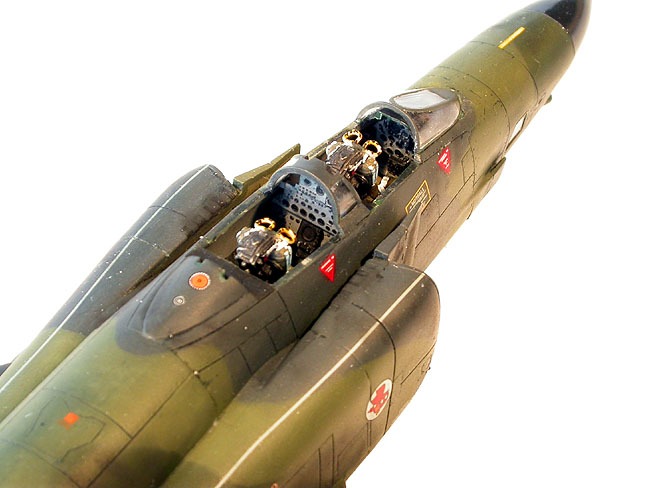
Constructions start, as usual, in the cockpit. There's no real
surprise in how anything goes together, and the raised detail makes
everything fairly easy to paint. I substituted a pair of resin ejection
seats (probably True Details), mainly because they were already painted
and I was feeling particularly lazy. The kit's seats are very nicely
done, but they do lack that certain look that resin seats provide. Not
to mention belts, and I'm terrible at adding belts.
Fuselage construction for me was complicated by the fact that I'd
decided to add a semblance of intake trunk. Because of the shape and
location of the F-4's intakes, you only really have to add the outer
halves to give the impression of a full trunk back to the turbine face,
which makes it a reasonably simple matter.
The turbine bulkhead was hacked in two, with each side glued into its
respective fuselage half. I then mixed up a batch of milliput, slopped
it into each fuselage half and started shaping. My goal was simply to
give a smooth transition from the intake back to the turbine so that it
LOOKED like an intake trunk, not to worry about any real accuracy. Once
dry, the milliput parts were CA'ed into place (as they promptly popped
out when dry…), sanded to smooth out and painted gloss white.
With the intakes more or less done, the fuselage went together.
Though the breakdown here LOOKS similar to Hasegawa's F-4 series, the
way Revell has handled location tabs and specific breaks makes things a
little trickier. With a number of Hasegawa and Fujimi Phantoms under my
belt, I got a bit cocky and had a bit of a hard time of it. I can only
suggest test fitting here, and to start out by following the directions
- just because you THINK you know better, doesn't mean you do… That
said, nothing was overly problematic, and all the parts did pop into
place eventually; they just required a bit of pulling and prodding. As
well, assembly was hampered by my intake trunks, which pushed a few key
areas slightly out of shape. t6
|
 |
|
Shot down the intake, all that is visible
is the outer half. Note the poor job measuring for
the splitter |
The major, self-induced hurdle passed, adding the wing was a simple
matter of slotting the finished assembly to the fuselage. Seam work was
pretty minimal, with a coat of Mr. Surfacer 500 brushed on to all the
join lines and the excess sanded away. This is my normal technique, as
it fills in all the minor imperfections, and I find it easier to putty
and sand the whole thing than to crank up the airbrush to prime and
check for seams. The bulk of the Surfacer was removed with a bit of nail
polish remover on a Q-Tip, per the "filling without sanding" method, and
for particularly heavy/stubborn areas I substituted CA De-Bonder for the
Acetone - it works faster and doesn't harm the plastic.
All panel line and rivet detail lost during this process was renewed
with a straight pin chucked in a pin vice. In preparation for paint, the
clear parts and intakes were masked off, and the lower fuselage/camera
bay press-fitted to the fuselage. I left the glazings out of the
side-facing camera windows, simply filling the holes with small squares
of masking tape. I also lopped off the fuel dump mast on the back of the
tail - I don't think I've ever managed to keep one on in all my Phantom
builds, so it's easiest now to cut it off first and re-attach later.
Paint
Modern German Aircraft use their own national standard for colour
matches - the RAL system. This is along the lines of America's FS
matches, and Britain's BSC colours, but of course, with everything being
different. It was quite a chore trying to find paint matches for the
various RAL shades with locally available paint brands, so in the end I
ordered Xtracolor tins for the camouflage from Roll Models.
The Xtracolor paints spray beautifully and dry overnight to a nice,
decal-able gloss, so this was, by far, the best option. While waiting
for the paints to arrive, I researched camouflage patterns and decided
to use one of the Norm '83 patterns from the Don Colour web site, mainly
to be a bit different from what the kit depicts. Don Colour's paint
diagrams were scaled up to the dimensions of the kit using a photo
editor, then printed out. I find the easiest method here is to just crop
to the edges of the image - from the tip of the nose to the end of the
tail, and wingtip to wingtip, then punch in the kit's dimensions using
the image size function. Hey-presto, drawings exactly the same size as
the kit. It's also best to make the drawings slightly larger than the
kit, to account for slight bulges, curves and the like.
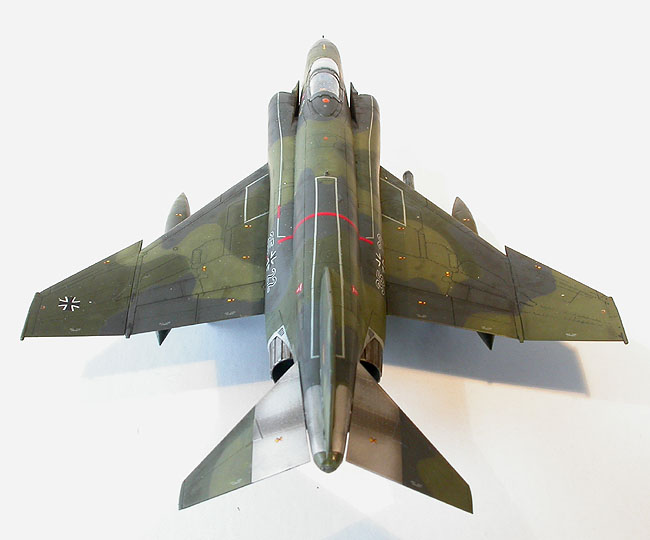
The base colour was sprayed, in this case, FS 34079. When dry, I cut
out the 34079 portions of the diagram and taped them onto the model and
sprayed the next colour. The process is again repeated for the third
shade of green. I'm particularly fond of this method, as it's easy to
get accurate, repeatable demarcation lines that are nice and tight, but
slightly feathered.
With the camouflage done, the wheel wells and engine bays were masked
around and sprayed white (easier than painting white first, then masking
off) along with the landing gear struts and doors. The radome was
sprayed with a gloss black and left to dry, and the drop tanks and
pylons were painted in a variety of greens - it seems that no two of
them match on real Phantoms, so I wanted to replicate this patchwork
appearance. The fuselage was masked off around the natural metal areas
aft of the engine and these were first sprayed with Mr. Surfacer, then
lightly buffed with a cotton swab and sprayed with Alclad. The lower
portions and exhausts are done in steel, with the uppers in a mixture of
steel and aluminium.
Painting done, the model was glossed and readied for decals.
Decals
I know Revell has a pretty poor reputation among modellers for their
decals, but I must admit I was quite impressed with the way these ones
went on. The decals were as good as any kit items I've used, and though
a tiny bit thick, with Micro Set/Sol, blended right in once flat coated.
Registration was pretty much perfect and the detail is quite crisp.
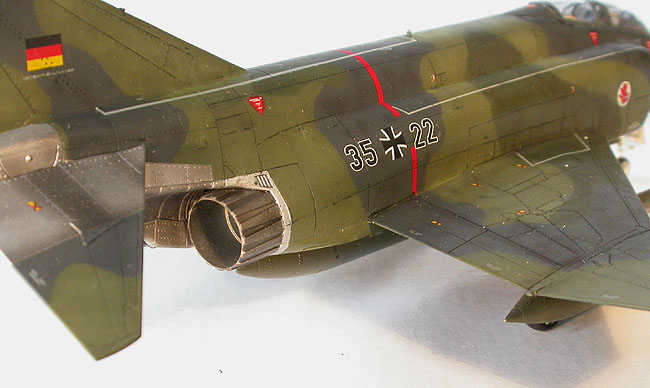
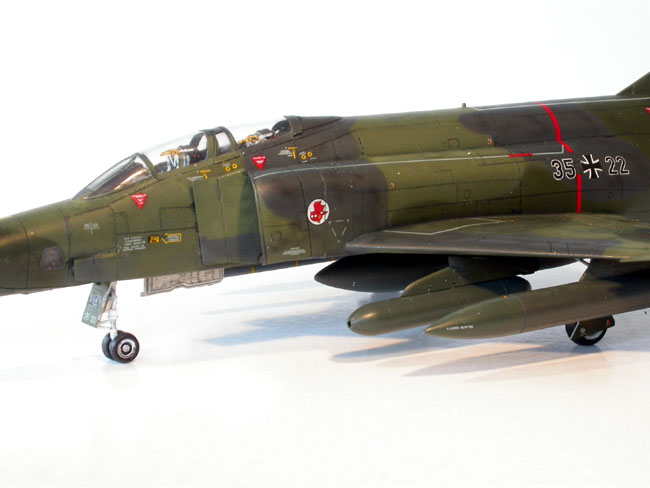
My only real complaints are to do with the lack of carrier film on
the larger fuselage stripes. The lines along the intakes, and the boxy
shape on the spine only have carrier film along the lines themselves,
which makes them very flexible, and thus difficult to line up properly.
You can see from the shot below that the decals on the spine are bowed
out (my fault). It would have been much easier had Revell used a large
expanse of carrier film here to give the stripes rigidity. Of course,
then I'd be complaining that there was too much carrier film…
Also worth noting is the squadron badge. Revell forgot the pupils in
the owl's eyes - they're just white circles on the decals. Oddly enough,
in their kit, Hasegawa DID manage to include the pupils, but filled the
area between the wings and tail in with red (as you can see, this is
white - as it should be - on Revell's decals).
With the decaling done, the model was glossed again to
level out the surface, then given a wash. I've been shying away from
thinned paint washes lately, instead using watercolours from tubes. An
appropriate colour is mixed, one for each shade in the camouflage,
slightly darker than the camo colour itself, then the watercolours (tube
type) are thinned slightly with water, and mixed with a healthy squirt
of liquid dish soap. The main benefit here is actually thickness - just
like the sludge wash, the paint doesn't run along panel lines with this
method, so you can pick out individual blocks of colour with great
precision. The wash is slopped along all the panel lines, then wiped off
with a dry, or very lightly dampened paper towel. The soap prevents the
wash from drying too quickly, so there's a pretty good working time - if
the wash does dry, it will tend to clump or flake, pulling out of the
panel lines in larger pieces. If this happens, switch to a damp cloth or
lightly moisten along the panel lines with a new brush, and wipe the
excess off gently. As a worst case scenario, you'll have to re-apply the
wash in a few spots, and if you completely muck things up, hold the
model under some running water to remove all traces of the wash. Very
easy to master, and very forgiving of mistakes - what's not to love?
After the wash had dried overnight, the model was matte
coated. Final assembly was completed, with the glossed radome tacked on,
tailplanes, pylons and landing gear added, and the various lights and
such picked out with a fine brush. The exhaust area was given a faint,
misty coat of matt black paint to simulate the sooty Phantom's exhaust
staining, and the wheel wells and turkey feathers given a light wash of
home made smoke - India ink mixed with Future - to pick out the details
and add depth. Mixing Future with Ink allows you to vary the intensity
of the smoke, from a very faint tinge to full-on pimpmobile. The cameras
were inserted into the nose, simply sliding into place with a friction
fit. This done, the glazing was all glued in place and the camera bay
cover finally glued on.
With the model just about finished, I attacked it with pastels. Using
green, white and black, four different mixes were made by blending the
pastel dust, from light to dark. These were dabbed lightly on the
model's surface in a random pattern, excess dust blown gently off, then
the pastels blended in by wiping along the direction of streaking with a
cotton swab. This gives a pleasantly mottled appearance of fading,
shadows and general grime, but it subtle enough not to be overwhelming.
As a final touch, streaks of oil and hydraulic fluids were added to the
underside by simply adding a dots of tinted Future and smearing it in
the direction of the airflow with a fingertip.
Revell Germany's 1/72 scale RF-4E is an excellent kit, is very enjoyable
to build, and can be the start of a fairly sizeable Phantom collection.
A bit of work will allow you to build RF-4s from Iran, Greece, Turkey,
Japan and Israel, while there's a number of iterations of operational
camouflage schemes seen on German RF-4s, plus some very nifty test
schemes and countless air display/colourbird markings.
As well, with a bit of effort, the F-4F, aside from modelling the
countless German paint jobs, can be converted to an F-4E, with all the
markings options that entails.
But the question remains, how does it compare to Hasegawa's F-4
Family? That's a difficult question to answer. As a kit, I'd say Revell
is leaps and bounds ahead, with better detail (by far) throughout, and
just a nicer looking all-round product. And at the price, it really
can't be beat - if nothing else, it makes a great OOB kit as a break
from more involved builds, and would be a good choice for newer
modellers just getting started in the hobby. Unfortunately, it's
hampered by two things: the shape niggles (it's close, but it just isn't
dead on like Hasegawa's), and the limited versions available.
With Hasegawa's Phantoms, you can build almost any Phantom, save the
Spey-engined types, from the same basic tooling.
If you're into the F-4, or simply plan to build more than the RF-4,
F-4F and (with work) F-4E, then there will be a noticeable difference
between them, in terms of shape, detail and surface detail. This goes a
long way towards evening out the playing field, and in the end, it's
probably a wash: the individual modeller will have to decide what's most
important themselves, and go with that. It's a kit that's definitely
worth picking up, however.
Modelling the F-4 Phantom II
Osprey Modelling 3 |
|
| |
|
|
Author: Geoff Coughlin, Neil
Ashby
US Price: $17.95
UK Price: £12.99
Publisher:
Osprey Publishing
Publish Date:
September 25, 2003
Details: 80 pages;
ISBN: 1841767468
|
|
|
|
|
Model, Images and Text
Copyright © 2005 by Mike
O'Hare
Page Created 02 March, 2005
Last Updated
03 March, 2005
Back to
HyperScale Main Page |
 Home
| What's New |
Features |
Gallery |
Reviews |
Reference |
Forum |
Search
Home
| What's New |
Features |
Gallery |
Reviews |
Reference |
Forum |
Search