|
Figure International
Magazine
54mm Subscription Figure
Roman Auxiliary
by
Glen
Phillips
|
 |
|
Roman Auxiliary |

Figure
International Magazine is available online from Squadron.com
|
Summary |
|
Subject |
Figure
International Subscription Figure – Roman Auxiliary |
|
Scale |
54mm |
|
Medium |
Metal |
|
Paint |
Andrea
Acrylics |
|
Accessories |
AEPR002
Andrea Round Base |
Since its inception, Figure International Magazine has offered a free
54mm metal figure with a one-year subscription. Their latest figure –
for those subscribing or renewing starting with issues 13, 14, 15, or 16
– is a Roman Auxiliary soldier.
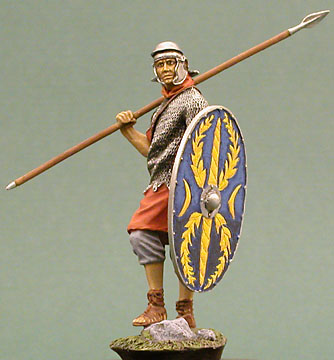
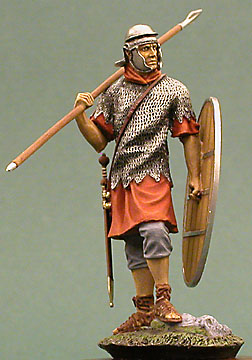
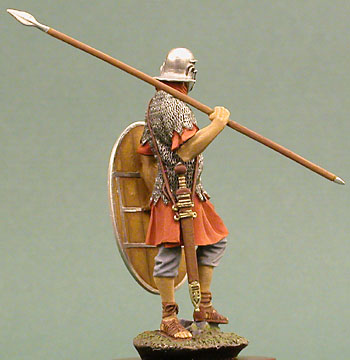
This is a well-sculpted and cleanly cast figure in a casual pose, but
with a posture that shows some ‘movement’ due to the raised leg, turned
torso and head, and the spear resting over the shoulder. The figure is
broken down into a torso, legs, left arm and shield, right arm and
spear, head, sword, and base. The head is particularly well done; having
a prominent brow, cheekbones, nose, and chin all neatly framed by the
helmet and cheek guards. The shield is lightly engraved with the facing
design. Although some areas were a bit ragged, the engraving provides an
easy guide to painting the crescents, wreaths, and spirals.
Preparation,
Painting and Assembly
|
 Clean-up
took all of about 45 minutes. Clean-up
took all of about 45 minutes.
Apart from some minor flash and a prominent seam around the toes of
the left foot, most of the casting seams had to be looked for under
strong light. Even then, I missed a few which didn’t become visible
until after I primed the parts. Since my plan involved pre-painting
nearly everything before assembly, I spent some additional time making
sure everything fit. I also pre-drilled the bottom of the kit’s metal
base to secure it to a wooden base later.
After priming, I buffed the helmet and the metal parts of the spear and
shield using a motor-tool. I simply prefer using metal to depict metal
rather than painting it. I then painted sandals, followed by the face,
arms, and legs. I usually find it easier to paint raised detail first.
Consequently, the sword strap was painted, shaded, and highlighted next.
The chain mail was then painted Gun Metal followed by a wash of Flat
Black. The wash was heavier in the shadowed areas. The lower tunic and
sleeves were painted Reddish-Brown (AENAC018), then shadowed with Dark
Leather (AENAC048) and highlighted with Golden Yellow (AENAC008) mixed
into the Reddish-Brown.
On a side note, both the highlights and shadows were applied using a mix
of water and isopropyl alcohol to thin the paint into a near wash
consistency. Successive applications of the wash will make the color
more intense and more opaque. This is also handy when painting the face.
Following up with the base color and the water/alcohol mix allows you to
soften any hard lines between the base color and highlights and shadows.
After talking to a number of painters and doing some reading, I found
this is a fairly widespread technique among acrylic users, so there’s no
points for originality here.
 Golden
Yellow, highlighted with White and shadowed with Purple (AENAC014)
mixes, was also used on the shield design. The shield background was
painted Prussian Blue (AENAC022) with mixes of White and Flat Black for
the highlights and shadows. Golden
Yellow, highlighted with White and shadowed with Purple (AENAC014)
mixes, was also used on the shield design. The shield background was
painted Prussian Blue (AENAC022) with mixes of White and Flat Black for
the highlights and shadows.
I used the kit base with no additional groundwork. The rocks were
painted dark gray, washed with black, then drybrushed with a lighter
gray. The ground cover was painted a dark brown mix, given a black-brown
wash, then drybrushed with various mixes light browns, tans, and green.
|
 Home
| What's New |
Features |
Gallery |
Reviews |
Reference |
Forum |
Search
Home
| What's New |
Features |
Gallery |
Reviews |
Reference |
Forum |
Search