|
Classic Airframes' 1/48
Scale
Savoia-Marchetti
S.79
by
Ian Robertson
|
 |
|
Savoia-Marchetti S.79 |

HyperScale is proudly supported by Squadron.com
Classic Airframes 1/48 scale S.79 tri-motor Italian bomber is a
limited run kit featuring injection molding with finely recessed panel
lines, resin cockpit, and additional resin and photoetch details.
Although the kit is not for beginners, it is a good choice for those
with moderate modeling experience. The end product captures beautifully
the unique appearance of Italy's most famous bomber, and makes a great
addition to any WWII aircraft enthusiast's collection.
Construction begins with the cockpit. The resin parts fit perfectly
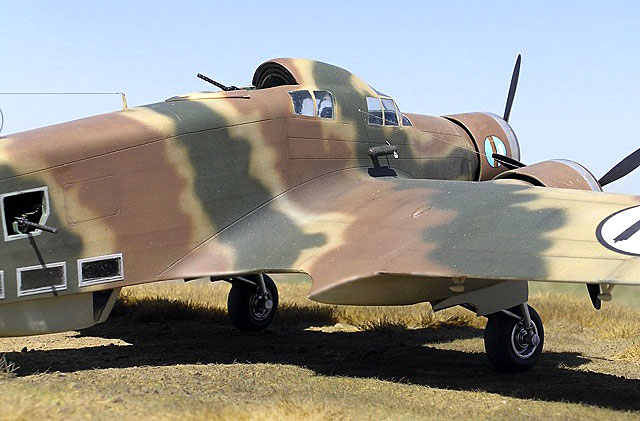
and offer no problems. I wanted to display the dorsal gunner's position
open, so I enhanced the interior areas with additional framing made from
strips of styrene. At the gun position I added a brass ammunition belt
and made a chute for spent cartridges.
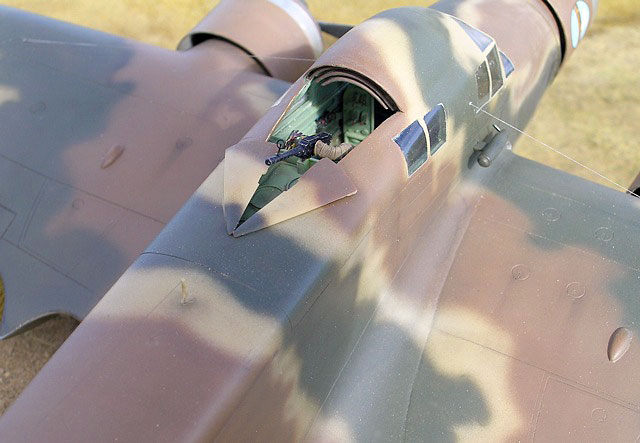
I encountered an aggravating problem when attaching the small windows
just aft of the cockpit (clear parts 2 and 3). In an effort to fit the
parts flush with the fuselage I used too much force and caused numerous
stress fractures in the clear plastic. I should have done a better job
test fitting before trying to install the windows (the holes in the
fuselage were far too small). The stress fractures were obvious and very
distracting given the prominence of these windows on the model, and no
amount of polishing would have corrected the problem. At this point I
was tempted to sideline the project for a while. Luckily, Kent Eckhart (aka
Boise Kent), came to my rescue and produced two vacuform replacements
which fit perfectly and were crystal clear. Thanks Kent!
I decided to open the gunner positions on either side of the fuselage.
Waist guns are not provided in the kit, so I found appropriate parts
in my spares box. The mounts were fashioned from pieces of styrene.
Photoetch ammunition belts were also added.
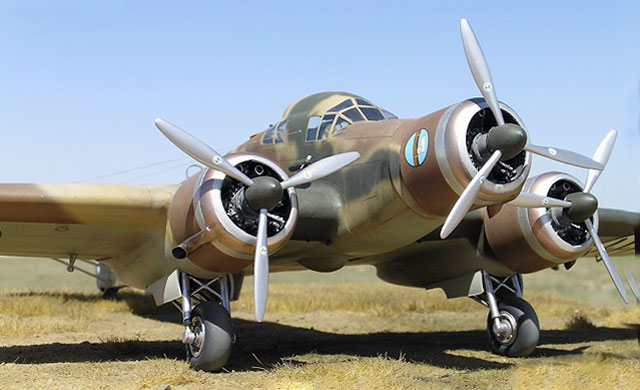
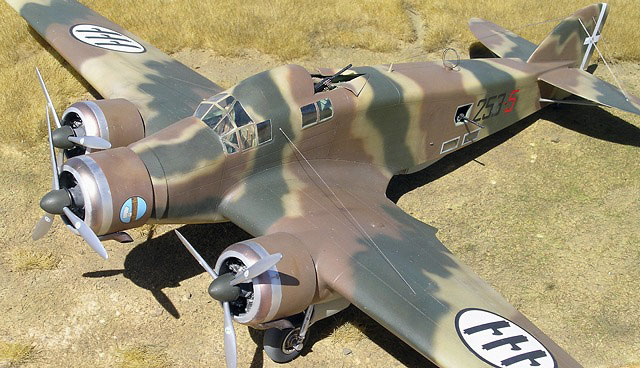
Proper attachment of the engine nacelles proved to be another challenge
in construction. Unlike manufacturers like Tamiya and Hasegawa, limited
run kits like Classic Airframes lack the convenient locating pins and
mounts which help with alignment of parts. Achieving the proper
alignment for the nacelles proved more challenging than I had expected.
My first mistake was using CA glue to attach the nacelles. I reasoned
initially that it would be an advantage to secure the nacelles quickly,
rather than relying on slower-acting plastic cement and the possibility
that the nacelles would shift in position as the glue dried. However,
once the nacelles were attached it became apparent that I had positioned
the center nacelle incorrectly - it tilted upward like a pig's snout.
The problem could not be ignored. However, removing the nacelle was
problematic, especially since the entire model had already been painted
by this stage. I ended up running CA-debonder behind the nacelle and
gently twisting and wiggling the cowl until the assembly broke free. Of
course, the paint finish on the cowl was ruined and required complete
reworking. Luckily the rest of the model, including rigging, remained
intact during my assault on the nacelle. Once the cowl was refinished, I
decided to reattach it with 5-minute epoxy. This turned out to be a good
decision. The epoxy hardened slowly enough to ensure proper positioning,
but fast enough that I didn't have to hold the assembly steady for a
long period of time while the glue set. In the future I would use
5-minute epoxy from the outset, or use metal rods to guide and anchor
the nacelles in position before gluing.
The resin exhausts already come partially hollowed, but I decided to
drill them out further for added realism. Once the exhausts were glued
to the cowls, I used Tamiya putty to fare each exhaust to the cowl ring.
If this is not done the exhausts will sit awkwardly on the cowl,
looking rather dysfunctional. Be sure to check your references for the
position of the exhausts on the aircraft you are modeling (see step 21
of instructions).
The metallic rings on the engine cowls were painted with Alclad II
over Tamiya's fine surface primer. The silver rings were made using
Alclad II's polished aluminum, whereas the darker cowl ring was a
mixture of copper and dark aluminum to give a burnt aluminum appearance.
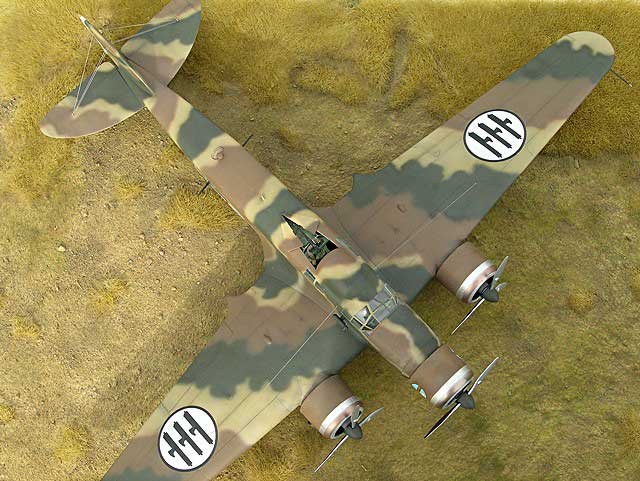
I painted the camouflage freehand using both Tamiya and Polly Scale
acrylics. The underside was painted with Polly Scale Italian light blue-gray.
The upper surface colors were based on my own mixtures of Tamiya
acrylics. The light sand color is buff (XF-57) with a touch of dark
yellow (XF-60), the brownish color is a mixture of red-brown (XF-64) and
khaki (XF-49), and the green is olive green (XF-58). These are not
mixtures specified by any particular reference. Rather, I was attempting
to approximate the colors shown in various color profiles.

The camouflage pattern was based loosely on a color profile in
Squadron's In Action book, as well as various wartime photographs.
The camouflage and markings represent an aircraft of 253a Squadriglia
in the summer of 1940. I used Sky Models decals sheet 48-018 for all
markings.
Images were taken outdoors with a Nikon Coolpix 5400 digital camera
set for maximum resolution. The "sharpen edges" tool in Adobe Photoshop
was used to restore some of the clarity and crispness lost during image
compression.
Click on the thumbnails
below to view larger images:
Messerschmitt Bf 109
Modelling Manuals 17 |
|
|
|
|
US Price: $17.95
UK Price: £12.99
Publisher:
Osprey Publishing
Publish Date:
January 25, 2002
Details: 64 pages; ISBN: 1841762652 |
|
|
Model, Images and Text Copyright ©
2004 by Ian Robertson
Page Created 06 July, 2004
Last Updated 05 July, 2004
Back to HyperScale
Main Page
|
 Home
| What's New |
Features |
Gallery |
Reviews |
Reference |
Forum |
Search
Home
| What's New |
Features |
Gallery |
Reviews |
Reference |
Forum |
Search