|
Tamiya +
Aeroclub 1/48 scale
Seafire Mk.IIc
by Fernando Rolandelli
|
 |
|
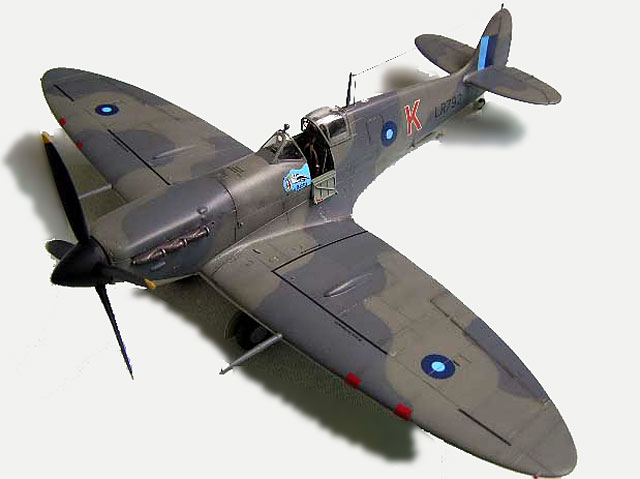
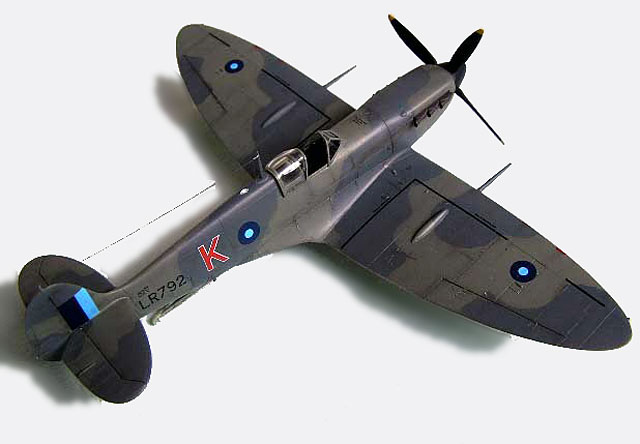
Seafire (Hybrid) Mk IIc,
LR792, “K”, of Nº 834 NAS, HMS Battler, British East Indies
Fleet, Indian Ocean, June 1944. Pilot: Lt. DAE Holbrook |

Tamiya'a 1/48 scale Spitfire Vb is available online from Squadron
Background
Realization that it was not enough simply to deploy aircraft at sea,
but top-class aircraft as well, came to the Royal Navy quite late, and
found it equipped with a motley collection of machines which would have
been swiftly swept away by any air opposition. Therefore, the need of
having a really first-class interceptor fighter made the Admiralty
accept the Seafire, a machine hardly adapted to carrier operations.
Giving its pilots a fair chance of shooting down the enemy made fairly
acceptable the fact that it would most probably, sooner or later, crash
land on returning to its carrier. Nevertheless, its slender shape figure
stands out among the rugged, purpose-built, American-made radial-engine
fighters which also found their way into the FAA ranks, “like a rapier
among scythes”. Interestingly, as soon as the pressure of wartime eased,
the FAA quickly got rid of its remaining Seafires, even of a superb
machine like the F.47 was, to the point of refusing to have anything to
do with its successor, the Seafang.
Development of the Seafire, like all things Spitfire, is a rather
crooked, meandering affair. LR792 was ordered to Westland Aircraft Ltd.
as a Seafire Mk III, but, due probably to the existence of older Mk II,
non-folding, wings, it was completed with one of those, part of a batch
of about 30 machines, called (Hybrid) Mk IIc. The aircraft features
four-blade propeller but older three-stack exhausts, “c” wing armament
and bulges but long cannon fairings, and no blanking stubs. All in all,
a very interesting bird from all sides.
The Kit
Well, as the readership may already know, there is no decent 1/48 kit
of the Merlin Seafire (according to some experts, neither of the
Spitfire V!). There exists a kit from Airfix, their old, old Spit Vb
with a new “c” wing and an insert for the arrestor hook (all grossly
oversized and/or indistinctly shaped); some conversions by Airwaves (who
had a strong, unexplainable preference towards the Arii kit as a donor),
and some by MDC, keyed to the Tamiya Spit V kit.
Speaking about kits, you have the aforementioned Airfix Vb (which has
staunch supporters), the Hasegawa and the Tamiya ones, in both Vb and Vb
Trop versions. If you open the box of the Airfix kit all of a sudden,
you’ll discard it almost immediately: it seems a lump of white plastic
completely devoid of detail, while the new parts, if sporting engraved
panel lines, are very roughly moulded (“spark-corrosion” mold
technology?) If you read some reviews and opinions from experts, you’ll
learn that it is regarded as very accurate in terms of shape. I honestly
wonder. Shape-wise, it has strong and weak points, like any other kit,
and the lack of detail is really despairing. Just not to seem biased, I
shall quote a statement by John at Aeroclub (in the “instructions” of
his excellent Seafire F Mk 17 conversion): “… can still be assembled
into a very presentable Mk.Vb if the top of the nose is re profiled, the
prop thrust line dropped 1 mm and re-scribing of the raised panel
lines”. It is enough to discourage me. Both the Hasegawa and the Tamiya
examples also have strong and weak points: a better wing plan form in
the Hase, but more consistent detail, a better fuselage and a better
cockpit in the Tamiya.
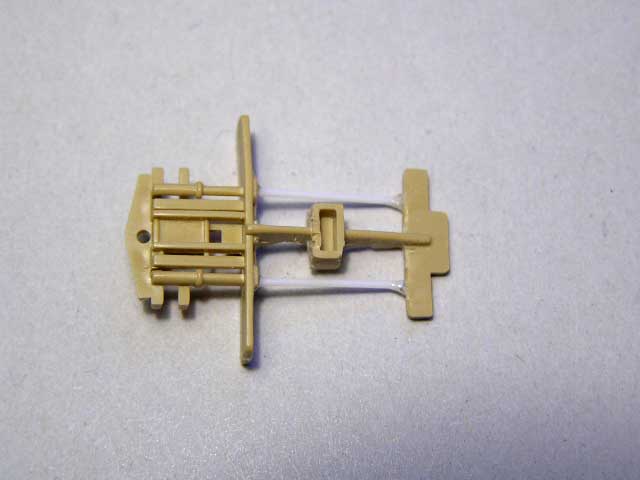
As the best conversions are those by MDC, I naturally preferred the
latter. I used the relatively cheap CV 723 Seafire Ib set, together with
an Aeroclub four blade prop, P422. An Eduard PE set, Zoom EDFE102, was
added to the cockpit, and the mandatory Airwaves RC48068 Spit Vb oil
cooler replaced the flattened example in the kit (but I think you could
scratchbuilt the opening out of styrene rod).
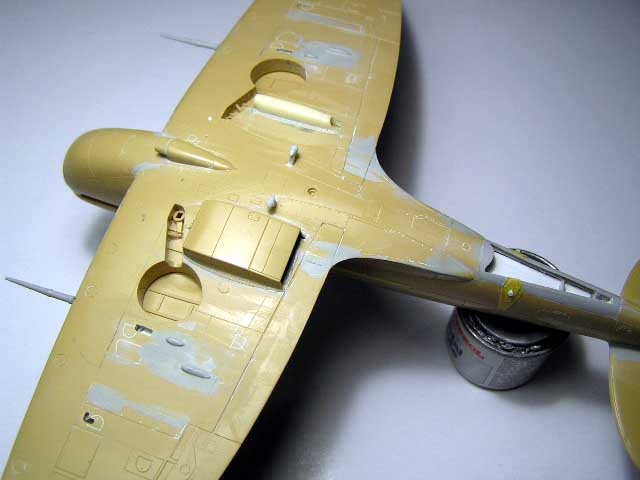
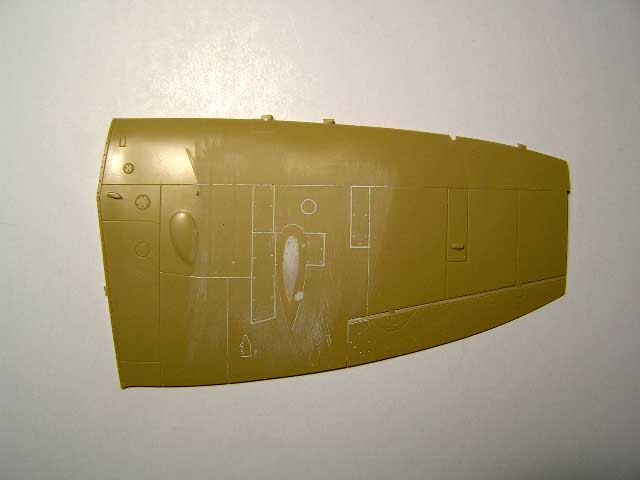
Who needs a “c” wing?
The heart of the project is not the Seafire conversion (mainly
comprising the arrestor hook insert which fits like a glove with only
small surgery), but the build up of the “c” wing. Of course, you could
buy one of the ready made resin sets, by Airwaves or MDC, but to a cost
which exceeds that of the kit. I figured that converting the wing should
not be impossible, and there are several ways round it.
I bought the Aeroclub V198 set, having cannon inspection doors with
three types of bulges (two-cannon “c”, one cannon “c” and “e”) a most
useful and cheap set. It would be then possible to grind down the “b”
bulges, cut the appropriate square from the upper wing and install the
complete inspection door as required. The same could be done using,
let’s say, a spare from any ICM Mk IX kit. I chose another way around,
which entailed erasing the “b” bulges and panel lines, smoothing the
surface and simply scribe the panel for the inspection doors and add
just the bulges. There is a Red Roo set providing just the bulges, but I
thought the bulges themselves could be taken out of the ICM panels
(solving their shallowness in the process) This procedure, involving a
Dremel motor tool, lots of putty and sanding and swearing, was done
without incident. But there’s still the lower wing… you must eliminate
bulges and panel lines, and perforate the new spent cartridges ejection
ports, the most difficult operation. For this, I thinned the inside of
the wing in the proper places, build up the “walls” of the port from the
inside with pieces of Contrail strip, and then proceeded to perforate
them with a pin vise and a sharp blade. The result is not at all bad.
Click
the thumbnails below to view larger images:
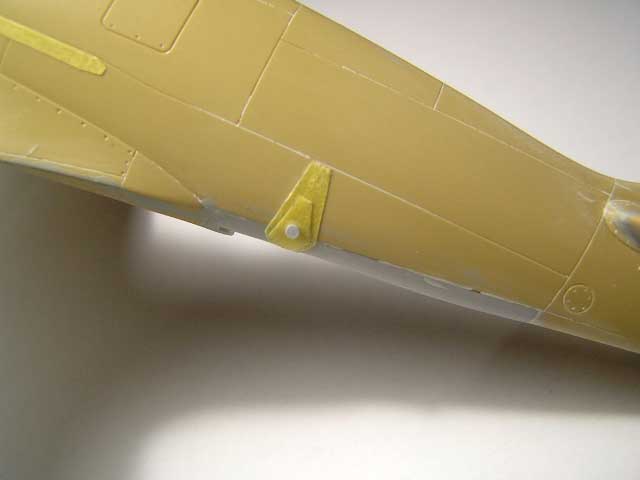
Not necessarily related to the conversion but with making the Tamiya
kit more accurate and better-looking, I decided to do something about
the trailing edges, which join the “Karman” fairings in a pronounced
“notch”, instead of a gentle curve. I glued some tiny crescent-shaped
pieces of plastic and built up them with superglue, sanding as necessary
as it hardened. Last of all, I moved the boundaries between the inner
and outer flaps about 2 mm outwards (they should be precisely where the
curve joins the wing). It is amazing how such small pieces of plastic
can change the appearance of the wing (and give so much trouble to get
right and even!)
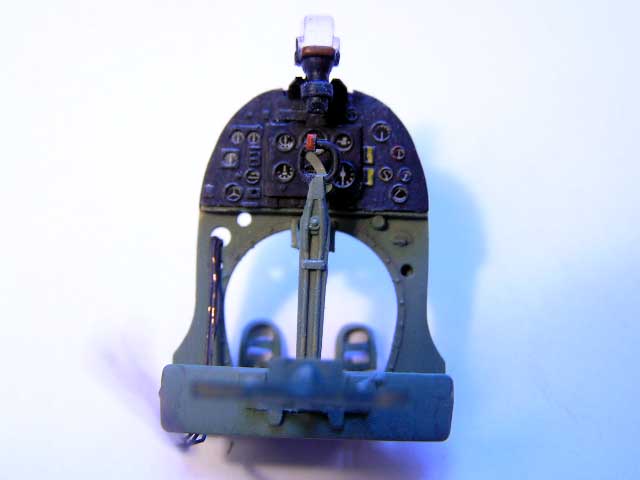
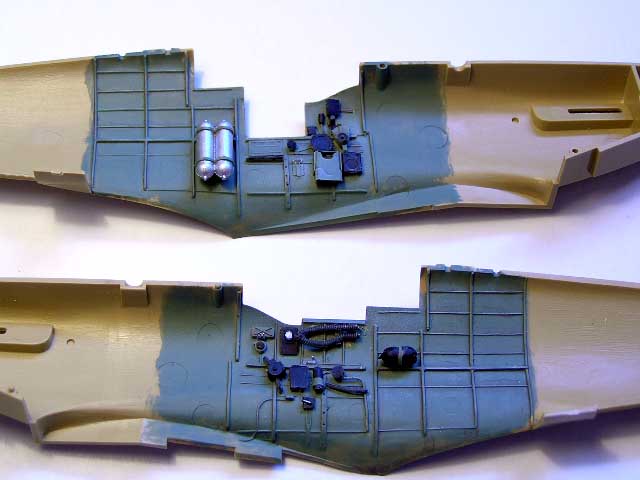
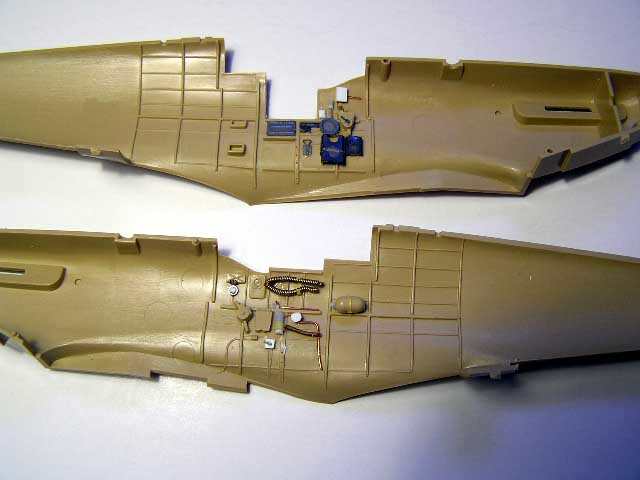
Cockpit
Having not for once began the work by the cockpit, I proceeded to
install the few PE parts (specially the instrument panel) and some
scratchbuilt items. The core work was hollowing the “false floor”
provided by the kit. I simply hacked off most of it, exception made of
the central “ridge” where the seat is glued, and restored the rudder
pedals rods with some Evergreen pieces. Then, to avoid a see-through
effect to the wing roots, I placed some suitably painted pieces of paper
glued to the fuselage sides; when the wing was presented, they naturally
folded to the inside, mimicking the rounded fuselage bottom and blocking
the ugly wing roots view. They worked fine.
Click
the thumbnails below to view larger images:
Canopy
The kit’s windscreen fits admirably, but I think the rake forward of
the rear frame is just a bit too pronounced. Comparing it to the Airfix
kit, it is almost the same, though against the Hasegawa and the Aeroclub
vac with which I intended to replace the hood there is a noticeable
difference. In the end I rather left the windscreen alone and used the
kit’s hood, which fitted well over the spine and it is not so thick so
as to make a vac replacement mandatory. The fixed rear portion has a
brace molded from the inside, which would have been better made as a
part of the cockpit assembly. After careful painting, it does not look
at all bad, even from the outside. The clear part itself is just a bit
wider than the fuselage, though it can be coerced to behave by exerting
some moderate pressure.
Seafire specifics
As said earlier, the insert for the arrestor hook fitted perfectly;
it is “open”, so you can see through it into the fuselage. I think this
was the case with the real thing (may be there was a canvas cover) but I
chickened out and glued a blanking plate. The hook itself was missing in
my example of the A-frame, a blob caused by a short-shot of resin in its
place. I considered adding the hook in the Airfix kit, but it is very
over scale and nothing near the angular and complex shape of the
original; I resorted to scratch build it.

The catapult spools (their position is clearly shown, but not their
“attitude”) and slinging points came in the MDC Seafire Ib set, the one
for the L.IIIc provided the “long” cannon barrels. The reinforcing
strips and plates were made of Tamiya tape. The reinforcements around
the radio hatch were, however, just scribed around it.
Putting it all together
The otherwise perfect mate of fuselage and wings was a bit spoilt by
the wing root operations, and some putty and sandpaper work was needed
(completely superfluous if building the kit OOB), but the end result
justified the trouble. Similarly, the wings ended up being thicker that
the separate wingtips (probably due to all the epoxy inside them!)
showing some step, which I confined to the underside.
The tail planes also fit great, but it’s my feeling that they are
perhaps 1 or 2 mm too far to the rear, but I could not pinpoint the
cause.
I drilled a hole in the new location of each cannon barrel and inserted
them without mishap; I also puttied and sanded flush the muzzle holes
for the machine guns: two had to be relocated, the others were way too
big, and anyway I planned to paint the Red tape over them.
The Airwaves oil cooler fitted just a bit proud, but careful sanding
solved that. The same can be said about the kit’s own and of course
about the radiator. The carburetor intake was faired in with a slight
bed of putty.
Paint
Though built by Westland, it is thought that this machine at last
displays the standard FAA Temperate Sea Scheme, most previous production
by that factory was finished in RAF Temperate Day Scheme colours! The
latter scheme shows a distinct contrast even in B&W period pictures.
In this case I used the Sky Type S and the Extra Dark Sea Gray from the
White Ensign line. The quality of these paints is excellent, but the
accuracy (if accuracy we can speak of) of the colours is something of a
mixed bag: some are great and some practically unusable. These two are
of the “great” kind! The Dark Slate Gray came from Xtracolor, for it
shows that exact blend of lichen and petroleum hues that makes all
others seem just a silly shade of green (well, the WEMM one is also very
good).
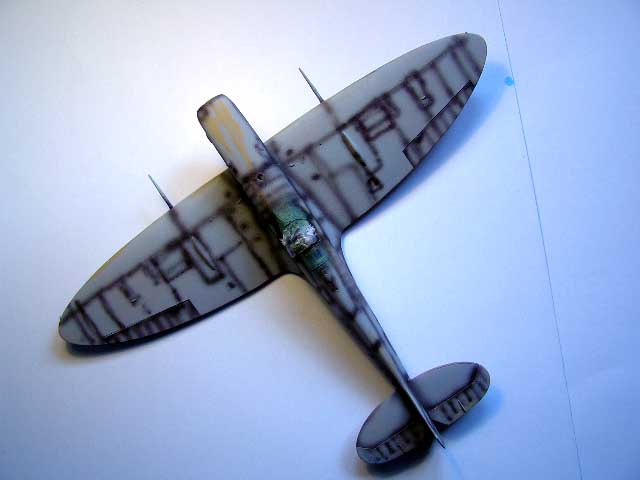
As usual, I did an extensive preshading (no, I fear not) and then
started with the Sky, then the EDSG, and then the DSG, all in very thin
and transparent random patterns. A consistently lighter shade was
sprayed on the fabric tail flying surfaces.
Markings
The standard ETO markings were overpainted in matching colours in the
fuselage, and in big DSG disks on wings, mostly free hand. The
difference in coat density made the additions stand out, without any
kind of colour mix.
Decals came from the "Seafires On Target - Profile nº 5" sheet, from
Aviation Worshop Publications Ltd. They are used together to the "On
Target Profile nº 5 - Supermarine Seafire Mk.iB - Mk.47", by Jon
Freeman, from the same publisher.
This arrangement works fine; the booklet, though containing only
profiles and devoid of any photograph, has very useful information on
the schemes proposed. However, no specific decal placement instructions
are given, nor in the sheet, nor in the booklet! But the schemes on the
decal sheet are provided with four-views illustrations will are mostly
self-explanatory.
The decal themselves worked really fine. The small BEIF roundels on
the wings should center exactly on the "overpainted" ETO ones; mines are
a bit off placed.
In my humble opinion, understanding of the differences between the
Spitfire Vb and Vc (and, therefore, of the nature of the Merlin Seafire)
came late to the model industry. Otherwise, it can not be explained that
both Tamiya and Hasegawa had issued a model of the Vb at almost the same
time, with no effort to upgrade it to the more interesting Vc. If you
look through the pages of the appropriate “Squadron in Action” book,
you’ll see just an inaccurate drawing intending to show the differences
between a “b” and a “c” wing. The Squadron title on the Fleet Air Arm in
its very cover illustration shows a pair of Seafires, which are
identified as L.IIc, depicted with cannon stubs added to an unmistakable
“b” wing. Even the MDC “c” wing has “b” wing wheel bulges. I understand
there was once a Gartex composite kit which depicted the Vc, but I do
not know to which degree of accuracy.
I think that the conversion made to the kit is relatively easy, though
tiresome. In another take, I would not use resin only to blank the holes
in the wing, but a blanking plate from the inside first, to provide
support: the flexing of the wing caused the resin to detach, showing
again previously eradicated cracks. The conversion is not “definitive”,
the elusive wheel bumps on top of the wing and the bulged u/c doors are,
or may be, missing, as I could not find solid reference on them. Also,
the look of the bulges on the cannon breeches is as good as the ones you
manage to scrounge, and mine are not the best. I am not happy with the
angle of the undercarriage struts (but comparing it to head-on views
seems better); the wheel wells have an unexplainably oval shape; the
rear frames of the windscreen are really too canted forward. But the end
result is in my opinion both good looking and reasonably accurate (I
think that it is more accurate than using either the MDC or the Airfix
wings, and better looking than the raw Tamiya Vb).
Of course, we are all still waiting for someone to come up with a good
Vc/Seafire, or, at least, an affordable conversion.
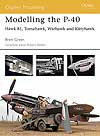
Modelling the P-40
Hawk 81, Tomahawk, Warhawk and Kittyhawk
Osprey Modelling 15 |
|
|
|
|
Author: Brett Green
US Price: $17.95
UK Price: £12.99
Publisher:
Osprey Publishing
Publish Date:
January 10, 2004
Details: 80 pages; ISBN: 1841768235 |
|
|
Text and Images Copyright ©
2006 by Fernando Rolandelli
Page Created 11 July, 2006
Last Updated
16 July, 2006
Back to
HyperScale Main Page |
 Home
| What's New |
Features |
Gallery |
Reviews |
Reference |
Forum |
Search
Home
| What's New |
Features |
Gallery |
Reviews |
Reference |
Forum |
Search