|
Hasegawa +
Airwaves 1/48 scale
Seafire Mk.XV
by Fernando Rolandelli
|
 |
|
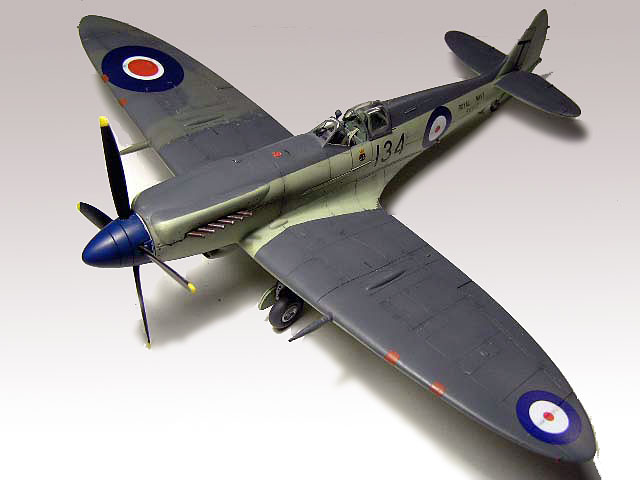
Supermarine Seafire Mk
XV
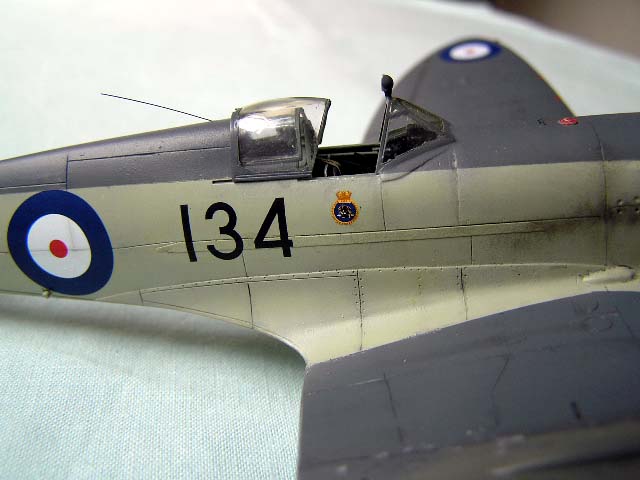
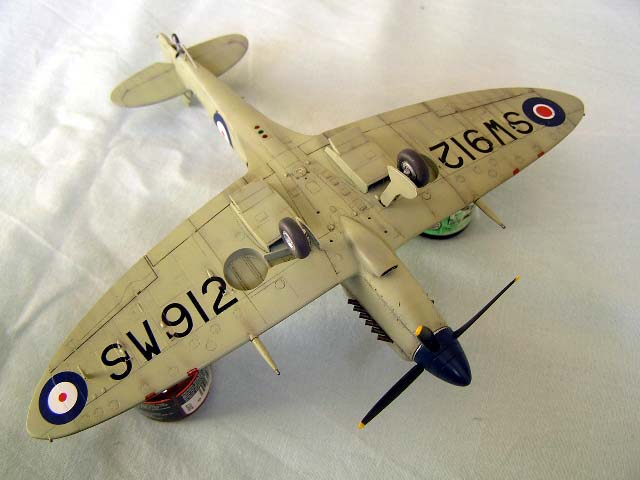
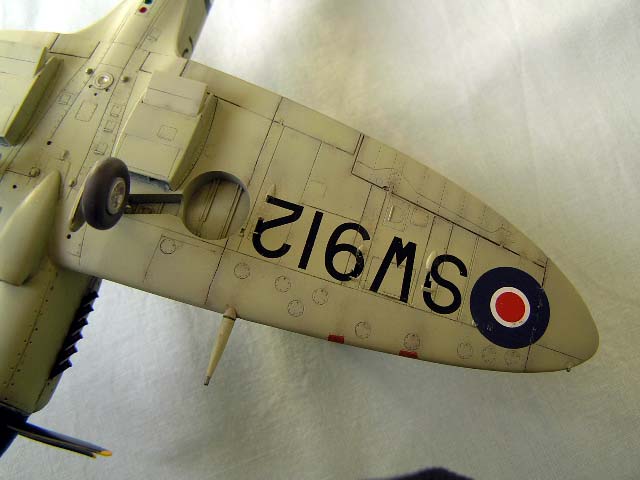
Serial SW912, “134/T”, 804 Sqn NAS HMS Theseus, February, 1947 |

HyperScale is proudly supported by Squadron
I wanted to build a Seafire Mk XV. But, what exactly is a Seafire Mk
XV?
It is not a navalized Spit F.XIV (like the Mark number could make you
think); it is not quite either a navalized Mk XII. As many marks of
Spit/Seafire, it is something of a mix and match. It seems to be
composed of a short Griffon nose, as in the Mk XII cowling (though
lacking the prominent Coffman starter bulge) mated to a Mk VIII airframe
(but with a F.XVIII style rudder –wait, the fin leading edge was not
modified!) and Seafire L.III wing (though the larger oil cooler led to a
“symmetrical” appearance); the whole thing navalized.
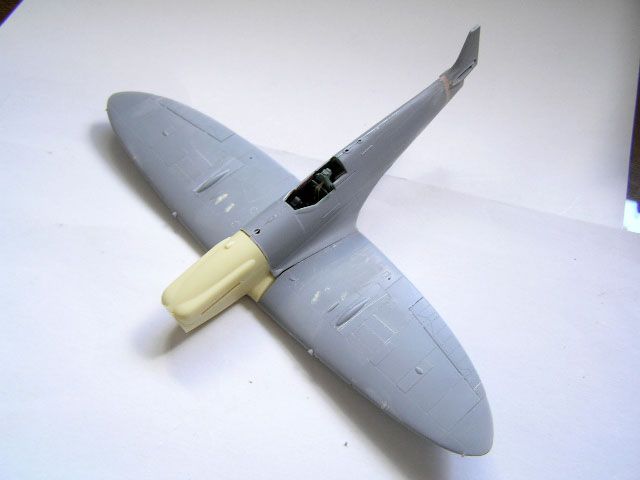
A Conversion Work
Well, the basis for this project was the Airwaves SC48094 resin
conversion. It is not perfect: the resin nose and spinner are gorgeous,
but the exhaust are of the fishtail variety, correct only for the three
prototypes; the “stinger hook” insert is sized for the standard Mk VIII
rudder which is not correct; the “A-frame” hook is depicted stowed, and
most of the remaining bits including the PE are more applicable to a
L.IIIc. But that nose is so appealing….
The Donor kit
I used the Hasegawa Mk VIII. Now, if you have read it is crap, you
have read it right! It is amazingly short. Mating it by the cockpit
opening to an ICM Mk IX as, seen in the pictures, it lacks at least 2 mm
both in the tail and in the nose areas. I decided to enlarge the tail,
cutting in a panel line; this correction is a piece of cake. But the
nose is hopeless… luckily, the conversion set would do the trick. On the
other side, the cockpit interior is great, inviting you to scratch build
the missing details, and the surface detail is excellent.
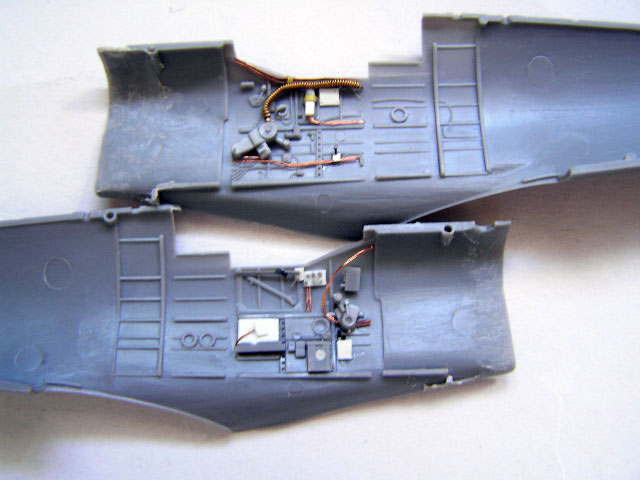
Fuselage
I decided first to cut everything and test the feasibility of the
tail extension.
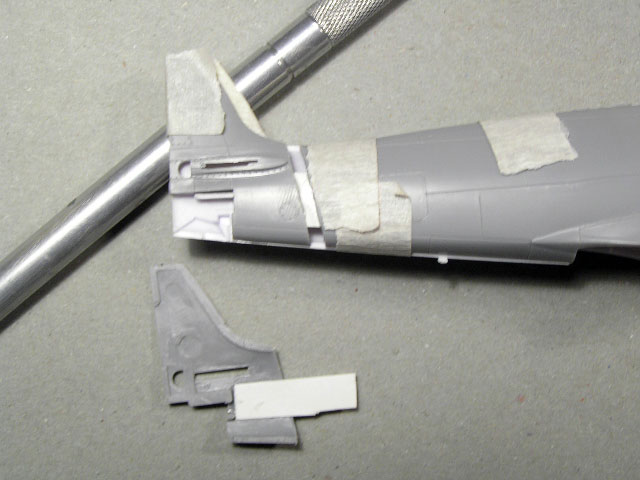
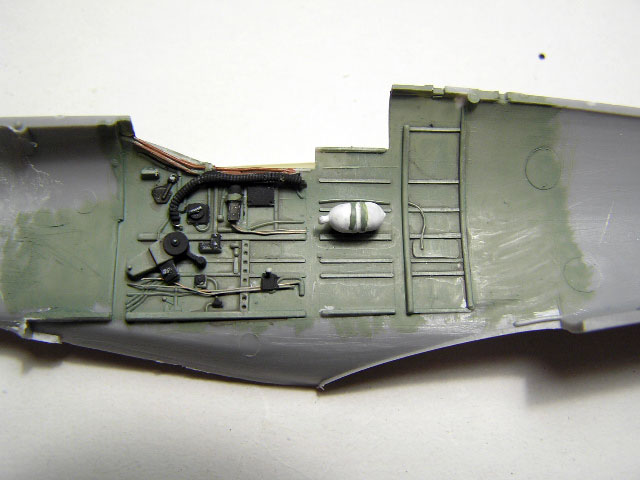
It was very easy, using internal styrene connectors. Then I furnished
the cockpit and closed the fuselage halves.
Click
the thumbnails below to view larger images:
The GS gunsight is rather small, but I let it be. I filled the
extension with a two part resin epoxy called “Parsec” (we also have an
irreplaceable household item there in Argentina, just like the famous
Future…). Once it was roughly finished, I turned to the wings.
Wings
Okay, I filled several panel lines and hatches and scribed some
others. The cannon covers have a straight panel line, not angled, like
in the Mk VIII. Then I glued them and scribed the wing fold, taking as a
model an MDC Seafire L.IIIc wing. I plugged in the outboard cannon stub
and the machine gun openings, they were so, so irregular. They would be
finished in Red dope tape, anyway. I modified the leading edge of the
undercarriage doors, making them rounder.
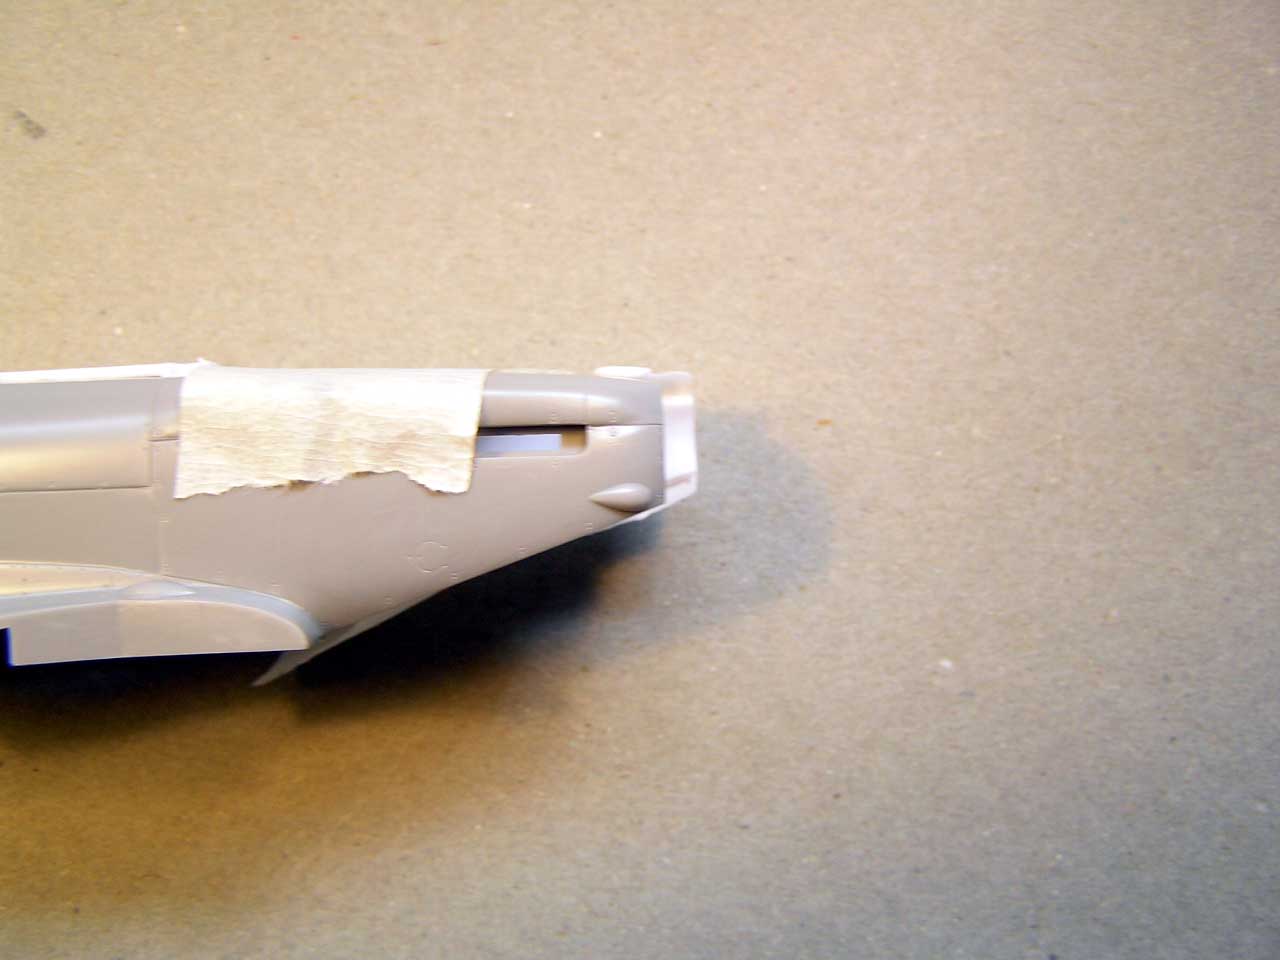
Mating them
I fitted the wings with some care, most of the mating surfaces were
gone with the nose, and then dry-fitted the resin nose. It was far from
perfect, but it was workable, thinning most mating surfaces with a
dremel tool helped a lot. The conversion provides the carburetor intake,
but there is a big gap in the wing’s undersurfaces, which was filled
with Parsec. The fit of one of the wing halves was considerably worse
than the other (some cutting mistake here) so the gap was filled in the
same way. Some bulges in the wing root were lost and made again in more
Parsec.
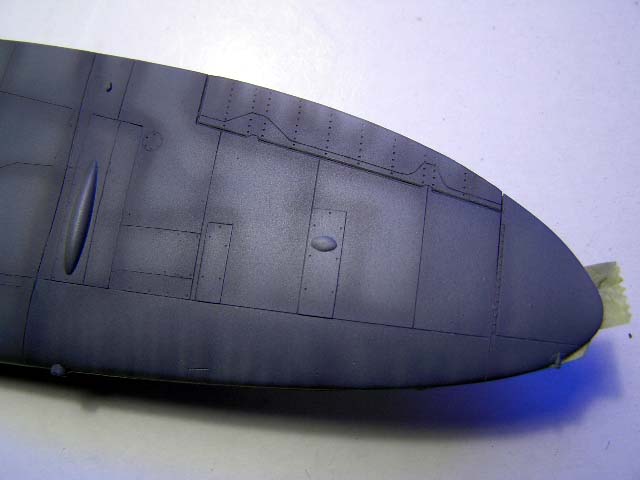
After many sessions of filling and sanding, the primer showed that
the nose and the rest of the fuselage already seemed to belong to the
same aircraft in the same scale! By lucky design, there is a panel line
on the join, but rescribing it on the various materials used to fair the
parts to each other was no lesser feat. After this I fitted the
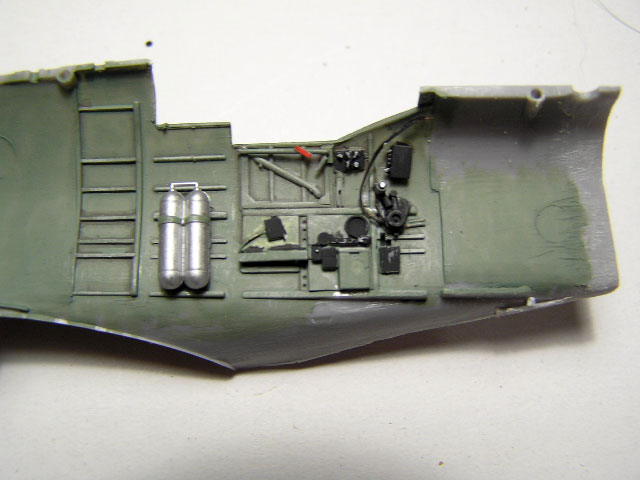
reinforcing strip in the mid fuselage skinning. The PE part provided is
useless, too wide. The SAMI book shows it ending just ahead of the
firewall panel line, but the only clear photo provided showed it running
much forward. I made it with Tamiya tape trimmed to shape. When priming,
a further problem appeared: the previously neat, well-defined sunken
rivets turned into potholes of unknown depth! After going around the
problem, I opted for filling them with white glue, cleaning the excess
with a dampened cotton bud. It worked (shall I try the method on the
Trumpeter Tomahawk?)
Canopy
I am able to report that there was not a single problem with these
parts. Their fit was excellent and with a little of putty they seem to
emerge from the solid plastic, as they should.
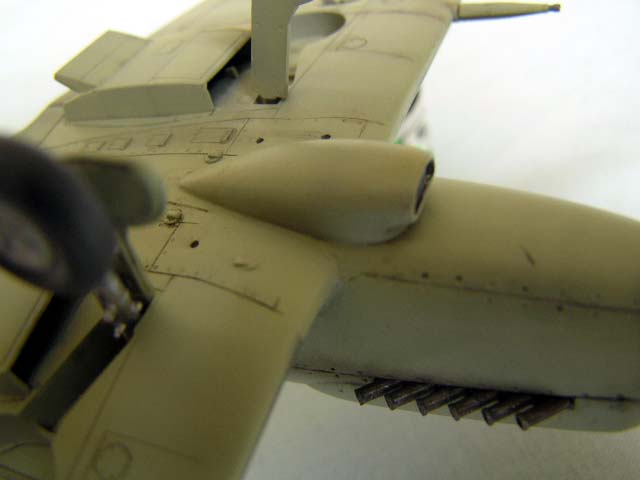
Rudder
Ah, it was another story… The Hasegawa kit provides the standard and
the extended Mk VIII rudders, nicely detailed both… The Airwaves
conversion provides the moving part of the “stinger tail”, and it fits
perfectly the “extended” Mk VIII rudder… Wait, something is wrong! Mk
XVs with “stinger tails” had a “further extended” rudder, akin (but not
identical) to the F. Mk XVIIIs’… Well, I had such a rudder in my spares
box, and I proceeded to hack at it until it resembled the Mk XV’s.
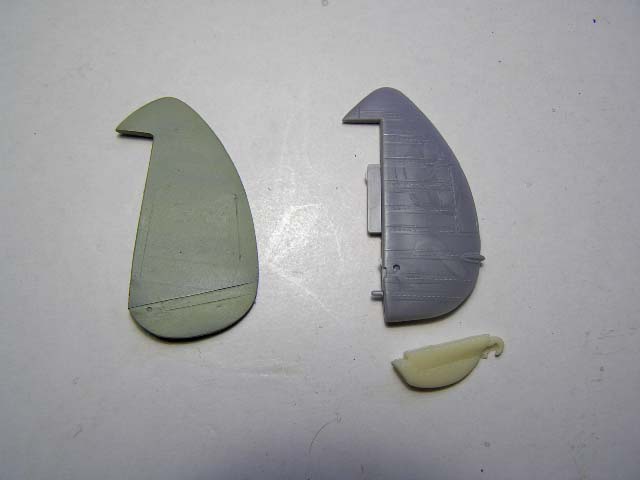
After that, I cut the hook from the resin part and glued it. Gruesome
work to say the least. No, the rudder for the “A-frame” version must
also be modified from the Mk VIII “extended” one, by enlarging the trim
tab.
Small fittings
They were added after painting, decaling and weathering, actually.
The exhausts included in the conversion set are of the fishtail variety,
only seen in the first three prototypes; I used the spare Hase ones,
rounded as they should be. The cannon fairings unused in the kit were
also fitted, you’ll recognize them immediately: they are the ones with
the “Seafire L.IIIc look”! I do not know why Hase included them at all.
No antenna was fitted, but the tail wheel guard was made of Contrail
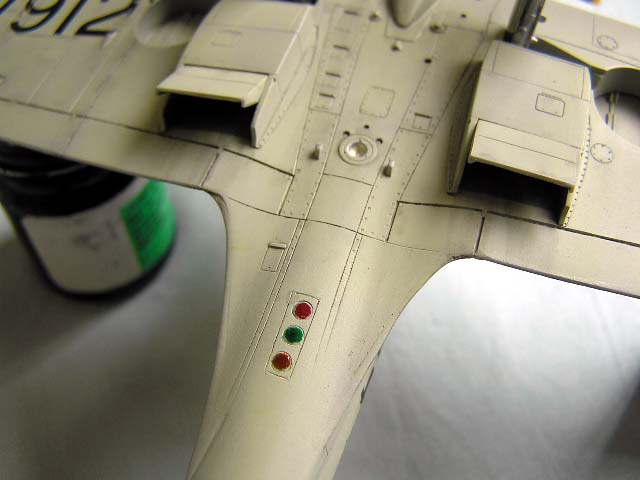
rod. I painted the various position and landing lights by the
time-honored method of a Silver paint circle, topped by the appropriate
Tamiya clear acrylic. Two very small slices of rod mimicked the catapult
slings in the rear fuselage; the strengthening fishplates, prominent in
L.IIIcs, do not show in Mk XVs. The leading edge hooks, visible on Mk
XVIIs, seem not to be present in Mk XVs; I did not fit them.
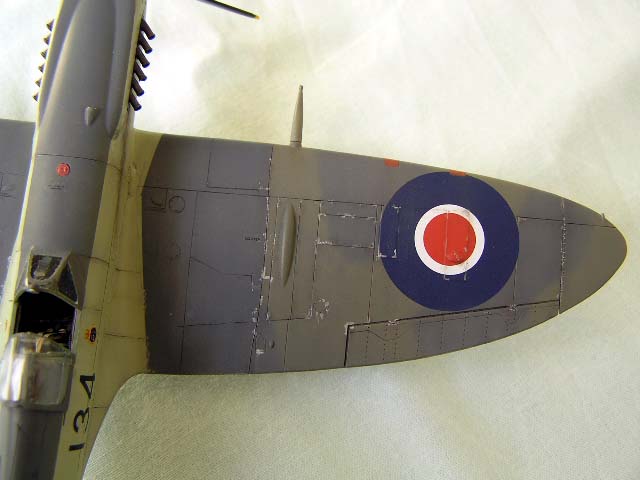
Painting
SW912 was painted in the early post-war FAA camouflage of EDSG over
Sky Type S; a most elegant operational scheme. The high separation line
left most (or all?) of the rocker covers in Sky; the side view in the
instructions conflicts with the upper plan view in this matter.
The most of this plane was Sky Type S, a very light, rather warm
color which is ideal to show the usual preshading tricks. I painted a
generous preshade in Burnt Umber over the Light Grey priming. Then I
proceed to paint the Aeromaster Enamels Sky panel by panel, in almost
translucent “mottle-and-strake” fashion… leaving enough of the preshade
to give each panel a distinct character. Long and tiresome work, but it
pays a lot. A particularly impossible to rescribe panel line in the
firewall join was just mimicked by differential painting. With these
areas conveniently masked with Tamiya tape, I painted the Extra Dark Sea
Grey, from the White Ensign line, in similar fashion. This paint seems
too translucent, but in the end it covers well and has a low shine. This
particular machine had a replacement outer wing painted in Temperate Sea
Scheme; I painted freehand the visible Dark Slate Grey areas, also using
WEMM paints. I tried hard to reproduce the more weathered look of this
older part; it certainly looks different. The Blue spinner was painted
in some indistinct Humbrol Blue, nº 15, I think.
Weathering was made with the usual oils, airbrushed exhaust stains and
silver chipping… all very, very restrained.
Decals
I used decals from the “The Aviation Workshop” Seafires sheet.
Several Merlin- and Griffon-engined machines are depicted all related to
the “On Target” booklet on the matter. That’s why the instruction sheet
has no hint about the decal placement… wait, the booklet has none
either! I wonder why they did not depict any British Pacific Fleet Mk.
XV, and why they did so with Seafire Mk 46 “LA 546”, the same shown in
the Grand Phoenix kit. The decals are first class, of Microscale
quality; they stand much abuse (the large under wing serials must set on
multitude of bumps and exhaust holes –I resorted to cutting each single
letter and number) and they settle down very well on a gloss surface
with the usual Set-Sol solutions. However, the images are just a bit
larger than they should (a common defect of many aftermarket decals); it
shows only when they must fit tight in between panels.
From a mess of resin, plastic and several kinds of glue and filler
emerged a handsome model of a handsome machine. The scheme I chose is
fairly classical, but wilder ones are available (French Aeronavale,
Burmese AF in NMF!). I cannot explain why Airwaves (well, Hannants,
nowadays) has discontinued this set, or why Aeroclub has chosen to make
a conversion for the much duller Mk XVII instead (you could do the same
conversion cutting the nose of the latter; cheaper and with lots of
useful parts). In the end, using the Hase as a donor kit was a mixed
blessing: once the rear fuselage is corrected (it is so easy…) the
quality of the rest of the kit really shows.
Click
the thumbnails below to view larger images:
Modelling the P-40
Hawk 81, Tomahawk, Warhawk and Kittyhawk
Osprey Modelling 15 |
|
|
|
|
Author: Brett Green
US Price: $17.95
UK Price: £12.99
Publisher:
Osprey Publishing
Publish Date:
January 10, 2004
Details: 80 pages; ISBN: 1841768235 |
|
|
Text and Images Copyright ©
2005 by Fernando Rolandelli
Page Created 02 December, 2005
Last Updated
02 December, 2005
Back to
HyperScale Main Page |
 Home
| What's New |
Features |
Gallery |
Reviews |
Reference |
Forum |
Search
Home
| What's New |
Features |
Gallery |
Reviews |
Reference |
Forum |
Search