|
Classic
Airframes'
1/48 scale
Hawker Sea Hawk
Mk.101 and FGA.6
by Ingo Degenhardt
|
 |
|
Hawker Sea Hawk Mk.101
|
images
by Lutz Degenhardt

Classic
Airframes' 1/48 scale Hawker Sea Hawk may be ordered online from
Squadron
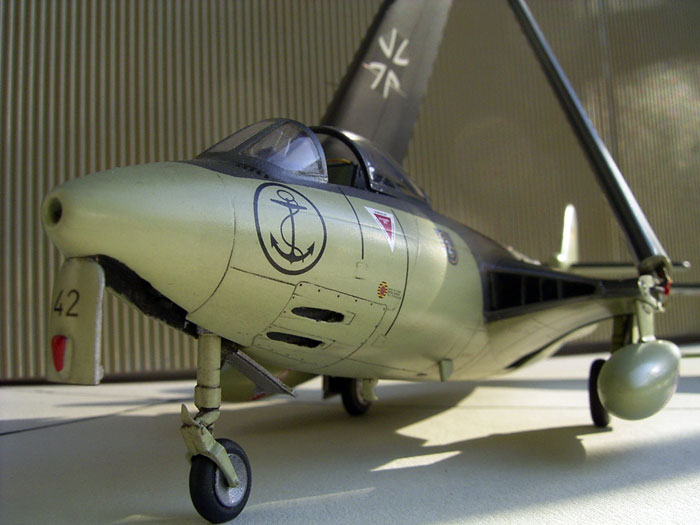
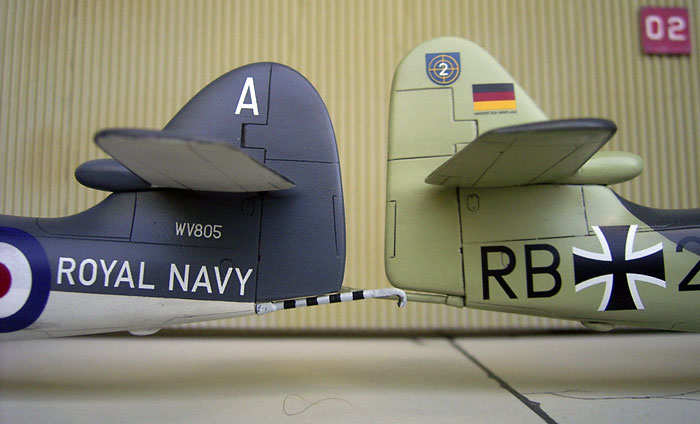
Initially I did not intend to build two Sea Hawks but only a Mk 101
as in service with the German Marineflieger during the early
1960’s.
Classic Airframes offers two Sea Hawk kits for the different versions
that can be build. So I ordered the kit for the Mk. 100/101.
Opening the box reveals 3 sprues of injection moulded parts, 20 pale
yellow resin parts, one fret of etched metal parts, a large decal sheet
and of course the instructions.
Construction in general looks rather simple and I started with
cleaning the major resin parts such as cockpit tub, main gear well
interior and air intakes. Some dry-fitting looked very promising and
indeed the fit of all these parts is excellent. My personal favourite
part of this model is the large resin block for the main whell well
interior – well detailed, flaw-free and a snap-fit into the lower
fuselage half. Just make sure about front and rear of this part.
Some attention must be paid to removing the excess resin because
otherwise the top and bottom front fuselage halves will not fit
together. As an example, the cockpit floor on my model was paper-thin
after I finally sanded off enough resin to make it fit. When all the
surplus resin is out of the way the front fuselage halves are glued
together. They do not fit very well.
To help them align a little better I glued small discs made from sheet
plastic along the inside of the joints on both parts. You just have to
make sure the upper and lower discs do not interfere with each other.
This measure improves things here a good deal, but there is enough
filling, sanding and rescribing left when the front fuselage has been
glued together.
Not quite so for the left and right half of the rear fuselage – although
no location pins are provided, these parts can be glued together without
any problems. I just used a few of my “alignment-discs” here.
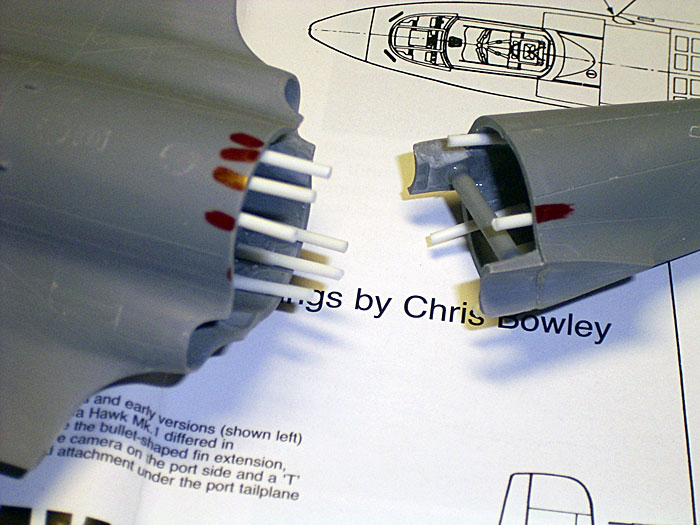
Attaching the parts A 8/27 (base for engine nozzles/blast shields) needs
some filing and sanding according to the instructions before glueing
them into the front hull, but their fit was quite good without much
extra work. The jet nozzles are to be installed at this stage also.
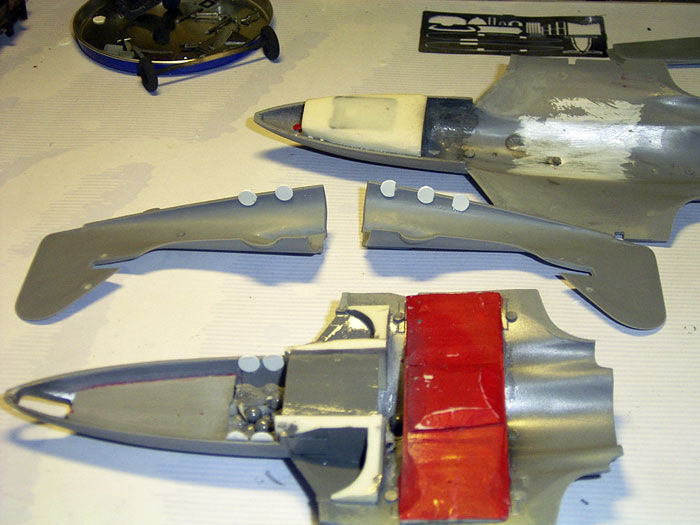
Connecting front and rear fuselage is nearly a butt-joint and fit ist
rather poor. Only limited success this time trying to equal the
cross-sections of this joint in the described way. Quite a lot of filler
was used here, followed by intensive sanding and of course rescribing.
Most difficult thing here is to smoothen the connection of A 8/27 and
the rear halves of the blast shield moulded to the rear fuselage halves
as there is very limited space for filling and sanding.
When that was done I installed the completed horizontal stabilizers.
Their fit is very good and needed no filling or sanding at all.
Click the thumbnails below
to view larger images:
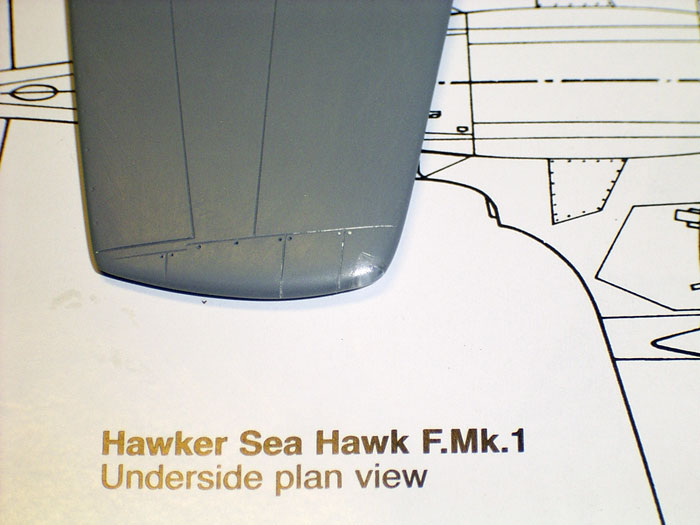
Next I drilled out the flat nose and carefully sanded it
into an oval shape with rounded edges. The gun ports were also drilled
out because they are moulded much too shallow. I did not install any gun
barrels as I could not make them out on any photograph. They seem to be
too far inside the fuselage.
Canopy and windshield are moulded as a one-piece clear injection part.
The fit of this part is not that good so I carefully separated
windshield and canopy by cutting them with a sharp hobby knife. The
windshield installation needs some filling and sanding to make it fit
but this is much easier than to make the closed cockpit fit. Besides
there now is a nice view into the cockpit when the canopy is displayed
open.
The last parts to be glued onto the fuselage are the catapult hook and
the spent cartridges ejectors. The hook must be positioned further
forward than stated in the instructions due to my drawings and the two
protruding ejectors must be reworked because they are angled too far
outwards when glued on as they are. Seen from the front their angle is
nearly exactly vertical downwards.
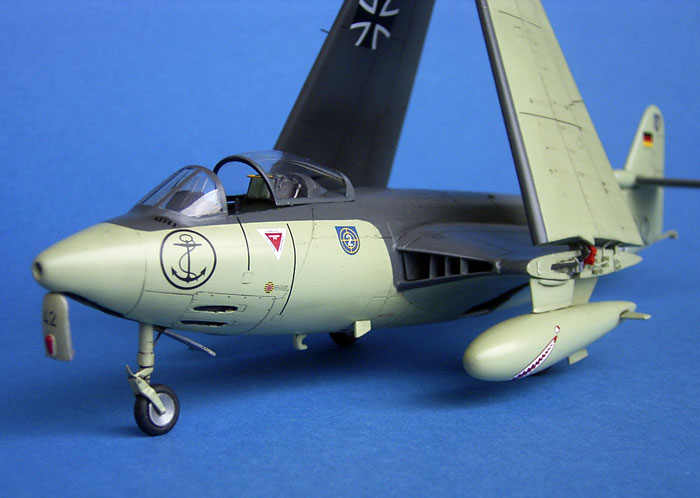
Although only land-based, it was not unusual to see
German Sea Hawks parked with the wings folded to save space. I built the
outer wings as sub-assemblies to glue them on later in the folded
position. A resin insert closes the wing cross-profile on the fixed part
of the wing while an etched-metal part is used for the outer wing. Both
can be attached without further problems. Parts A 7/26 can be used to
adjust the outer wing profile. I did a little extra detailing on the
resin part later.
So much for the construction – well, almost... later on I discovered two
things about the model that were wrong. The first is the angle of the
windscreen. While fitting it onto the fuselage, I didn’t pay enough
(none) attention to it’s correct attitude. I was satisfied when I had it
properly glued on, filled the gaps and sanded it smooth. What I didn’t
notice then but is most apparent once perceived is the angle of the
windscreen’s rear framing – it is much too steep, nearly exactly
vertical. No chance to correct it now.
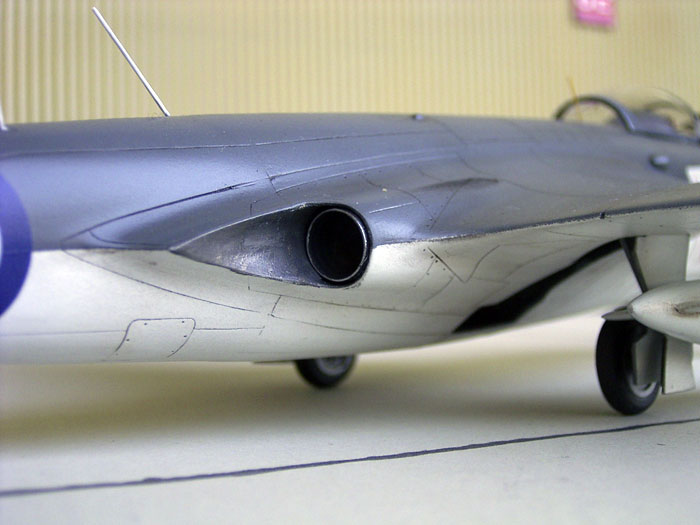
The second mistake I discovered while flipping idly through Warpaint No.
29 and looking at the many photographs: The model’s jet exhaust pipes,
installed as per instructions, protrude a good deal from their fuselage
housing. Not so with the real thing. They are visible but end where the
surrounding panels end. This can be easily corrected, provided it is
noticed in time, i.e. before installation. Again no chance to alter it
now.
This was the moment I first thought briefly about making a second Sea
Hawk without these mistakes.
Paint
There is only one paint scheme to choose from for the
kit’s decal options – BS 640 Extra Dark Sea Gray over BS 210 Sky.
I started as usual (cockpit and wheel wells already covered) with a base
coat of flat light grey to reveal any building issues that might still
need some additional work; often not easily noticable without this base
coat. And there were some of those. A little bit of work with some fine
grit wet & dry dealt with that and the model was ready for Xtracolor X 5
and X7
X7 Sky was first – sprayed on aircraft undersides, sides, vertical
tailplane, gear doors and struts. Xtracolors have a quite long drying
time, but nearly always spray very nice and –most important to me- are
gloss paints.
Masking the undersides for this camouflage scheme is not that easy as it
is not a straight ‘waist’ line as on the later scheme with white
undersides but has some curved lines in front of the windshield as well
as on the wing leading edge and the fuselage rear. I used Tamiya masking
tape for the job.
Extra Dark Sea Gray sprays fine too and after removal of the masking
tape the paint scheme is ready for weathering. After a two days drying
time a wash with diluted enamel (brown for the undersides, black for the
upper surfaces) was applied directly onto the XTRA-color. The wash of
course thins the paint but almost never down to the base coat or even
the plastic. Precondition is that the paint has been given enough drying
time.
Decals
As mentioned I used the decals for a Mk 101 of MFG 2
from the early 1960’s. The second choice for this kit is an Indian Navy
Seahawk. Surplus German Sea Hawks were sold to India when the
Marineflieger transitioned to the F-104 in the mid-sixties.
The decals are printed by Microscale and are very good. No problems
here. I used Superscale Micro Set and Sol as usual. When dry, all excess
decal glue was wiped off with a damp tissue and then I checked the
markings for any Silvering that might have occurred. There was only very
little of that and these few air bubbles were pierced with a needle. A
tiny drop of Sol then was applied and pressed into the fine hole with a
brush. Sol then displaces the trapped air.
I repeated the wash on the panel lines running through the larger
decals, wiped it off and now it is time for the clear coat.
I used Humbrol Satin Cote for this because I considered a semi-gloss
finish to be the best compromise between the factory gloss coat of the
real aircraft and weathering and scale effect on the model’s side.
A little further weathering was done with pastel chalk powder to
resemble stains for example from the guns or – often very prominent on
real Sea Hawks- the cartridge starter port on the left upper fuselage
behind the cockpit. Few oil stains were simulated by wiping thinned flat
black from covers, etc. in the direction of the airflow. In general,
this Sea Hawk received only very moderate weathering.
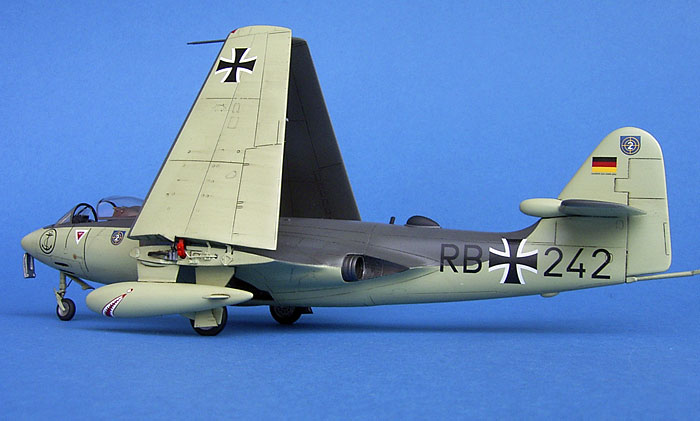
I like the Sea Hawk, I like the Classic Airframes model – and I gnawed
on the mistakes I made. So I ordered CA’s second offer, the kit for the
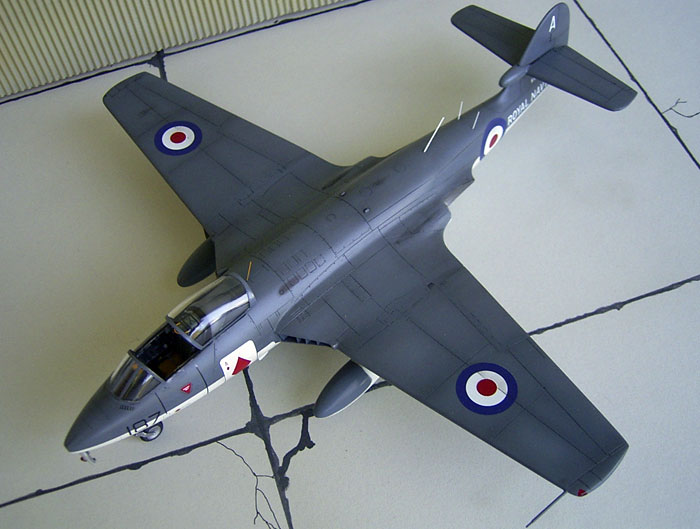
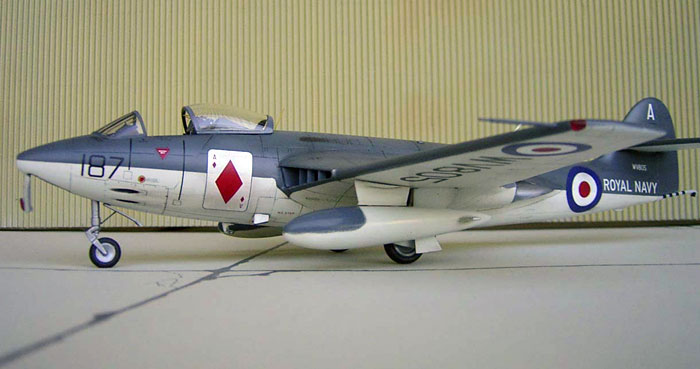
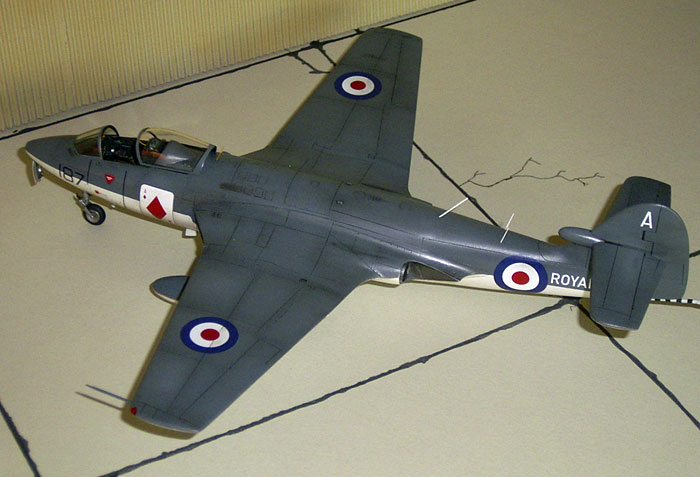
FGA.6/Mk.50/FB.3 as an on-the-spot decision. This time I chose a RN
aircraft with the later style camouflage scheme from No. 806 Squadron
“Ace of Diamonds”.
Construction methods in general remained unchanged except of course
avoiding my mistakes regarding the windshield and engine nozzle
installation. I am satisfied now with these areas. The wings were now
unfolded, which is of course less detail to take care of but fit is an
issue here. Again, the parts A 7/26 are helpful in order to align inner
and outer wing cross sections. I closed the gap completely with
Cyanoacrylate glue and rescribed the wing folding line afterwards.
In both cases a little bit more ordnance than the two drop tanks would
have been nice; in case of the Mk 101 an EKCO 38b Radar-pod or some
rockets with launchers for the FGA.6.
Source
Warpaint No. 29 Hawker Sea Hawk
Model and Text Copyright © 2005 by
Ingo Degenhardt
Images Copyright © 2005 by Lutz Degenhardt
Page Created 14 December, 2005
Last Updated
13 December, 2005
Back to
HyperScale Main Page
|
 Home
| What's New |
Features |
Gallery |
Reviews |
Reference |
Forum |
Search
Home
| What's New |
Features |
Gallery |
Reviews |
Reference |
Forum |
Search