|
Classic Airframes 1/48 scale
De Havilland
Sea Hornet F.Mk.20
by Stephen Naylor
|
 |
|
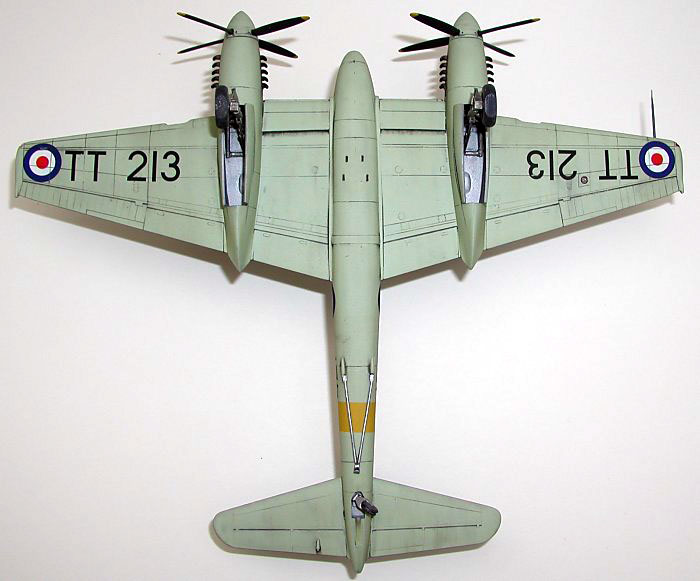
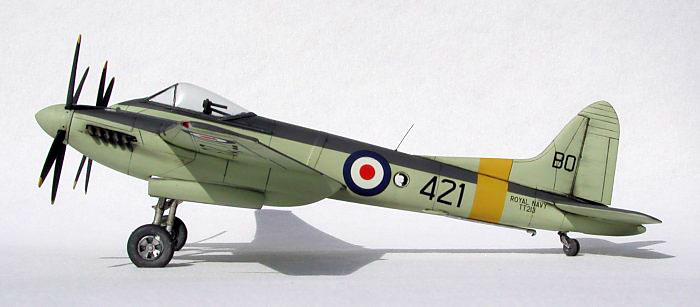
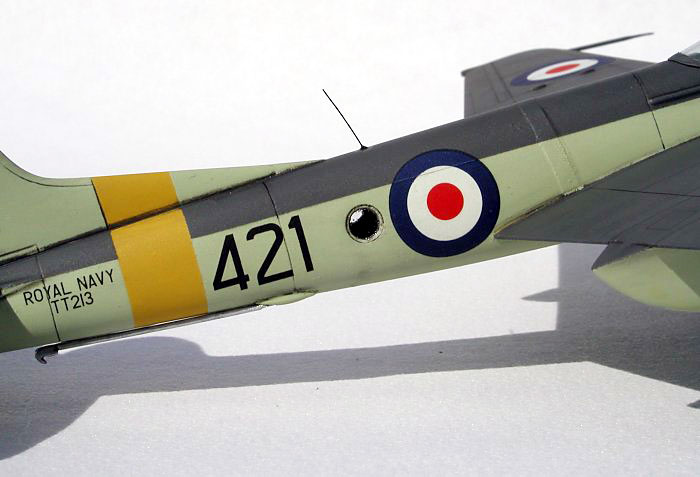
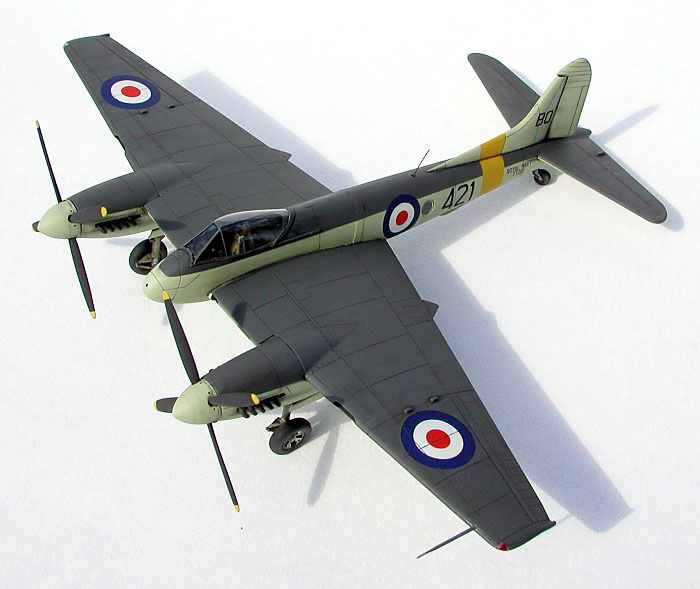
Royal Navy Sea Hornet
F.20 of Airwork FRU, Hurn Airport, Dorset. C1955 |

Classic
Airframes' 1/48 scale Sea Hornet F.Mk.20/21 is available online from Squadron.com
By rights, this model (the first aircraft
I have attempted since my youth) should have been a
Beaufighter. Why? Well although aviation has always been a
keen interest, I eventually took up railway modelling, a hobby which I
still enjoy. More recently though I caught the aircraft 'bug' again
and, after discovering 'HyperScale', set about catching up on
developments in aviation modelling that had occurred in the meantime.
The changes that have taken place are amazing: improved accuracy of
models; greater diversity of subjects; the massive increase in
aftermarket support; limited run kits; multimedia kits; larger scales
are better supported, plus the role of the Internet and publishing in
providing greater information about your chosen subject matter - the
list goes on.
After 'watching' HyperScale for a while, I
decided on a planned campaign for my return to modelling aircraft, in
stark contrast to the random disorder of my earlier days. My main
decisions were:
·
Scale would be 1:48. Mainly because of the display space
available (Piston-engined twins are likely to be the biggest thing I
will be attempting) and also because I think it is a pleasing size to
work in.
·
Subjects chosen would primarily be those with a local
connection here in southern England, but which also fit in with my
specific interests, e.g. WW2 (Allied, especially the Mediterranean
Theatre) to Post-War/Fleet Air Arm/Early Jets. This doesn't rule out
some 'diversions' along the way (my other interests include photo
reconnaissance and flyingboats!), but does give me an overall 'focus'.
So after selling-off the few unmade kits in
various scales, which I had stashed away from years ago, I drew up a
list of subjects/specific aircraft and began gathering information on
them (another favourite pastime). Eventually I began purchasing a few
kits and then made a start on the aforementioned Beaufighter (my
favourite aircraft of WW2). However, with research stalled on the
intended subject (T3316 'M' Pegasus), modelling ground to a
halt. Then Classic Airframes brought out the Sea Hornet F.20, for which
I had got all the information, so the 'Beau' went back in it's
box and the workbench was cleared for action.
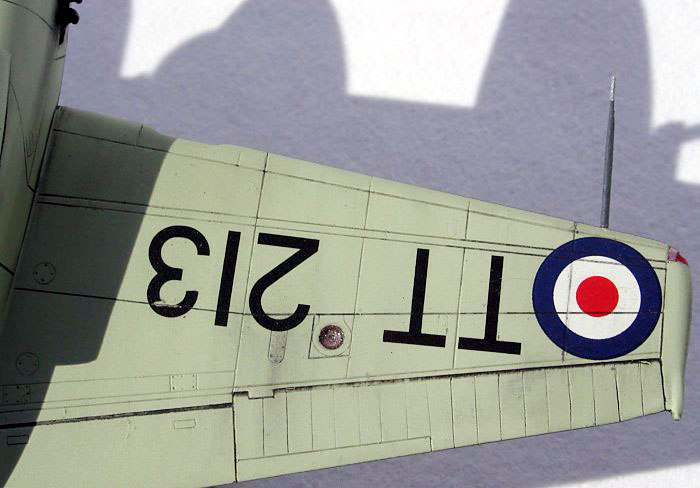
Why
'TT213'?
Primarily, because she was operated by the then
local firm of Airwork Limited FRU (Fleet Requirements Unit) at Hurn
Airport (now Bournemouth International) in Dorset, from 1953 until
1955. At this point I should just mention that this was BEFORE I was
born (though only just!).
Two other reasons tipped the balance, firstly she
was an unusual aircraft in that she had also spent time on loan to the
RAAF (1948 to 1951, as A83-1) undertaking some 49 hours of Tropical
trials, and secondly (and decisively), because Hannants produced the
Xtradecals sheet X042-48, which contains markings for 'TT213'. Of
course the DH103 is a also a beautiful aircraft, from the zenith of the
piston-engined design era - who needs any other reason?
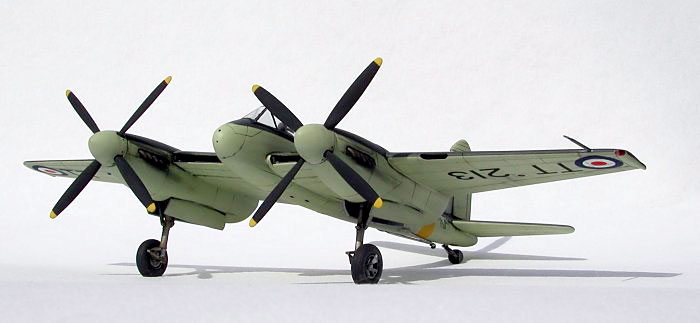
Classic
Airframes' 1/48 scale Hornet
|
Classic Airframes' RAF Hornet F.1/F.3 and RN Sea
Hornet F.20/NF.21 kits have already been extensively reviewed, both here
on HyperScale and elsewhere, so I do not propose to repeat what has been
said already. However, what I will do is describe my experience of the
kit and the modifications I carried out.
Preparation, as with most things I do, involves
producing a plan and following it. This is especially important for me,
as the time I have free for modelling is often limited and I may have
to put a model to one side for days (sometimes weeks) at a time. By and
large, this plan will follow the kit's printed assembly sequence and
also use it's part number references. Modifications required are also
highlighted, together with any aftermarket parts or other variations.
The use of such a plan also allows me to tick off each phase of assembly
or variation as it is completed; handy when picking up the model again
after a hiatus.
Rather than ramble on, describing the build
'blow-by-blow', I will just give a summary of the assembly sequence.
Firstly though, I will outline the final form of the model I wanted.
The aircraft was to be shown on the ground with a view to incorporating
it into a diorama at some point (possibly about to be serviced, refueled
or towed). As such I decided to leave the cockpit canopy closed (thus
no pilot required), have the rudder and tailwheel shown offset to Port
(as if the aircraft had been swung round to the resting position, before
switching off) and leave the wings un-folded (although I understand from
a local ex-Airwork employee that they would have been folded on landing,
before the aircraft was towed away and parked in the hangar.
[Note: my local 'source' also told me that at
that time, Airwork's aircraft 'tug' was a Ferguson TE20 tractor ('Little
Grey Fergie') with an improvised tow bar. At present, the nearest kit I
can think of to model this, would be the 'O'-scale/1:43 whitemetal kit
by Langley Models].
Anyway, enough of this, on to the assembly.
Pre-Assembly
·
Opened-out the opposing camera windows in the fuselage
halves (A1 & A2).
[I over-did this
initially, so I used stock plastic tubing to 'sleeve' the hole size down
again, before reaming it out carefully to the correct size.
Coincidentally, fixing this insert so that it ended up recessed
slightly below the fuselage surface, has produced quite a good effect I
think. Just goes to show how sometimes a mistake can lead to an
unexpected outcome].
Main Assembly
·
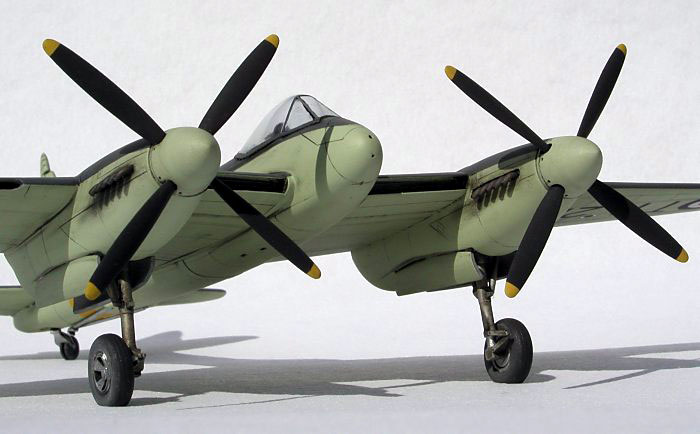
Modified the tailwheel halves (A22 and A23) to represent
the anti-shimmy type wheel actually fitted to DH Hornets (similar to
that used on the Mosquito).
·
Modified and repositioned the tailwheel oleo (R17) to
Port.
·
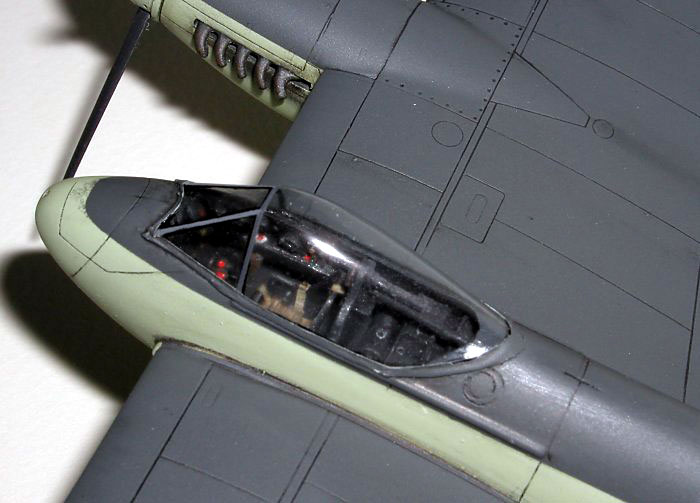
Cockpit - added scratchbuilt cylindrical radio aerial
(behind headrest) and the angled tubular brace fitted to the rear of the
armoured seat back (strengthening for deck landings?). Also added one
of Eduard's coloured etched seatbelts (#49-007 'RAF Late') to the seat.
[I ignored the
(surprising?) lack of a cockpit gunsight in the kit, as TT213 didn't
undertake live firing whilst with Airwork at Hurn (canons were retained
though, to maintain the aircraft's CofG). Anyway, I used the excuse
that such a delicate and superfluous piece of equipment, would probably
have been removed and stored].
After painting the
cockpit and fuselage interior (lightened matt black), dry-brushing to
bring out the detail and assembling the fuselage halves;
·
Opened up the four, shell ejector chutes.
[However, I ignored
the instruction to cut the lower nose and insert the section R5 (having
the 20mm gun port troughs). This was because my local source told me
that as TT213 was used to provide a radar/gunnery practice target (i.e.
never firing it's own guns), these ports were always covered and doped
over and then painted to match the aircraft's own colour scheme].
·
Added appropriate holes for the Gun Camera Port (upper
front of nose) and Cockpit Fresh Air Intake (lower front of nose).
·
After dipping the cockpit canopy in 'Future' (thanks
Swanny), I drew the black framing lines on the inside using a
draughtsman's (Rotoring) pen, before assembling it to the fuselage.
·
Removed the rudder elements from the fin parts (B5 and B6)
and reassembled to show the rudder set slightly to Port.
[On this occasion
however, I chickened-out of doing the same to the elevators, despite the
fact that my reference photo of TT213 showed them slightly drooped -
what can I say].
·
Scribed the wing-fold panel lines, and add appropriate
‘lumps’ to represent the two (upper surface) wing-fold hinges.
·
Added the Port and Starboard Wing-tip Navigation Lights
(using clear plastic, drilled-out and filled with appropriate Red and
Green food colouring before assembly, then sanded back, polished and
re-scribed any lost panel lines).
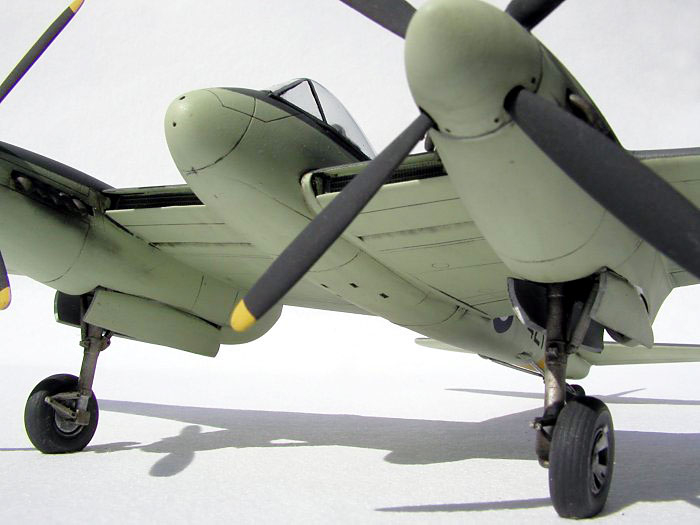
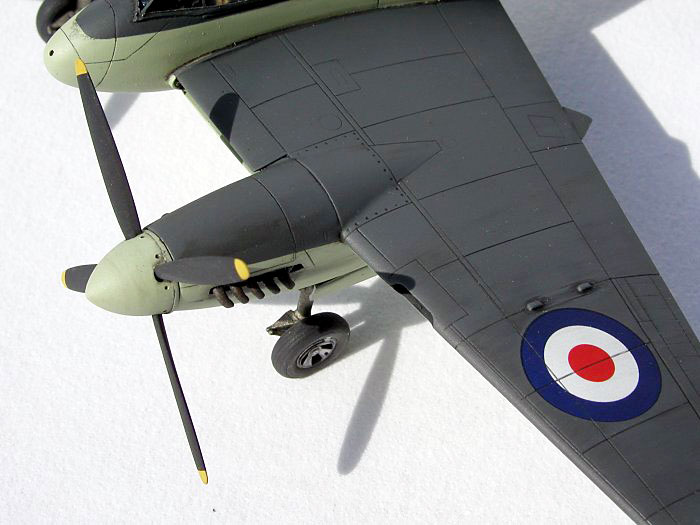
·
Drilled out the landing light lens hole, then fitted the
wings.
·
Added the Zeus fastener detail to the rear of the
propeller spinner rims.
·
Assembled the tie-down/towing eye brackets (Parts R14) on
the main undercarriage oleos in the vertical plane (not
horizontally, as incorrectly shown in the kit instructions).
·
Flattened the bottom of the main wheel tyres, remembering
that these wheels are also angled outwards by about 3 degrees (Had to
shorten the main axle stubs slightly as well).
·
Finally; left the propeller assemblies loose, to allow
removal during possible transport/storage of the kit - obviously also
allows the props to be posed in different positions).
The usual filling and sanding was undertaken, but
I could (and should) have done this better (some joint seams still show
in places). Almost unavoidably, this sanding also removed part of the
aircraft's prominent fuselage strengthening band, which I had to replace
using an appropriate strip of paper, attached with liquid cement. Then
the cockpit canopy was masked using 'Magic tape', but only around the
bottom edges (i.e. I didn't bother to mask the individual glazing at
this point). Also masked the wing-tip navigation lights. Parts such as
the undercarriage assemblies, arrestor hook, tailwheel and oleo,
undercarriage doors, propeller/hub assemblies and propeller spinners,
were left off to be painted and weathered separately and assembled
later. I remembered to add the white 'creep mark' to each tyre/wheel
rim, but since completion I have discovered a good photo which shows an
F.20 with pairs of opposing white creep marks (so is this the more usual
practice?).
So, on to the painting. One thing that hasn't
changed since my youth, is my use of enamel paints, mostly Humbrol or
occasionally Revell. For the undercoat, I usually use a can of Holts or
Duplicolour grey or white cellulose primer (a tip originally picked up
from my railway modelling), but on this occasion I used enamel primer
and my Badger airbrush. The area of yellow (Humbrol Matt #24) for the
fuselage band was then sprayed. Once dry, the yellow band was masked
off and the undersurfaces, tail fin, spinners and undercarriage doors
given a couple of coats of Revell 'Sky' (Matt #59). In hindsight, I
hadn't realised how 'Green' this colour is, or at least how green
Revell's version is. In most pictures I have seen of this colour scheme
(EDSG over Sky), the 'Sky' looks more like a mid-grey, so perhaps I
should have lightened it a bit (or is there another 'Sky'?). Anyway,
the undersurfaces and tailfin were masked off next and the upper
surfaces given 2 coats of Humbrol Extra Dark Sea Grey (Matt #123,
lightened with White Matt #34). At this point, the interior of the
wheel wells and inside of the undercarriage doors also received a
brushed coat of Humbrol Silver (#11).
Next, all masking
(except the canopy and navigation lights) was removed, prior to decal
application. Decaling, and particularly weathering, can make or mar a
model, so I had to decide how I would approach this next task
(weathering especially, as although I am used to weathering railway
model buildings, etc, I had never weathered a model aircraft before).
Having looked at HyperScale for some time now, I have seen various
techniques explained and applied but some, although skillfully done, do
not produce results which appeal to me (each to his/her own, as they
say). So eventually, for my first go at weathering an aircraft model, I
decided to adapt Bill Pettyjohn's method, as described in his
Mosquito article in Finescale Modeler magazine (May 2001).
First, the entire model (and the sub-assemblies)
were given a couple of light coats of 'Future', and allowed to dry
thoroughly. Then the appropriate decals from the Xtradecal sheet were
applied, using 'MicrolSol' and 'MicroSet'. These decals went on like a
dream – the first time I have used this method (the last time I decalled
an aircraft, was with water-slide transfers). Next, a second coating of
'Future' went on, to seal the decals and protect them from the next
stages. Weathering came next, using a wash of Winsor & Newton artist's
oils (Ivory Black, Titanium White and a touch of Burnt Sienna, to
produce a grey just darker than the EDSG) thinned with their 'English
Distilled Turpentine'. When dry, this was wiped off (in the direction
of the airflow), firstly with a dry cloth, then using a wrung-out cloth
previously soaked in turpentine. This all went reasonably well, though
some wash repeatedly came completely out of some panel lines (should
have re-scribed, I know). In the end, I turned to the use of a soft
(4B) pencil to infill the missing areas with pencil lead (the excess
being removed with a soft pencil eraser). Pencil lead dust was then
also used to simulate the exhaust stains on the nacelles and the oil
streaks near the undercarriage door hinge lines. Unlike Bill Pettyjohn,
I decided not to try paint chipping as I felt that this aircraft would
have seen relatively little use and also have been pretty well
maintained. So that was about it. The model then got a final coat of
'Future' to seal the weathering, then a finish coat or two of Humbrol
'Satin' (#135).
Sub-assemblies were also painted, weathered and
finished in much the same way, then assembled to the model. The canopy
masking was then removed and the individual glazing frame members masked
and hand-painted with lightened EDSG. The navigation lights were also
unmasked and given a final brush coat of 'Future'. Glazing of the
oblique camera windows and the landing light lens was achieved using
Humbrol's 'ClearFix' (another first for me). Finally the pitot tube was
added from stretched 'Evergreen' rod and painted, and a paintbrush
bristle provided the whip aerial.
There are always things you would like to do to a
model but can't, either because you don't yet have the information,
because the work involved is beyond you, or perhaps not justified in
terms of the time/effort required. For me, on TT213 these are;
·
Eventually add ventral fuselage identification lamps
(however, the only good underside view I have, is of an FR version of
the F.20 and, as with the Westland Wyvern S.4, I don't at the moment
know which of the three lamps is which colour).
·
Possibly add two vertical camera ports in same location
(shown in the Avia Graphica cutaway mentioned below, but I'm
still not sure if all/any F.20's had these).
·
Fit main undercarriage wheels with 'diamond-pattern' tread
(and bulged) tyres (TT213 and later Hornets had them - aftermarket guys
take note!).
·
Fuselage stencil and propeller decals would have been nice
too, but at normal viewing distances I don't think their absence matters
too much.
Now that she is 'finished', the first question to
ask is, “Is this model the best aircraft kit I have ever built? To
that, I would have to answer, “Yes, absolutely!”
My second question would be, “Could the model
have been better”? No problem, the answer is, “Undoubtedly yes!”
As my first model aircraft kit for over 25 years
(Arrgghhh! - sorry), deciding to tackle a limited-run, low-pressure
injection moulded, multi-media kit, was perhaps asking for trouble.
Luckily I have had experience using plastic, card, resin, whitemetal and
brass in my railway modelling, so it shouldn't have been too traumatic.
Indeed, it was not. In fact I have been impressed by what I have
achieved, even if I do say so myself, and Classic Airframes are to be
congratulated for producing such an excellent kit.
There were problems of course, such as: my liquid
glue of choice (Slaters 'Mepak') not really being as effective on CA's
plastic as I am used to; the tailplanes seem somehow to have acquired
some dihedral that the real thing doesn't have; and I think the
weathering effect I have achieved (my first on an aircraft) is a little
too dirty. Some of the kit parts could be better or need replacing
(e.g. No detail in the u/c bays, some resin parts too small to use
without damage/breaking them, the undercarriage doors too thick/not
detailed inside/difficult to attach), but all in all, I'm quite pleased
with the end result.
So that about covers it and I'll bring these
first ramblings to a close. Hope that some of this has been of interest
or informative, but I mustn't rest on my (1/48th scale)
laurels - now, where did I put that Beaufighter kit?
The Hornet File;
Lewis G Cooper; Air-Britain Publications; 1992; p.25
[Has actual photo
of TT213, albeit whilst with Airwork at St. Davids, Pembrokeshire,
rather than Hurn - thanks to Paul Fontenoy via HyperScale for that]
The De Havilland
Hornet; P J Birtles; Profile Publications; No.174
Sea Hornet
Supreme; Article ('Viewed from the Cockpit') by Captain Eric Brown
CBE DSC AFC RN; Air International magazine; October 1982; p.192 – 199
[Includes an
excellent Avia Graphica cutaway, showing all the salient
details]
The De Havilland
Hornet; Article by Richard Caruana; Scale Aviation Modeller
International magazine; October 2002; p.943 – 951
[Only covers the
RAF's F.1's, PR.2's, F.3's and F.4's though]
The photographs were taken with my Olympus
Camedia 4040Zoom (High Quality setting, i.e. JPEG rather than TIFF) on a
tripod, then cropped, re-sized and sharpened for the web using Paint
Shop Pro7. With the exception of one indoor flash shot, the rest are
all outdoor shots taken on a sunny day.
Finally, many thanks to those on 'HyperScale' for
your encouragement, advice and direct help, as well as those former De
Havilland and Airwork staff, who took the time to respond to my plea for
information on TT213/Airwork Limited in our local newspaper (Bournemouth
Evening Echo).
Click on the thumbnails
below to view larger images:
Model, Text and
Images Copyright 2004 by
Stephen Naylor
Page Created 21 April, 2004
Last Updated 21 April, 2004
Back to
HyperScale Main Page
|
 Home
| What's New |
Features |
Gallery |
Reviews |
Reference |
Forum |
Search
Home
| What's New |
Features |
Gallery |
Reviews |
Reference |
Forum |
Search