|
Aeroclub's 1/72 scale
Short 184
by James Fahey
|
 |
|
Short 184 |

HyperScale is proudly supported by
Squadron
The Plane
The Short 184 takes its official name from
the serial number of the prototype but in the RNAS it was also called
the Short 225 (derived from the horsepower rating of the first engine, a
Sunbeam Mohawk, and retained even when more powerful engines were
subsequently fitted).
Two successful torpedo launches were carried out in August 1915 in the
Gallipoli campaign, but they highlighted the shortcomings of the
seaplanes. The 184 could not carry a full fuel load with the torpedo,
nor an observer. The take-off run was in the order of two miles and it
could only get off in calm sea conditions. Maximum ceiling was about
1500 feet with the torpedo and flights were limited to about 45 minutes.
Basically the Short was underpowered for torpedo carrying but it went on
to serve widely with the RNAS in reconnaissance and bombing roles.
Against U-Boats it was found that the Short was too slow to get within
bombing range before the submarines could crash dive below the surface
and get away. The patrols were still somewhat effective in terms of
limiting the U-Boats surface time and therefore their effective range.

It served from Spring 1915 until after the war finished in late 1918
(324 were in commission in December 1918) – a remarkable achievement for
the time.
Flight Commander A H Sandwell liked the Short 184 enough to describe it
as:
“ . . . the pilot’s dream for putting in hours – docile, stable,
obedient, and thoroughly deserving its affectionate nickname ‘Home from
Home’.”
The Kit
Aeroclub’s Short 184 is an injection
moulded kit with over 30 parts, plus a variety of nicely cast white
metal detail items including choice of two props, a large box radiator,
control wheel, seats, interplane and float struts, Lewis gun, Scarf
ring, and wingtip floats.
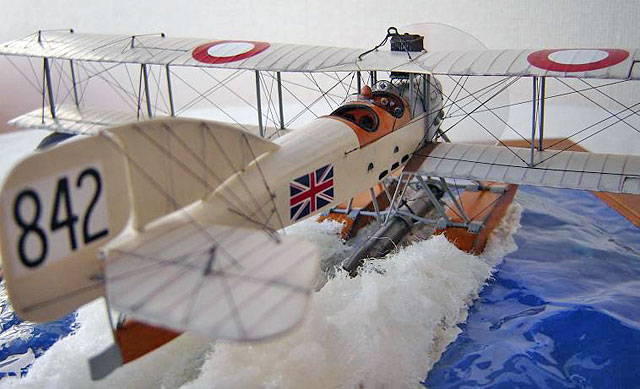
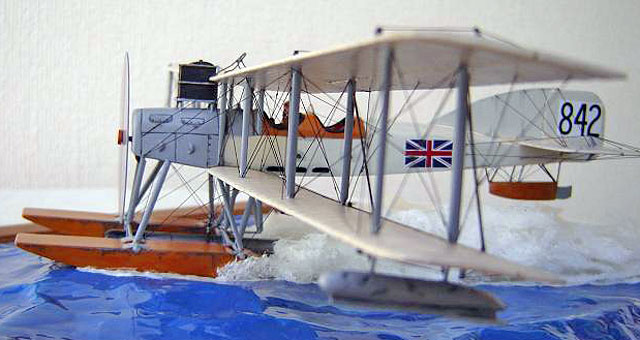
The decal sheet provides for four different aircraft, two in clear doped
linen with red/white RNAS roundels (the original 184 and the historic
842 which carried out the first successful air-launched torpedo attack),
two with red/white/blue roundels - one in clear doped linen (the famous
8359 from the Battle of Jutland) and one in PC10 khaki finish.
The detail on the pieces is well done with commendably thin trailing
edges and restrained ribs. The kit measures up well against the scale
plans in the Windsock Datafile.
No torpedo is included. I really wanted to model a Short with torpedo
and found one produced by Flightpath. Although it is based on a later
prototype, it looks close enough for the 14” used on the Short. It is a
lovely kit in its own right, featuring a resin body, white metal warhead
and photo-etched brass fins and propeller blades. It also has PE bits to
build the trolley, but I didn’t use these. The torpedo has a surprising
amount of detail and is much better than I could have built from
scratch.
References
The best reference for a WWI aircraft is
the Datafile from Albatros Productions. Not cheap, but the quality is
fantastic with plenty of detail shots, colour plates, plans in 1/72 and
1/48 and a full history and markings section.
Although long out of print, Profile Publications produced a monograph on
the Short 184 many years ago, and these are still readily available on
ebay or via internet book search engines like http://used.addall.com/.
Its not as good as the Datafile however.
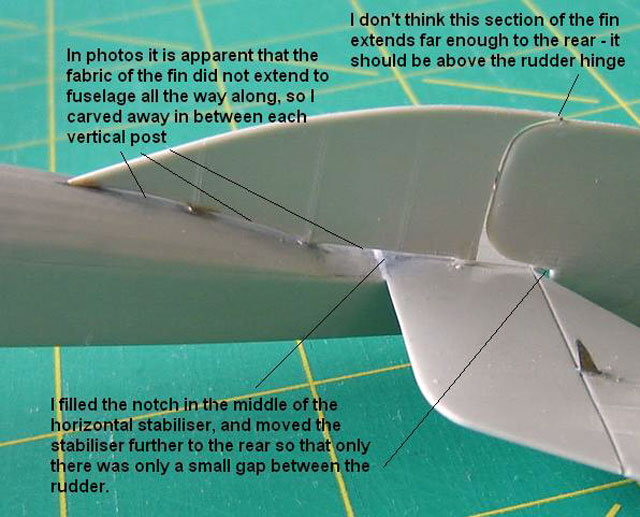
Some modifications to the kit can be made to improve the accuracy:
The fin should not touch the fuselage continuously along its length,
just in those places where a vertical post is present. Modellers should
carve away a small gap in between these posts.
The horizontal stabilisers and elevators should be moved back on the
fuselage – modellers should consult plans to get this right.
If you plan to build the prototype 184 you
will need to fill in the hingeline for the lower aileron because it was
only fitted with ailerons on the upper wing.
I added control horns on the wings and elevators made from left-over
brass PE sets. These were fitted at unusual angles to the wing surfaces
– again check photographs to get this right.
The two sprues of metal wing struts ARE different lengths and you have
to look very hard to find the tiny F and R scratches (Front & Rear).
There is an unusual strut which sticks out horizontally from each side
of the rear fuselage - I believe this was to brace the wings when they
were folded. I used some thin brass rod for this but care is necessary
to ensure it is fitted symmetrically on both sides.
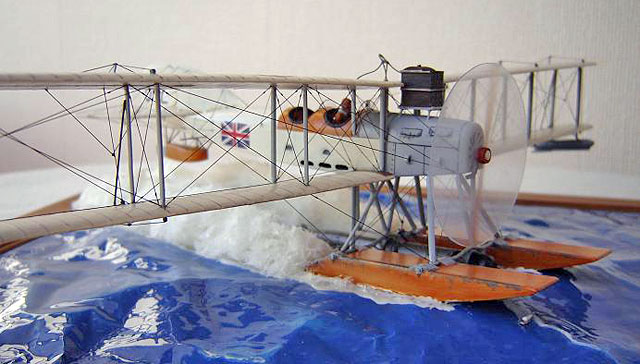
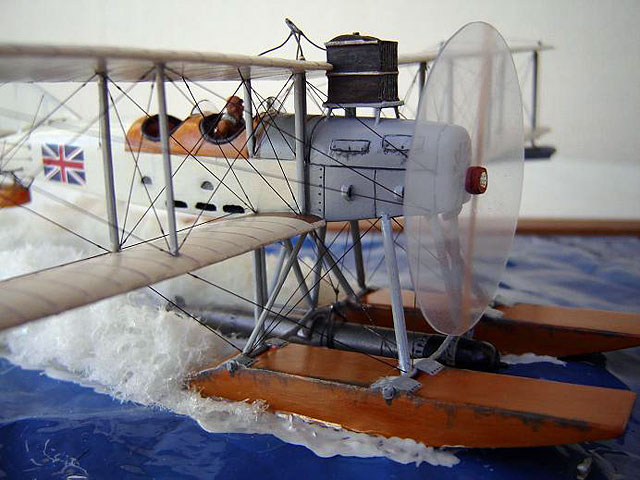
The radiator is a white metal casting with the same ribbed effect on all
four sides. After studying the Datafile I took the view that the left
and right sides should be smooth not ribbed and I sanded the detail
away. The original was made up of metal plates running fore/aft which
the pilot could almost see through if his head was correctly aligned.
Another feature that needs to be represented is the lifting cables on
the top of the centre section of the top wing. In the Datafile you can
clearly see the cables 'sat up' like a pyramid, with a metal loop at the
apex.
The engraved panel lines were filled in on the fabric sections of the
fuselage.
I scratchbuilt two cradles for the torpedo from brass strip and fitted
these to the horizontal float struts.
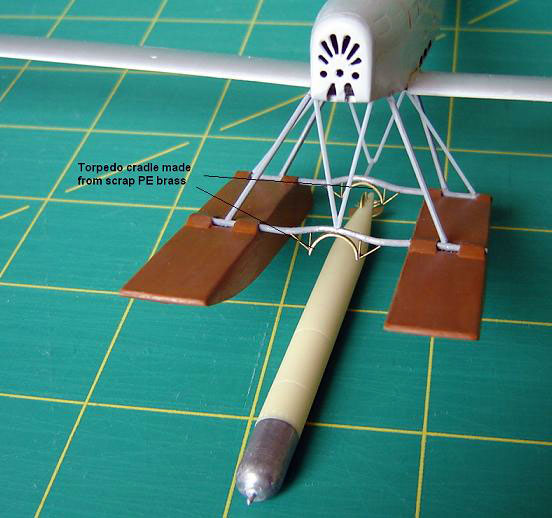
I also scratched the attachment wires for
the torpedo, made up from some fine copper wire and some PE WWI
turnbuckles.
Instrument gauges came from a set of decals by Mike Grant.
Click the thumbnails below to view larger images:
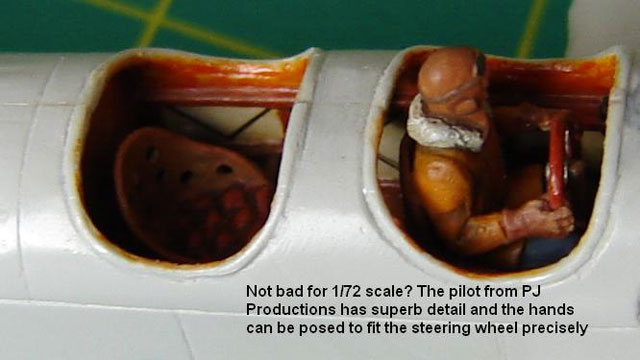
The pilot is a resin figure from PJ
Productions. It comes with separate arms that are posable for getting
the hands to ‘hold’ the steering wheel.
I handbrushed WWI German Naval Clear Doped Linen (CDL) from Misterkit.
The Misterkit range features an enormous number of WWI colours from all
the major powers. German Naval CDL is a paler finish than some other 184
models I have seen on the Internet but it is based on a watercolour
painted at Imbros in 1915 by Norman L Wilkinson titled 'Seaplanes at
Kephalo' which I found in Alan Moorehead's book "Gallipoli". Curiously
it shows the floats in grey not varnished ply.
All the photos in the Datafile show prominent dark ribs both on upper
and lower surfaces. After pondering the best way to represent these I
used salmon-pink German rib tapes from Eagle Strike with a further coat
of the Misterkit German Naval CDL over the top to soften the contrast a
little. There are 312 separate rib tape decals fitted to the wings,
stabilisers and elevators.
Weathering is a wash of grey enamel heavily thinned with turpentine.
Rigging
I use 0.005” stainless steel wire from
Smallparts.com. This stuff has revolutionized my WWI aero modelling! I
don’t like drilling holes in my model and it isn’t necessary when using
this wire. Its very hard and must be cut on a solid surface – I use a
ceramic tile and a scalpel. I pre-colour the wire using a black
permanent marker, but I am now experimenting with a grey coloured
permanent marker which might give more prototypical results. Each length
is measured using dividers and attached using white PVA woodworking
glue. The glue will shrink and dry clear and should be touched up with
matt clear finish to make the glue really invisible. I fitted 175
separate rigging and control wires to the model.
A careful study of photographs is necessary to get the rigging correctly
reproduced, especially the outer bay of the wings which were quite
distinctive, in order that the rigging would not get fouled with the
tailplane when the wings were folded back.
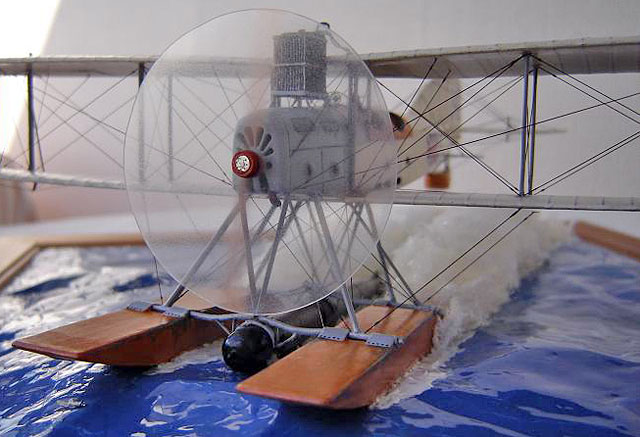
Water Effects
The sea base uses slightly crumpled
kitchen foil, painted blue, then coated with 2-3 heavy coats of an
acrylic medium called Mod Podge (craft shops stock it for things like
decoupage). It goes down white but dries completely clear, and softens
the sharp edges of the aluminium foil. I made two rectangular holes in
the foil where the floats would fit in.
Next time I would try for a darker blue, but I rationalise the current
colour by saying it is meant to be the brilliant blue of the Greek isles
(Gallipoli).
My inspiration for the wake effects came from this really brilliant
seaborne AFV diorama:
http://www.network54.com/Forum/thread-110741-1129553334-%26quot%3BLand+t
I used the same sort of white abrasive pad from a kitchen scrubber that
is made with two materials (the other material in the scrubber is
ordinary plastic foam which I threw away). I cut the white material into
strips and pulled it apart a bit with my fingers, then used CA glue to
attach it to the base.
The key step is then to paint the wake material with more Mod Podge. It
dries rock hard.
Click the thumbnails below to view larger images:
Model, Images and Text
Copyright © 2005 by
James Fahey
Page Created 22 December, 2005
Last Updated
21 December, 2005
Back to
HyperScale Main Page |
 Home
| What's New |
Features |
Gallery |
Reviews |
Reference |
Forum |
Search
Home
| What's New |
Features |
Gallery |
Reviews |
Reference |
Forum |
Search