|
Anigrand's 1/72 scale
Douglas D-558-1
Skystreak
|
 |
|
Douglas D-558-1 Skystreak |
or, Train guys don’t know
how to cut plastic!
by Bill Dye

HyperScale is proudly supported by Squadron
I never built a resin kit before. Vacuforms were
challenging enough. Horror stories of grinding diamond hard surfaces;
sagging landing gear struts and air bubbles the size of walnuts came to
mind. But then somewhere I found out about Anigrand. They are making
1/72nd scale resin model airplanes many of which, of course,
I had already purchased the vacuform version years ago – except for the
Rainbow. That one I just plunked down some bucks for the vac version,
plus extra parts, only to find out that these guys have a resin version
out for, true, just a tad more money, but hey, it’s resin. Oh well, I’ll
save my money for the Martin Sea Master; that one I don’t have yet.
The kits Anigrand produce are, for me, like gifts
from above (trumpets here). Some of their subjects I remember seeing in
magazines when I was little but I never saw a kit of them; not even a
vac – at least none that I knew of. They have stuff like the four
engine tilt wing airplane, the four engine ducted fan looking thing and
even a Mixmaster, Sky Lancer and of course the XF-84H
Thunderscreech because I just finished the vac kit; shoot me now!
So, I took the plunge and, being a sucker for
prototypes and the unusual, I bought the Skystreak, the Cutlass, the
XB-46 and the Sky Lancer. When they arrived only 2 weeks later I opened
the package that would be a stamp collectors dream and found there were
only two boxes. What gives? I ordered four kits. I opened the XB-46
and the Sky Lancer boxes and found that they had taken the contents out
of the other two smaller kits, neatly folded the boxes and put them
inside. Pretty clever!
I looked at the Skystreak and thought, ‘It’s a tube
with wings; should be the easiest to build . . . . I think I’ll do that
one first.’ I bought a book about building resin models1 and
after realizing that plastic glue was not for these kits, I grabbed my
trusty epoxy and super glue and dug in. But wait . . the real aircraft
blurb:
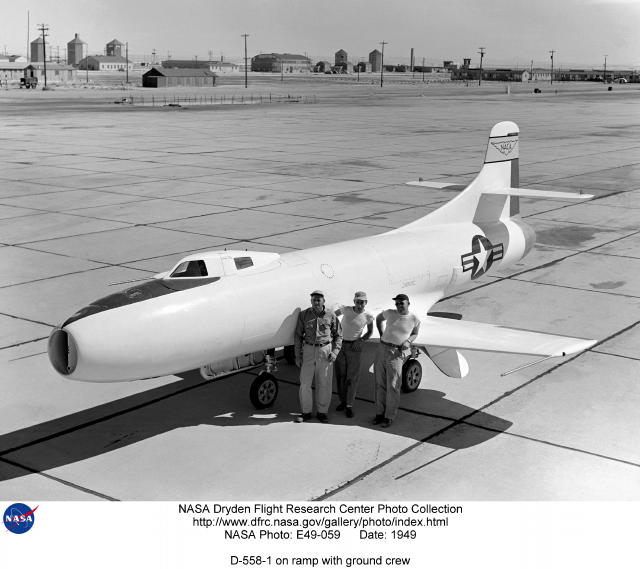
Historical Background
“The Douglas Skystreak (D-558-1
or D-558-I) was designed in 1945 by the Douglas Aircraft Company for the
U.S. Navy Bureau of Aeronautics, in conjunction with the National
Advisory Committee for Aeronautics (NACA). The Skystreaks were turbojet
powered aircraft that took off from the ground under their own power and
had straight wings and tails.
Conceived in 1945, the D-558-I
Skystreak was among the early transonic research airplanes like X-1,
X-4, X-5, and XF-92A. Three of the single-seat, straight-wing aircraft
flew in a joint program involving the National Advisory Committee for
Aeronautics (NACA), the Navy-Marine Corps, and the Douglas Aircraft Co.
from 1947 to 1953. In the process, the Skystreaks set several world
speed records. All three D-558-1 Skystreaks were powered by Allison
J35-A-11 turbojet engines producing 5,000 pounds-force (22 kN) of
thrust.”2
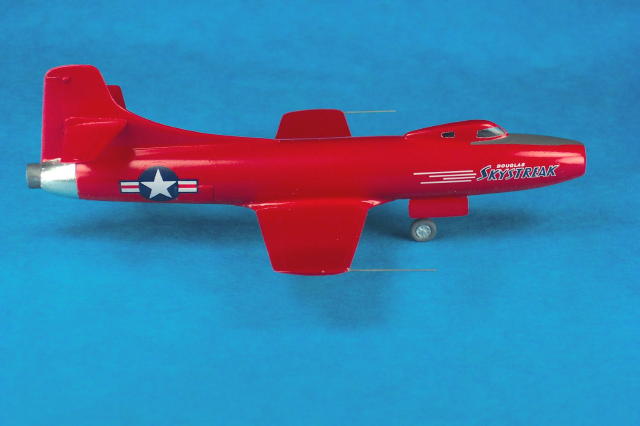
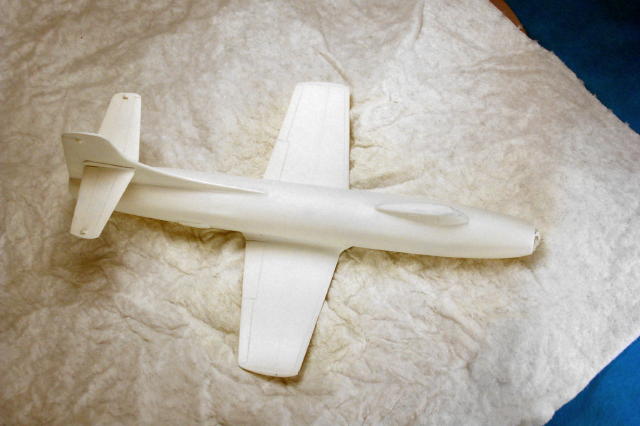
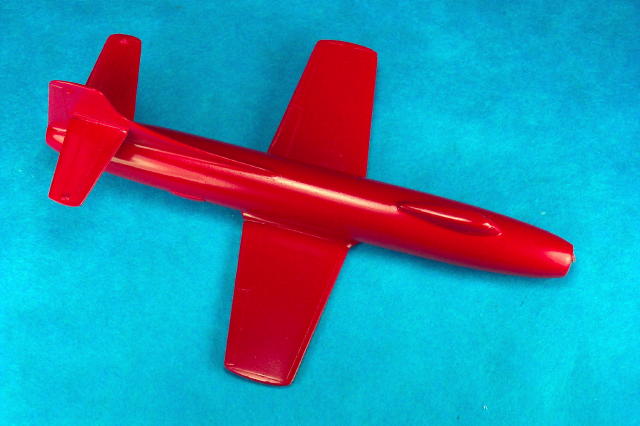
Anigrand's Skystreak in the box
Well it’s pretty basic, a tube fuselage in halves
with nice wings and horizontal stabilizers. It was so nice not
having to scrape the trailing edges of the flying surfaces as one does
for vac kits. To pick up a wing and have thin trailing edges right
there . . already done! I realized just how much of a drag vac trailing
edges are for me. These were quite nice.
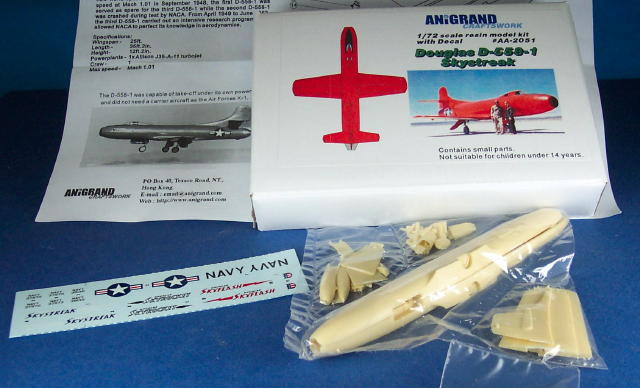
The little bits – gears, doors, cockpit, etc. –
were nice; not very much flash on any of the parts and very delicate
looking – at least compared to what I’m used to, and since I broke a
gear door hinge strut trying to get it cleaned up.
I particularly enjoyed the fact that molded into
the wings and fuselage were the wheel wells with detail! WOW I’m not
used to that! The holes for the gears protruded through the top surface
of the wings but a dab of putty and it was gone. The cockpit was sparse
but that didn’t bother me since I wanted to build the all metal canopy
version. . . well, the whole canopy wasn’t metal . . I mean ‘cuz
if it were all metal then the guy couldn’t see out . . . . it’s
the almost all metal one with the teeny weenie windows that I
wanted to do.
Fuselage
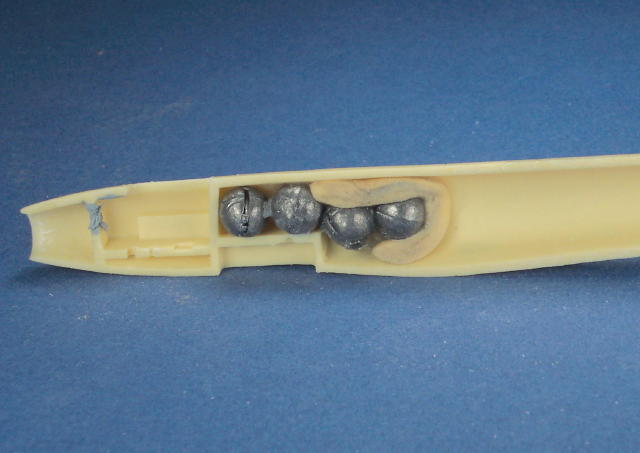
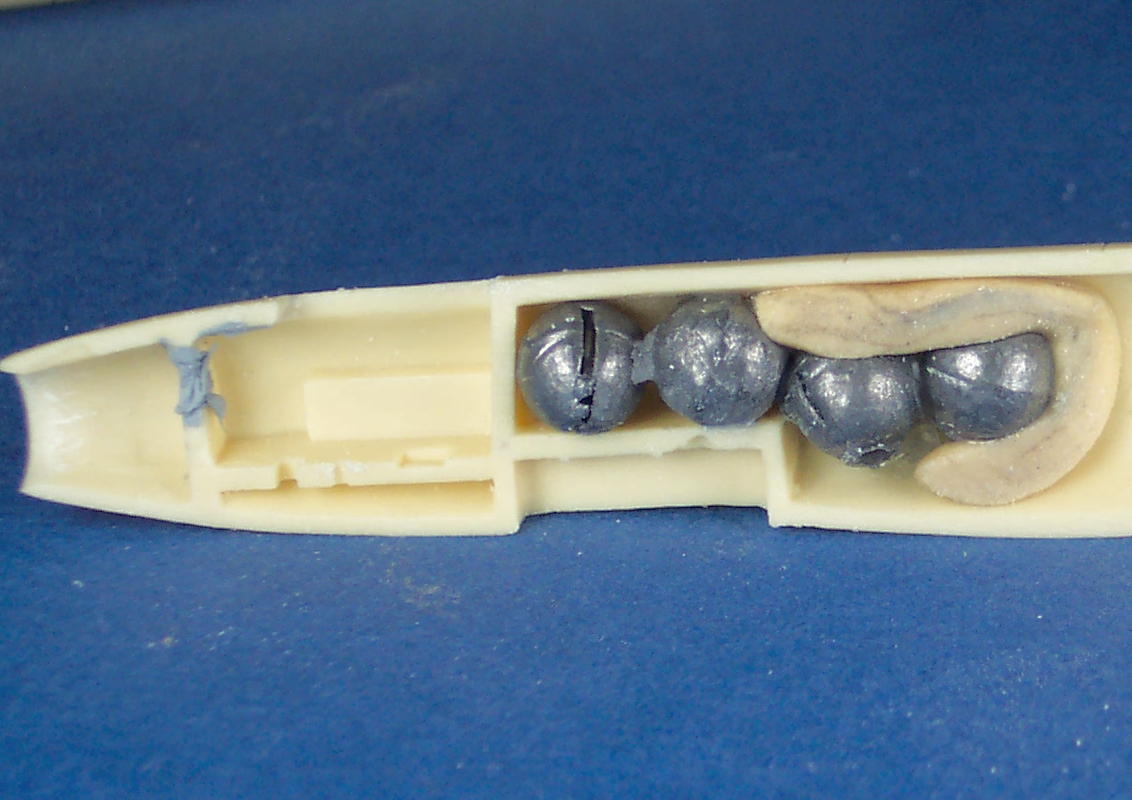
I put enough weight in the nose to counter balance
a bowling team with balls, so to speak. I added the control panel
(habit), put in the intake splitter and glued the halves together.
I filled the too deep and too wide for my taste
panel lines with TAMIA putty and/or Mr. Surfacer. But that was after I
tried superglue. Yikes! The resin is soft and it was a job trying to
sand the super glue without marring the resin even after only about an
hour and a half of drying. The super glue wasn’t even at that ‘hard as
a diamond’ state yet. First resin lesson for me: don’t use super
glue to fill panel lines.
Let’s see, very small cockpit with teeny weenie
windows. What to do? Solution: gloss black interior, put canopy on and
hope Plastic Model proctologists with flashlights and magnifiers don’t
peer in and see what’s not going on in there.
Click the thumbnails below
to view larger images:
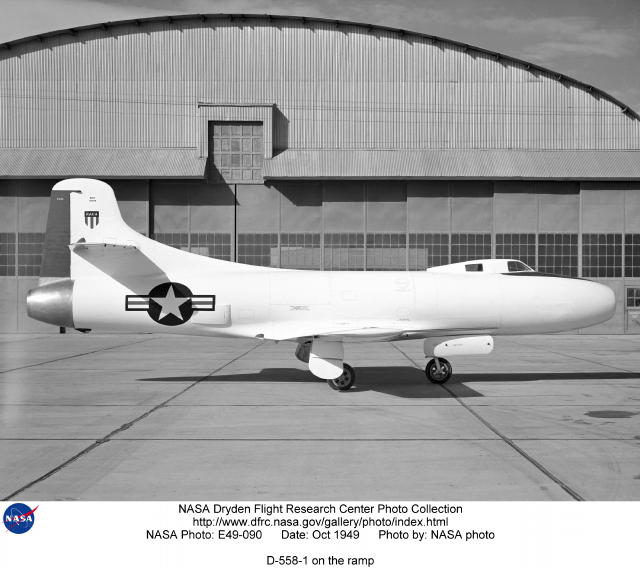
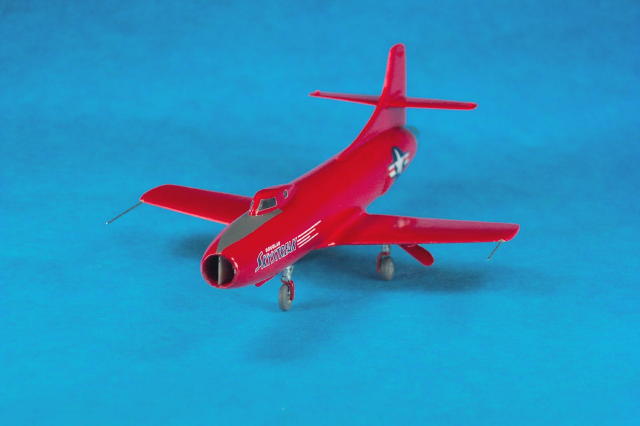
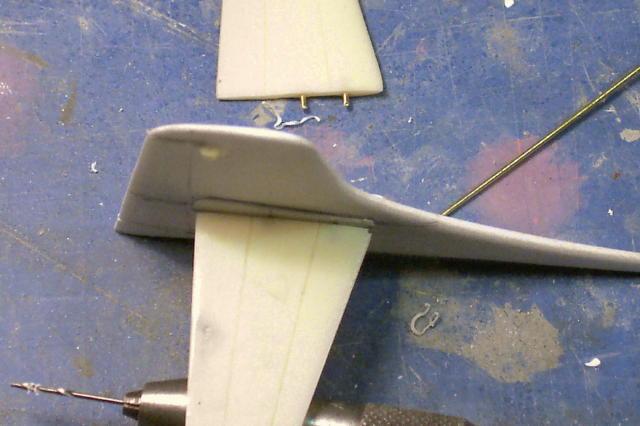
The Tail
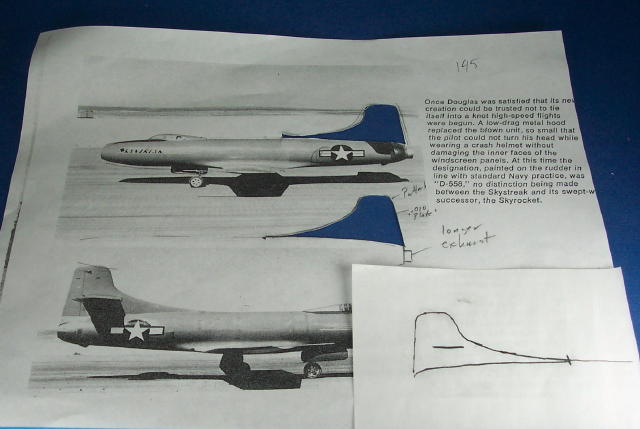
But wait. A reference photograph I had3
was taken exactly from the side looking right down the wing centerline.
Something was wrong with the tail. I looked at the model kit tail and
then the photo and then the kit tail and then the photo. I held a
fuselage half with the kit tail propped up against the photo. Hmmmm.
The kit tail looked kind a like a DC-6 tail. Not only that, but the
slot for the horizontal stabilizers had a couple of degrees of
incidence. Was it too far aft? Nope. Too far forward? Nope. Was it just
me? Maybe, but I didn’t think so.
The photograph of the real a/c showed that the tail
had a more pronounced ‘hook’ in the leading edge and the horizontal
stabs were at zero degrees incidence. I debated. I don’t fix things
that I have to measure to see if they’re out a whack. But this . . .
this, to me, was out a whack. So, I decided to make a new tail. I
measured the thickness at the base and it was not quite 0.10 inches
thick.
I went to a train shop because they sold plastic
sheet and I wanted to see if they had an N scale box car I wanted – oh,
sorry, wrong hobby. I found some .080” white plastic; close enough.
The guy at the counter, who always wants to know ‘Why are you doing it
that way?’, and, oh by the way, ‘you can do it better my
way,’ says, “Oh man this stuff is really tough to cut, you have to use a
jig saw; you sure you want plastic that thick?”
I was tired of being polite. I was a tad . .
‘pointed’. I mean, I had a bad day – with the tail out of whack and all
and, oh yeah, work stuff too, so I said, “No, it’s not tough to cut and
yes I need it that thick.”
“So, how do you think you’re going to cut it?” as
he looked down his nose.
“With an X-Acto knife.”
“Yeah, right. (snicker) How many cuts do you have
to make? 30? You’ll go through a lot of blades!”
“Nope, one dull blade, one cut; one firm snap,” I
said.
“Yeah, sure; well, good luck.”
“Won’t need luck, just an Xacto knife.”
He looked at me like I was nuts. I paid my $4.90
for a hunk of plastic and when I got home I took out one of my normally
dull knives and make one pass and snapped the plastic. I did it again
in another direction and just like that I had a small rectangle of .080
plastic in my hand.
I smiled. It’s these little things in life that
can be so rewarding sometimes.
,dye%20640.jpg)
I made the pattern for the new tail by photocopying
the magazine photo. I changed the copier magnification until the
fuselage length was the same length as the model. Shhh, I smuggled a
fuselage half into work and used the fancy-schmancy machine that can
enlarge or reduce copy. Like I said, this photo was a perfect side shot
and even if there was some photo distortion, it would be closer than the
kit DC-6 tail.
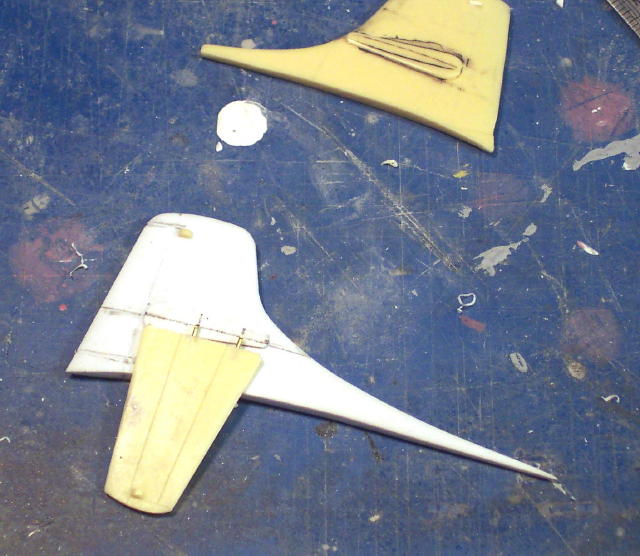
I had to transfer the photo of the correctly shaped
tail to the white plastic. As Agent 86 Maxwell Smart would say, “Well
Chief, I transferred the pattern to the white plastic using the ol’ –
‘rub a pencil on the back of the pattern then put the pattern on the
plastic and trace over it with a pencil’ – trick.” I broke out the
trusty dull Xacto and made cuts about a 16th of an inch all
around in case it didn’t snap cleanly. . . . . . “Would you believe
3/32nds plus an armored car?” Sorry, I’ll get out from under the ‘cone
of silence’. It did; snap OK I mean. I sanded the pattern of the new
tail with my 80 grit vacuform dry sanding matt to finalize the shape and
to taper the thickness toward the tip. It was finished by sanding with
wet 400 then 600 paper. I scribed the rudder and then added some plate
like thingies copied from the kit tail using 0.015” thick plastic. I
transferred some bumps that I cut off of the kit tail onto the new tail
in the same spots. (The little bumps were tiny fairings for the counter
weights for the elevators and rudder).
Click the thumbnails below
to view larger images:
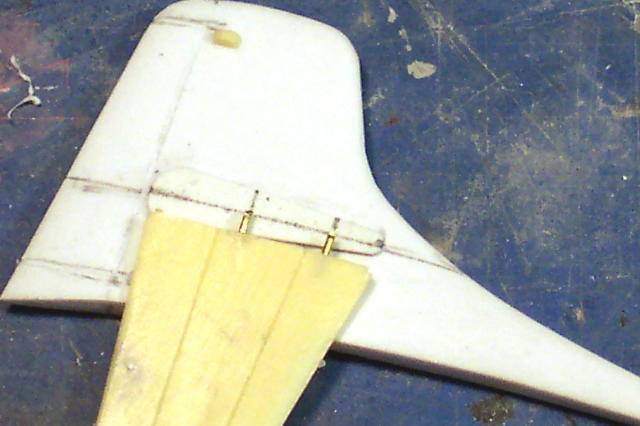
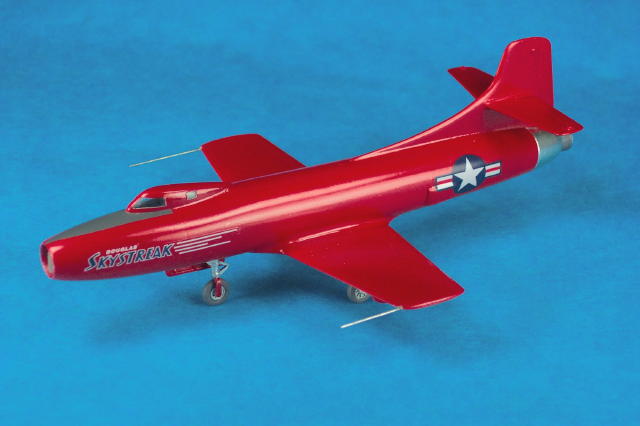
Final Assembly
For each flying surface I drilled small holes into
each root chord (poke with a pin or something where you want the drill
bit centerline to be so the bit doesn’t wander) and inserted brass wire
pins. (See photos.) These pins really gave the wing and tail joints
strength. Without these I’m sure the thin little horizontals would snap
off if you just breathed on them.
I carefully cut out the nice canopy by lightly
scoring it with an X-acto and then again and again until it started to
give. I sanded the bottom of it until it was smooth and then dry fit
it. Holy cow! It fit!
I marked the outline of the canopy on the fuselage
with a pencil and then painted everything that would be on the inside of
the canopy gloss black so the flashlight guys wouldn’t see the yellow
plastic inside. I dunked the canopy in Future, let it dry for a few
hours under a paper cup to keep kitty hairs off of it and attached it
with superglue. Some Mr. Surfacer was added around the joint and then
scotch tape covered the teeny weenie windows.
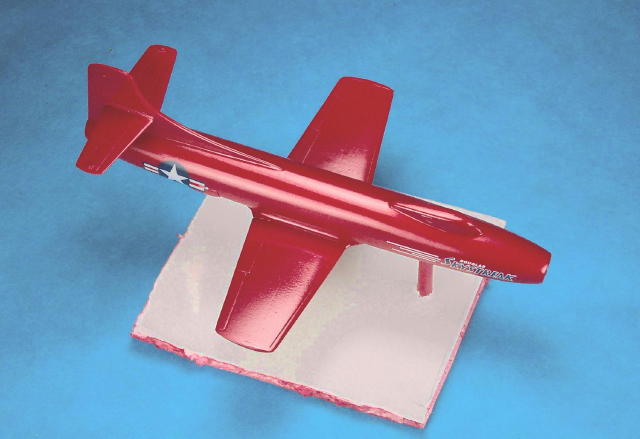
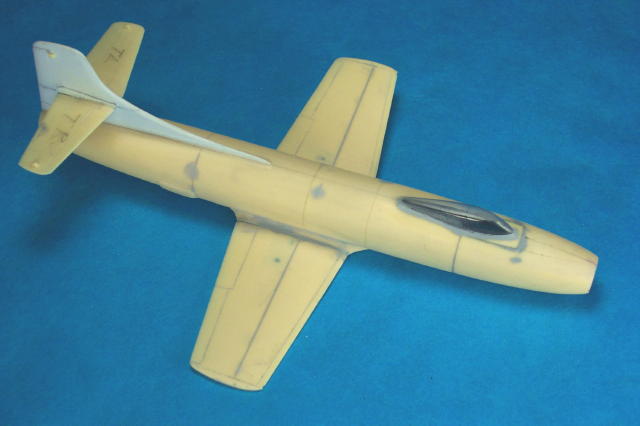
Ready for primer.
First I sprayed the clear canopy gloss black,
plugged the wheel wells and intake with wet paper towel fragments and
later hosed the entire model with a very light coat of Testors Model
Master Acryl gloss white (I thought I’d give these a try . . not too
bad). As usual I found lots of ‘gotta fix its’ so I sanded some more.
Another coat of white, then another, finally it looked OK. The next
night, I misted on a coat of red. I tried Signal red, but it looked too
orange so I went back to D&J Hobby in Campbell, CA and with Al’s help I
bought some Model Master Acryl ‘Guards’ red. It matched the photos
better (I know, I know, photo color changes with type of film etc. etc.,
but I only know the airplane from the photos so I pretended they were
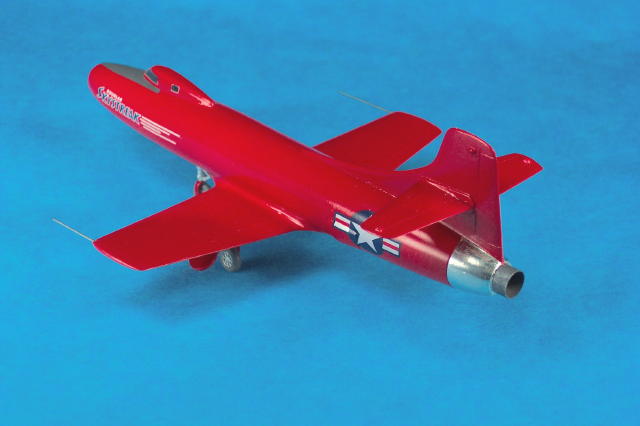
gospel.) I added another coat, and another and then the final coat.
WOW! Is that bright red or what!
Oh yeah, before you put on the red; if you have to
sand a small spot on the white paint and think the red will cover it . .
. it won’t. Well, OK, I admit, I was too lazy to set up the air brush
with white again just to paint another coat of white in that one
itsy bitsy wee little spot . . . ‘the red should cover it’. It didn’t.
After the first few coats of red I had to go back and hose on some
white and then more red. Trust me on this one: The entire model must
be flaw free white before you put on the red. Another thing,
once you see it white, you’ll want to buy another kit to do the white
version. Get your wallet ready! This airplane looks great in white too.
I pulled out my reference photos because the
instructions showed the all metal canopy version I wanted to build but
without the Skystreak decal. Hey, I gotta have one with the Skystreak
decal. Sure enough I found a photo in an old yellowed magazine article,3
that I had in my files since Reagan, that showed the teeny weenie window
metal canopy, bright red paint, stars and bars and the Skystreak
decal. Woo-hoo! Life is good! This configuration was to test an
extended exhaust. So, all I had to do was extend the exhaust. Big
deal.
A few days later, decals; but I replaced the stars
and bars with ones from Microscale (OK, Superscale Decals . . the old
Microscale decals) because the decal was situated right over the speed
brakes and the kit decals just didn’t nestle down even with Micro Sol.
The Superscale decals worked fine. Then I put on the Skystreak decal.
That one went on nicely. Uooo cool!
After a few days I applied a Gloss Water Soluble
Varathane clear coat. I thinned the Varathane with ONLY water
(alcohol or any other solvent gets you cottage cheese in the little
paint bowl) about 15 to 20% and misted on the first coat, misted the
second, waited 5 minutes then did another one but a tad thicker and
finally increased thinner to about 30% and gave it another shot. Really
glossy!! It’s thin, so if you get a run you can either swipe it quick
with a Q-tip and hose on some more to level it or wait and hit it with
1,500 wet paper and then polish it out. I’ve done both and it comes out
fine. It’s very forgiving stuff. After awhile you know just when to
stop before it runs. Like anything it takes some practice but it’s very
thin, clear, dries rock hard, is impervious to hot fingers and in
several years has not yellowed. But use the clear coat of your choice at
this point.
The teeny weenie canopy window masking was removed
– hey, look, you can see. . . .ahhhh . . nothing inside. Then
wing pitot probes, (I forgot to predrilled these before I painted, Doh!)
made from 0.20in. Brass rod hand painted with Testors Metalizer Dark
Anodonic Gray and polished with SnJ powder, were attached to the wing
tips. I only punctured my finger once while polishing it – I was
distracted by Star Gate SG-1’s 200th show.
I masked the antiglare panel being very careful not
to get the tape on the ‘Skystreak’ decal. (Hint: Anigrand has extra
decals and clear parts (sold separately). Do your self a favor and
order a second canopy and decal sheet for a couple of bucks.)
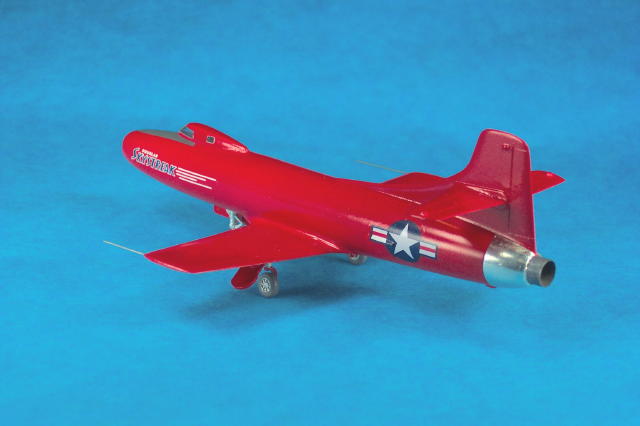
It took a couple of tries at paper patterns that
wrap around the exhaust area and when I got one that was close I traced
it onto Bare-metal foil (I like that stuff!) and applied that onto the
exhaust area and trimmed it with a super duper sharp Xacto #11 blade.
The exhaust tube itself was painted with Poly Scale grimy black
(railroad color) and then a little bit of blue and violet Rub & Buff on
the outside. I smeared it with my fingers to mush these colors together
until it looked just kind a cruddy and burnt. I put some brown and gray
chalks (from railroad pastel chalks) on the inside of the exhaust and
glued it in with some Elmer’s glue.
Gears, doors and the bottoms of the wheels were
sanded just a tad. Done. TA-DA!
Even considering that I had to make a new tail. I
STILL think this was a great kit and I’m glad I purchased
a few more subjects from Anigrand. I think I really like these resin
kits! I bought the 4 engine tilt wing, the 4 engine ducted fan thing
and the D-558-2 . . I’m in love!
Lessons learned:
- Fill excessive panel lines on resin kits with
TAMIA putty or Mr. Surfacer but not super glue.
- White under red must be flaw free, i.e.
uniform white.
- Buy an extra canopy and decal set when you
order your Anigrand kits or when you order through your hobby shop.
Bury me with sandpaper!
-
Marmo, Richard; How to Build and Modify Resin Model Aircraft Kits,
Specialty Press, 2002
-
http://en.wikipedia.org/wiki/Douglas_Skystreak
(free)
-
Trimble, Robert L., “Skystreak”, Air Classics, (unknown
date), pp28-32, 91-93.
-
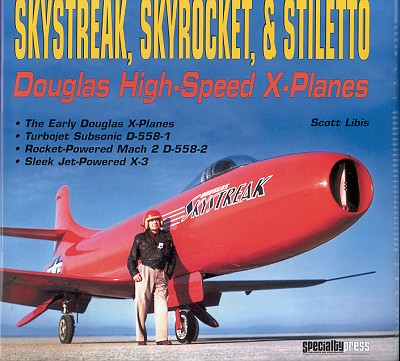
Libis, Scott; Skystreak, Skyrocket, & Stiletto Douglas High-Speed
X-Planes, Specialty Press, 2005.
Click the thumbnails below
to view larger images:
Model, Images and Text by Copyright ©
2006 by Bill Dye
Page Created 18 September, 2006
Last Updated
21 February, 2007
Back to
HyperScale Main Page |
 Home
| What's New |
Features |
Gallery |
Reviews |
Reference |
Forum |
Search
Home
| What's New |
Features |
Gallery |
Reviews |
Reference |
Forum |
Search