|
1/48 scale
Hasegawa
Spitfire FR. Mk.IX
by Jim Kiker
|
 |
|
Supermarine Spitfire
PR. Mk. XIX |

Hasegawa's 1/48
scale Spitfire IX is available online from
Squadron.com
I have a deep and abiding interest in photo reconnaissance aircraft,
and being a great admirer of the Spitfire, I returned to the recce Spits
for the second of several helpings. I also like unusual camouflage
schemes, so when I read an article about pink FR IX Spits that were
flown by 16 Sq during Operation Market Garden in the fall of 1944, I
knew I had my subject!. These pink Spitfires were used to take low-level
oblique pictures on days when there were some clouds, near sunset or
sunrise. Although I do not have one mounted here, these aircraft were
also used for dropping pictures and messages to field headquarters by
placing them into the old 44 gallon-size drop tanks, and dropping the
tank from just above the ground.
Thanks to the Spitfire boffins on Hyperscale, I knew the in’s and
out’s of the various Spitfire kits on the market when I started this
project. I prefer the ICM kits, but having acquired a Hasegawa kit I
decided to make use of it. I did not have the desire to do a complete
fuselage correction, but I did choose to do most of the length
correction on the Hasegawa kit’s fuselage. I used the rear fuselage from
an ICM kit to do the lengthening. To do this, I picked a spot on the
rear fuselage of the Hasegawa kit and matched it to a spot on the ICM
fuselage where the contours (especially the top and bottom edges) would
meet. This gave me almost 1/8” in added length, and proved to be a
fairly simple mod. As a buddy of mine recommended, I added the
strengthening bits inside the fuselage from a number of small pieces of
plastic strip; this was much easier than fitting a single long piece and
gave a much stronger joint. Thanks, Gary!
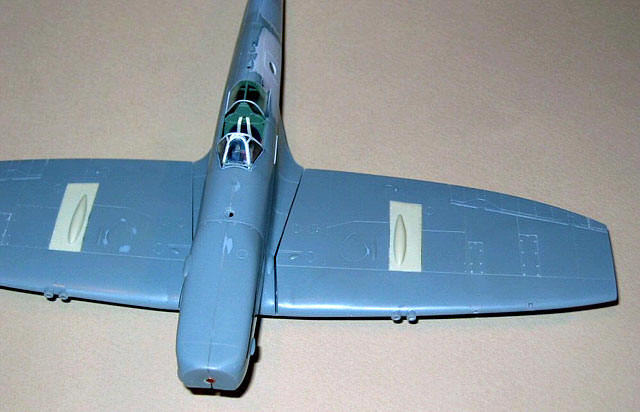
In this particular instance, the reconnaissance modifications were
dead simple to do. I drilled out the oblique camera port on the battery
access door (visible above) and chamfered the hole from the inside to
take a clear plastic cover. I used a camera from one of Roy Sutherland’s
resin 1/48 scale Spitfire camera sets.
Then it was on to the interior.
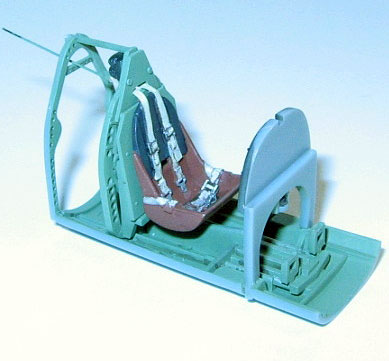
 I
used many of the kit’s pieces for the interior. I substituted an
Ultracast seat with Q-type harness for the kit seat, and added the rear
section of the shoulder straps that pass through the head armor, as well
as the shoulder harness restraining line. I
used many of the kit’s pieces for the interior. I substituted an
Ultracast seat with Q-type harness for the kit seat, and added the rear
section of the shoulder straps that pass through the head armor, as well
as the shoulder harness restraining line.
I used the kit instrument panel. I painted the panel in a very dark
gray, painted in the instrument dials, and added a drop of clear epoxy
to represent the instrument faces.
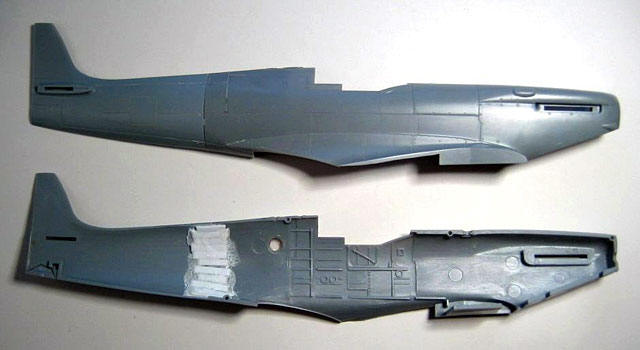
I assembled the fuselage without further incident and moved on to the
wings. I added blanking plates for the outer cannon shell chutes and
pre-finished the insides of the radiators, including dropping open the
outlet doors and adding new side pieces since this is often seen in
photographs of Spits sitting on the ground.
Having visited Duxford a year or so before I started this project, I was
keenly aware that Spitfires have a distinctive “hunkered down” stance
when fueled up. I haven’t found a 1/48 scale kit yet that gets this
right. Mostly, they are modeled with the landing gear oleos fully
extended, instead of mostly compressed. Many kits also have the main
gear molded with a lot of sections (different diameters of rod), which
does not compare well to photos. I chose to make new main struts from
nested brass tubing (1/16” for the main gear and axles, 3/32” for the
upper shock struts). These were further detailed with bits of tape, fine
wire, and brake lines later on.

I found that I had a gap all around the wheel wells, so after
assembly of the wings I filled it in using Aves epoxy putty (it is
similar to Milliput, but easier to work, and also can be thinned and
feathered with water if done before it sets up).
At this point I committed a major boneheaded error. Since everyone spoke
about this kit and it’s wonderful engineering and fit, I believed the
press and assembled the wings and the fuselage without checking their
fit. When I tried them together the first time, I was chagrinned to find
I had about an .030” gap along both wing roots. I will note that this
problem seems rare in the Hasegawa 1/48 scale Spitfire IX kits; mine may
have been taken out of the mold a bit early, or some other factor may
have caused it in this particular pressing. But since I didn’t check it
out first, I wound up needing to fix the problem “after the fact.”
I used Aves two part epoxy putty in the joints, followed by a couple
of layers of Mr. Surfacer and some sanding and rescribing of panel
lines. How many times must I relearn the obvious? Check the fit of major
components before gluing them up!
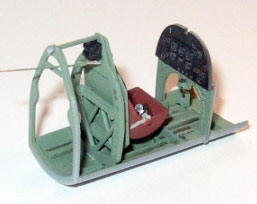
With all that done, I also added new cannon bay covers from Ultracast,
and I also cut away the kit elevators and added Ultracast ones in the
dropped position. As you can see in the pictures, I usually paint the
upper canopy frames (using a complete Falcon vacuformed unit this time)
of the fixed sections and glued them in before painting. When I mask off
the cockpit, I mask and paint the lower frames at the same time,
starting with the interior framing color.
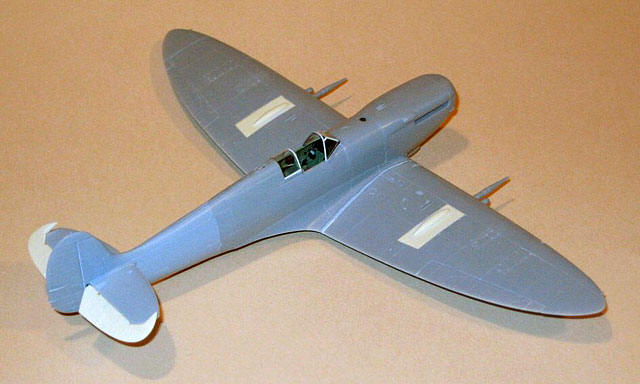
By the way, please note that the kit rudder was fixed cocked slightly
to the left, making the elevators look over-drooped in the picture
above.
With all the major work done it was off to the paint shop. I decided
to try preshading on this model, so I painted all the panel lines with
dark gray. The pink was originally from the Xtracolor enamel line, but
my references indicated that PRU Pink faded quite rapidly to a very pale
shade. I lightened up the basic shade a great deal- almost too much-
with white and a touch of gray to keep it from looking like cotton candy
pink. As it turned out, the dark gray preshading took a lot of pink to
cover, and I mostly lost the preshading. I think that most preshading
winds up looking like a grid pattern, which in my experience is pretty
rare on real aircraft. I prefer to build models as realistically as I
can, and that grid effect was not what I was after. After adding a clear
acrylic gloss coat to the model, I did my usual panel line washes with
artist’s oils, using Payne’s Gray for the major panel lines (flying
control surfaces, removable panels such as the engine covers, and so
forth), and a much lighter and slightly brownish gray for all the other
panel lines.
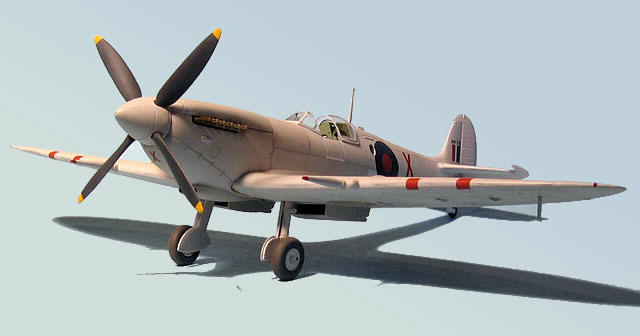
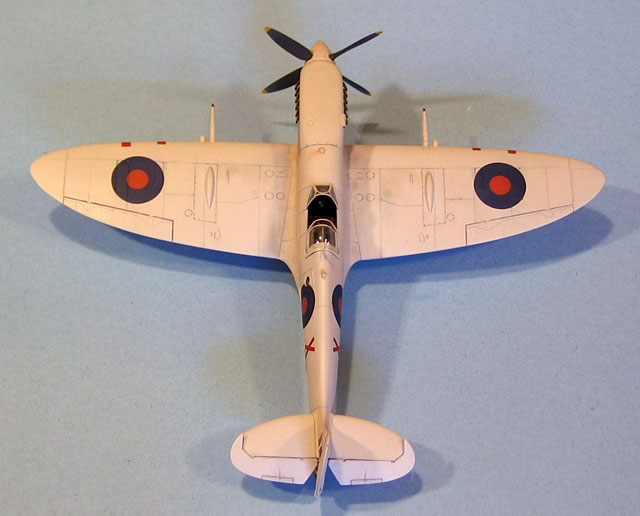
The two pictures I have of MK716 were taken in the fall of 1944. They
show a color/tone for the individual aircraft letter “X” similar to the
dull red center of the roundels, so I used small dull red letters. There
is also a smaller red X under the nose, just behind the spinner. For you
Spitfire boffins out there, can you figure out where the spinner came
from? The roundels are standard for the PR/FR Spitfires; 40” diameter
ones on the upper wings and 30” ones for the fuselage. The fin flash is
cut down from the standard size, and the serial number (unusually) is in
very small black characters on the fin, per the available photographs. I
used tiny black dry transfer lettering for these. The D-day invasion ID
stripes were painted on the lower fuselage only, using off-white and
dark gray to simulate worn stripes. They are purposely not perfectly
lined up, as was often the case in reality. After partially filling the
machine gun openings, I added strips of dull red decal for the red-doped
fabric covers, and painted the covers on the cannons (no drilling
necessary!).
In the following picture you will see a great amount of streaking on the
belly of the model. On Spitfires the oil streamed back from the bottom
edges of the cowling and was soon covered with a fine layer of dust and
dirt. I used oil paints for this, putting just a touch near the bottom
rear edges of the cowling and pushing them backward, allowing them to
thin out to next to nothing.
I added dull silver paint chipping on areas frequently walked on and
on the leading edges of wings and tail, as well as some dry brushing to
show larger areas of wear. At the end I added a final clear flat acrylic
coat, and the silver chipping/wear looks a lot like a light dirt color.
Lucky for me I like the effect! I added on the final bits, including
Ultracast exhausts and main wheels. Did I mention how much I like
Ultracast detail parts? They are outstanding! The exhaust stains were
done with very thin Tamiya ‘smoke” acrylic paint, done with the airbrush
in several light passes.
So now I have two PR Spitfires, both in unusual schemes, and likely a
few more to go!
Click
the thumbnails below to view larger images:
Model, Images and Text Copyright ©
2006 by Jim Kiker
Page Created 11 May, 2006
Last Updated
21 February, 2007
Back to
HyperScale Main Page |
 Home
| What's New |
Features |
Gallery |
Reviews |
Reference |
Forum |
Search
Home
| What's New |
Features |
Gallery |
Reviews |
Reference |
Forum |
Search