|
Fliegerhorst 1/48 scale
resin
Luftwaffe Standard Barrack
by
Floyd S. Werner Jr.
|
 |
|
Luftwaffe
Standartenbarrack |

HyperScale is proudly supported by Squadron.com
Do you ever get bored modeling just airplanes? Are
you a ham fisted figure painter, such as myself? Armor got you down in
the treads? Cars make you feel like you're flat? Then have faith there
is something else out there - buildings. I never thought of myself as
an architect, but when I opened this resin kit I was really thinking of
the possibilities that were before me.
|
Summary |
|
Company |
Fliegerhorst
|
|
Product |
Luftwaffe
Standard Barracks |
|
Stock No. |
FL-006 |
|
Scale |
1/48 |
|
Price |
USD$55.00 plus
shipping |
|
Recommendation |
Highly
Recommended |
|
Available From |
DMCModels |
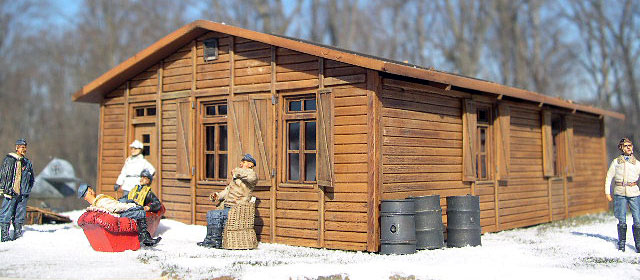
This article describes Fliegerhorst's 1/48 scale
Luftwaffe Standard Barrack model.
The kit provides a resin single floor standard
Luftwaffe barracks.
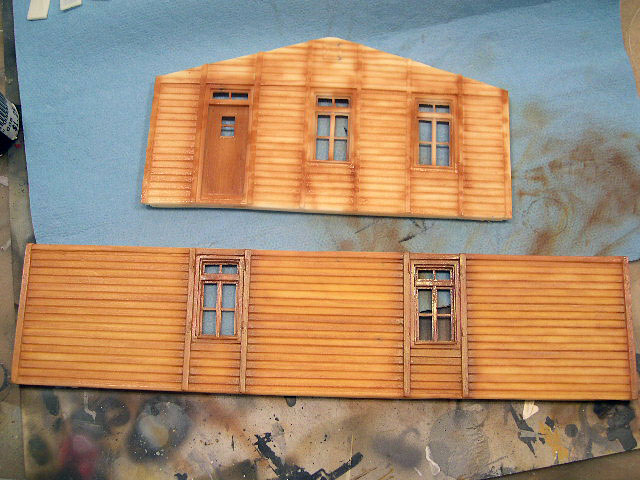
You are supplied with 30 pieces of yellow resin
that have minimal air bubbles but lots of possibilities. There are two
roofs, two long sides, two short sides and the rest is made up of the
window shutters. The fun of this kit was the simplicity of it all.
You are also provided with two instruction pages,
one written in German and one of the picture of how it is all suppose to
fit.
There was no distortion and the few air bubbles
were not anywhere where they would be objectionable. Actually I didn’t
fill them and depicted them as wood knots.
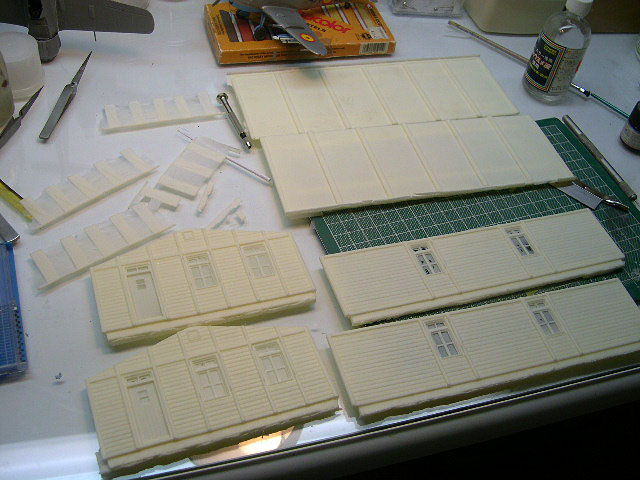
The biggest part of the job was cleanup and
painting. Cleanup was easy. There are casting blocks on the bottom of
all the pieces that came off with a cutting wheel and/or saw. There was
some cleanup that I had to use a riffler file around the window framing,
not the windows themselves but the framing. This was very easy. Then
it was just a matter of sanding the parts. Lots of dust, so wear a
mask. The windows have a slight covering of resin that has to be
removed from the back. I used a Dremel tool and a sanding wheel to thin
out the backside of the windows until they popped out easily. I opted
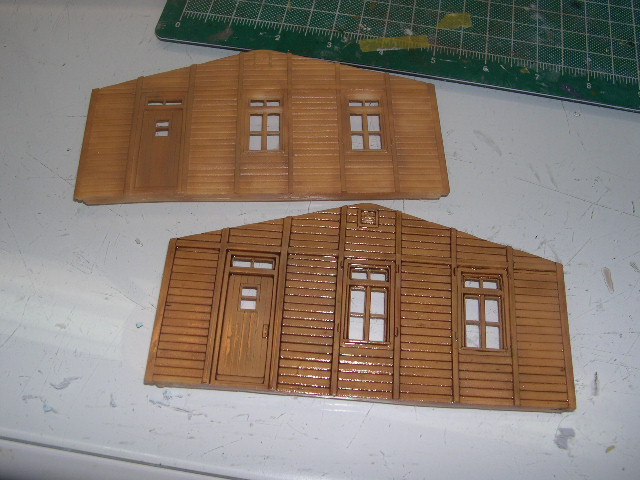
to paint the model before putting it together. This ensured that the
sides would be weathered differently as they would on the real thing.
Remember the north side gets more sun than the south or something like
that.
A quick wash with warm soapy water and it was time
to start painting.
I decided to use Gunze Wood as a pre-shade color
and painted the deeper spots with it. I intentionally left lots of
areas unpainted and over sprayed at the same time. This provided a
random pattern to the wood pattern, which is wonderfully represented on
the outside. Why didn’t I prime the kit with a gray primer? Well I
wanted to use the yellow color to my advantage so that is why it didn’t
get primed. You could do it but it would have just created an extra
step as you would have had to paint the yellow again anyhow. After the
Gunze Wood was down I took some thinned Model Master Wood and sprayed
the wood panels in the direction they were laying. Vertical panels
(door) were painted vertically and horizontal (walls) were painted
horizontal. This ensures the grain is maintained. Sounds funny but it
makes a big difference in the look. Once this was dried, a very thin
wash of Burnt Umber Artist Oils was slathered over the entire project.
I did this twice to get the look I was after.
Once that had dried I went back and dry brushed
with various shades of browns to grays. Some colors I used were Tamiya
Deck Tan, Buff, Model Master Wood. These colors were first dry brushed
as before but as I went to the grayer colors, I switched to vertical
strokes as the weathering would have done from rain. I have to say that
I had never painted wood to such an extent but I really liked the
results. The same process was used on the shutters, but to a lesser
extent as they would not be exposed 24/7 to the elements, because they
open and close. I left the door lighter to add interest in the solid
color.
Putting the whole thing together after that was
easy. Line them up and run a bead of super glue along the seam some
accelerator and voila’, structure.
The roof required a different style of painting. I
started out painting the roof in a traditional pre-shade of Flat Black.
The roof was going to be mostly the dark tarpaper for waterproofing.
The Gunze Wood was added to the boards on the roof and they were
finished similar to the sides. The tarpaper was something I thought
would be a problem but a little Floquil RLM 81 and I was ready to
weather it. I stood back used my greatest artist impressionism and
largest brushes and started dry brushing from the top of the roof to the
bottom. This made the very top of the roof more weathered than the
bottom. I figured that all the crap from the top would go to the bottom
and stay there until washed off with rain. It worked for me. I used
multiple tan, wood, and buff colors all very thin to get the look I was
after. When it was done I took a wash of burnt umber artist oils and
streaked them from top to bottom. This worked out quite well. I did
not give the whole roof a wash, just streaks of the wash. A very thin
Tamiya Red Brown was airbrushed over the entire roof to blend things
together. I was very happy with the results.
I couldn’t decide whether to use clear styrene
windows, not provided, and paint the back of them or to use a white glue
compound and form the windows. I elected to use clear styrene as the
openings were too big for the white glue compound. I did paint the
inside walls Tamiya Red Brown. This allowed me to go back at any time
and add additional details inside such as posters and maps. As there
was no floor, furniture or anything else I just wanted something to
cover the yellow resin. I like the way it turned out. The shutters
were actually added at this time before I did the windows. I staggered
the way they were hung and opened to provide a candid look. A few of
the hinges were missing but I just added these from styrene rod. The
hinges were painted with Model Master Magnesium as were the vents on the
rooftops. A small thread for the door handle and the place was almost
ready to move in.
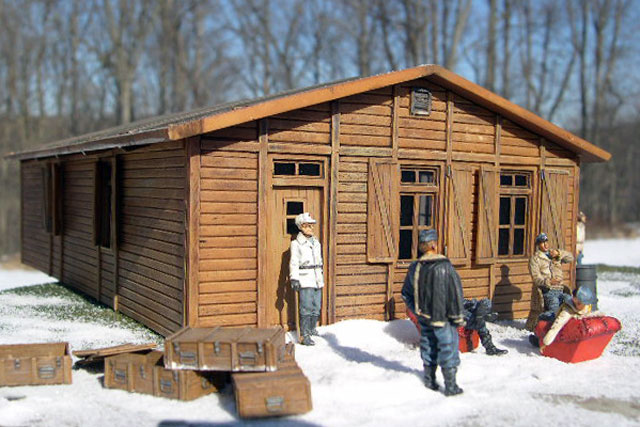
A flat coat before the windows were attached and
that is it. The roof is not attached because I may want to add detail
later and to ease carrying the barracks to a show. I did decide while
adding the flat coat to the roof that I should add some dead leaves on
there for visual interest. I sprayed the individual panels and let some
foliage fall where it wanted to and in the corners where I wanted it to
go. The flat allowed the foliage to stick and added a nice dimension
and character.
There were so many more possibilities that I
thought about while building this kit. How about I add some stove
pipes, maybe a light over the door, what about a unit sign by the
entrance. Wouldn’t it be cool to have a floor and furniture inside?
What about a slit trench outside the door? Maybe I could prop up a bike
at the doorway? Maybe a bird’s nest in the rafters or at least some
bird caca on the top of the roof. What about a Tamiya Kubelwagen
outside? It was nice to think outside the box, very refreshing.
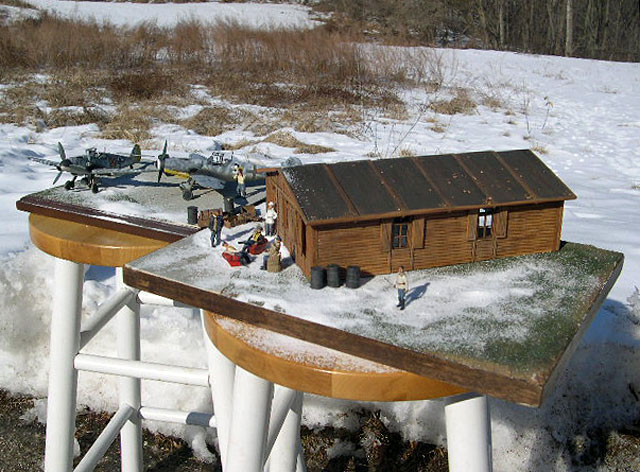
In the end, I settled for a curbside model, where
the outside is what mattered. I am very happy with the build, which was
quick and easy. You will see this background element in my future
builds. It is an added dimension to airplane modeling that is often
neglected. I, for one, am very happy to see that Fliegerhorst has
announced a tactical control tower and a maintenance hangar. Remember
the Shep Paine hangar?
Oh, the possibilities, I can’t wait.
I highly recommend this kit to anyone looking to
expand his boundaries or for just something that is different. It is an
easy build and a lot of fun. And as I always say: “Modeling is fun!”
Thanks go to Dmcmodels for the review copy. The
model can be found by calling 413-527-7491 or emailing
airplane104@aol.com or at their website
http://www.resin-plane-kits.com . Please let them know you heard
about it here.
Messerschmitt Bf 109
Modelling Manuals 17 |
|
|
|
|
US Price: $17.95
UK Price: £12.99
Publisher:
Osprey Publishing
Publish Date:
January 25, 2002
Details: 64 pages; ISBN: 1841762652 |
|
|
Model, Images and Text Copyright ©
2005 by Floyd S. Werner Jr.
Page Created 02 April, 2005
Last Updated 04 April, 2005
Back to
HyperScale Main Page
|
 Home
| What's New |
Features |
Gallery |
Reviews |
Reference |
Forum |
Search
Home
| What's New |
Features |
Gallery |
Reviews |
Reference |
Forum |
Search