|
Airfix 1/72 scale
Shorts Stirling Mk.I
by
Jose Lucero
|
 |
|
Shorts Stirling
Mk.I |

Airfix's
1/72 scale Stirling is available online from Squadron.com
Here is my build of the Airfix 1/72 Short Stirling
Mk.I. As must of you know, this is a very old kit that first was
released in the early 70's. Inside the nice cardboard box there are 273
parts moulded in a light blue plastic with two sprues of clear parts.
Two versions of the Stirling can be done from this kit, the Mk. I and
the Mk. III. The differences can be seen in the engine detail and
exhausts and the mid upper turret which is rounded in the Mk. III.
Airfix provide parts for both versions and instructions on the
differences. There is also a nice tractor with bomb trolleys and lots of
bombs.
At the beginning of this build, I decided that I would do it as simple
as possible, out of the box of course. This is the largest project I
have ever done as I mostly build 1/48 WWII fighters. I choose to do a
Stirling Mk.I and left the fine raised detail there.

It all started with the cockpit which is very simple. The instrument
panel is cutout in the instruction booklet. The seats are very crude as
are de the control sticks. I added some wiring and seat belts as I just
couldn't stand to see the office so empty. The fuselage floor and the
stairs connecting it to the cockpit was added next. I closed the
fuselage just to find a horrible gap. I fixed it with Milliput epoxy
putty, Testors red putty and Mr. Surfacer in various grades. I reshaped
the upper fuselage as it had some very bad sink marks and one side was
wider than the other. Of course, all the raised detail was lost, which
had to be scribed. The bomb bay doors where then fixed in place shut,
another very bad join which needed a lot of work and scribing.
There are two cavities at both sides of the fuselage where the wings are
supposed to fit. The openings are too big and I had to use Milliput to
fix that horrible 3 mm gap. The flying control surfaces where fixed as I
don't care for moving parts. The turrets where dry fitted as I decided I
would put them after the model had been painted.
I attached the canopy after some very tedious and hair pulling masking.
After all the hard work of building this beast was done, I proceeded to
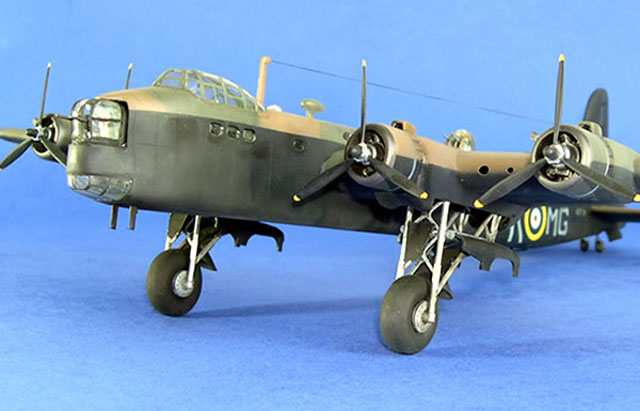
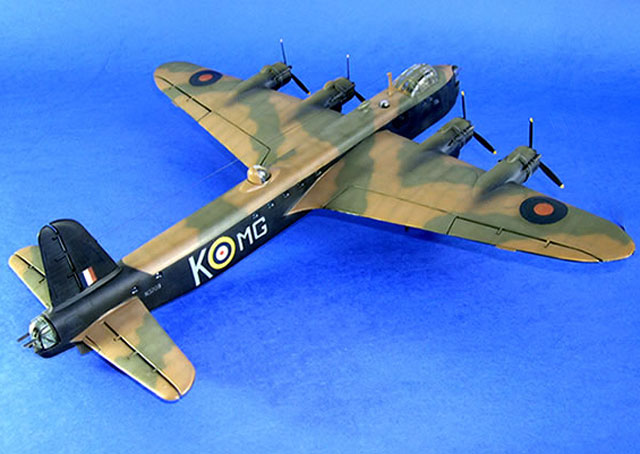
the paint shop. After preshading the upper surfaces of the model, I used
Gunze Sanyo acrylics for the Dark Green and Dark Earth and Humbrol 33
mixed with a little gray for the black undersides.
Weathering was applied with a very thin mix of
Tamiya Smoke and gray over the panel lines. the under surface was then
weathered using clearer and darker shades of the black applied.
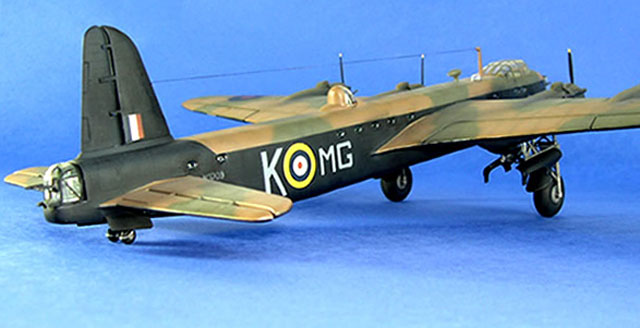
A Future gloss coat was applied only where decals had to placed. The
decals had yellowed over time so I bleached them by taping the sheet to
my car window for almost a week. This worked like a charm. To my
amazement the old Airfix decals performed very well after several
applications of the Microscale decal treatment. I choose to depict and
aircraft of RAF No.7 Squadron which took part on the night raid of
Rotterdam on the 10th/11th of February 1941.
Well, this was a really great build and I now have
a very rarely built kit in my collection, at least it's the only one
I've seen in this part of the world. I really like how the subjects call
on you and it doesn't matter what scale the kit is as long as you love
the aircraft.
This was my first 1/72 bomber and now I have a
stash of them, some old, some new.
Best regards from Guatemala!
Model, Images and Text Copyright ©
2005 by Jose Lucero
Page Created 13 December, 2005
Last Updated
13 December, 2005
Back to
HyperScale Main Page
|
 Home
| What's New |
Features |
Gallery |
Reviews |
Reference |
Forum |
Search
Home
| What's New |
Features |
Gallery |
Reviews |
Reference |
Forum |
Search