|
Kopro's
1/48 scale
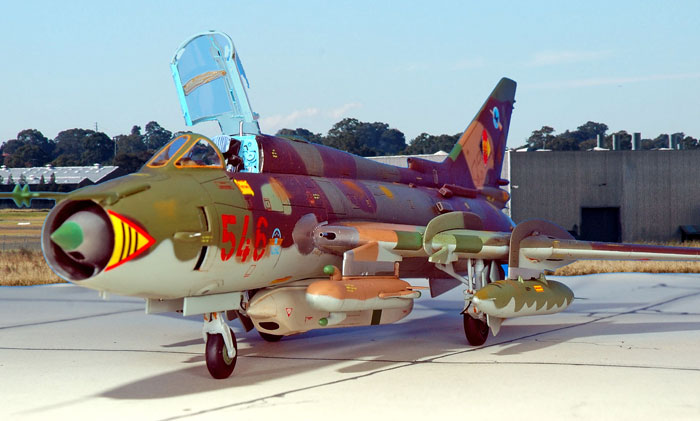
Sukhoi SU-22M4 (Fitter-K)
by Ingo Degenhardt
|
 |
|
Sukhoi SU-22M4 (Fitter-K) |

Kopro's 1/48 scale Du-22M4 is available
oneline
from
Squadron
The SU-22M4 in service
with the NVA
The SU-22M4 is one of the last
variants from a long line of fighter bombers that started with the SU-7,
even the interceptors SU-9, 11 and 15 share the same roots.
This aircraft, originally the
soviet SU-17 (first flown in 1966), was the first plane of this family
to feature variable wing geometry. The mostly simplified export variants
were designated SU-20 and SU-22 and further development lead to
sub-variants such as the SU-22M4. NATO-Code for all versions is “Fitter”
with an annex letter to distinguish the different types.
The SU-22 got famous in 1981,
when two Libyan SU-22M3’s found out the hard way that the US Navy also
operated swing-wing fighters that are better not to be messed with.
In 1984 the former German
Democratic Republic (Deutsche Demokratische Republik) formed JBG-77 to
be based at Laage and to be equipped with the SU-22M4.
Because Laage airfield was still
under construction the first ten SU-22 were delivered to Rothenburg.
They arrived dismantled in crates via AN-22 airlift directly from the
USSR. Suchoi technicians accompanied the transport, assembled and flight
tested the new aircraft.
Eight were already completed
when the deployment to Laage began in December 1984.
Further aircraft were delivered
directly to Laage – all in all 36 aircraft until march 1985.
In a second phase from 1986 to
spring 1987 the final delivery took place.(IL-76 this time)
The fighter bombers were divided
between JBG-77 (Jagdbombengeschwader) and MFG-28 (Marinefliegergeschwader),
each with a strength of 24 SU-22M4 and 4 SU-22UM3K two-seat trainers by
mid-1987.
During the altogether six years
of service with the NVA (National peoples army) each wing lost one
aircraft in accidents with the pilots both saved by the K-36 ejection
seat.
With the end of the German
democratic republic in 1990 the #546 of JBG-77 and the #798 of MFG-28
each received a brightly coloured farewell scheme during September 1990.
With the official reunion of
both Germanys the East German air force was disbanded on November 3,
1990 and the Luftwaffe took over.
Both SU-22 wings still existed
(with Luftwaffe markings) for the rest of the year but it was already
clear that the Luftwaffe would not form any wings equipped with Fitters.
Instead
they were put into storage at
Laage with minimal maintenance.
In 1991 some aircraft were
chosen to be kept airworthy and later several of those were operated by
WTD-61 (Wehrtechnische Dienststelle – Military trials unit.) and the
USAF bought 4 SU-22M4 (and five MiG-23ML)
Some others survived in various
museums or are now even privately owned. The remaining Fitters found a
sorry end in October 1994 at Verwahrlager (storage facility) Laage when
they were simply crushed by a recovery tank. (what an idea)
Laage is now base for JG 73
“Steinhoff”, currently being equipped with the Eurofighter Typhoon.
I have always liked the lurking,
hunchback appearance of a parked Fitter-K and especially the M4 version
of the former East German (DDR) LSK/LV (Air Force/Air Defence) with
their rather loveless applied camouflage schemes that seem to be
individual for every single aircraft.
So when this version was
released by Kopro I got myself one of them immediately; but as so often
it spent quite a while in the ‘queue’ before construction finally
started.
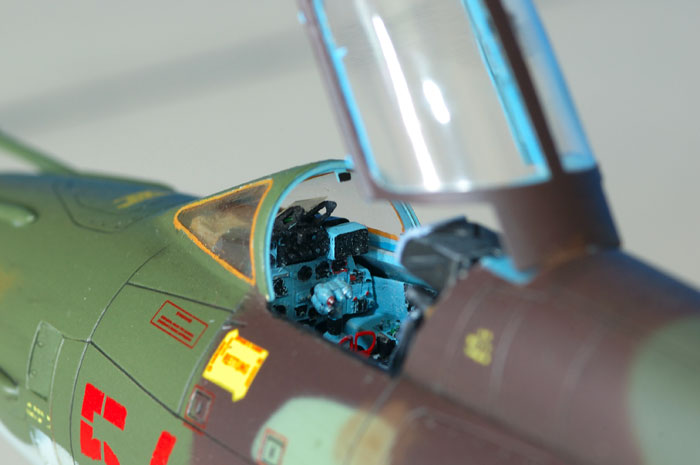
In the meantime the kit was
examined several times and I came to the conclusion that buying the
Cutting Edge Cockpit (or Neomega, I think they make one, too) might be a
good idea. And it is. At least the K-36 ejection seat should be replaced
– the kit seat is simply worthless.
It takes only minor work to
make the CE cockpit fit into the fuselage half. The major modification
is to remove nearly all of the vertical annex of the front wheel well.
Although dry fitting looked alright, when it came to installing the
shock cone sub-assembly I found there was not enough space in front of
the cockpit tub to make it fit correctly.
My solution was to leave off the
rear bulkhead from the shock cone and paint the fuselage insides from
the cockpit on rearwards flat black to avoid any ‘see-through’ that
might be caused by omitting the bulkhead.
I also thinned down the inner
fuselage sides in the area of the four auxiliary air intakes (blow-in
doors) which is a tedious process as the plastic is very thick; but
necessary if you want to cut out the doors and display them open. They
may be shown open at any random angle as seen on the real thing when
parked on the ground.
The fuselage halves join quite
well but it is helpful to work in stages as it is very long and some
support for alignment using sheet styrene from the inside makes sense
also.
Installing the speed brakes
closed calls for some effort because their fit is only very poor. I
eventually glued them in, filled the gaps with CA glue, sanded
everything smooth and rescribed the contours completely. The model in
general does not suffer too much from sanding because the panel lines
are very deep, leaving almost every time at least a fine line that made
rescribing rather easy.
No good fit either at the
fuselage-wing joint. I assembled the wings completely including
painting/masking of the natural metal areas of the variable wing
geometry. The location tabs on the wing roots do not fit into the
fuselages slots at all, so I cut them off and the wings were glued on as
a butt-joint using a mixture of CA and plastic cement. Care must be
taken to achieve a symmetrical, slightly drooped wing profile. Being
satisfied with this, I was left with a pronounced gap on the undersides
and a moderate one on the upper joint. This step of construction took a
lot of filler. Not to mention sanding and rescribing the panel lines.
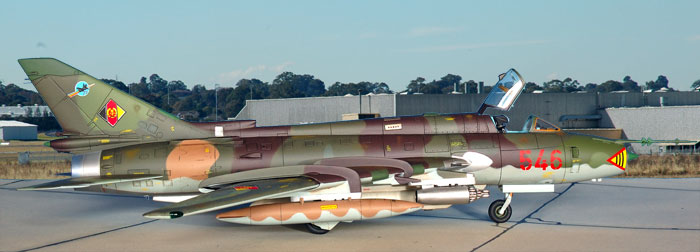
Attaching the vertical fin and
the dorsal fin intake part (afterburner cooling intake – the most
distinctive feature of the M4 among the late Fitters) is
straightforward.
On the forward fuselage I
corrected the devices for the retractable landing lights which the kit
has flush with engraved outlines only. On the real aircraft they are
noticeable bulges on the left and right lower fuselage sides. A little
bit of sheet styrene cut to size, filler and some sanding produced the
bulges. Holes of the appropriate size were drilled into them and later
covered with Krystal Klear to represent the lenses.
The strangest thing with this
kit are the wing pylons – if the SU-22 had straight wings I guess they
would fit quite good, but for the swept wings they have to be cut to
shape. I did reasonably good here and some filler completed the job.
True to the motto “simulate, not
duplicate” I added some detail to the rather plain wheel wells in form
of various cables, hoses, etc. attached according to photographs.
The undercarriage itself is
quite poorly detailed and needs careful assembly – I glued the
suspension arms to the gear legs by eye-measurement which turned out to
be a big mistake, because when I first placed the model on its wheels I
found out that it was sitting far too low on the main gear. The wheels,
flattened a little to simulate weight, added to the disaster.
Eventually there was no other
cure but to cut off (Dremel circular saw) the suspension arms and
reattach them at the right angle. All very unnecessary, as there is an
exact scale drawing in the instructions how the assembly should look and
that can even be used as a template.
To improve the undercarriage’s
look a little I added some brake pipes to the gear legs. Wheel well
covers could need some detailing too, but I chose not to because it can
hardly be seen anyway among all the ordnance.
I replaced the wing tank fins
with thin plastic sheet as the kit parts are brick-like things that look
impossible.
There is a good choice of
external loads included and I went for a kind of ‘armed reconnaissance’
external load, including the KKR-1 recon pod for the centreline,
a UB-32 rocket pod for the right
inner pylon, two 158 gal. drop tanks and the funny looking pod on the
left inner pylon is an SPS-141 MWGA ECM-pod.
General detailing included 30mm
gun barrels in the wing roots made from hypodermic needles, stretched
sprue-made static dispensers, odd-rod antennas and AOA vanes (PE) from
the Cutting Edge cockpit set.
The two pitot probes have wrong
bases or fuselage attachment points. I cut them much shorter, sculptured
them a little and added a kind of duct made from plastic rods at their
rear. This looks more like the real thing. The forward part of the left
probe again is a fine hypodermic needle.
Of course most of the smaller
parts were attached after painting.
As said, the LSK/LV Fitter’s
camouflage patterns are peculiar to each aircraft, so I had to find as
much pictures as possible for the aircraft of my choice – #546 of JBG-77
before it received the farewell scheme.
Fortunately there are a lot of
photographs showing the aircraft in this colourful paint scheme, so
providing sufficient information about the camo scheme as well. The
instructions can be used also, because the farewell scheme is one of the
decal options.
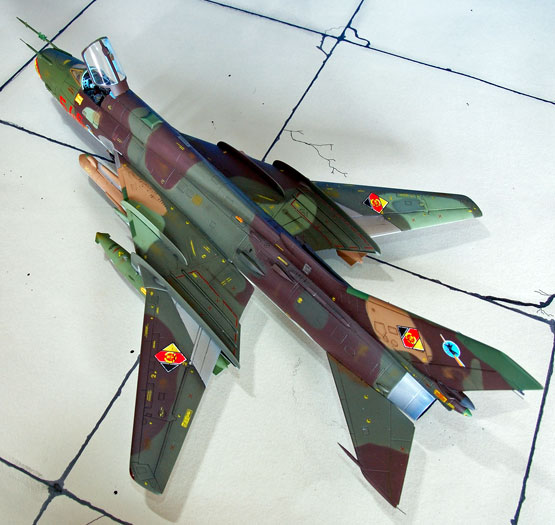
I used Xtra-Color paints for the
job and because there are no specific paints for the East German Air
Force, they range from various ‘Eastern block’ colours, FS 34102 to
completely self-mixed and even RLM 65.
To achieve something like
scale-like demarcation lines between the paints, I used rolled
‘sausages’ of blu-tack for masking; reducing the feathering effect of
spraying considerably.
Quite a lot of patches from
paint repairs were sprayed on at random – these do not always match the
original colour of the area and there can be very well a brown patch on
Dark Green or vice versa or any possible combination. Seems that the NVA
did not care too much about the look of their ‘Susis’ as they were
nicknamed.
Before I started the camouflage
painting, the model was given an overspray of Alcad’s Grey primer and
microfiller, revealing some spots that needed further sanding,
rescribing or whatever. The primer was sanded with very fine wet & dry
and the all the natural metal surfaces were sprayed with Alclad
Aluminium and Dark Aluminium and then masked.
Masking with blu-tack is very
effective in my opinion and needs only very little practice to learn. It
simply depends on the angle you hold the airbrush how sharp the paint
edge becomes.
Decals
Kopro provides three different
marking options – East German #546 as mentioned, 98+14 of WTD-61
(Luftwaffe) and a camouflaged Russian aircraft.
I considered buying some extra
decals for this kit because I was looking for a regular JBG-77 aircraft
but was not able to find them. So I went for #546 and had the problem
that the modex number was yellow with a red outline as it is part of the
farewell colour scheme. All other standard markings are there as needed.
First I planned to cut spray masks from the #546 decals but then had the
idea of simply spraying the neatly cut out numerals in the required red.
I taped them to a piece of cardboard with beads of blu-tack, sprayed
them gloss red and let them dry. Of course they were a little thicker
now, but an extra layer of Humbrol Flat Cote sprayed from various
angles concealed this. The Kopro decals in general are ok, although they
do not react so very well with Micro Sol/Set and therefore wouldn’t snug
into panel lines that much. On the positive side there is a full
complement of stencil data.
What is not quite sure with
aircraft #546 is if it had the wing emblem on the tail fin or not before
it received the special paint scheme. Some JBG-77 had it for a certain
period, but it was ordered to be painted out as can be seen on several
photographs But I do not know if this order was followed completely or
not.
I used the decal anyway to add a
little colour to the model and because I had a picture showing #546 in
the paint shop for the farewell scheme with the work just having started
(masking). On this picture the wing badge is already there. So I guessed
it to have been applied earlier and not to have been painted over.
If you want to make any JBG-77
or MFG-28 aircraft the modex numbers are not very helpful – at least I
could not make out any system in the numbering of JBG-77 and MFG-28
aircraft. To distinguish the Fitters of the two wings the chaff/flare
dispensers on the rear fuselage can be used. JBG-77 aircraft had two of
these ‘strakes’ while MFG-28 received later series aircraft with four
dispensers. (there may be exceptions though).
Surely not a kit for the
beginner, with some effort and endurance I think the Kopro Fitter-K
turns out into a nice-looking model. It’s the only choice in this scale
anyway. Some aftermarket stuff is available to improve the model but I
contrived to confine myself to the Cutting Edge cockpit set which I
really consider necessary.
Thanks to Frank Banisch for all
the helpful information and his website
www.su-22.de (unfortunately currently offline but hopefully to be
available again soon)
- Squadron/Signal publ.
“Fitters in action”
Model and Text Copyright © 2006 by
Ingo Degenhardt
Images Copyright © 2006 by Lutz Degenhardt
Page Created 22 May, 2006
Last Updated
22 May, 2006
Back to
HyperScale Main Page
|
 Home
| What's New |
Features |
Gallery |
Reviews |
Reference |
Forum |
Search
Home
| What's New |
Features |
Gallery |
Reviews |
Reference |
Forum |
Search