|
Building Collect-Aire's 1/48
scale
Sukhoi Su-24M
“Fencer D”
by Phil "Bondo" Brandt
|
|
|
Sukhoi Su-24M “Fencer D” |

HyperScale is proudly supported by
Squadron.com
The Sukhoi Su-24
(NATO “Fencer D”), affectionately known by aircrews as "The Suitcase," was
born in the mid-Sixties amid the alarm caused in Soviet planning circles
by introduction in the West of the General Dynamics F-111 "Aardvark".
The Soviet Union
had no equivalent airframe with the Vark's unique capabilities: low level
speed, terrain following radar, long unrefuelled range and significant
weapons carriage ability.
The Fencer's long
development was a quantum jump for the Soviet aircraft industry and, as in
the case of the F-111, a difficult one. But, the Fencer's difficult
early years eventually led--again, as in the Vark's case--to a relatively
stable maturation phase; the Fencer has soldiered on through the
Afghanistan debacle of the Eighties into the New Millennium.
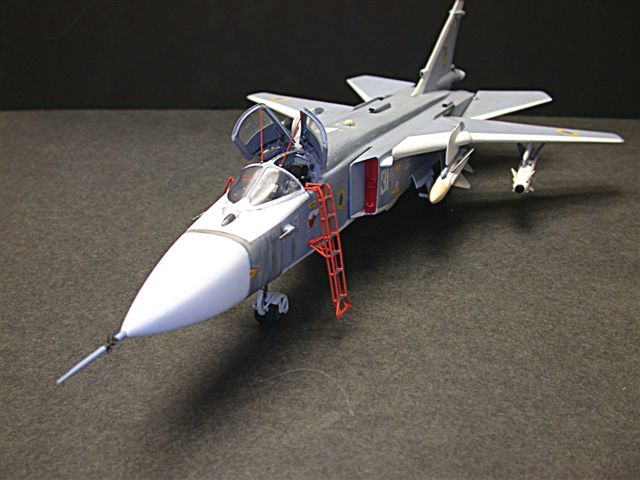
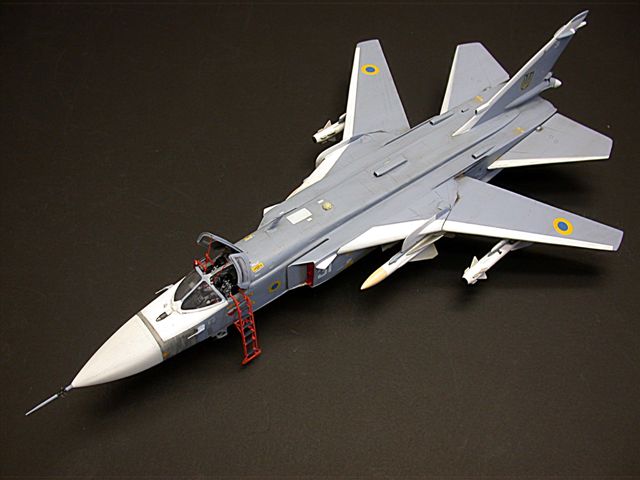
Collect-Aire's
1/48 Scale Fencer D
|
Initial Assessment
With many past
Collect-Aire releases, the good and the not-so-good often battle to a
Mexican standoff, and the Fencer is no exception. This one was done by LF
in the Czech Republic and, as such, exhibits clean, smooth molding, very
little warpage and petite, sharp engraving that rivals the best injected.
Unfortunately, the very nice looking parts in-the-box suffer from variable
resin shrinkage which significantly affects major component alignment, and
resin pinholes (not bubbles).
Wings
The wings have
caused the Difficult Kit Division of Bondo Industries the most grief and
indecision. The problem centers around the fact that the folks doing the
master decided not to create movable wings (as opposed to the design
philosophy of the much more inexpensive Monogram and Academy F-111s) but
to leave it to the kit builder to permanently set the desired wingsweep
angle and to cut the outer wings at an appropriate location to mate
properly with the solid “gloves” (inner wing segment).
This scheme would
have been OK but for the unfortunate cross sectional enlargement of the
outer wing at the wing/glove interface. This enlarged section makes the
outer wing exactly the same thickness as the glove, which ain't the way
these 'switchblades' work! They really do slide between thin structural
layers of the glove, and there simply isn't any extra thickness left in
the Collect-Aire resin gloves. What to do…what to do?
Plan A
Although this
scheme was eventually shelved in favor of working with the original
Collect-Aire wing parts, I’ll go into the procedure anyhow because it is
workable. Bondo ambled out to the plastic kit “junkyard" and examined
the Zhengdefu ripoff of the Academy F-111 kit. Wonder of wonders; the
Vark gloves and wings were essentially the same shape and size (just have
to trim 1/4 inch of wingtip) as the Fencer's! The only changes needed to
adapt the injected gloves and wings to the C-A resin fuselage were to thin
the cross sections of both wings and gloves by about 1/16 inch on the ol'
sanding plate — the pivot pins/bosses also had to be trimmed--and to saw
off a small aft portion of the Vark glove to match the Fencer planform. I
even planned to adapt the interlocking Academy "gears" so that the
wingsweep would be synchronized. To pull off this synchronizing trick and
provide clearance for the gears required some delicate, yet
industrial-strength Dremmeling of the inside top half of the fuselage--we
Vark troops call it the "over-the-wing fairing." And, we haven't even
mentioned the rescribing of all the F-111 parts to match zee Russkiy
panels or adding the irregularly shaped pivot pin covers which stand
proud of the upper and lower glove surface! Although all the milling of
the fuselage top has made it very thin for such a large section, there's
a relatively thick, wide resin spine that laminates right over the
thinned area. Mebbe it's a lotta practice bleeding, but since Bondo's an
old Vark 'crew dog,' he really cared that the wingsweep appear realistic.
An added advantage of this route would have been lightness and increased
rigidity of the injected wing/glove halves. But it wasn’t to be. After
actually creating both wings, I rethought the whole deal and opted,
instead, to work with the labor-intensive Collect-Aire wings.
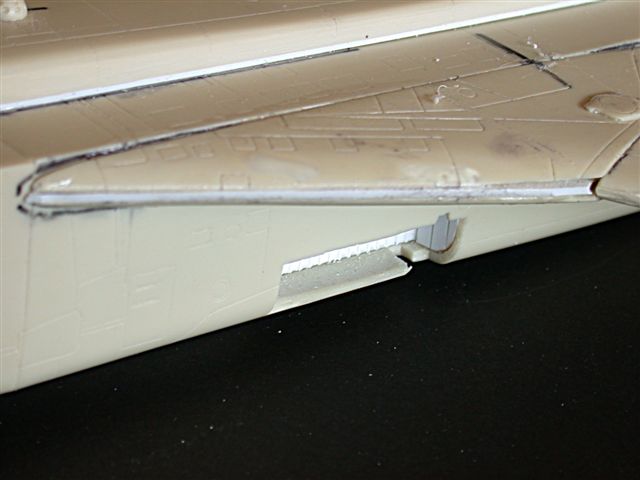
Plan B
The solid resin
Collect-Aire gloves were carefully sliced into upper and lower halves with
a razor saw, and a filler sheet of plastic sandwiched in between. The
outer mating surface of each glove was painstakingly Dremmeled so that the
outer wings would nest inside, with only a thin layer of resin covering
the joint….just like the real thing. Rather than have the wings full
forward, the wingsweep was set at forty-five degrees, which lends an
offsetting sleekness to the boxiness of the “Suitcase’s” fuselage.
Included wing
fences are of the square-edge profile, seen only on the cammo’ed MK, or
export, version (Iran, Iraq, etc.). To make proper -24M fences, the
forward and aft fence top corners were rounded off and the whole fence
tapered to a relative knife edge at the top. The fit of these fences with
the wing was not good, so putty and some very careful sanding were
required to blend in to the wing leading edge.
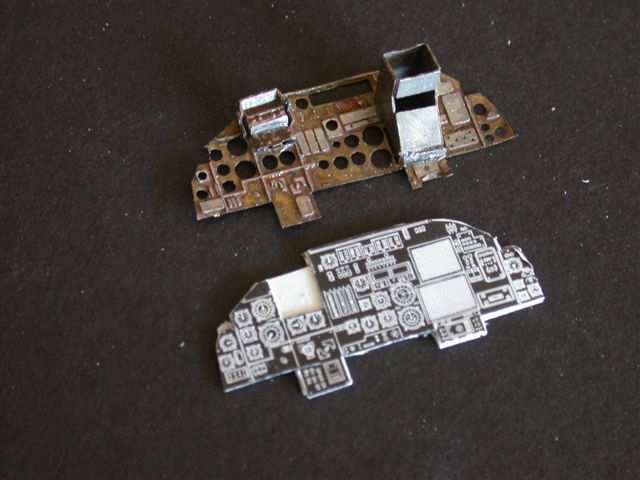
Cockpit and Canopies
Most of the Collect-Aire photoetch panels were used, with some added
sidewall boxes. No throttles were included, so they were scratchbuilt, as
was a right console radar tracking handle. A thin piece of clear plastic
sheet was sandwiched between the PE instrument panel and the included
printed instruments. These instruments, although helpful, are way removed
from Eduard’s latest and greatest. Each kit instrument was printed with a
hokey white ring which I inked over with a fine Koh-i-Noor pen.
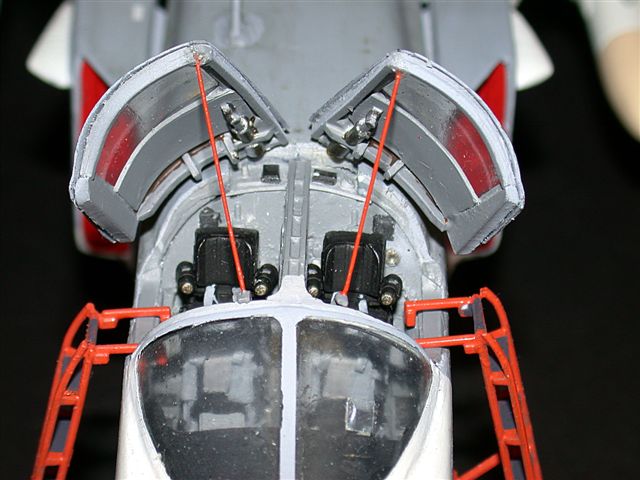
Although the Collect-Aire KM-36 seats are not bad, I substiututed KMC ones
which are much “busier” and have very nice harnesses, etc. molded in. An
avionics shelf under the canopy raising mechanism was scratchbuilt, as was
the top of the longitudinal cockpit divider “wall”. The aft edge of the
windscreen was thickened for realism with plastic strip, and another strip
was glued down the inside of the center divider.

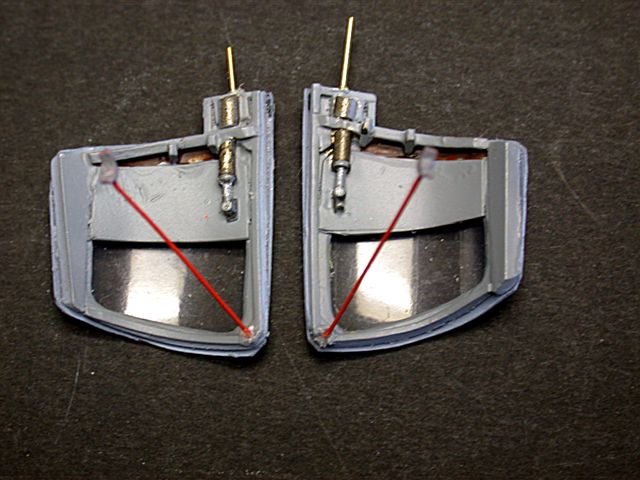
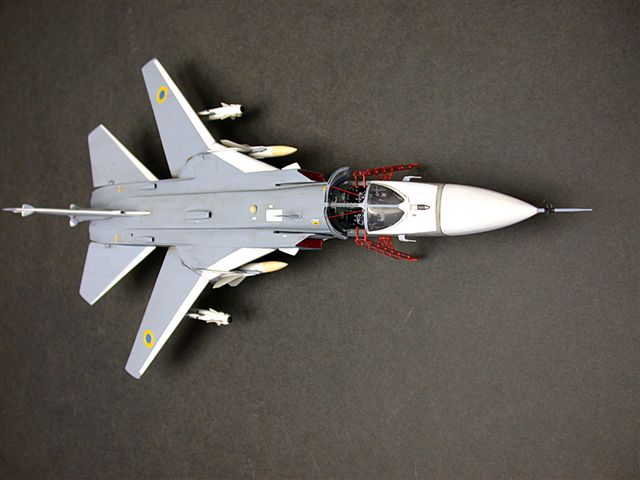
In the interest
of even more cockpit busi-ness, I elected to pose the unique split
canopies open in their flower petal configuration. This required
significant thickening of those thin, vacuformed pieces. I used the spare
canopy set as a female mold for two laminations of plastic sheet. Window
cutouts and scratchbuilt interior surface detailing.
Fuselage
Now is where fit
problems really surface. The radome aft cross section was fully 1/32” too
large as compared to the mating cross section of the forward fuselage.
Instead of industrial strength grinding and sanding of the radome, or
significant puttying of the forward fuselage, I chose to cut (razor saw)
deep vertical and horizontal kerfs in the radome, then gluing and clamping
down to squeeze the part in both dimensions; it works! The bottom area of
the separate afterburner empennage casting is oversize, also, and this
time I chose to grind it down to mate with the aft fuselage. The long,
flat resin fuselage “spine” didn’t mate properly (too low) with the
forward fuselage section, so I (again) sandwiched in plastic sheet for the
whole length of the spine, all the way aft under the vertical fin.
Afterburner
assemblies from the Academy Flanker were substituted for the simple, much
too shallow kit ones, and the divider area between the burner cans, absent
in the kit, was scratchbuilt. For balance, model railroad lead sheet was
rolled and then glued into the forward fuselage; sure glad the landing
gear is cast metal!
The kit didn’t
seem to allow for the distinctive anhedral of the wings, and the
wing/fuselage joint seemed under designed for those relatively heavy
parts, so I custom-bent a 1/8” diameter brass rod and glued it (somewhat
like the modeler’s version of a “carry-through box” ) to the inside of the
fuselage top or, as we in the Vark community call it, the “over-wing
fairing.” The laborious sanding required by ill-fitting parts naturally
obliterated much delicate scribing, and lotsa rescribing was required to
duplicate the complex lines. 3/32” brass rod was also run through the
empennage to create a strong mounting point for the large, movable slabs.
Gear wells were
devoid of any detail, so both maingear ones were lined with ribbed plastic
sheet. The nosegear well is too small for any detail to be seen. And,
while I’m at it, the PE maingear doors are much too thin to be realistic,
so an outer panel was made from plastic sheet and laminated to the PE.
Thicker, scratchbuilt plastic ventral strakes were also substituted for
the kit PE ones.
The PE seals, or
fairings, into which the wing trailing edges slide when they’re swept aft
were too small and difficult to integrate with the fuselage. I
scratchbuilt new ones using very thin (.005”) sheet which could actually
be pressed in to duplicate the softness of the real thing. BTW, in the
Vark these flexible fairings are actually inflated to properly seal the
wing/fuselage interface.
Ancillary Fuselage
Parts
There were many,
many tiny resin and metal detail blisters, cooling air intakes, ECM
antennas, pylon components, etc., all in small unmarked plastic baggies,
with no numerical references in the exploded parts diagrams. To really
make things worse, my kit was missing a significant number of 'em. Lou
Maglio, the Collect-Aire honcho, quickly sent me the missing parts, with
the exception of two. Because of time constraints the still-missing ones
were duplicated in resin using the other, present, item of each pair as
masters. The large sweptback antenna on top the fuselage, just aft of the
cockpit, was scratchbuilt.
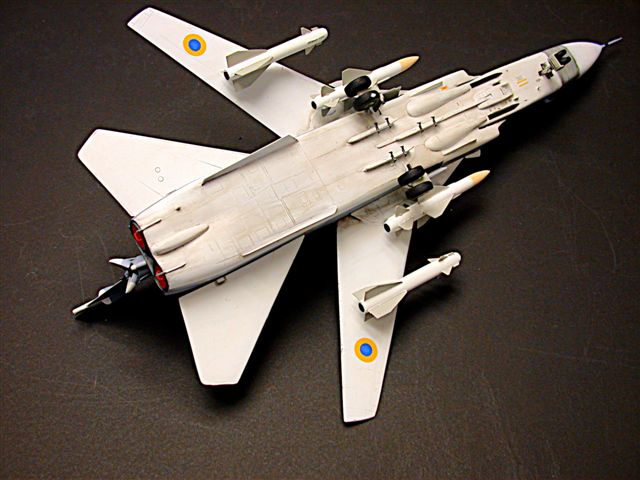
Weapons
I chose to use
the included AS-11 "Kilter" and AS-14 "Kedge" missiles. The included PE
fins and pylon sway braces add to the detail, but it's my opinion that the
PE weapon fins are actually too thin. I used thicker plastic sheet
instead. The “TV” nose of the “Kedge” was created by using kitbashed
fronts of 1/32 Mavericks from the Trumpeter A-10. The “Kilters’ are
carried on the inboard pylons, but the fins wouldn’t clear the wing under
surfaces, so I added a missile launch pylon from the Monogram F-18.
The included PE
weapon sway braces—adding homebuilt jackscrews would’ve been very
laborious--were replaced by more realistic, three-dimensional ones from
the Monogram E-6B kit. More Monogram sway braces were added to the three
empty under-fuselage pylons. The outer pylons/missiles are anchored to the
wing with brass rod and are removable; same, same with the inboard
missiles, although the fence/pylon assemblies are permanently affixed to
each wing.
Painting,
Markings and Weathering
|
Finish
After much filling
(Blue Acryl) and many primering/wet sanding iterations, all leading edges
and airframe bottom surfaces were shot with multiple coats of PollyScale
Reefer White. Then appropriate areas were masked (luv that Tamiya tape!)
and slightly bluish PollyScale Haze Grey , lightened with Reefer White,
was applied with Bondo Industries’ new Tamiya gravity-feed airbrush.
Masking for the grey was almost as laborious as the above-mentioned resin
fit problems. The outer wing slats are hard masked, but the inner wing
leading edges, vertical fin leading edge, slab leading edges and fuselage
color divider line are “soft-edged.” This was achieved by lifting up the
outer edge of the tape with a knife edge and spraying over the upturned
tape edge. Next, PollyScale gloss clear was applied (at least two coats)
to provide a proper base for the extensive decaling that was to follow.
After the decalling, PollyScale clear flat was lightly applied. This stuff
dries almost instantly, so you don’t have to wait around to see if there
was enough flattening agent to do the job.
Decalling, Markings and Weathering
Collect-Aire
provides a very extensive sheet of markings and stencils. Strangely, the
included sheet appears to be almost an exact duplicate of the older
Cutting Edge offering that was ostensibly produced (years ago) to
accompany their advertised-but-never-released Fencer kit! Bondo went with
the Cutting Edge decals because of the known quality and opacity — he’s
had past troubles in this respect with thin Collect-Aire decals that don’t
underprint vivid colors with a layer of white. I’m confident in saying
that close to one hundred individual decals were laid on, and I spent at
least eight hours just on this task.
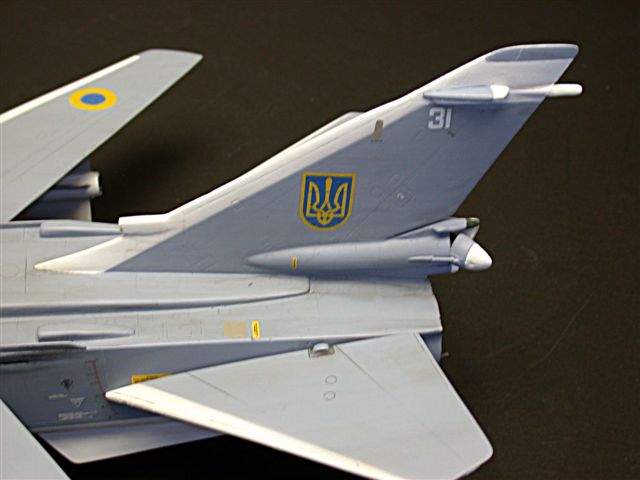
Tired of seeing
red Soviet stars, I was impressed with the unusual blue and yellow
national markings on Ukrainian Fencer Ds of the Nineties as seen in a
great World Airpower Journal feature (see references) and with the
weathering opportunities to duplicate the overall VERY dirty Ukraine
airframe exteriors. Apparently there was little financial room in the
post-Soviet breakup budget for wash racks. The multipiece Ukrainian
national roundels and vertical fin badge were taken from the nice Cutting
Edge Flanker sheet.
Weathering was
done with watercolors, and the dead flat PollyScale clear coat provided
the perfect base for the medium, just like watercolor paper! The
“adjusting” of watercolor intensity is, in my opinion, MUCH easier than
with oil washes. There’s no worry about solvent action with the underlying
finish, and, since much of the real airframe staining is done by flowing
liquids, the “staining” can be brushed out, or done over, any number of
times, and seems to these elderly eyes to be more realistic.
Auxiliary Ground Equipment
The thin canopy
braces were scratchbuilt, as were the intake and exhaust FOD covers. The
crew ladders are from old OEZ Su-7 kits and are the same generic design
used on the Fencer and other Evil Empire birds.
This was a
laborious but uplifting project for personnel of the Bondo Industries
Difficult Kits Division. The struggle defines what modeling is to me and
was well worth it.
Now that the
Fencer’s been rolled out, I look forward to the imminent release of same
by Trumpeter! J
I continue to appreciate (and buy!) the wonderfully eclectic Collect-Aire
releases.
1. World
Airpower Journal, Vol. 5, Spring 1991, and Vol. 39, Winter 1999. The
Fencer is the featured cover article in the latter volume and IMO the
primo pictorial reference.
2. Przegiad
Konstrukcji Lotniczych, “Su- 24”, by Jefim Gordon, 2/93, ISSN
1230-2953. This monograph includes a superior centerfold of removable
Fencer line drawings. Many closeup detail pics, some in color.
3. Russian
Falcons, Steven J. Zaloga, Concord Publications, Page 27-31. Nice
color pix.
4. Red Stars
Over Europe, Marcus Fulber, Concord Publications. Color pix (front
cover and pages 10-14). Excellent cockpit
Model, Images and Text Copyright © 2004
by Phil Brandt
Page Created 01 April, 2004
Last Updated
31 March, 2004
Back to
HyperScale Main Page |
 Home
| What's New |
Features |
Gallery |
Reviews |
Reference |
Forum |
Search
Home
| What's New |
Features |
Gallery |
Reviews |
Reference |
Forum |
Search