|
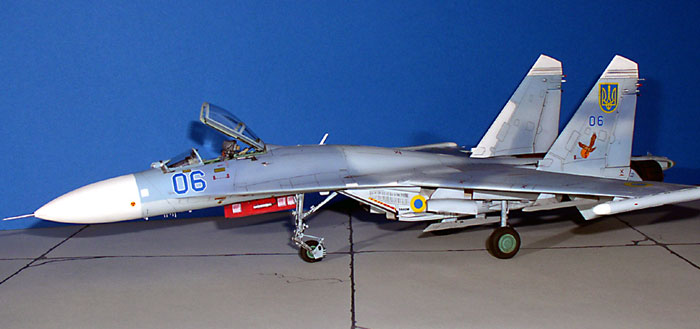
Sukhoi Su-27
Flanker B
Zhuravlik
by Ingo Degenhardt
|
 |
|
Sukhoi Su-27 Flanker B |
images
by Lutz Degenhardt

HyperScale is proudly supported by Squadron
I think this well-known heavy Russian fighter does not need any
detailed introduction.
About 400-500 Su-27 are believed to have been delivered to the
Russian Air Forces. Over the years severe financial problems reduced the
number of serviceable aircraft drastically and the others begin to show
their age – for example faded paint is a common sight and even bald
tires can be seen on some Flankers.

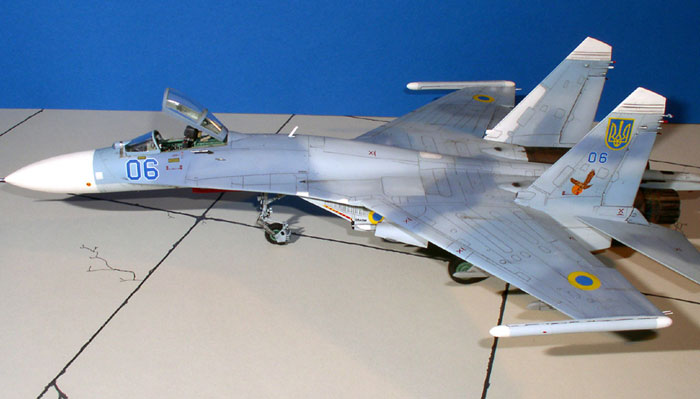
Of course it still forms the fighter backbone of Air Forces such as
Russia or the Ukraine. Foreign users include China, Vietnam, Ethiopia
and India. The Flanker’s impressive appearance is not only made up by
the aircraft’s sheer size but also by it’s elegant lines.
Quite a lot of aftermarket items were used on this model.
I started with the Cutting Edge cockpit tub that was sprayed
Xtracolor X629 Russian interior blue/green and was given some
drybrushing and the appropriate detail painting. To make it fit between
the upper and lower fuselage halves a good amount of material has to be
removed as well from the tub’s bottom as also from the inside of the
front wheel well. The CE cockpit fits nicely into the upper fuselage.
Next step was the correction of the main wheel wells on the lower
fuselage half. The top walls of the wells have a straight edge that
covers part of the wheel well so no wheel could retract into it. The
intake duct outsides have a correct rounded cutout and by simply
dry-fitting the intakes into place, this can be used as a template to
draw a line where the wall has to be cut out. Some filling and sanding
here becomes necessary later when the intakes are glued on.
Test fitting showed a very poor fit of the upper/lower fuselage
halves and the air intake ducts as well. Lots of work to be expected
here. I decided to start with the intakes by cementing their halves
together, filling the ejector pin marks on the inside and sanding them
smooth. They were now painted gloss light grey with the front edges in
light blue (underside colour).
The FOD-screens (etched metal, kit-contained) were fitted in the
raised position. The square opening in the bottom of the intakes
(auxiliary intake slots) were left open for now.
I thought it best to attach the intake ducts to the lower fuselage
half first and then to glue this assembly to the upper half of the
fuselage. The decision was right but it turned out to be hard work
anyway.
First I glued supporting styrene strips to the inside of the engine
trunks in order to force the intake ducts to align with them. Width of
the intakes was also mostly out of shape, so I inserted (not glued) rods
made from sprue and cut to the desired length in order to widen the
intakes where necessary. It took a while to make each intake fit as
desired, but finally I was satisfied and glued them on using
Cyanoacrylate. Only moderate finger pressure here and there was still
necessary. After everything had dried thoroughly, the sprue rods were
removed (using the ‘rear exit’, as the FOD-screens blocked the other
way). The styrene alignment strips then were carefully cut and/or broken
off, too. (an exciting moment) Fortunately the ducts stayed in place,
although with a remarkable tension in some places I think. The strips
had to be removed because they occupied the position where the
compressor front parts had to go. These were attached next, adding some
further strength to the whole assembly.
Next step were the fuselage halves – another challenge as their fit
is also only very poor.
Again, I used styrene strips on both parts to align the seams as good
as possible. Especially to the left and right of the engines and on the
forward fuselage. Cementing the big parts together was done in several
steps: tail boom first, then the rear section to the wing trailing
edges, the wings themselves, LERX and finally forward fuselage.
Attaching the radome completed the construction of the basic fuselage.
What followed was a lot of filling, sanding and rescribing until this
large ‘sub-assembly’ was ready for further construction. The ‘barn-door’
airbrake was fitted in the closed position and also sanded and it’s
outlines rescribed where necessary.
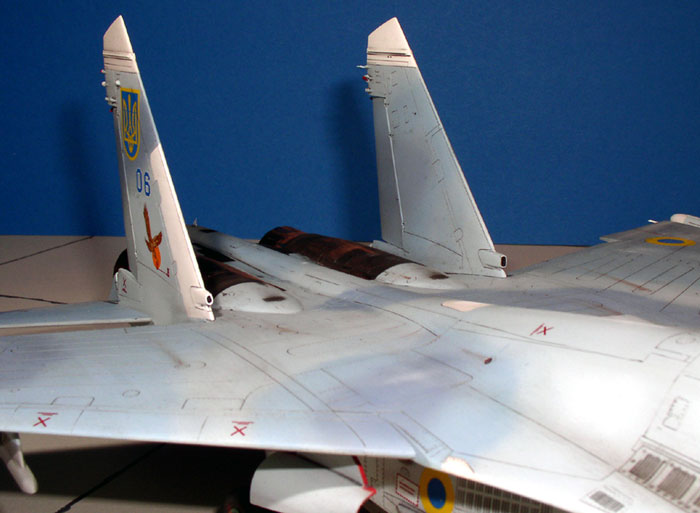
The two vertical fins each have a small air intake at the base of
their leading edges. On the model, both are of the same size and shape.
On the real thing, the intake on the right is apparently smaller than
the one on the left. So I cut off the moulded-on intake from the
assembled fin an made a new one from Tamiya epoxy putty – filed, filled,
sanded to shape and drilled out. The left intake was given a more
accurate rounded appearance both on the in- and outside.
After installing the vertical fins, wing flaps, ventral fins and a
few other parts the model was ready for painting.
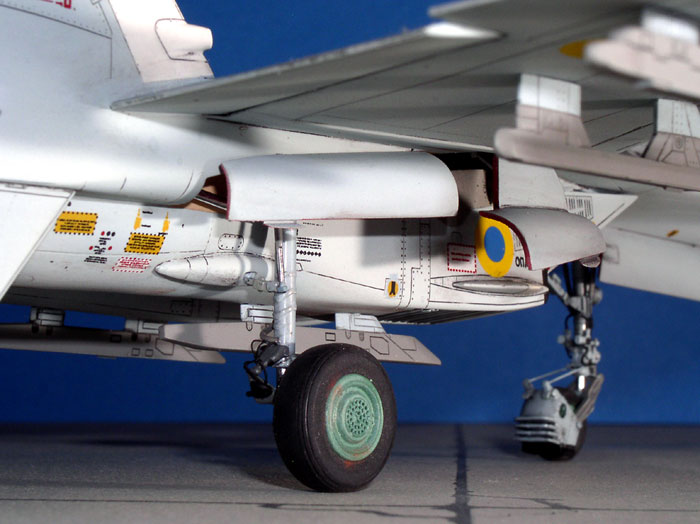
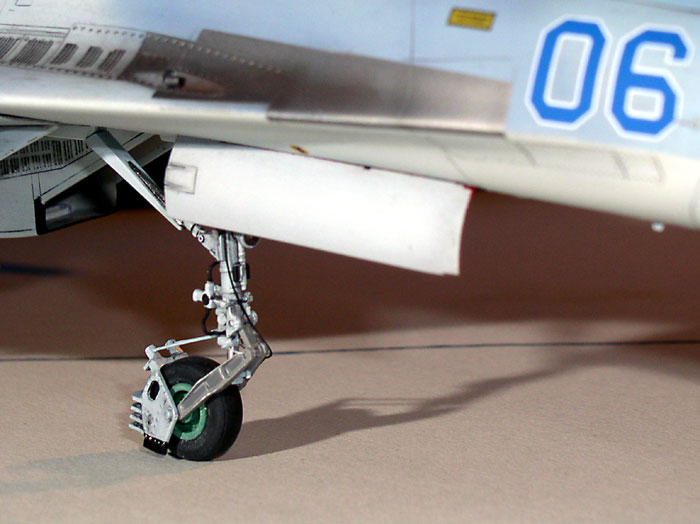
As usual, the landing gear was build as sub-assemblies. These already
fine kit parts received some further detailing such as brake pipes,
electrical wiring and drilled-out landing lights with Krystal Klear-windows
over a silver inside. The struts supporting the front wheel’s debris
guard were replaced with thin wire and the rubber tires were treated
with fine wet&dry to remove the sidewall lettering, the rubber shine and
some of the tread to resemble rather old and worn tires.
Another sub-assembly were the tailplanes – originally designed to be
attached straight and level. These were modified a bit by cutting off a
small slice of plastic where they meet the ledge of the vertical fins,
so they could be attached in a trailing edge-down position, more likely
for a parked Flanker.
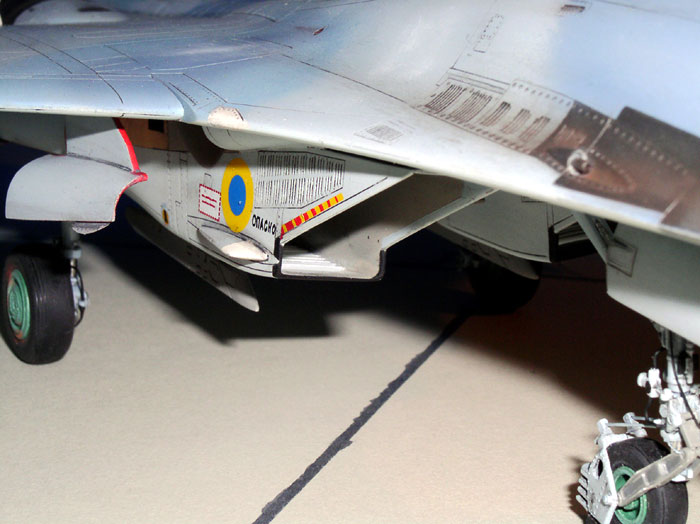
May be not so likely my choice to show the auxiliary intakes (bottom
of air intake ducts) in the open position. (venetian blind style) Eduard
provides the etched parts for this but it is a little bit tricky to
attach all the small metal strips to their diagonal slots in the parts
on the left and right side of the opening as they need to have the exact
length to fit in properly.
I choose to equip the Su-27 with the wing tip-mounted ‘Sorbytsia’ ECM-pods
included in CE’s cockpit detail set. Each one is made of two parts –
front and rear half. They look quite good but lack all detail. First I
reinforced the assembly of the two by drilling holes into each half and
inserting a piece of plastic rod as a bigger kind of location pin before
they were glued together, filled and sanded. Detailing included two
cable ducts (or what they are) on top and bottom of the pods, a mounting
rail for the wingtip and a thin square plate for the outside and forward
portion. On these the position lights are located – made from a tiny
elliptical drop of half-dried Krystal Klear painted Clear red and blue.
Work on the cockpit and the canopy, both pre- and post painting,
included the following:
The upper fuselage opening for the instrument panel had to be
enlarged to accommodate the CE instrument panel. It’s cover also comes
from CE. The attached cover gets in the way when trying to fit the
windshield, so the inside of the windshield frame was cut back
accordingly. Canopy and windshield both have prominent moulding seams on
top over their whole length. These were first scraped off with a sharp
knife, then sanded with 1200 wet&dry. The resulting blind areas were
polished using a chrome polish. For the finishing touch the clear parts
were dipped into Future and set aside to dry.
The rear parts of the cockpit behind the CE ejection seat come from
Neomega, while the cockpit sills, Canopy inner framing and lock-pins for
the canopy are Airwaves parts – as well as the various AOA-vanes,
odd-rod and crossbow antennas.
The only kit part in the cockpit is the control stick which I
considered being superior to the ones made by CE and Neomega, it only
needs to be shortened a bit at the base.
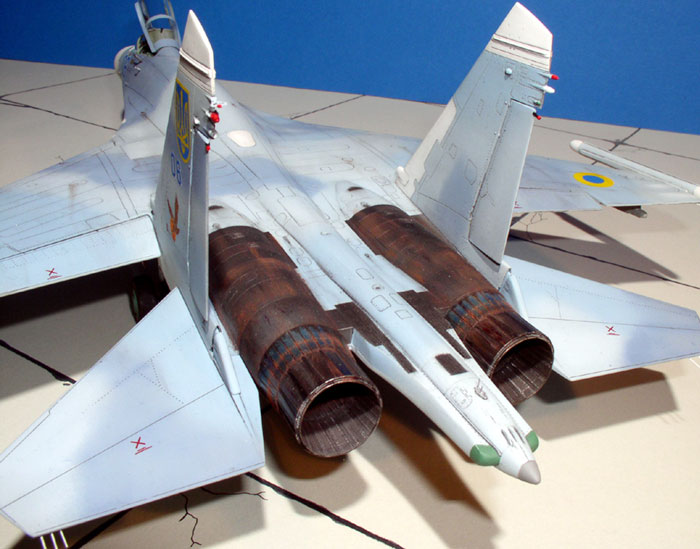
To complete the list of additional parts – the burner cans come from
CE too, very fine resin cans in the fully open position.
Painting
I prefer to use Xtracolor for my paintjobs and the Flanker is no
exception. X601, 602 & 603 provide the necessary colours for the
‘standard’ Flanker camouflage scheme. All these were lightened
considerably for spraying, but painting started with the areas around
the engines. I prepared them with a coat of Alclad II – Grey Primer &
Microfiller (ALC302) Very light sanding of this basecoat resulted in a
very smooth surface about to receive a thin coat of ALC 113 – Jet
Exhaust. In the photographs this whole area appears a bit darker than it
really is.
The burner cans (not yet attached) were treated the same way and
additionally their front half was sprayed with ALC104 – Pale Burnt
Metal. All the natural metal surfaces were then masked off using Tamiya
masking tape.
Next step was masking the already painted intake insides and the
cockpit. Then the model received a base coat with Humbrol No.1 – Gray
primer. This also was carefully sanded smooth.
Painting/masking sequence after that was as follows:
-
Humbrol Gloss White Radome, fin tips,
‘Sorbytsia’ tips (sub-assembly) and dielectric panel
on right vertical fin.
-
X602 Light blue Undersides, upper
surfaces camouflage pattern and ‘Sorbytsia’ bodies
-
X603 Blue/Grey Upper surfaces
camouflage pattern
-
X601 Medium Blue Upper surfaces
camouflage pattern
-
Humbrol Flat White Dielectric panels
on LERX, spine, fuselage and intake sides
-
Humbrol Gloss light Grey Front area
of main wheel wells
-
Humbrol 121 Rear part of main gear
wells and front wheel well
-
Model Master Titanium buffing
metalizer Gun blast area (polished)
-
Humbrol Gloss red Inside of wheel
well covers
Weathering
The three camouflage colours were given some spot painting and shaded
panel lines with the original (=darker) paint from their respective cans
to simulate some fading and re-painting. One panel was made as a
pre-painted ‘replacement part’ and so has a sharp edge to the
neighbouring colour. (‘Roof’ of left main gear wheel well)
With all the masking tape removed from the model and a few days drying
time in between, the aircraft received a wash with a heavily diluted
mixture of Flat black and Flat white = Dark grey.
Some oil and grease streaks from thinned black paint were also added.
A special treatment was given to the natural metal areas around the
engines. Streaks, Spots, discolouring and what else happens to these
surfaces were simulated by washes, drybrushing and brush painting in
different colours. The front half of the burner cans was lightly
oversprayed with Revell Metallic Blue.
Some further weathering was done after the decals were already
applied and the model got it’s final coat of Clear Flat. This additional
weathering was made using the powder of pastel chalks in various shades
from White, Tan, Dark and Red Brown to Black. Especially the gun blast
shield, the area behind and again the engine parts were treated with
these brushed on powders.
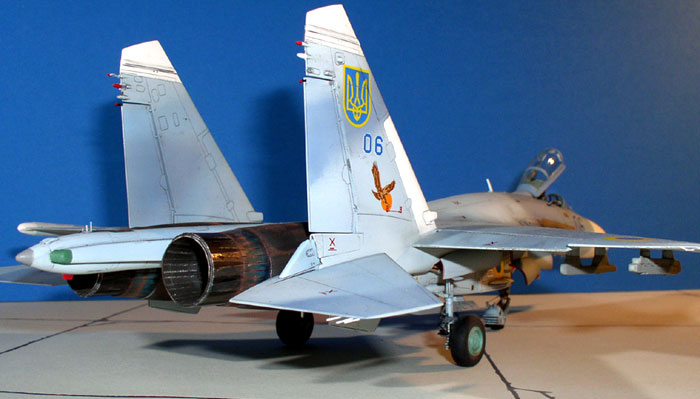
Decals
I had the HI-Decal Line sheet 48-003 for this model to make it the
‘Blue 06’ of the Ukrainian Air Force, sporting the ‘Eagle & Moon’
insignia.
This sheet also contains a good amount of stenciling data. I started
with the left fuselage side from front to rear (as usual).
I am always a little suspicious with flat decals like these and this
time they were a really bad surprise. I had just applied the first five
or six decals with the support of Microscale Set & Sol (as usual), when
I realised some heavy ‘silvering’ of the decals applied first that now
started to get dry.
I waited for a while and the same thing happened to all the decals
already on the model. There was no cure – the carrier film just would
not stick to the surface (remember: Xtracolor – paints are gloss) These
decals would certainly ruin the model, so I removed them all. I decided
not to use single decal from this sheet and instead ordered Cutting Edge
CED 48-011 as a replacement.
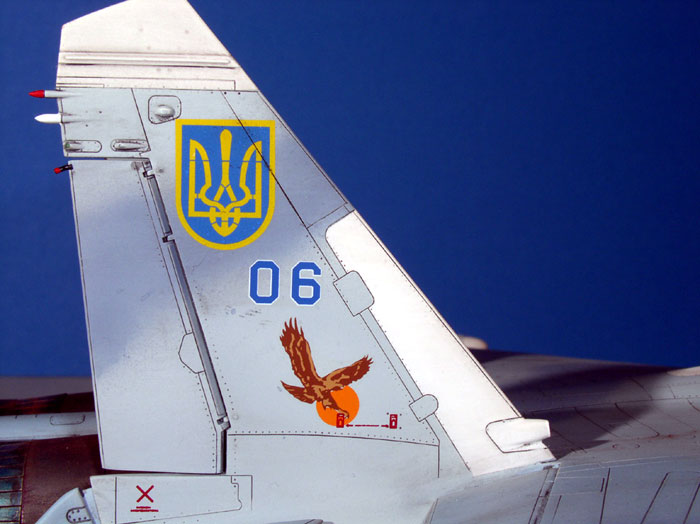
‘Blue 06’ – an aircraft belonging to a Ukrainian Air Defence Regiment
based on the Crimea was also part of this sheet and it was my choice
again.
By the way there are some differences between HI-Decal’s and CE’s
version of the markings for this Su-27. For example, HI-Decal has only
got one ‘Eagle & Moon’ for the left vertical fin, round style Ukrainian
markings for the fins and no roundels for the air intake sides – all
contrary to the CE sheet. I relied on the latter – of course.
Unfortunately, CED 48-011 includes no stencils at all and so I had to
confine myself to the kit-supplied stencils, which are not so very
numerous. Even the air intake warnings had to be painted in this case as
Academy’s choice for markings has the large shark/sharkmouth-decal that
covers the intake sides.
Anyway, the CE decals were a pleasure to work with – very nice.
When the decals all had dried, I wiped off the excess glue and
checked all markings for any silvering, of which there was only very
little. This was dealt with in the usual way by piercing the tiny air
bubble with a needle and putting a small drop of Sol on top. But even
with those very few and minor cases of silvering I contrived to overlook
(as always) one or two to be discovered after the model had already got
it’s final Clear coat of Humbrol Matt Kote.
Afterwards all the remaining sub-assemblies were attached, the cockpit
was completed and the last detail painting was done. Among the last
things I attached were the static dischargers on outer wings, tailplanes
and rudders as well as the metal ‘band’ that runs across the IRST. This
was made from lead foil.
This model has it’s difficulties, especially regarding the poor fit of
the fuselage/intake assembly. But it was fun to build in general and
particularly with all the variety of detail sets used as a mixture.
They were:
-
Eduard 48-150
-
Cutting Edge CEC 48060
-
Cutting Edge CEC 48061
-
Airwaves AC48074
-
Neomega C2
-
Cutting Edge CED 48-011
I had this kit on the shelf for quite a long time, hence this
‘collection’ of additional detail sets. (There is enough left for a
second Flanker).
I did not yet decide about the kit’s missiles. I do not like them
that much. So this Flanker has solely to rely on it’s GSh-301 30mm gun
so far. But there is a detail set for the missiles, isn’t there...?
Sources
and Acknowledgements
|
Model and Text Copyright © 2004 by
Ingo Degenhardt
Images Copyright © 2004 by Lutz Degenhardt
Page Created 25 April, 2004
Last Updated
15 September, 2004
Back to
HyperScale Main Page
|
 Home
| What's New |
Features |
Gallery |
Reviews |
Reference |
Forum |
Search
Home
| What's New |
Features |
Gallery |
Reviews |
Reference |
Forum |
Search