|
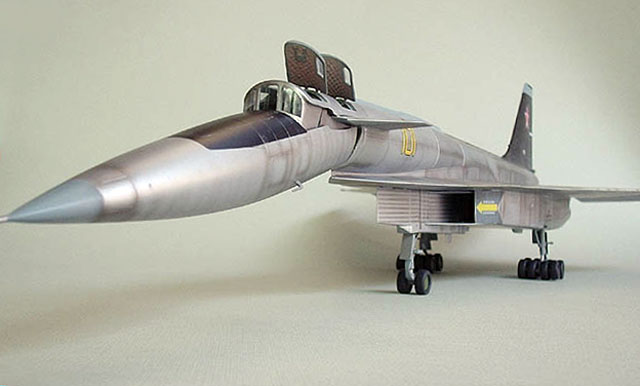
A-Model's 1/72 scale
Sukhoi T-4
by Ricardo Cornejo
|
 |
|
Sukhoi T-4 |

HyperScale is proudly supported by Squadron
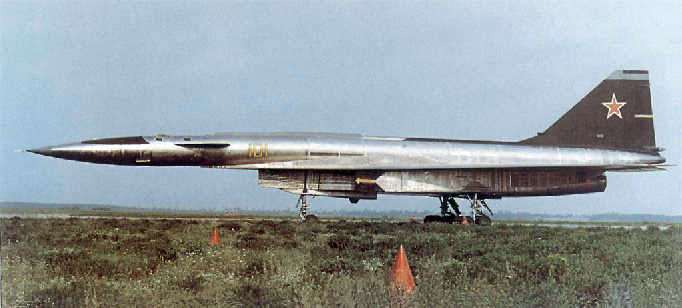
The T-4 was part of the prolific series of strange Soviet bombers designed
during the cold war. This was traditionally considered to be the Soviet
response to the supersonic bomber XB-70 North American.
The T-4 flew for the first time in August 1972 in the center of tests
Zukhovsky. The first flight was at the expense of the pilot Vladimir
Ilyushin and the navigator Nicolay Alferov. It had one of the first
systems of flight as cable (Fly by Ware) made in the URSS. During the
flights of test 1.28 reached a speed Mach, nevertheless it did not come
at the speed programmed of Mach 3 due to the fact that the finished
project was cancelled in 1974. The T-4 accumulated in his record of
flight only 10 hours.
Nevertheless the design of this impressive plane was following an
extensive and complex program of engineering, aerodynamic and
metallurgical. The T-4 was constructed in steel and titanium. Its weight
when fully loaded exceeded 100 tons!. It was considered to equip it with
two missiles of great size Kh-45 but this armament never managed to
establish oneself.
Another two airfranes were in process of manufacture when the works of
production were suspended. The sole surviving model ended its days in
the museum Monino, close to Moscow.
A-Model's 1/72 scale T-4 kit is of type short run and it is of mixed
manufacture, resin fiberglass and injected plastic. The wedge is not
perfect but here it enters game the patience of the modelist. The
sections of resin are the fuselage and great part of the wings made of
two halves (top and low) those who come assembled from factory. Part of
the tail fin also is of the same material. The rest of the pieces is in
injected plastic. The glue that it is necessary to use is of type
cyanocrilato CA or super glue.
I used putty Marson (for cars) with an catalyst. It is easier to refill
unions and on having dried, modelling does not contract as the
traditional putties of the category. The putty Tamiya was used for the
final finishing touch before the painting.
Cockpit:
It is basic and with a minimum of details in the lateral consoles, panels
of instruments and seats. I replaced the consoles of kit by others more
detailed of another kit, I believe that they were of a F-105 I am not
sure much. I replaced the seats by copies in resin of two K-36 with some
modifications. Actually I eliminated the cylinders side by side of the
head pilot and replaced them by square badges, very similar to the seat
that was used in the family of the Yak-28. I do not know what was the
type of seats that the T-4 was using. I realized an identical work to
which Mr Phil Brandt did in the rims of the accesses to the cabins of
his T-4 that he published in the past in Internet. I added a badge of
plasticard inside the cabin to give him more depth. I replaced three
original frontal windows by new made pieces of plate of acetate, equal
method for two lateral windows and the two that are in the lids of
revenue to the cockpit, the final score is much better!
Wings and tail fin:
On having been joined to the fuselage only, it is necessary to add to them
the rim of attack (2 pieces), I carry to extremes of the wing (1 piece)
and flaps of the rim of escape (1 piece). I preferred joining the flaps
to the rest of the wings in position below.
The leeway is completed joining the rim of attack and the mobile panels.
Front fuselage and nose:
After assembling and painting the interior of the cockpit and two halves
of the front fuselage, I placed an internal piece of plasticard to
reinforce the union to the rest of the pre-assembled fuselage. In this
stage it is necessary to align correctly both sections of the fuselage
and to apply enough putty in the union. The nose is composed of two
halves each one with an internal axis. I preferred the option above or
below doing a groove it curls to the sides of the cabin.
Air duct:
On having assembled this section, it is necessary to put attention in the
aligned correct one and adjustment in the union to the rest of the
fuselage.
Here also putty is applied enough. I did not consider to use protective
lids for the air captures.
Nozzles:
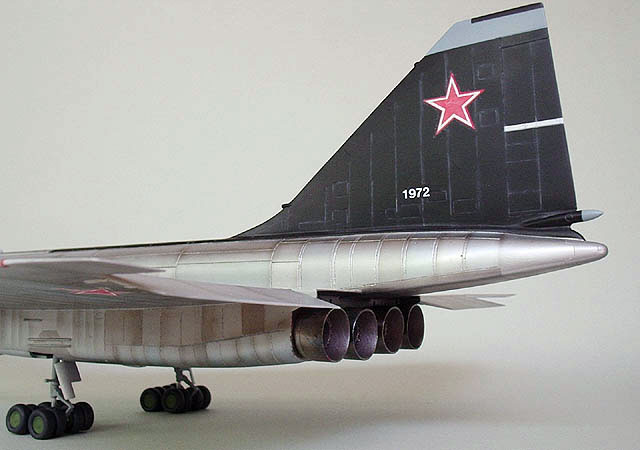
Every nozzle comes in two halves and one joins the burners in his base. It
is necessary to do a slow but necessary work of cleanliness of excess of
plastic in these 4 pieces.
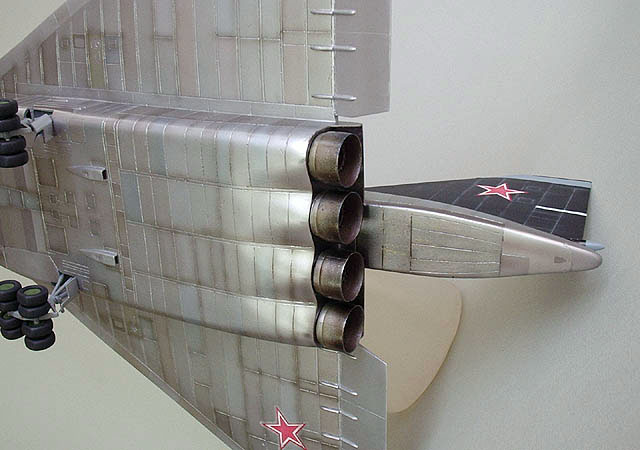
To give him more depth to the burners I did 4 orifices in the later face
of the fuselage.
Undercarriage:
Every principal train has eight wheels and two arms hydraulic, the train
of nose is more conventional only it has two wheels but I added two
horizontal cylinders that go to the sides of the axis or vertical arm
and that were not included in kit. In contrast to the unit of nose the
adjustment of the axes of the wheels of the principal train is
defective, this problem can be solved ... but I did not do it. The wells
have little depth but the front lids cover this area.
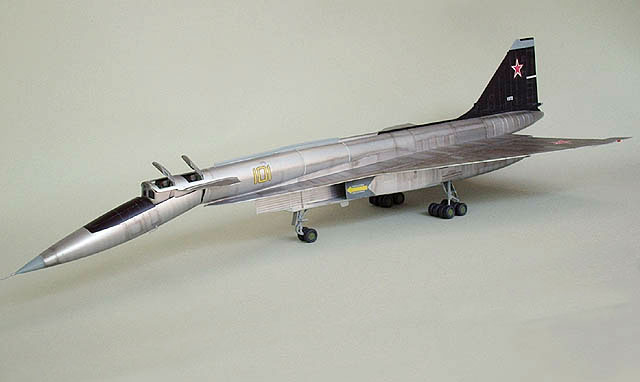
I used acrylic lacquer of cars applied with airbrush. The aluminium is
called ‘Opalescente‘ and I did the differences of tonalities mixing the
aluminium with black, blue, red, white and yellow. Then I retouched with
airbrush you stain of black diluted enough color applied in the rims of
the panels of the fuselage and wings.
The bands or strips of the darkest color of the air captures be
re-produced by me with a rigid mask of plasticard. Before placing, you
trace them I applied a layer to all kit of transparent lacquer. You
trace Amodel they are transparent because of it I painted first the
stars of tail and wings directly on the surface in white color. This way
you trace them of the tail they would not have a translucent aspect.
Identical procedure I did with the code yellow 101 in both sides of the
front fuselage but making the numbers with role he traces Testors
printed on an inject previous I design in FreeHand 9. Finally I applied
to all kit a final surrounding layer of brilliant lacquer mixed with
matt lacquer.
Note: the image of the real plane was published in the book Soviet
Xplane, Jefim Gordon and Bill Gunstom.
:
I must say that this kit does not have the level of details that a kit
Hasegawa, Tamiya, Fujimi or Accurate Miniatures, but AModel's is the
only kit available of this type in 2005.
The type of material used in the manufacture of the pieces of resin
fiberglass means you will have to use special adheisves such as super
glue or one of the two-part epoxy glues.
Many modellers will know that Trumpeter announced for 2005 the Tu-160
injected into 1/72, so I believe that it will not be any surprise that
the the Chinese mark and T-4 may also be released in the future.
Here's hoping!
Click the thumbnails below to view larger
images:
Model, Images and Text
Copyright © 2005 by
Ricardo Cornejo
Page Created 18 May, 2005
Last Updated
17 May, 2005
Back to
HyperScale Main Page |
Home
| What's New |
Features |
Gallery |
Reviews |
Reference |
Forum |
Search