|
ProModeler's 1/48
scale Ta 154 A-0
Professor Tank's
Twin
by Brett Green
|
 |
|
Focke-Wulf Ta 154 A-0 |

Dragon's 1/48 scale Focke-Wulf Ta 154 "3 in 1" kit is
available online from
Squadron
Kurt Tank's night fighter was inspired by the innovative
and deadly deHavilland Mosquito.
The Focke-Wulf Ta 154 shared the British fighter/bomber's wooden
construction, high performance and even its familiar name - "Moskito".
However, a combination of technical problems and
bureaucratic bias against this Focke-Wulf night fighter meant that only
a handful actually entered service.
ProModeler / Dragon Ta 154 in the box
 ProModeler
released their Ta 154 A-0 kit during 1999. In the box are around 100
pieces of fairly soft grey plastic. The main parts are finished with a
slight satin texture. ProModeler
released their Ta 154 A-0 kit during 1999. In the box are around 100
pieces of fairly soft grey plastic. The main parts are finished with a
slight satin texture.
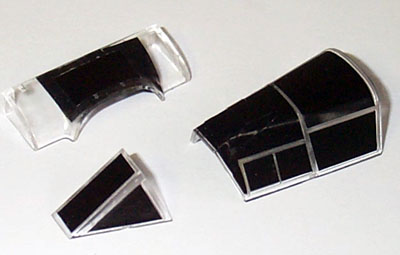
The five clear parts are thin and very clear. They are
bagged separately. The navigator's top window is moulded integrally with
a section of the mid-forward wing.
The length of the kit fuselage is almost exactly correct and the
wingspan is only 3mm short compared to the specifications in Monogram's
"Close Up 22 Moskito". The outline of the model looks true to the
original aircraft, but the shape of the broad wooden propeller blades is
poor.
Surface detail on the main parts features recessed fine panel lines.
There are no ejector pin marks or sink marks on any of the outer
surfaces of the parts, but there are a few minor blemishes on the
cockpit sidewalls.
The features of the Ta 154A-0 are all present including early flame
dampers, straight wingtips and Lichtenstein radar. Exhaust stacks for
the A-1 day-fighter are also on the sprue, but some filling to the nose
will be required if this variant is modelled.
The pilot's cockpit detail is nice, but the pilot's instrument panel is
a bit basic. Both seats include textured cushions but no harnesses.
Detail in the radar operator's cockpit is half-hearted. There has been
no attempt to replicate the high sidewalls in this part of the aircraft.
Inserts are supplied for the side fuselage gun panels. The top cannon
barrel is moulded as part of each panel. The lower hole for the 30mm
cannon will need a cannon barrel added and be blanked off, or the large
empty hole will look pretty obvious.
Small details are well represented. These include tiny separate intake
scoops, underwing FuG 101 antenna and the big FuG 220 Lichtenstein SN-2
radar array. I also like the look of the annular radiator faces.
The undercarriage has been designed to ensure a
positive, very solid location. This method of engineering does
compromise the detail in the main gear wells, but it is not possible to
view much through the small forward doors in any case.
The wings are supplied as separate halves and, as
mentioned above, do not have separate wing tips. The top wing is one
piece per side and the bottom wings each comprise separate section
inboard and outboard of the engine nacelles.
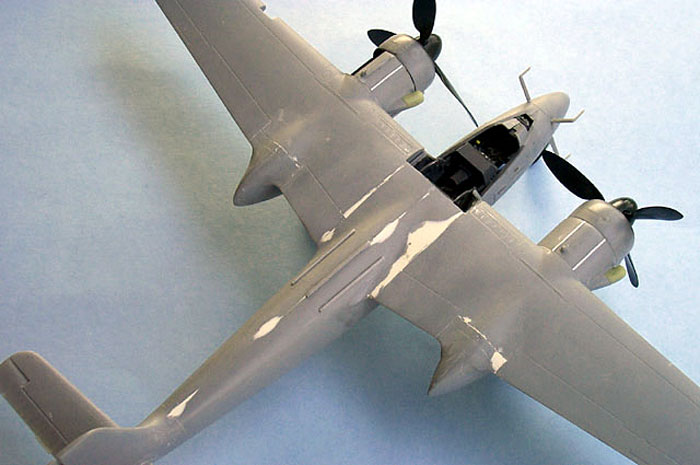
My main wing parts were slightly warped. This seems to be common to
most, if not all of these kits. If the parts are assembled without
correction, the wings will display a pronounced "droop".
The rudder is a separate part with large locating tabs.
These have to be removed or repositioned if the rudder is set at any
angle other than dead ahead. The elevators are moulded as part of the
upper horizontal tail parts. This assures a sharp trailing edge. The
fabric surfaces of the rudder and elevators are convincingly done.
The painting diagram fails to capture the camouflage
pattern of this well-documented aircraft. It suggests the wrong shaped
mottles in the wrong places in the wrong quantities. The boxtop artwork
is a more accurate guide if you don't have more specific reference.
Markings are supplied for one aircraft, TQ + XE. Full stencil data,
including the prominent red walkway markings, is also provided.
In 2006, Dragon re-released this kit with the addition
of a few new plastic parts, a photo-etched fret and new decals. The
additional parts permit the model to be built as the Ta 154 A-1 day
fighter, or the Ta 154 V-1 or V-3, in addition to a Ta 154 A-0.
Decals offer more marking options, but hakenkreuze for
the fin are not supplied, and the only stencils are the red wing walk
lines.
I started building this kit in August 2000, and finished it last week.
This is the reason for the difference in quality between the early
construction photos and those from the last few days.
Those Drooping Wings...
The first task was to address the drooping wings. I glued a length of
fine brass rod to the inside of the top wing halves. This just about
straightened the wing, but the droop on the starboard side returned
after the wing halves were assembled..
Cockpit
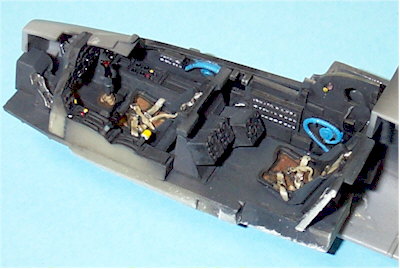 I
bought the Verlinden resin update set, which adequately addressed the
shortcomings in the rear cockpit. I
bought the Verlinden resin update set, which adequately addressed the
shortcomings in the rear cockpit.
Verlinden's set included replacement flame dampers and supercharger
intakes, both of which were a more accurate shape than the kit parts. A
port-side weapons bay and one engine half are also supplied. I did
install these, but once in place I thought they lacked depth. With the
benefit of hindsight, I would not use these parts in future, but the
rest of the Verlinden set was quite good.
Although they are not mentioned anywhere in the instructions, a full set
of separate resin landing flaps are also supplied. I was reluctant to
add more weight aft of the centre of gravity, so I decided to keep these
for a future project.
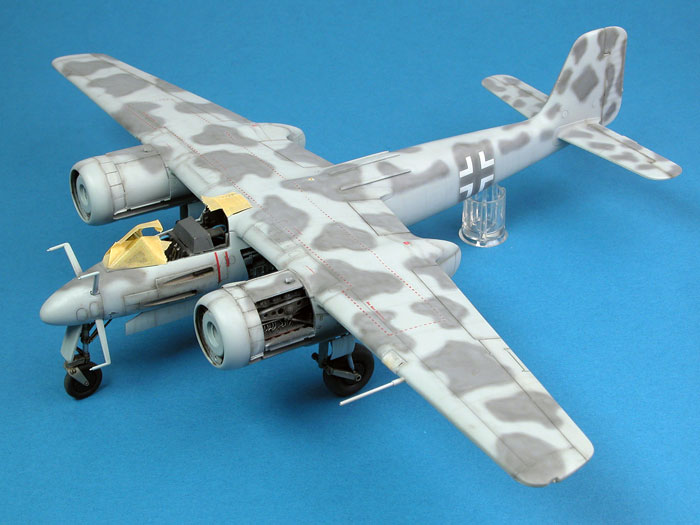
Fortunately, I installed the weapons bay before painting the cockpit
parts, as the rear of the cockpit floor fouled against the weapons bay.
In fact, I had to grind away a rectangular portion from each side of the
back of the cockpit floor before the part would fit between the fuselage
halves. As with any modelling project, continual test-fitting is the key
to avoiding frustration!
The cockpit was nicely detailed with harnesses cast in place. High resin
sidewalls and other components were addressed the shortcomings of the
kit's rear cockpit.
General Construction
Small lead sinkers were installed in the nose cone and in the small
amount of available space inside the engine nacelles. This limited space
was even more restricted in the port side nacelle due to the resin
engine face.
Every gram of this weight was needed to keep the nose wheel on the
ground. In fact, once the model was completed, it would tip backwards if
one of the propeller assemblies was removed!
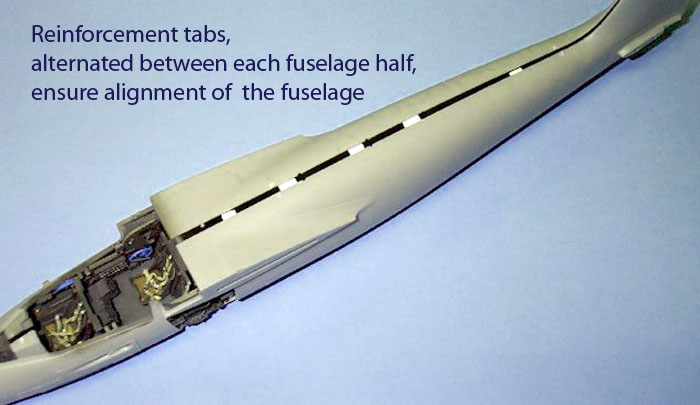
Surprisingly, the main components of the kit, including the fuselage
halves, did not have locating pins. I was concerned about potential
alignment problems considering that the plastic was quite soft and
flexible, so I glued small tabs of scrap plastic along the inside edges
of the fuselage halves.
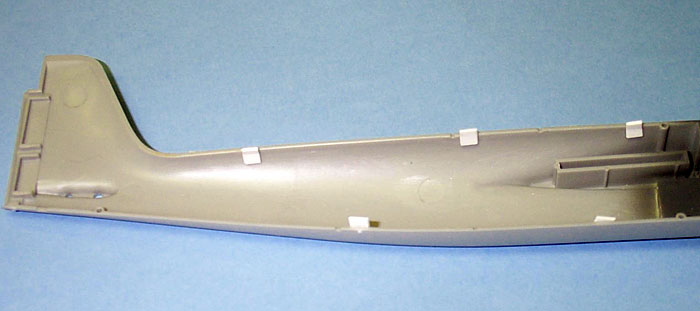
These helped align the fuselage halves, although the result was still
less than perfect. Once the main components were assembled, there were a
number of steps and gaps that needed to be addressed. The most serious
of the steps was between the wing and fuselage at the top joins, but the
bottom fuselage seam was pretty bad too. Milliput was my weapon of
choice. This two-part epoxy putty cures slowly, giving plenty of time to
smooth the surface and easing later sanding.
Click the
thumbnails below to view larger images:
The kit supplies VS 11 propeller blades, which were
appropriate for Ta 154 V1 through V7 and V9 prototypes, plus the first
eight Ta 154A-0 aircraft. However, by early 1944 these propellers were
replaced by the broad wooden VS 9 type (associated with the Jumo 211N
engine). VS 9 propeller blades were retrofitted to the surviving earlier
Ta 154s by mid 1944.
Fortunately, Cutting Edge Modelworks offers replacement
VS 9 propeller blades in resin (item number CEC48168). These were a
simple drop-fit replacement for the kit parts.
A Cutting Edge Revi 16 gun sight (item number CEC48172)
was also installed.
Thin strips of plastic were glued to the engine nacelles
to represent the cowling hinge lines.
 The
model was prepared for painting by first fitting the canopy with Black
Magic canopy masks. These flexible self-adhesive masks conformed well to
the curves of the canopy, and delivered excellent results in the form of
crisply defined canopy frames with a minimum of effort. The
model was prepared for painting by first fitting the canopy with Black
Magic canopy masks. These flexible self-adhesive masks conformed well to
the curves of the canopy, and delivered excellent results in the form of
crisply defined canopy frames with a minimum of effort.
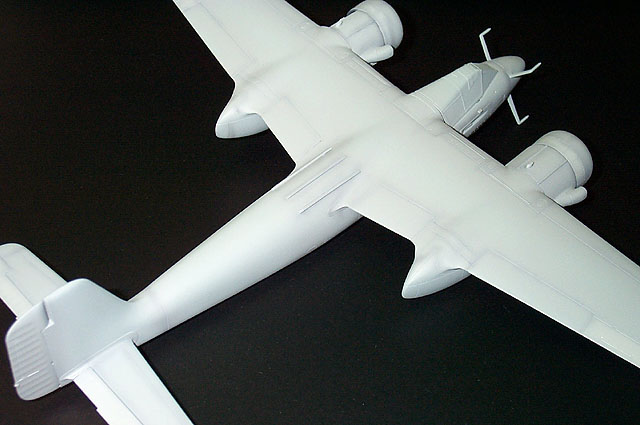
Back in 2000, I was still pre-shading panel lines on my
models. This involved spraying fine lines of dark paint along panel
lines, control hinges and other prominent structural features before the
main camouflage colours are applied.
This can still be an effective technique, but I
generally prefer post-shading and diffusion for weathering these days.
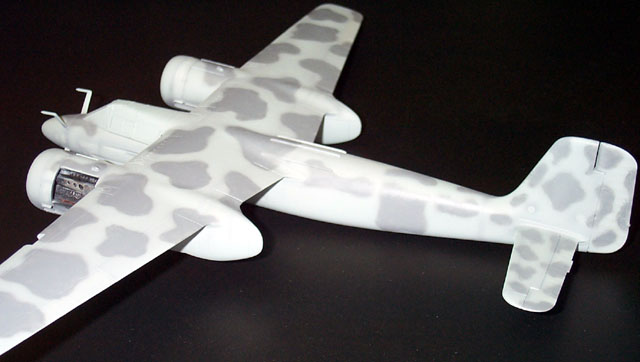
I am not entirely sure of the colour I used for the
overall coat of RLM 76, but I seem to recall that it was Tamiya's AS-XX
German Light Blue. This is actually more reminiscent of RLM 65 Light
Blue, a deeper shade than RLM 76. This was followed by mottles of RLM 75
using Gunze acrylics.
All paints were applied with my trusty Testor Aztek
airbrush fitted with the fine tan-coloured tip.
I was never terribly satisfied with the results. I
retouched the scheme here and there with no great improvement, so I
applied the decals and a flat coat. The model was 95% finished - even
the wheels and landing gear had been installed.
And so the model was placed, unfinished and with an
uncertain future, in the cabinet some time early in 2001.
Click the
thumbnails below to view larger images:
Painting and Finishing, Take Two
Fast forward to 2006. It is amazing how a looming
deadline can re-motivate interest in a previously comatose project!
I needed a night fighter with 75/76 camouflage fast, and
this Moskito had been mocking me from the other side of the glass for
more than five years. It was time to take up the challenge and actually
finish this thing.
First I stripped off some of the decals - the codes and
the fin hakenkreuz. I decided that I could paint around the rest,
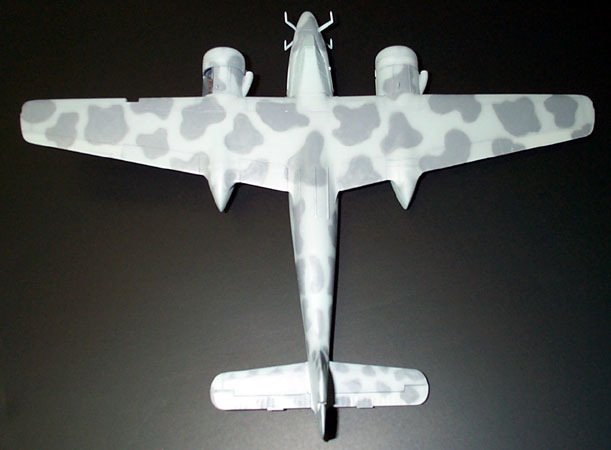
including the stencils. I resprayed RLM 76 using the more accurate and
noticeably paler Gunze acrylic colour, weaving around the decals and the
RLM 75 mottles. I next filled in the RLM 75 mottles with an irregular -
and hopefully subtle - squiggle of a slightly darker shade to lend some
variety. During this process I oversprayed the wing crosses, so I simply
covered them with paint until I could apply new decals later.
Click the
thumbnails below to view larger images:
|
|
|
|
The basic camouflage colours have been applied here
|
|

|
|
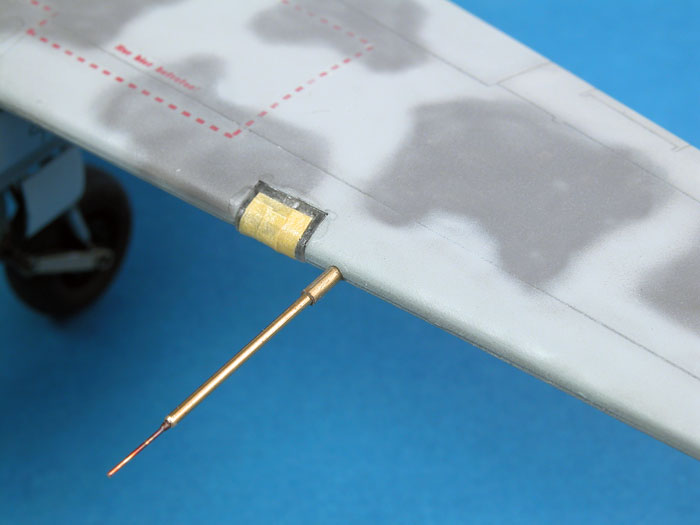
A new pitot tube was fashioned from telescoping brass tunes and copper wire
|
|
|
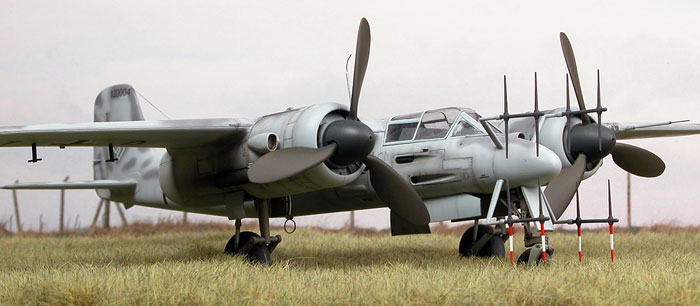
More weathering was applied, but not too much as
these Moskitos seemed to be kept in fairly clean condition. A
thin mix of Flat Black and Red Brown was sprayed along control surface
hinges and major panel lines. The same mix was used as gun dust around
the fuselage troughs, and exhaust stains on the engine nacelles. Panel
lines were also treated to a thin wash of acrylic semi-gloss black
paint.
The propeller blades were repainted RLM 71 Green, and
the landing gear was weathered with the airbrush and an oil wash.
The airframe was sprayed with a coat of Future floor
polish thinned with about 25% isopropyl alcohol. I find that the
alcohol slightly speeds drying time and reduces the risk of unsightly
runs in the Future, which are a nuisance to repair.
New decals for the codes, the werknummern and the
upper wing crosses were sourced from the new Dragon Ta 154 "Three in
One" kit. A good selection of codes are available on this sheet, but the
instructions are somewhat confused. Please note that the small codes
should be applied to the bottom of the wings, and the larger codes are
correct for the fuselage sides. Fortunately, Dragon supplies two sets of
each of the larger codes. My one nit-pick is that these codes are a bit
too big, but I did not have any better options available.
Now, the whole model received two coats of Polly Scale
Flat to tone down and blend the weathering and paint work. At last, the
model was starting to match my original mental image.
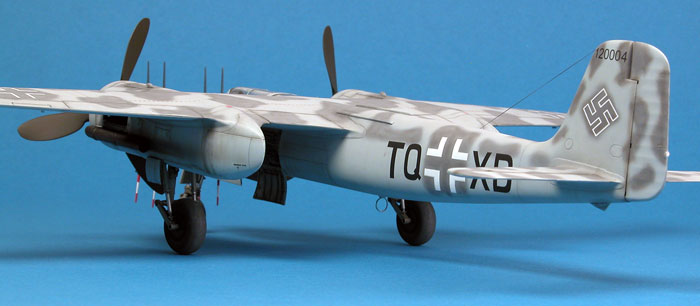
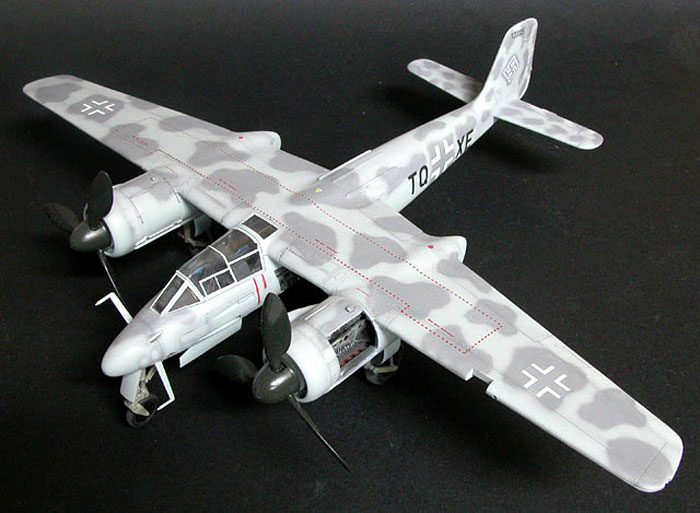
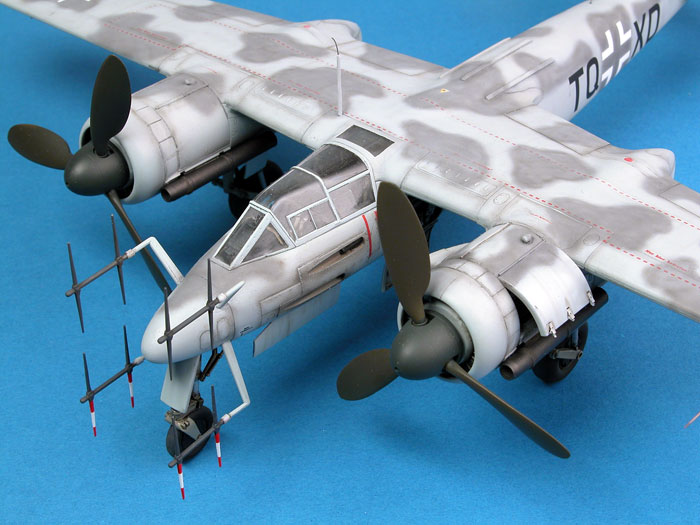
With the overall paint camouflage and markings finished
to paint and install the radar array (the red and white warning stripes
were masked and sprayed), the leading edge landing lights, the cannon
and engine access hatches and the resin flame damper exhausts.
The exhausts were sprayed a 50/50 mix of Testor's
Gunmetal Metalizer and Burnt Iron Metalizer, followed by an oil wash. A
new pitot tube was fashioned from telescoping brass tube and copper
wire.
The kit does not supply covers for the wing tip
navigation lights, so I painted the lamps green and red, then mixed up a
small batch of Araldite, a two-part 5 minute epoxy cement. I picked up a
small blob with a toothpick and applied it to the navigation light
indentation on each wing tip. This quickly dried clear and shiny - an
easy and excellent representation of the clear light cover.
The aerial wire was added using elastic E-Z Line, and
the end of the Morane mast was replaced with fine wire.
I like the sleek lines of the nose, so the canopy was
glued into the closed position with white glue. I glued the weapons bay
cover open, but I just left the engine cowling cover open slightly as if
the fasteners had just been cracked. The engine detail was really not
worth displaying.
This twin certainly had a delayed
delivery.
The ProModeler / Dragon 1/48 scale Ta
154 kit is attractive, quite accurate and well detailed, with crisp,
subdued surface features. Having said that, the model is not without its
frustrations. The drooping wings and taxing fit are the main issues.
However, these challenges are relatively easy to conquer with sufficient
planning - plus some help from a rigid wing spar and your favourite
filler.
However, the kit shortcomings were not
the reason for my delayed completion. I always felt that the camouflage
and weathering of my Moskito should look better, and I am very pleased
that I eventually made the effort to refinish the model. It is not
perfect by any means, but it is an improvement on the first attempt.
The Ta 154 is a great looking
aircraft, and I will certainly build the Dragon version of the kit some
time in the future, this time with dropped flaps.
Click the thumbnails below to view larger images:
Model,
Images & Text Copyright © 2006 by
Brett Green
Page Created 13 October, 2006
Last Updated
21 February, 2007
Back to
HyperScale Main Page |
 Home
| What's New |
Features |
Gallery |
Reviews |
Reference |
Forum |
Search
Home
| What's New |
Features |
Gallery |
Reviews |
Reference |
Forum |
Search