|
1/32 scale Trumpeter +
Scratchbuilt
TA-7C Corsair II
by Frank Mitchell
|
 |
|
TA-7C Corsair II |

Trumpeter's 1/32 scale A-7E Corsair II is available online
from Squadron.com
When the Trumpeter's 1/32 scale A-7E was released, I had
to get one, if for no other reason than the fact that I had scratch
built an A-7D in 1986 (well, it was a Combat kit, but for that one I
will take a scratch—not much of the kit left).
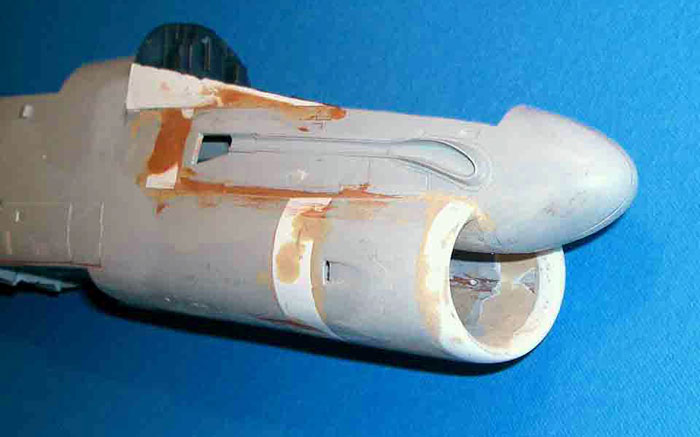
The first thing(s) I noticed were that the windscreen, canopy, intake,
and tailpipe all looked rather smushed (to use the technical term).
Going in order, I made up new molds and made a new canopy and
windscreen. Next up was an RTV mold for a resin “ring” that I hoped
would, in combination with bending and squeezing the sides of the intake
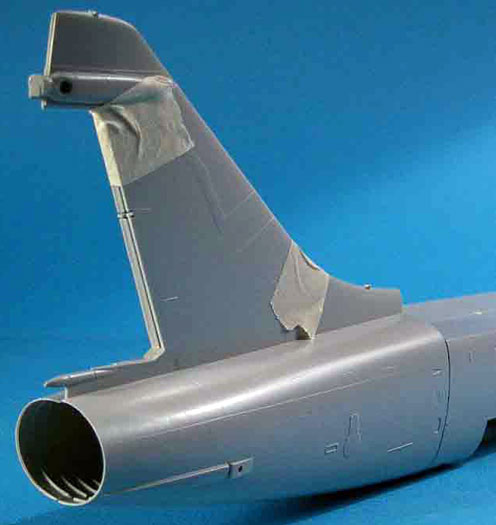
opening, correct the intake problem. As for the tailpipe opening, the
molded-in tailpipe holder was removed, which allowed the sides of the
fuselage to be bent and squeezed together making the opening much more
correct than molded in the kit. A new tailpipe holder was cut to hold
the shape and part of an old 32nd engine from “something” in the trash
pile that was the correct shape was made into a new tailpipe.
Following my usual logical pattern, it was only after the single-seat
canopy project was complete that I decided to do a two-seater.
Construction / Conversion
|
It turns out that doing a two-seat A-7 is not just
a simple matter of adding two extensions. If one wishes to do a TA-7C,
one has to avoid all kinds of things for the forward extension such as
the refueling probe on the starboard side, and all the various steps and
such on the port side. Therefore, one has to lengthen the forward
fuselage in a multi-facetted way, as seen in the photos. The rear
extension was simple, except that the rear fuselage on the two-seat was
angled up 1 ½ degrees so that the carrier approach angle would be the
same as the single-seat aircraft. Doesn’t sound like much, but it is
surprisingly noticeable if it isn’t done.
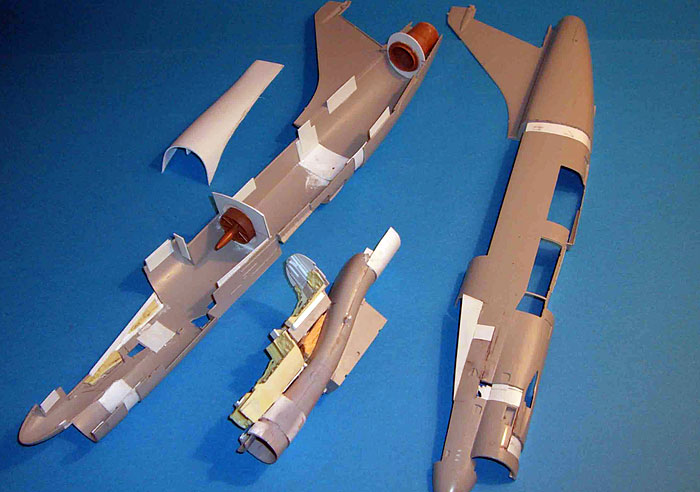
The next issue was the intake trunk, which also, of course, needed to be
lengthened. There is no easy way do this. Just cut it apart, add the
extension, and then have all the fun of inside sanding. I also added a
bulkhead with and engine face, but it can’t be seen.
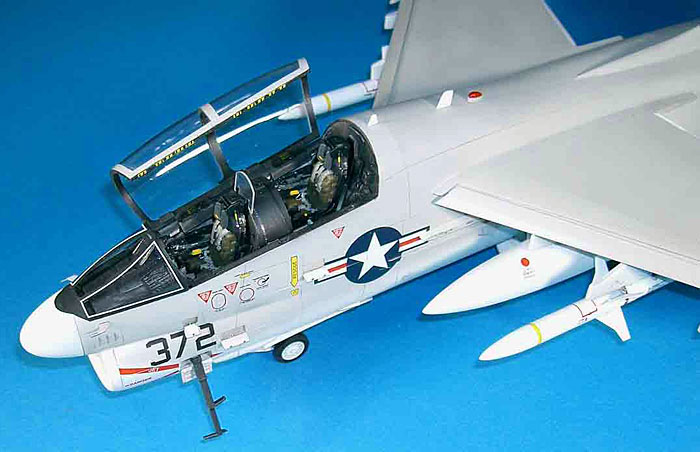
The most time-consuming problem was the cockpit. First up was getting
the sides of the fuselage to match the drawings for the elevated rear
seat. Once that was done, the next thing was to construct the cockpit
itself. To gloss over a couple of false starts, I ended up using two
Black Box sets, mounted on top of the modified intake trunk. I also used
the Black Box side panels cut down and modified, as were all the other
pieces, including the instrument panels, to match the TA-7C. During this
long process, the pieces were taped together and taken apart about 30
times, but it finally all got worked out.
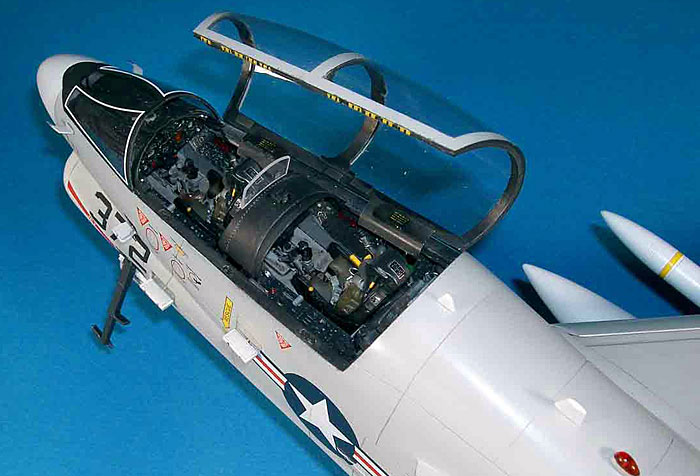
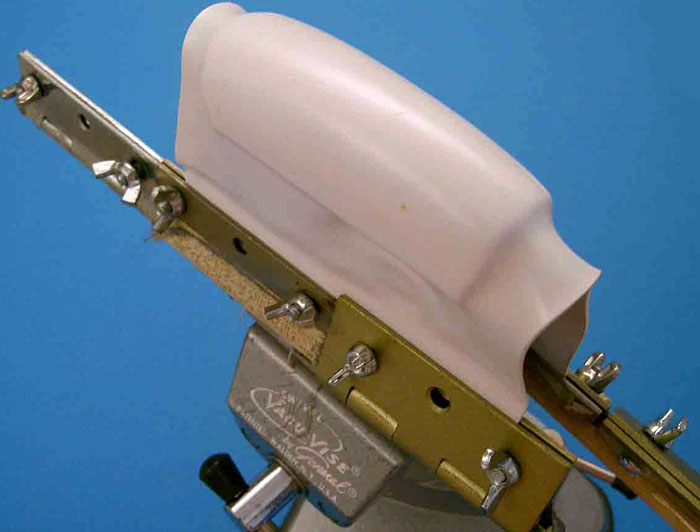
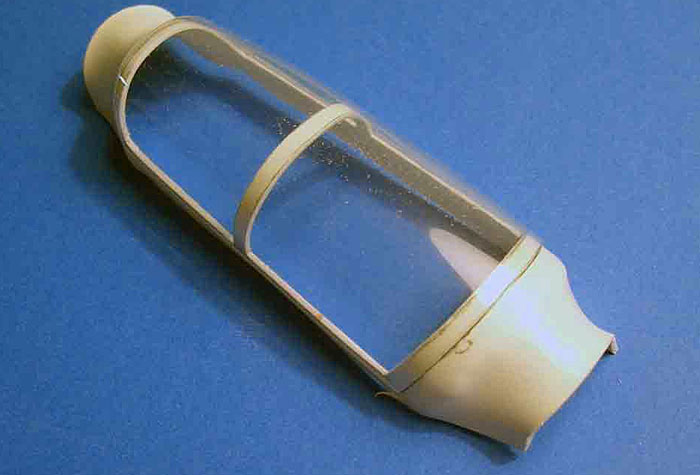
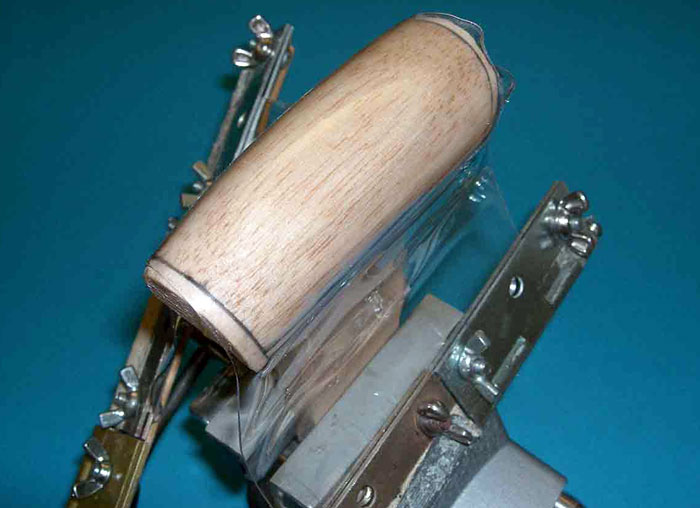
Obviously, (another) new canopy had to be made, and since I have been
asked about this, I took a couple of extra pictures to illustrate how I
do this. I actually make two moldings: one of clear, and another of 40
thousandths white styrene. Once the clear canopy is cut to shape, the
white piece is inserted into and areas that are supposed to be clear are
removed. Then that framework can be painted, detailed, and then glued
inside the clear part so that you end up with a canopy that has a
realistically thick framework, which also makes it easier to mount.
Click on the thumbnails
below to view larger images:
The fuselage “hump” was a simple balsa mold which was heat-and-smashed.
Although rough-fitted to the fuselage while everything was still in
pieces, final fitting and fairing in had to wait until the fuselage was
assembled and the wing attached.
I decided to keep the wings unfolded (and also close up most of the
panels on the airplane), which meant trying to get all those loose parts
to look like they were really closed and a part of the structure.
However, as much as I fiddled around trying to make the seams less
noticeable, I finally just gave up and glued everything together and
re-scribed it all. Took less time. I also elected to put down the flaps
simply because I thought it looks cool. I did however, look through
everything until I found a picture of one like that.
Just before I was getting ready to glue the fuselage halves together,
Aires announced their wheel wells for this kit, and of course I had to
have them (at this point, I figured I already had so much invested in
this thing, why not?). I have to note that they are very, very nice.
Once the wells were painted and installed, the fuselage was finally
glued together. That meant that I at last got to see if the intake mod I
had made would work. To my eye, it did improve the appearance
considerably, but then I am probably biased.
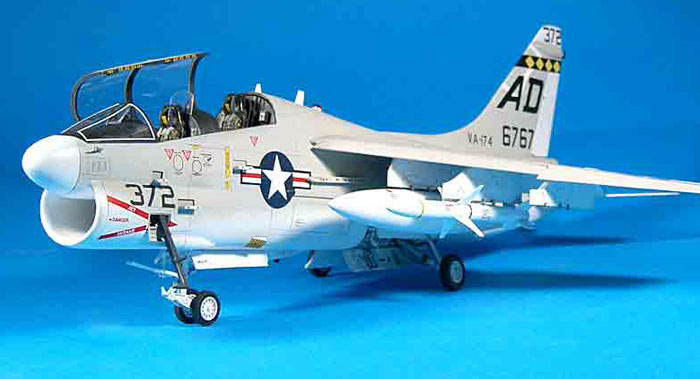
Lots of small things need to done: New steps had to be added to the port
side, a drag chute housing had to be made and fitted to the bottom of
the fin, and lots of little antennas, and other additions such as
rotating beacons and nav lights made and installed. In addition, all the
pylons, landing gear, tanks, weapons, etc., were also assembled and
installed.
I have no idea if the airplane ever flew in this specific
configuration, but it looked good, so let’s just pretend that it did.
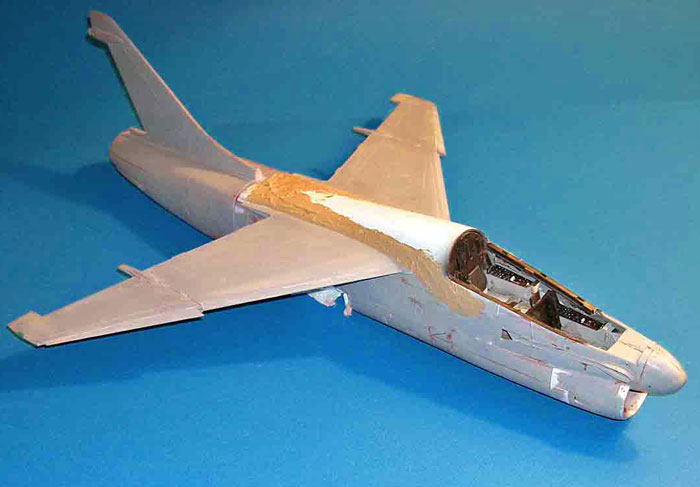
The fuselage was then sprayed with auto primer,
sanded, and scribed in those areas that would not be affected by the
wing and hump attachment. I figured it would be easier to do it then
rather than wrestle around the wing.
The wing was glued to the fuselage (fit is very good), and the “hump”
attached and faired in with two-part epoxy. That was followed by more
sanding, priming, filling, etc.
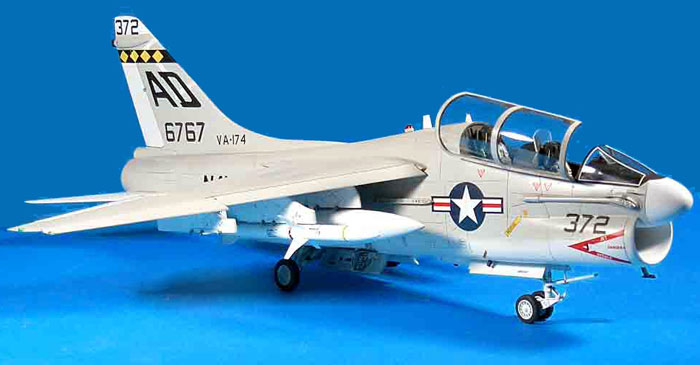
The paint was typical Gunze white and gray. The markings took a bit of
time as no one has decals for a TA-7C (very short-sighted). I chose this
squadron only because pictures of the TA are hard to come by (excluding
the Hellenic ones, which I did not want to do since my previous A-7D was
in Viet Nam markings, and I wanted something different). The TA-7C
really is the forgotten airplane when it comes to pictures showing
different markings.
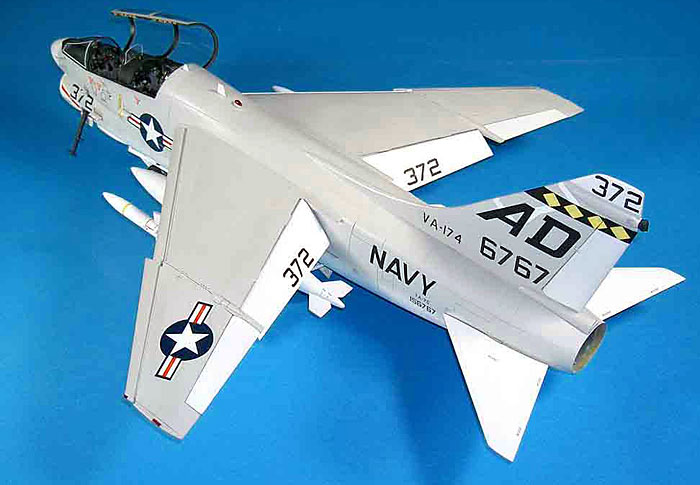
The stripe and diamonds on the tail were cut from black and yellow decal
sheet and the squadron letters were painted on using frisket. All the
numbers were made in Word using a downloaded Long Beach Font and printed
onto decal sheet.
Not much in the line of weathering was used, and what was used was
pretty subtle, meaning no pre-shading, etc. I have to admit that I am
not a great fan of the “dirty” look.
The bottom line is that the Trumpeter kit is nice
in that it fits well, and is impressive when finished.
I do wish they had used a bit more care in the
shape of the intake, the windscreen/canopy, and the rear of the
fuselage. Those are nits, I guess, since in this day and age, what can
you expect from a $100 ++ kit?
Besides, you only need to subject yourself to
several months of work to do a two-seater and most of the problems will
go away...
Click on the thumbnails
below to view larger images:
Model, Images and Text Copyright ©
2006 by Frank Mitchell
Page Created 06 October, 2006
Last Updated
21 February, 2007
Back to
HyperScale Main Page |
 Home
| What's New |
Features |
Gallery |
Reviews |
Reference |
Forum |
Search
Home
| What's New |
Features |
Gallery |
Reviews |
Reference |
Forum |
Search