|
1/700 scale Tamiya Gato
"Tipping Over the Boat"
by Val “Don’t touch that
lever” Bueno
|
 |
|
"Tipping Over the Boat" |

Tom's
Modelworks' 1/700 scale Gato detail set is available online from
Squadron
Why is it that something
interesting catches your eye and you only ever get less time than
necessary to get it accomplished?
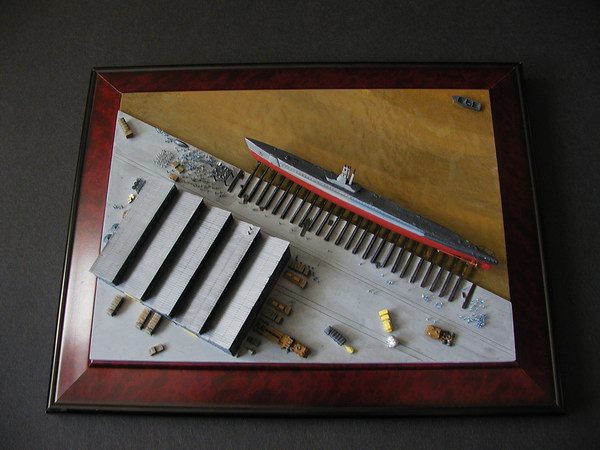
When Submarine Night was
announced at the January meeting, I knew I wanted to do a diorama of a
submarine being launched sideways off of the drydock. The photos I have
seen show a great big splash which would be an absolute nightmare to
model. Being the big chicken that I am, I decided to model the submarine
moments before contact with the water. That way I can show the sub at a
precarious angle, the dockyard, the spectators and the dignitaries. Buk
buk buk bukaaack!
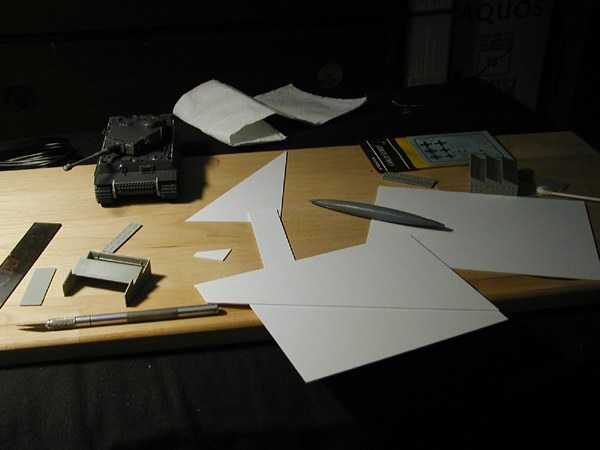
Dock, Dock, Goose
For the base of the
diorama, I used a picture frame I picked up at the local Costco, three
for $9. These have a glass cover that I left in place and a nice dark
finish. I cut a piece of 0.040 sheet plastic to cover the top of the
picture opening. For the dock section of the diorama, I cut two pieces
of plastic at an angle across the base. These were glued together and
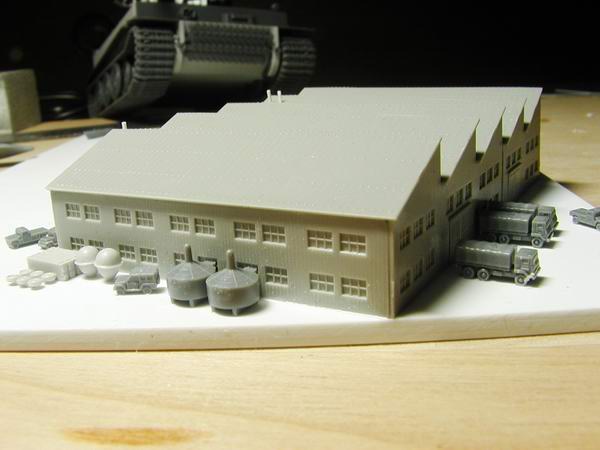
the edges cleaned up with CA filler and sandpaper. I picked up a 1/700
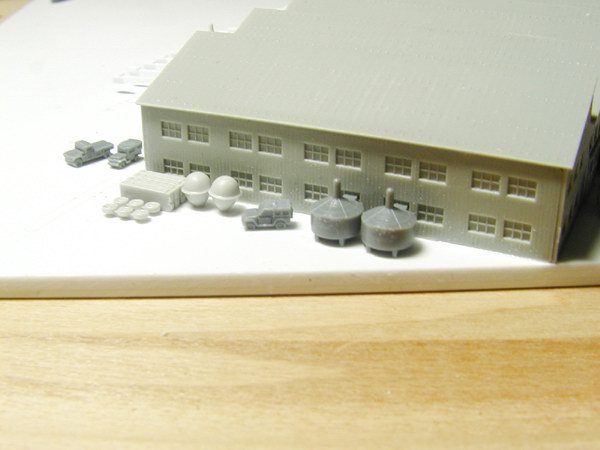
scale factory set from the Armchair Adventurer, assembled 1-1/2
buildings and added these to the base parallel to the edge of the dock.
Two pairs of groves were scribed into the base parallel to the edge of
the dock, one all the way across and one leading into on of the factory
doors. These are meant to represent railroad rails.
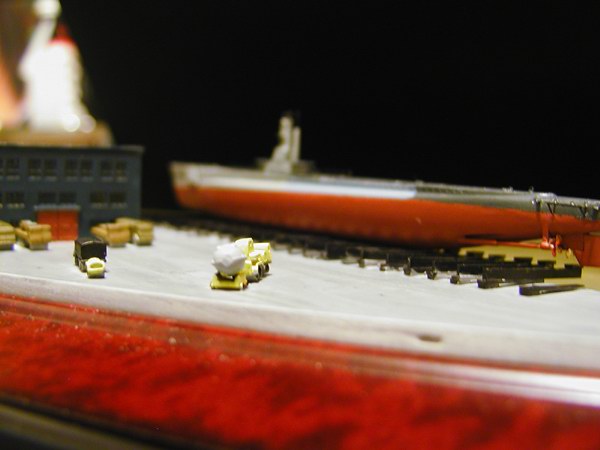
The steel beams that the submarine rests on were cobbled together from
strip plastic to mimic what I saw in photos off of the internet. I
didn’t strive for total accuracy here; I just wanted to get the
impression of the launching system. Flatbed trucks, covered trucks and
miscellaneous jeeps were glued all over the dock. These came from
Tamiya’s Ohsumi kit and Skywave’s Modern vehicle set. I didn’t have any
WWII trucks on hand, so I made do with what I had. You can’t really tell
it’s a Humvee down there unless you really look for it.
The entire base was
blasted with Tamiya Neutral Gray from a spray can. This became the color
of the concrete dock. The river was painted wet on wet with Polly S
Oliver Drab, USMC Olive Drab and Desert Yellow. If you ever take a
really good look at a river, it is never blue in color. The water is
usually clear and the color of the bottom of the river comes through.
When I say wet on wet, I mean I had the three bottles of paint open at
the same time and I would dip the wet paint brush into the next color
after applying the previous color to the surface and blending the two
wet colors together. Figure painters use this technique to blend shadows
and highlights on figure uniforms.
The factory walls were painted Dark Sea Blue, the roofs Metallizer
Magnesium and the vehicles in various shades of Olive Drab, black and
yellow. A sludge wash was applied to everything deepen the shadows in
the corners of everything and to add some stains to the concrete in
front of the factory. After this had dried, I lightly drybrushed
everything with white oil paint. MIG European dust and Rust weathering
pastels were dropped and smeared here and there on the base to add a
dust bowl look to everything.
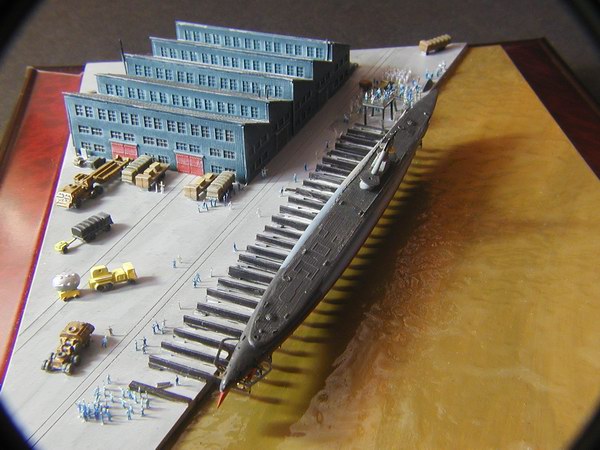
Aoooooooogah! Dive! Dive! Dive!
While things were bumping
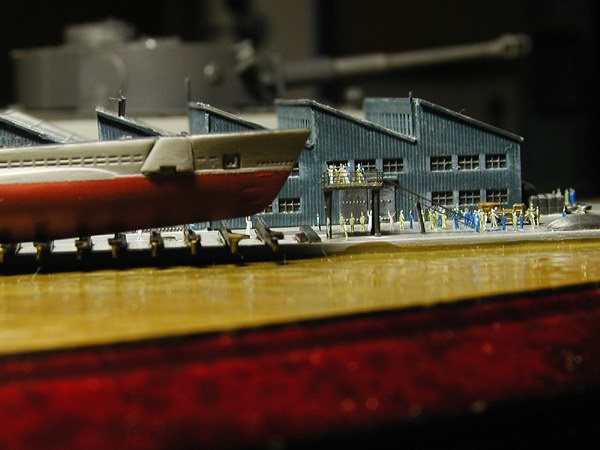
along on the base, construction of the submarine followed apace.
I had the Tamiya Gato
Class Submarine kit in my un-built stash along with the Tom’s
Modelwork’s Photo Etched set. This kit comes with two complete Gato
class subs and IJN sub chaser. I had already built one Gato out of the
box just for the sheer fun of it. Now I had a chance to detail the other
one with the PE set, except that the submarines were essentially
launched unfinished! Thus a lot of the really neat details were not
used. I did use the PE propeller guard, the two bar rails, lookout
platforms and the propellers. The rest of the PE parts weren’t needed
for this diorama. One thing I wished was on the PE set, but wasn’t, is a
set of hull strakes.
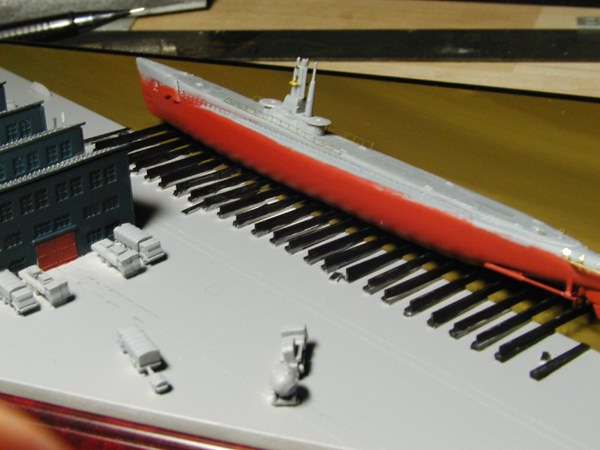
I spent some time flipping through my Squadron US Subs in Action only to
find what I was looking for on the back cover, a colorful submarine
camouflage. The boat was painted with Polly S Red Oxide for the Hull
red, Scale Black for the deck and rear hull, Intermediate Blue for the
blue section and Dark Gull Gray for the rest. A dark sludge wash to
deepen the shadows in the limber holes and a drybrush of white oil paint
to highlight the texture of the deck planks completed painting of the
sub.
Oh the Humanity!
I wanted to add as many
figures as I could to this diorama. I had picked up the pre-painted
1/700 scale figure sets from Eduard a few months ago in preparation of a
1/700 scale diorama of the USS Arizona with the entire crew complement
on deck for a crew photo, but I sacrificed one fret of 400 figures to
this project. I’ll do that diorama someday, as soon as Tamiya releases a
kit of the Arizona in 1/700 scale…….
The figures are pre-painted in various colors, blue dungarees, dress
whites and khaki uniforms. I cut and trimmed all the figures at one time
and dropped them all into a matchbox. I then used a sharpened eyeglass
screwdriver to make dents in the plastic base. The feet of the figures
were glued into these dents.
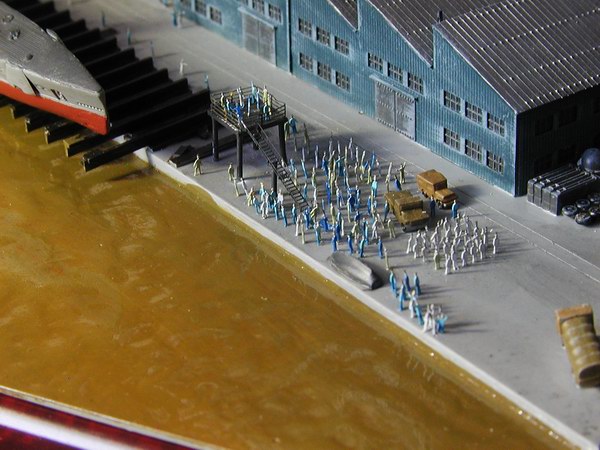
I randomly picked figure
up out of the matchbox, dipped their feet into a puddle of CA glue and
attached them to the diorama base. It took me three hours to do 100
figures. I did create a grid of all white figures to represent the band
playing at the launch.
Picture Perfect
Ship models are the
hardest things in the world to photograph. I used an older digital
camera, a circa 2001 Olympus 2100UZ. This is a 2 megapixel that can get
within 2 inches of the model. With closeup filters attached to the end,
I was able to get within 1 inch of the model. So close, all the dust is
visible! Acck!
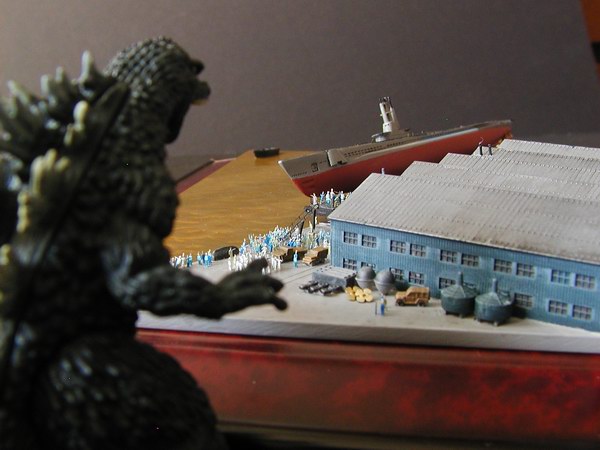
I had a Godzilla gashapon
figure so I had to pose him near the diorama for at least one or two
shots.
Click the
thumbnails below to view larger images:
Model, Images and Text Copyright ©
2006 by Valentin E. Bueno
Page Created 16 May, 2006
Last Updated
15 May, 2006
Back to
HyperScale Main Page |
 Home
| What's New |
Features |
Gallery |
Reviews |
Reference |
Forum |
Search
Home
| What's New |
Features |
Gallery |
Reviews |
Reference |
Forum |
Search