|
Pilatus
Turbo-Porter
by Thomas
Muggli
|
 |
|
Pilatus Turbo-Porter |

HyperScale is proudly supported by Squadron
If your destination is
to one of the remote areas of the planet, and it happens to have an
airstrip the size of a large beach towel, you’re likely getting there in
a Pilatus Turbo-Porter. This rugged flying “jeep” has become the
favorite mode of transport for missionaries in the Amazon, oil workers
in the Sahara, tourists in New Zealand, trekkers in the Himalayas,
paratroopers in the Alps, covert US operatives in Southeast Asia, and
other assorted military and civilian operators worldwide. It also has
the distinction of being produced in the same place for the last 40
years, the Pilatus Aircraft factory in the town of Stans, Switzerland,
which builds Turbo-Porters in small numbers each year.
Utility transport planes such as the Turbo-Porter are not among the
popular subjects of kit manufacturers. Nevertheless, I found two
Turbo-Porter kits in 1/72, which happens to be my favorite scale: One is
from High Planes Australia, the other is from Classic Plane Germany,
both are limited run kits. As a Swiss Air Force buff, I wanted to build
a Turbo-Porter model in Swiss military colors. The Light Aviation
Squadrons (Leichtfliegerstaffeln) of the Swiss Air Force have 18
Turbo-Porters in use. Of these, 12 were procured in 1967 as
piston-engine Pilatus Porters and later retrofitted with turboprop
engines. The Swiss Air Force uses its Turbo-Porters mainly for liaison
duties, but they are also the aircraft of choice for the Swiss Army’s
elite parachute commandos (Falschirmaufklärer).
When I examined my two Turbo-Porter kits, I noticed that, in the Classic
Plane kit, the dimensions of the wings and fuselage were quite a bit
larger than those in the High Planes kit. Crosschecking against my
references revealed that the dimension on both kits were off. The
correct size of the model should be somewhere in between the two kits.
Inaccuracies like these are almost impossible to correct, so I chose to
ignore them and moved on.
I decided to use the High Planes kit for my Turbo-Porter model. The
Classic Plane kit would be used for a conversion to a piston-engined
Porter. This project would yield a whole other story, which is why I
will stick to a description of the construction of my Turbo-Porter
model. As with any other limited run kit, the High Planes Turbo-Porter
kit requires a lot of special attention. The parts are molded from
powder blue plastic and have good surface detail. However, they are
marred with lots of flash and require many cleanups.
Interior
I wanted my
Turbo-Porter model to have its side door open, ready to take on a load
of parachute commandos, so much of its interior would be visible. The
floor, two pilot seats, instrument panel and a white metal control
column are provided in the kit. The floor turned out to be too short so
I added a 1-cm portion using sheet styrene. While I had the sheet
styrene out, I also fashioned a rear cabin wall and a bulkhead, which
would be installed forward of the instrument panel. I scratchbuilt
rudder pedal assemblies from pieces of sheet styrene and stretched sprue
according to reference photos.
It did not take me long to realize that it would be a big challenge to
create realistic looking cabin windows. They are provided in the kit as
part of a vacuformed clear sheet. Trying to cut the windows from the
sheet and achieve a decent fit seemed futile to me. I decided to go
another route by replacing the four doors with clear sheet styrene. The
port sliding door, the starboard swing-open door and the car-style
cockpit doors were cut from 1-mm clear styrene and dry-fitted to the
fuselage halves. To reproduce the two round windows in the rear of the
cabin, I cut 1-cm squares from the fuselage halves in the appropriate
area and replaced them with pieces of clear styrene. The outside and
inside of the fuselage where the clear piece had been glued were then
sanded smooth so no seams would be visible. Next, the area was polished
with a polishing kit so the window area would be clear and transparent.
I then installed the new clear port cabin door, and cockpit doors with
small amounts of super glue ensuring a tight fit. The starboard cabin
door, which was to be posed open, was installed only after the model was
painted. The windshield was the only clear kit part I used. It was
fitted and installed after construction was complete.
While dry-fitting the fuselage halves I noticed that there would be a
nasty seam visible on the cabin ceiling once the halves were joined. To
remedy this, I cut a new ceiling from thin sheet styrene and glued it
into position to the inside of one of the fuselage halves. Once again, I
consulted my references and installed molding made from sheet styrene
along the edges of the ceiling and between the cockpit and the cabin. I
also added some knobs on the cabin ceiling and made a jump seat from
styrene scraps and stretched sprue, The jump seat was installed instead
of the co-pilot seat to make more room for the parachute commandos.
Aluminum foil from a yogurt cup cover was the material I used to make
seat pockets and seat belts for the pilot seat.
Before the interior was painted, the windows needed to be masked. They
would also have to be masked on the outside before painting. I realized
that the masks on the inside and outside needed to be exactly the same
size to avoid edges of the interior paint to be visible on the outside
and vice versa. To accomplish this I made templates of each window from
0.75mm sheet styrene and glued them to a 10 x 5 cm styrene sheet. To
make the masks, I placed a piece of Scotch tape on the template and cut
around it with a fresh No. 11 blade. The masks were then carefully
removed from the templates and placed in the appropriate positions on
the new clear doors with tweezers. I repeated the process for each
window. Once all the masks were in place, I airbrushed light gray and a
coat of clear gloss to all interior components. A black wash was applied
and various details painted with a fine brush. Once everything looked
satisfactory, I joined the fuselage halves with superglue. This went off
without problems thanks to dryfitting all components many times during
the construction.
Final
Assembly and Finish
|
The remainder of the
model was assembled according to the standard construction sequence (as
with many limited run kits a complete instruction sheet is not supplied
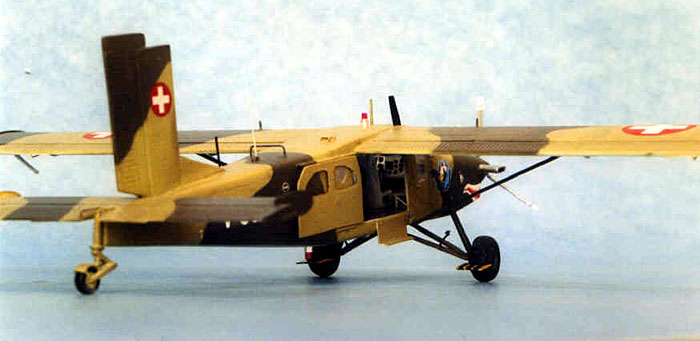
with this kit). I added wings and tail assembly after cleaning up the
parts and ensuring proper fit. Tailwheel and landing gear struts are
provided as white metal parts. I replaced the wing struts with Contrail
strut stock and the propeller blades with items from my spares box.
Cleaning up the kit parts of these items would have been too much of a
chore. Lastly, I fabricated more small exterior details such as
antennas, beacons, mudshields and footrests from styrene scraps and
wire. These items would be added after painting.
 Polly
Scale acrylics were used to finish my model. I mixed the colors myself
to match reference photos and hope that I got them more or less correct.
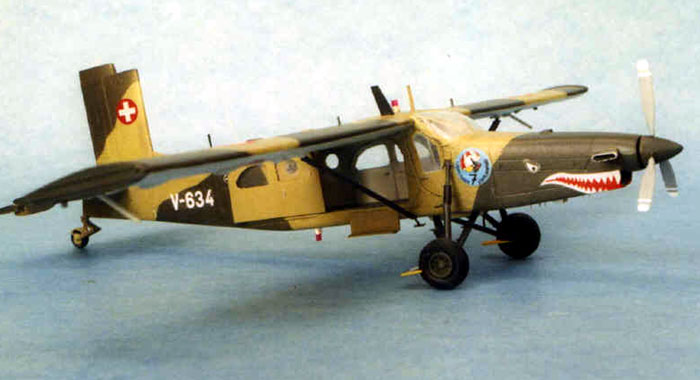
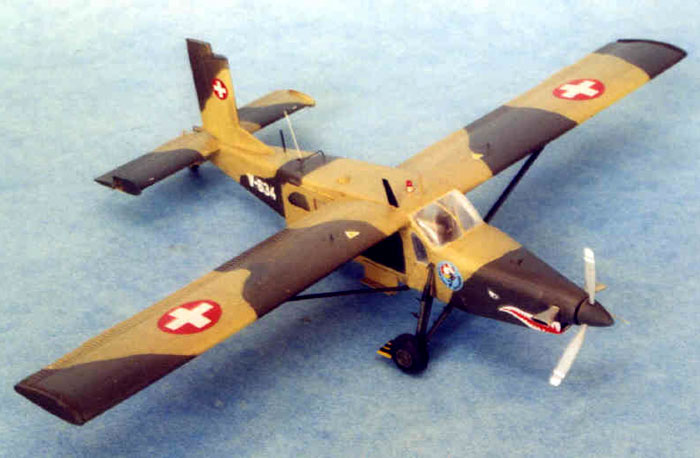
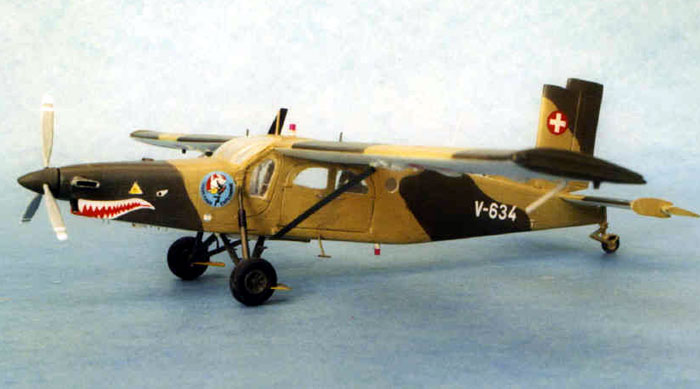
I used the decals provided in the High Planes kit for a shark-mouthed
Turbo Porter of Leichtfliegerstaffel 7. However, I replaced the national
insignias with decals from a Shadow sheet. Polly
Scale acrylics were used to finish my model. I mixed the colors myself
to match reference photos and hope that I got them more or less correct.
I used the decals provided in the High Planes kit for a shark-mouthed
Turbo Porter of Leichtfliegerstaffel 7. However, I replaced the national
insignias with decals from a Shadow sheet.
And there it is – my Turbo-Porter – ready for its next mission to a
remote airstrip in the Alps!
Model, Images and Text Copyright © 2004
by Thomas Muggli
Page Created 25 April, 2004
Last Updated
25 April, 2004
Back to
HyperScale Main Page
|
 Home
| What's New |
Features |
Gallery |
Reviews |
Reference |
Forum |
Search
Home
| What's New |
Features |
Gallery |
Reviews |
Reference |
Forum |
Search