This is another one of my projects the "just happened".
I heard some good things about the new-tooled
EuroFighter Typhoon kit from Revell(AG) and
decided to get one to check it out. The things I heard
about the kit were all true and before I knew it, it had
displaced what was my current project, and I was
actively building the Typhoon.
The Kit
The kit is not quite the quality of Revell's
Strike Eagle and Rafale kits, but it is not very far
off. The detailing is a touch "soft", but not anything
worse than vintage Monogram of the 1980s (which I
never found to be bad). There is a little more flash
than I would expect from a newly tooled kit, but it is
not unmanageable. The fit is good. There was some need
for filler though since the "soft" quality made the
pieces have rounded corner edges, thus the seams are
more open than some other kits.
The scribing is recessed, heavier than Hasegawa
scribing, but with paint it was be fine. The cockpit is
raised detailing. The main instrument panel looks really
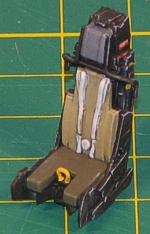
nice. The ejection seat is a five-part assembly and
looks good when built. It could stand adding some seat
harnesses, though.
The Typhoon has some complex airframe shapes like the
Rafale. Revell did well to capture these shapes
without making the kit too difficult to build. The
engine exhausts are deep enough and the engine intakes
have enough ducting to make them look nice, although the
intake ducting does have some nasty seams to address.
The wheel wells are nicely molded and deep enough. The
main wheel wells are especially nice looking.
One of the truly wonderful parts to the kit are all
the weapons options. The Typhoon is being billed as a
multi-role "jack of all trades", and the weapons mix in
the kit supports this with both air-to-air and
air-to-ground weapons and even includes a recce pod.
There are two full-size trees of all sorts of exotic
(and not so exotic) weapons, all molded nicely. Included
are:
- 3 x 100L External Fuel Tanks
- 2 x AIM-9L Sidewinders
- 4 x AIM-120B AMRAAMs
- 2 x AIM-132 ASRAAMs
- 4 x Meteor AAMs
- 2 x IRIS-T AAMs
- 2 x Taurus Stand-off Weapons
- 2 x Storm Shadow Stand-off Weapons
- 2 x GBU-24B Laser Guided Bombs
- 1 x German Recce Pod
| |

Click to
Enlarge |
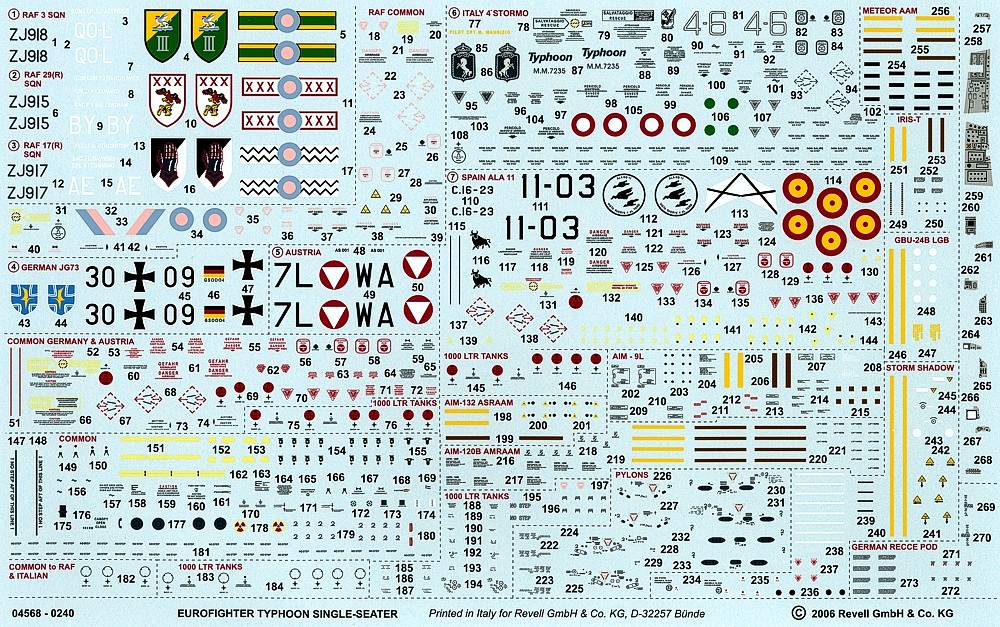
And then there is the decal sheet -- WOW! Markings are
provided for seven aircraft including aircraft from all
five air forces currently flying the Typhoon (RAF,
German, Italian, Spanish, and Austrian). And, there is a
ton of data markings, even extensive markings to go on
all the weapons. The decals are numbered up into the
270s. I live for data decals and this sheet had me all
hot and bothered from wanting to use it...
All in all, a very nice kit, well worth the Squadron
price of $14.49 (IMHO). I have to stop buying stuff like
this if I ever want to finish my other current
projects...
Since I started this project sort-of by accident, my
initial construction items revolved around items I
needed to help me with test fitting the model together.
First on this list was the main wheel well. This built
up quickly and fit perfectly onto the lower
wing/fuselage piece. I then drilled out the locator
holes for the weapons pylons in the lower wing (I was so
proud that I remembered this for a change) and attached
the upper wings into place. With the wheel well and
upper wings in place, the fuselage dry-fit quite nicely
onto the wing assembly.
I moved on to the cockpit next. The ejection seat
built-up easily after a short time of tinkering to
remove mold lines and ejecter pin marks. I cut and
cleaned the center console, control stick, and throttle,
then attached these all into the cockpit tub. The
ejection seat did not want to fit easily into place
inside the cockpit, so I trimmed some lower details and
got it to slide into place.
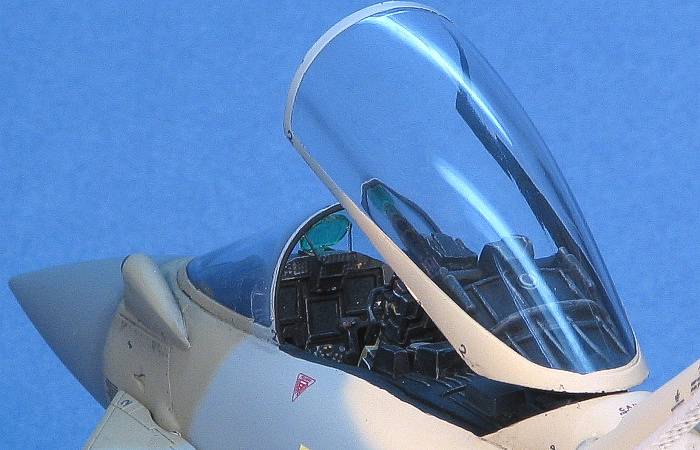
By this point in the project, I had decided I was
doing a "what if..." model. I was curious about how
all-black cockpits can be painted (I have plans to do
some Israeli aircraft that get all-black cockpits), so I
decided to try it out on this model.
To that end, I painted the whole cockpit in Interior
Black. I painted the instrument clusters in true black.
I dry-brushed things in L.Ghost Gray (F.S.36375) to pop
up the details and made some highlights in red, yellow,
and silver. The end result seemed busy enough for my
taste.
(Note: The effect seen in the image to the
right on the CRT screens is just light reflecting off
the gloss paint.)
With the cockpit finished, I assembled the fuselage
and trapped the cockpit inside. The seams around the
edges of the fuselage were not too bad. I used liquid
cement and allowed some excess plastic to squish out of
the seams, filling them. After the cement dried and the
plastic hardened, I filed off the squished out plastic
and had completed seams.
I needed to tinker with the fit of the spine piece.
There were mold lines and flash that prevented a close
fit on the spine. I took time to find the high points
that were effecting the fit and trimmed them down. When
I was done, I needed no filler on the spine piece.
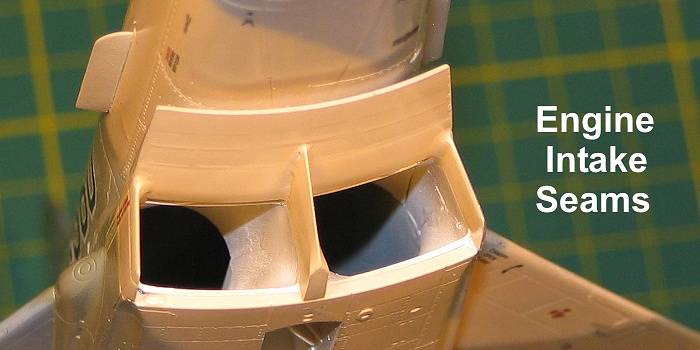
Next I attached the nose wheel well to the lower
wing/fuselage piece. The upper side of the nose wheel
well piece has the start of the engine intake ducting. I
clipped and dry-fit all the rest of intake pieces. This
is where I found out how much work the intake seams were
going to be. The top and bottom intake pieces meet in
the middle and do not look too bad there. The issue is
with the outer portions of the intakes. These use a
portion of the fuselage halves that fills the gaps
between the upper and lower intake pieces to complete
the duct and the fit is not so great. I was originally
going to paint the intake trunks white before assembly.
After seeing the seams, I decided I would be better off
assembling and filling the seams before I painted the
intakes trunks.
The image below highlights the killer seams
(highlighted by black lines in this image). The inboard
seams (marked "A") were not too bad. Before the wing is
attached, you can even get at them to fix them. The
outboard seams (marked "B") are no contest. Revell has a
four-piece jigsaw puzzle coming together to form the
outboard ducting. I trawled super glue in as best I
could to try to reduce their being noticed. Smoothing
them off is a futile effort. I am afraid I'd do more
harm that good if I tried anything more.
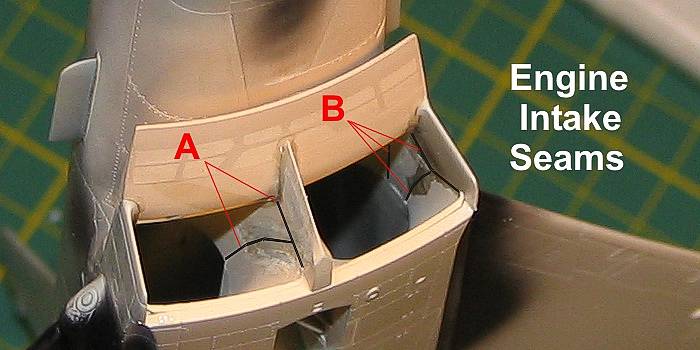
Intake Seams -- Trying to Fix
Them |
I left off the intake plug piece that closes off the
rear end of the intakes. The intakes are deep enough and
angled such that the plugs did not really do much to
help the model. By leaving them out, I had an easier
time shooting white paint into the intake ducts after
assembling the wing and fuselage. This second image
below shows how I did at hiding these seams. It is not
contest quality, but then, this is not a contest model.
Intake Seams -- As Fixed As
They Will Get |
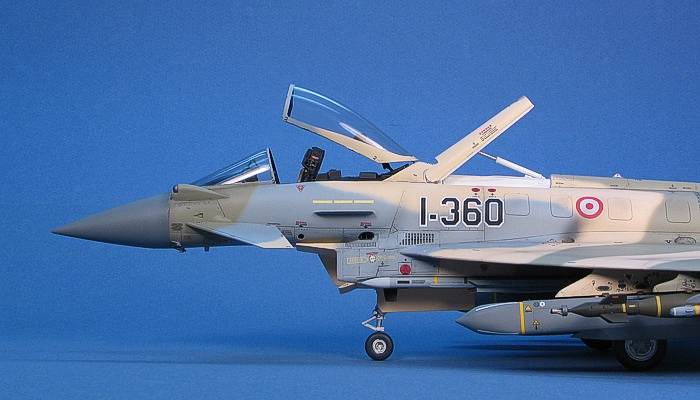
As the time to start camouflage painting got closer,
I started getting excited. I cut and cleaned all the
little do-dads that go on the outside of the fuselage.
Just because Revell provides the options to open
certain things does not mean they should be. I have
found no images on-line of Typhoons with their in-flight
refueling probe open when parked, so I glued this in the
closed position. I liked the look of the ball sensor on
the left side of the upper nose, so I assembled and
attached this into place. There are a half dozen or so
little antennae to attach all around the fuselage. I did
these quickly with no problems.
For the wings, I assembled the weapons pylons and
flaperon actuator fairings. I attached these into place.
The countermeasures pods on the wing tips caused me to
pause for a moment. Would the camouflage painting be
easier with or without them? I decided to go for the
gusto and assembled the pods, attaching them into place
on the wing tips.
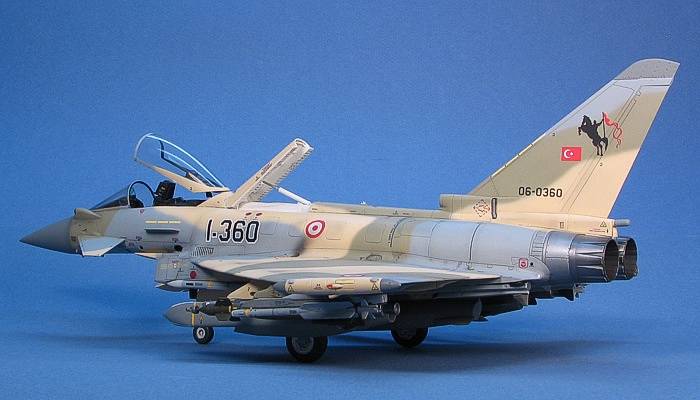
It was time for camouflage painting...
 Revell
did it again with their crazy color call-outs, just like
they did on the Rafale kits. Does anyone really know
what the exact color is when they say "Light Grey",
"Grey", "Dust Grey", or "Anthracite Grey"? And then, the
instructions wanted me to mix ratios of these colors to
get the actual colors in which the model needed to be
painted ... YEAH, RIGHT! Like I did before on the Rafale
kit, I decided to build a "what if..." model and tossed
the cryptic Revell color references out the
window.
Revell
did it again with their crazy color call-outs, just like
they did on the Rafale kits. Does anyone really know
what the exact color is when they say "Light Grey",
"Grey", "Dust Grey", or "Anthracite Grey"? And then, the
instructions wanted me to mix ratios of these colors to
get the actual colors in which the model needed to be
painted ... YEAH, RIGHT! Like I did before on the Rafale
kit, I decided to build a "what if..." model and tossed
the cryptic Revell color references out the
window.
I was working on the painting and decals for this
model in late November. I was trying to decide between
Spanish, Turkish, and UAE markings. A couple friends
insisted that the only appropriate nationality to put on
a "what if..." model in late November is Turkey. If you
live in the US or have knowledge of the US holidays, you
will understand the reasoning here. I chose to "go with
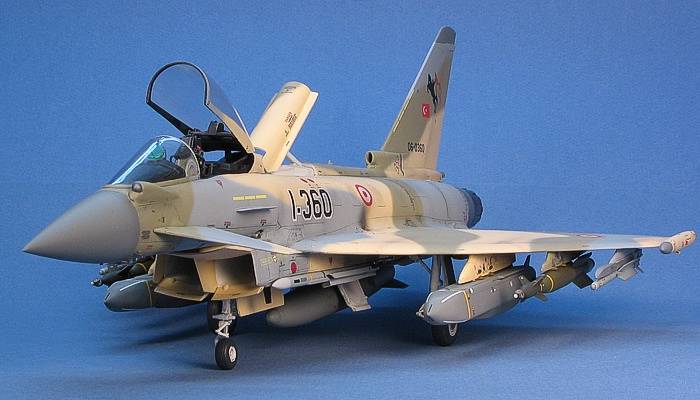
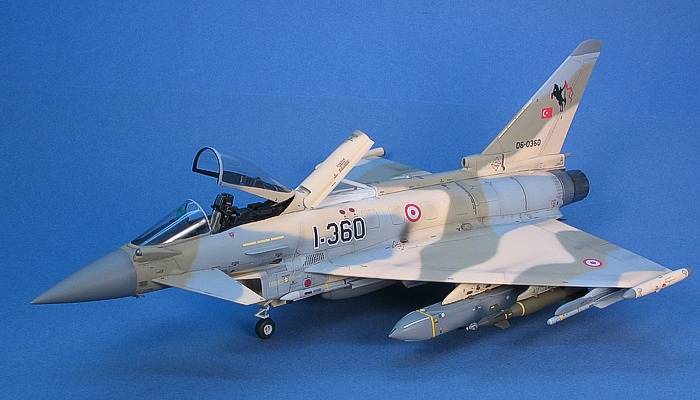
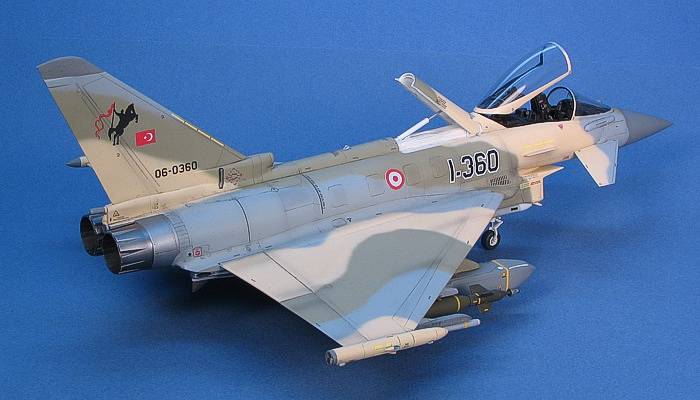
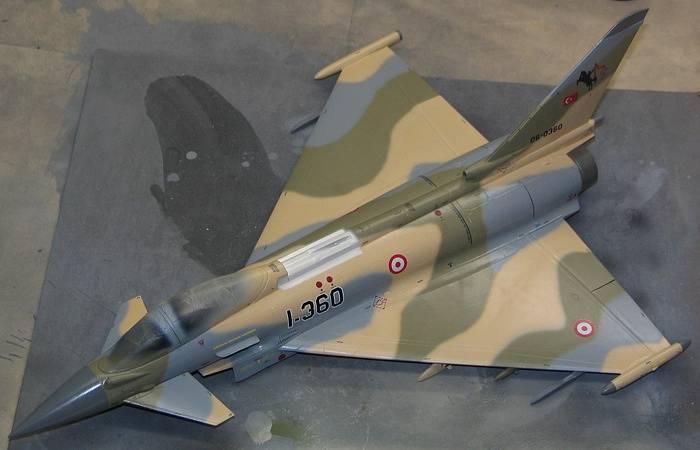
the flow" and applied Turkish markings to the model.
This is a fictitious model of what a Turkish Typhoon
might look like if they continued the process to
modernize their Air Force. Being sensible, they would
figure out that simple gray aircraft are boring and
decide to apply some nice desert-like camouflage scheme
to their new Typhoon aircraft. I figure this will
eventually happen sometime, anyway. One of these days,
some high-ranking Air Force general will look at these
boring gray planes and mandate that something be done to
"dress them up" a bit. This camouflage is my attempt at
doing just that.
Click to
Enlarge
|
|
I actually dreamed up the camouflage for this model as
one of my ongoing "what if..." Rafale schemes. However,
this Typhoon kit got built first, before I could double
back to build more "what if..." Rafale models. So, I
decided to migrate the "what if..." concept over to this
Typhoon kit. With the two aircraft (Rafale and Typhoon)
having fundamentally similar designs, it was an easy
task to translate my camouflage design onto the Typhoon.
The diagram to the left is the Rafale design I used with
only minor adjustments to make it fit the Typhoon
airframe.
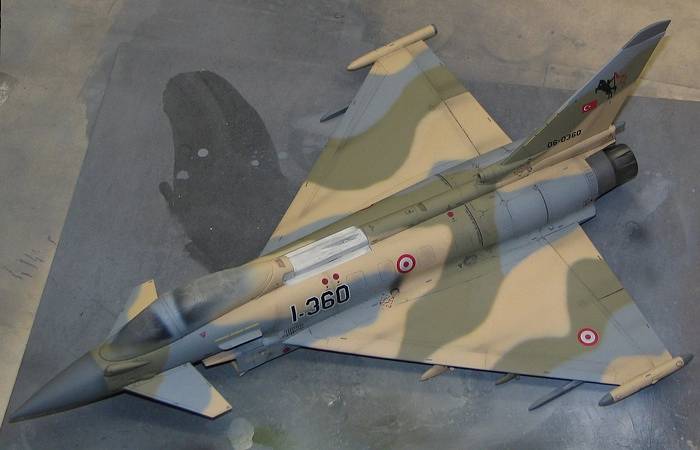
I used all Testors Model Master enamel paints
on this model. The camouflage is free-hand air brushed
in three colors -- sand, gray, and olive. The sand color
is Radome Tan (F.S.33613). The gray is L.Ghost Gray
(F.S.36375). The olive is a 50-50 mix of Radome Tan and
SAC Bomber Tan (F.S.34201). I originally painted the
model with using straight SAC Bomber Tan, but this color
was too rich and dark in combination with the other two
colors. Mixing it toned down the color to better match
the other two colors. The nose cone and assorted
antennae are painted in Neutral Gray (F.S.36270).
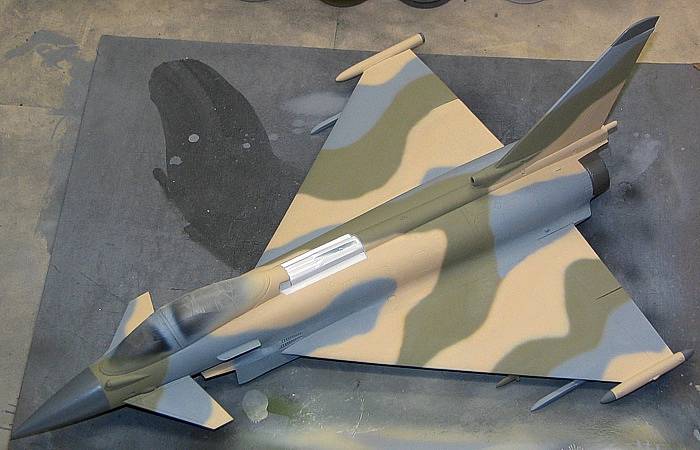
Camouflage Applied -- Ready
for Gloss Coating and Decals |
|
| |
Decals Left After Finishing |
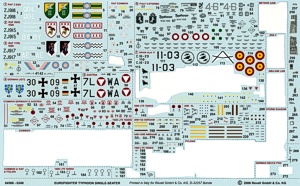
The awesome kit decal sheet is probably the biggest
reason I chose to build this kit. All that great
airframe data was just begging to be used. This
translated to a lot of decals on the model, and I only
used less than half of the total kit decals, as seen to
the right.
|
| |
Major Markings: |
|
12 Decals |
|
| |
Airframe Data Markings: |
|
195 Decals |
|
| |
Weapons Markings: |
|
120 Decals |
|
|
| |
Total: |
|
327 Decals |
|
|
The decals actually come from a number of sources.
The Revell kit decal sheet provided most of the
decals (all the airframe data and weapons markings). I
got the Turkish national insignia, serial numbering, and
"buzz numbers" from a CAM decal sheet for F-4
Phantoms (48-007). The "mounted knight" unit crest on
the vertical tail comes from a Zotz decal sheet
for F-16s (ZTZ32007).
I was not sure I should mix the unit markings up like
this -- the "1" in the "buzz number" is for the 1st
wing while the knight markings is for 152 squadron
(which I do not think is part of the 1st
wing). But, what the heck! This is my daydream and I
liked the markings this way.
Decals Applied -- Ready for
Washes and Flat Coating |
For weathering, I used my typical style of thinned
down enamel paint washes and air brush shading. I
finished the weathering with some dry brushing to pop
out the surface details. For a more complete discussion
of what I do to weather my models, see my posting on
"Weathering Aircraft".
Weathering Applied -- Ready
for Final Assembly |
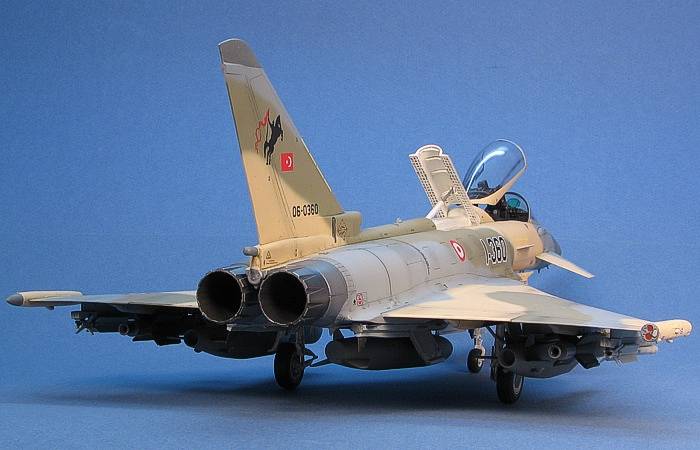
Finishing
Touches
With the camouflage work done, I turned my attention
to the wheel wells. When the wheel wells are open and
exposed like on the Typhoon, I generally choose to paint
them after the camouflage. I find it easier to mask
around the wells and paint the white into them rather
than stuffing them full of masking material in hopes of
trying to protect them while I am painting the
camouflage around the wells.
The landing gear in the kit is nicely molded with
plenty of detailing. I had a bit more flash in my kit
than I would have expected for a newly tooled kit, but
it did not take too long to clean up the mold lines. I
assembled the landing gear and painted it overall white.
A quick black wash popped out the detailing, then I
applied some details in silver, gray, and black. The
tires are painted Engine Gray (F.S.36076). As
comprehensive as the decal sheet is in the kit, there
are no decals for the landing gear ... :-(
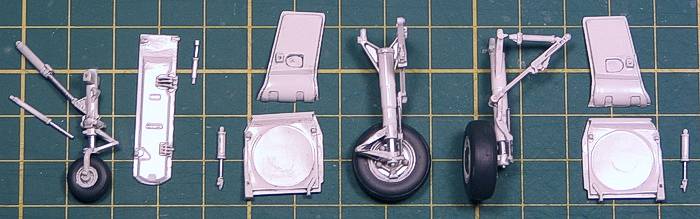
Completed Landing Gear |
With the landing gear painted and finished, I plugged
it into place in the wheel wells. Everything fit as
expected.
I had to make some decisions on the weapons. The kit
provides enough weapons in the box to fully arm three or
four Typhoons. After some careful thought, I selected
the weapons I thought looked the most interesting (to
me) and assembled these.
Based on the camouflage and other details, I
determined I am building this model as an interdiction
aircraft. With that as a premise, I decided a couple of
the unusual looking stand-off weapons was the best load
to carry. The Storm Shadow weapons just looked too cool
to ignore. Having some extra hard points made me also
choose to add some Hasegawa AGM-123 "Skipper II"
bomb/missiles (rocket assisted GBU-16s). I have enough
models in my collection that use standard GBUs that
these "different" weapons will be a nice switch.
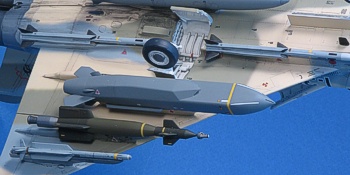
I painted the Storm Shadows in Neutral Gray
(F.S.36270). The kit decals provided lots of data for
the weapons to make them look appropriately busy. The
"Skipper IIs" are Olive Drab (F.S.34087) bodies with
Green Drab (F.S.34086) guidance and fin sections with
Steel (metalizer) rocket units. Hasegawa provides
the data decals for these weapons.
I also included a fuel tank on the centerline
hard-point. The tank is painted in Neutral Gray
(F.S.36270) with the pylon painted in the camouflage
colors. I chose this because I felt the tanks would not
be getting the elaborate camouflage painting and would
be left in whatever color they were delivered in. This
gray color seems close to the right one for the Typhoon
in RAF service (where the tanks would supposedly have
come from).
I also included self-defense air-to-air weapons. I
decided to be just as exotic with the self-defense
air-to-air weapons and chose to use the Meteor and
IRIS-T missiles. I figured I have enough models in my
collection that use AMRAAMs and Sidewinders. I painted
the missiles up in L.Ghost Gray (F.S.36375). Again, the
kit decal sheet provided a ton of data markings to make
these nicely busy.
I made a slight change on the Meteor missiles. The
kit provides only rear fins, but the web pages I looked
at for painting information showed that they also have
forward fins, just like the AMRAAM. I hacked off some
AMRAAM forward fins from the kit-provided AMRAAMs and
attached these to the Meteor missles. The image below
shows all the weapons after they were painted, just
before attaching them to the model.
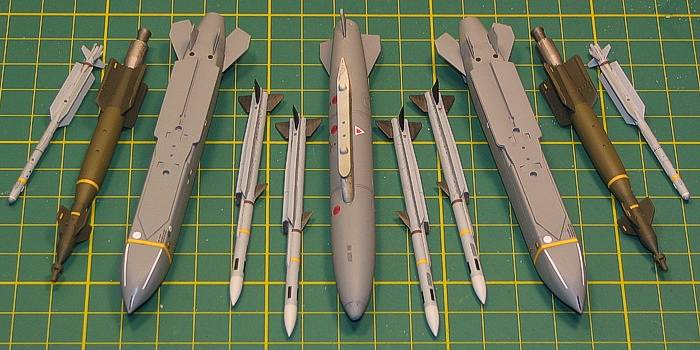
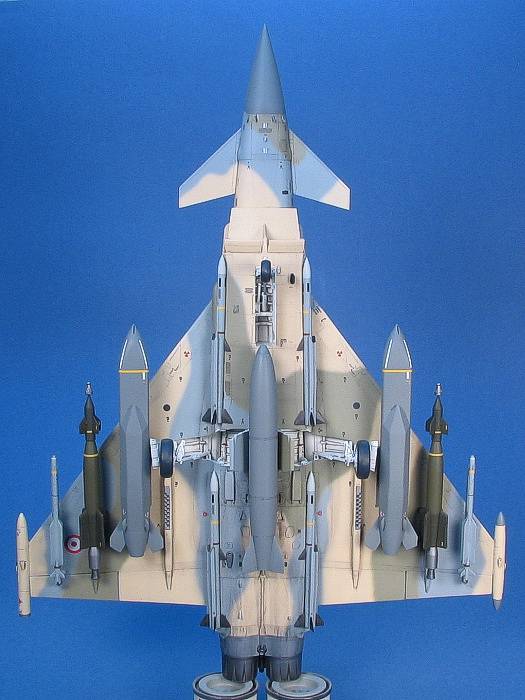
Weapons Assortment |
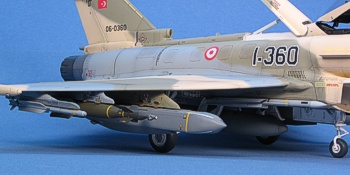
Weapons Mounted |
Weapons Mounted |
The final touches were a few miscellaneous antennae,
the navigation lights, and the four sensor vanes under
the nose. Attaching and painting these marked the end of
the project.
This is a really nice kit. It is not perfect, and it
will have you exercise some modeling skills to build it,
but nothing extraordinary. The kit is well worth the
price I paid, and the decals and weapons made it even
better. On-line listings from other modeling sources
seem to indicate the kit costing more from these other
sources. Perhaps I got a lucky break when I ordered it
from Squadron. If Revell can ever get their act
together on defining the paint colors, I will not have
to keep making "what if..." models.
 Home
| What's New |
Features |
Gallery |
Reviews |
Reference |
Forum |
Search
Home
| What's New |
Features |
Gallery |
Reviews |
Reference |
Forum |
Search