|
Aeroclub's
1/48 scale
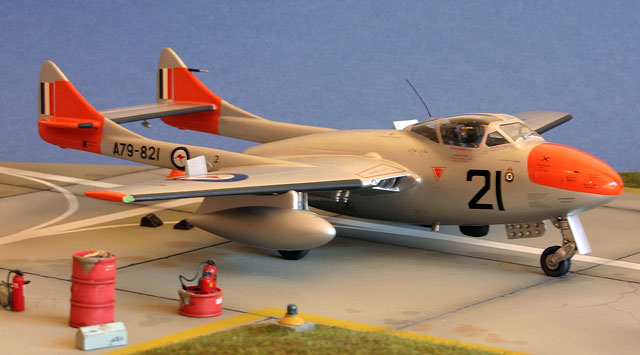
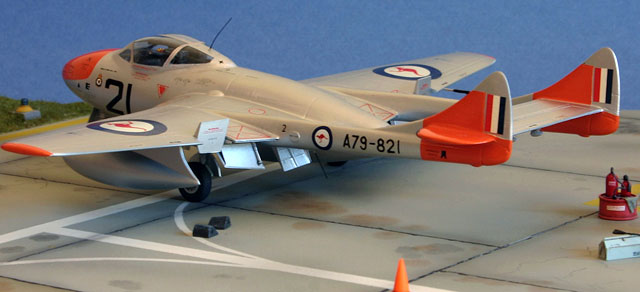
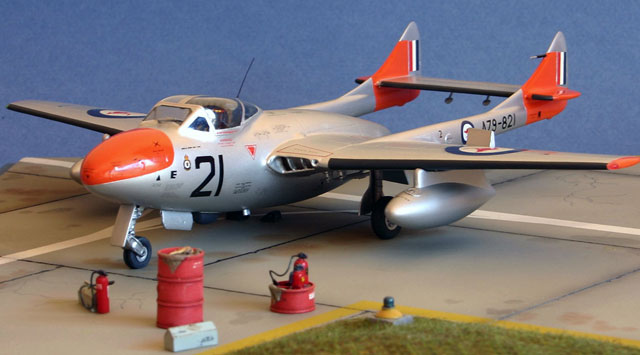
De Havilland Vampire T.35
by Peter Jones
|
 |
|
De Havilland
Vampire T.35
2 Flight Training Squadron (FTS) RAAF |

HyperScale is proudly supported by Squadron.com
I originally
purchased this kit many many years ago, long before the Hobbycraft and
Classic Airframes releases became available. The kit is a product of
the “cottage industry”. The main airframe components are comprised of
plastic vac-form parts with the detail parts being cast in white metal.
Aeroclub have done a good job on this one and it allows you to build an
accurate representation either one of an Mk FB5/9, NF.10 or T.11 to be
built.
This project has
been a work in progress; albeit very slow, for many years and the
pending release of the Classic Airframes kit provided the incentive to
finish.
Construction
commenced with removal of vac-form components from their backing sheet,
a chore which unnecessarily scares many modelers from tackling vac-form
kits. However, once you get into it, it is not all that daunting and
the task can be completed in a matter of a few hours.
I used my normal
approach to this process by running a very fine 2H lead pencil around
the bottom edges of the vac-formed parts then scribed a light cut
approximately 1mm from each part and simply snapped the parts from the
sheet.
120 grit coarse wet
and dry sandpaper was taped paper to a piece of 20mm thick glass and the
separated components were sanded using lots of water to lubricate the
parts and to keep the dust down whilst removing the bulk of the plastic.
When the pencil line marks were close the course paper was replaced
with finer 360 grit sandpaper and the sanding process was continued
until all components were down to the pencil line. Once the line was
reached, the remaining material was simply wiped off and the parts were
ready for the next step in the construction process.
The excess plastic
over the openings for the cockpit and cannons was removed by first
drilling a series of holes close to the edges of the openings and
“joining the dots” with a motor tool to remove the waste material.
Final finish to the edges was achieved with a scalpel, fine files and
sandpaper.
The mainplane is
supplied as top and bottom one-piece affairs that incorporate the stubs
for the twin booms as well as the fuselage pod. I liked this approach
by Aeroclub as it helps in establishing the correct dihedral. The
forward fuselage sections are separate pieces and are split vertically
as per conventional kits to enable the various versions to be built.
The modeling phase
of the project commenced next as the kit does not supply any detail for
the cockpit sides. This was achieved using scrap plastic card,
stretched sprue and fine fuse wire to replicate the various wiring and
cables that abound in the one-to-one-scale version. Whilst time
consuming it was not really all that onerous and the access to a
preserved example at the RAAF Association Museum here in Perth was of
tremendous help.
Once the
construction was complete, the cockpit was sprayed with a very dark grey
(the one-to-one-versions were painted black) and later dry brushed with
a lighter grey to enhance the all the added detail.
The only other
scratch building really necessary was to add cannon blast tubes and this
was done by using Sutcliffe plastic tube. Whilst I was satisfied with
this added detail I couldn’t help myself and partly scratch built the
wing flaps into the lowered position.
Aeroclub supply
bulkheads for the fuselage/mainplane and these are welcome as they
stiffen up the complete assembly significantly. A substantial lead
weight was added to the nose section to ensure that the model sat
correctly on its undercarriage. Once all the major components were
assembled all joints were given a wipe with Tamiya putty and then block
sanded with various grades of wet and dry sand paper. The cockpit was
then masked off and a coat of Humbrol primmer was applied to the
completed airframe.
Paint
After a final clean
up and sand using 400 grit wet and dry sandpaper the whole airframe was
then re-primed for the following
colour
coats. I wanted to complete the model to depict a machine operated by 2
Flight Training School RAAF here in Perth, Western Australia in during
the 1960’s. Being a training machine it bore the RAAF’s then
high-visibility finish of airframe silver and International Orange
(IO). Due to this choice, it was essential that a white base coat was
first applied. These areas were painted in gloss white (Xtracolour
X141) and, after allowing a few days for this to harden the white was
masked off using Tamiya tape and the IO (Xtracolour X104) was sprayed on
building light coats until the correct depth of colour was achieved.
The IO was allowed
a few days to dry and harden and then masked off. (Xtracolour X216 –
Silber) was then sprayed over the whole airframe to simulate the silver
dope finish worn by the RAAF machines. Final detail painting was
completed using Humbrol matt black slightly lightened with white to
simulate the anti icing strips.
Decals and Finishing
As the Xtracolor
paints that I used are gloss, no further topcoats were needed and
decaling commenced. XtraDecal sheet 018-48 was of great help here as it
carries a vast amount of stencil data and this sheet was used
extensively. However, further examination of the RAAF Association
Museum example indicated that even more stencil data was required and
this was sourced from my decal spares box as were the RAAF roundels and
squadron applied markings. Having the real aircraft as a reference,
there was no excuses to not getting it right!
Final Assembly
The model was then
allowed to settle for a few days to let the paint and decals harden.
Final Assembly followed and the dangly bits and pieces such as the
undercarriage, wheels, doors, partly scratch built flaps, various pitot
tubes, and the windscreen wiper etc were fitted.
Once completed, I
was very pleased with the result and felt that it captured the overall
form and feel of the original very well.
I am now looking
forward to Classic Airframes kit of the dual seater.
When the Hobby
craft kits were released I purchased both single and two seat kits. On
closer inspection the Hobbycraft kits were very disappointing and bore
only a slight similarity to the real aircraft. Both kits were given to
my son for cracker (Aussie for firecracker) fodder and I only kept the
drop tanks for use with the Aeroclub kit (although even these are not
the correct shape).
Subsequent Classic
airframes releases have been a great inspiration and I would personally
like to thank Jules for his endeavor in providing us with kits that
would have been a scratch build exercise previously.
Aviation
Heritage Museum – Bullcreek, Western Australia
www.raafawa.org.au/wa/museum
Vampire, Macchi
and Iroquois in Australian Service – Stewart Wilson
Published 1994, ISBN 1 875671
07 2
Aircraft OF THE
RAAF 1921 – 71
Geoffrey Pentland and Peter
Malone, Published 1971,
Flightpath
Magazine – Volume 6 Number 1
(plus numerous other issues)
Click on the thumbnails
below to view larger images:
Model, Text and Photographs Copyright ©
2005 by Peter Jones
Page Created 09 July, 2005
Last Updated 08 July, 2005
Back to
HyperScale Main Page
|
 Home
| What's New |
Features |
Gallery |
Reviews |
Reference |
Forum |
Search
Home
| What's New |
Features |
Gallery |
Reviews |
Reference |
Forum |
Search