|
Fairey Fulmar Mk.II
by
Stephen Tytko
|
|
|
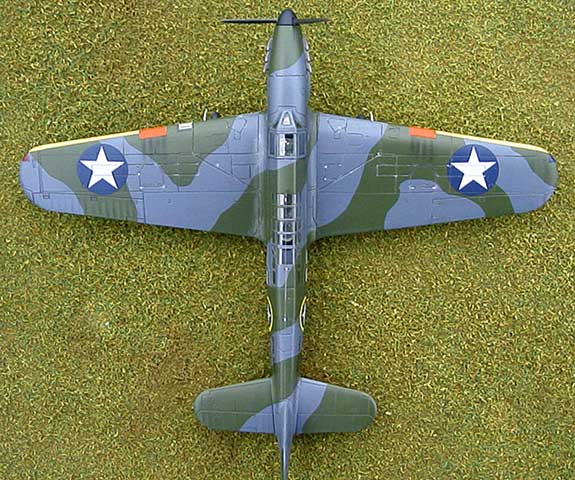
Fairey Fulmar Mk.II |

Smer's 1/72 scale
Fairey Fulmar Mk.II is available online from Squadron.com
The Fulmar was a British WWII two-seat Fleet Air
Arm fighter. Delivered first as Mk I and later as higher horse power Mk
II variants between January, 1940 and February, 1943, Fulmar production
totaled 600 aircraft. Armament consisted of eight wing mounted .303 in.
machine guns. While not as nimble as Spitfires or Hurricanes, Fulmars
gave good service in carrier operations and convoy protection roles.*
Vista's 1/72
Scale Fulmar Mk.II
|
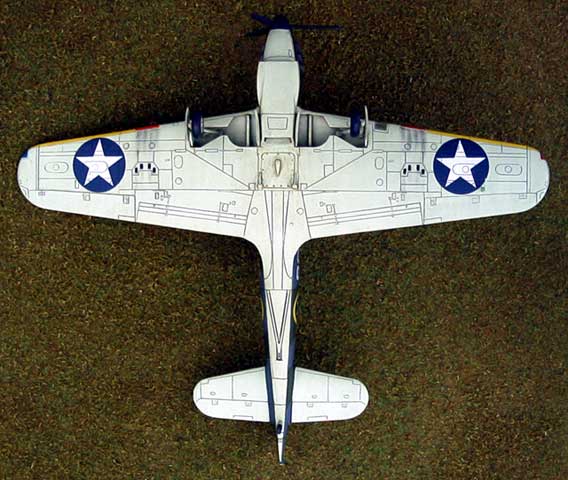
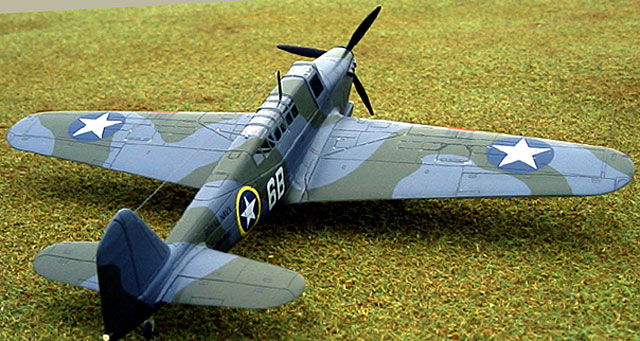
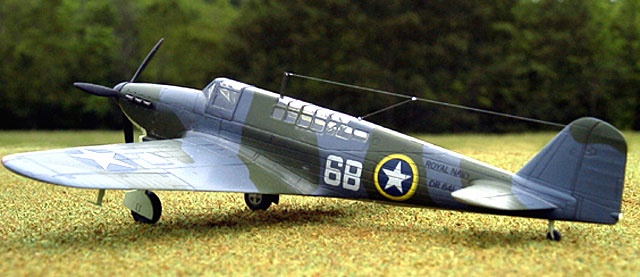
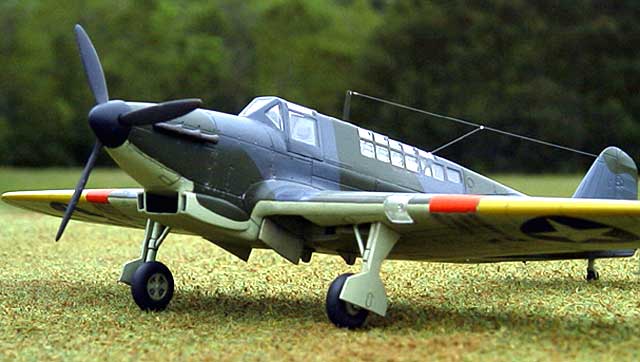
This is Vista’s 1/72 Fairey Fulmar Mk II in
Operation Torch markings. I believe the kit has been reboxed at least
once since I purchased my Vista copy a few years back, and the Smer kit
of the Fulmar available from Squadron may be its current incarnation.
|
Advantages |
Nice panel line
detail, great canopy, interesting subject and markings,
inexpensive. |
|
Disadvantages |
Mismatched tooling,
some vague parts placement/attachment, wing root/fuselage fit
needs work. |
|
Recommendation |
Recommended to anyone
willing to put in a little extra effort. |
The kit uses injection molded styrene with nicely
done engraved panel lines and includes 33 parts to make either a Fulmar
Mk I or II and includes markings appropriate to each mark.
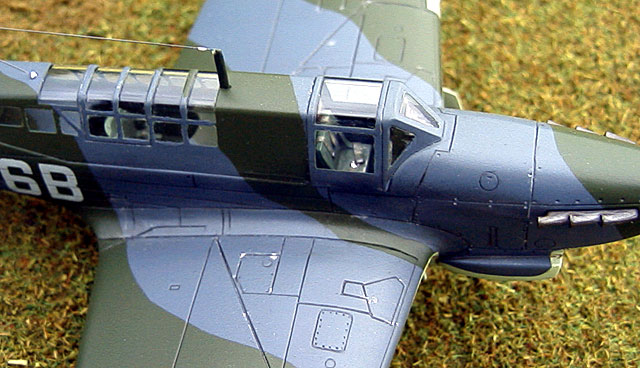
Clear parts include a one-piece injection molded
canopy, landing light cover and gun sight. There were a couple sink and
injector pin marks on the wing to be dealt with.
The small single sheet of instructions outlines a
brief subject history on one side and eight text-free drawings of
assembly steps on the other. The box provides color artwork showing
paint scheme and decal placement.
Construction
High and Low Lights…
I usually prefer 1/48 scale, but bought this kit
because the Operation Torch box-art scheme appealed to me. Not being a
prolific model builder, coupled with a long spell of not working on
anything, I was looking forward to a simple warm-up project. The kit
challenged me a bit more than I’d hoped for, although I’m never sure
just how many of my modeling difficulties aren’t self inflicted!
·
One bright spot: Dipped in Future, the greenhouse canopy
is wonderfully clear, and although closed, affords a decent view inside.
It fits beautifully with minimal sanding and dry fitting, allowing me to
white glue it in place after finishing all painting and weathering. I
used Bare Metal foil to mask the canopy. There are a lot of
little windows here!
·
Pilot and navigator cockpit detail consists of floor,
seats, stick, main instrument panel, gun sight, rudder pedals and a tiny
instrument panel for the navigator. Placement of a couple parts is a
bit vague I added masking tape seat belts and painted/dry brushed the
instrument panel and dials, adding Future to the dial faces to simulate
glass. The compass was missing from the compass/rudder pedal part, the
result of a short-shot. I ignored the problem.
·
The wing/fuselage joins required strip styrene, sanding,
repeated dry fitting, some filler, and re-scribing of panel lines to get
a tight fit.
·
Panel line alignment discrepancies forward of the cockpit
meant sanding away and reintroducing cowl panel lines so that they would
meet across the top and bottom of the fuselage halves. Worse yet, the
left and right exhaust stub openings and panel lines are not on the same
horizontal plane (no pun intended.) As a result, the left side exhaust
stubs and panel lines are about 1 mm lower than those on right side when
viewed from head on! A strategically positioned prop blade helps hide
this tooling gaffe.
·
Those nifty cowl cheek intakes, the chin scoop and landing
gear doors were thinned, sanded, dry-fit (and sanded and dry-fit, and…)
and attached. No fancy locating tabs, pins or flashed over option holes
here.
Aside from the belts and antenna wires
(mono-filament with white glue insulators), the only thing I added not
provided in the kit box were styrene bits and a blob of Testors silver
enamel paint used to box in the wing leading edge landing light opening
and suggest a bulb/lens assembly. Oddly, I was willing to overlook the
missing compass and un-boxed in wheel well openings, but not this. The
kit’s clear landing light cover fit nicely after a little sanding,
fiddling and polishing.
Painting,
Markings and Weathering
|
·
I airbrushed a combination of Floquil railroad, military
and Polyscale acrylic colors for the paint scheme. Model Master
Metalizer Sealer served as gloss coat for decal placement and sealing.
·
Happily, the kit decals performed very well. One wing top
star broke apart during positioning, but the pieces patched together
perfectly. The decals snuggled absolutely flat using Solvaset setting
solution. The decal whites and yellows are a bit transparent, but I’m
pleased with the results. Some homemade red decal strips represent
taped over gun ports as the kit wing leading edges are devoid of any
such detail.
·
I used pencil lead on the panel lines, and washed the
model with a thin brown acrylic wash. Pastels simulate exhaust and gun
powder residues. Testors Dullcote sealed it all. Silver artists pencil
served to add a little wing root and panel edge wear.
I photographed the model outside under a bright
overcast sky, using a home made static grass base held up against a
distant tree line for background. I used a Ricoh RDC 5300 digital
camera.
Although not an effortless build, my Fulmar was an
interesting project, allowing me to practice a variety of modeling
skills and built up into an interesting addition to my collection. It’s
an inexpensive kit delivering good bang for your buck with a little
effort.
Green, William and Swanborough, Gordon, The
Complete Book of Fighters, 2002, Salamander Books Ltd., London
Click on the thumbnails
below to view larger images:
Images and Text Copyright © 2003 by
Stephen Tytko
Page Created 20 July, 2003
Last Updated 17 March, 2004
Back to HyperScale
Main Page
|
 Home |
What's New |
Features |
Gallery |
Reviews |
Reference |
Forum |
Search
Home |
What's New |
Features |
Gallery |
Reviews |
Reference |
Forum |
Search