Home  |  What's New  |  Features  |  Gallery  |  Reviews  |  Reference  |  Forum  |  Search

Focke-Wulf Fw 190D-9
Hasegawa 1/32 Scale

by Brett Green


Focke-Wulf Fw 190D-9
Brown 18, 5./JG 26, Uetersen, May 1945 flown by Lt Günter Seyd


Hasegawa's 1/32 scale Fw 190D-9 may be ordered online from Squadron


Introduction


If the Focke-Wulf Fw 190A seems to be a bit of an ugly duckling, then the Fw 190D is more like a swan. A totally redesigned nose combined with an extended rear fuselage transformed the stocky Butcher Bird into the sleek embodiment of an airborne hunter.

The Focke-Wulf Fw 190D was not built in huge quantities nor did it affect the outcome of the war, but it was a highly competent fighter that was more than a match for its Allied contemporaries in the hands of an experienced pilot. Even though the Dora was in service for less than eight months, its good looks and wide range of colour schemes makes it a perennially popular modelling subject.


A good selection of 1/48 options are available for Dora fanciers. The top two contenders are the Tamiya kit, which is a simple build but with some outline problems; or the Trimaster/Dragon/Italeri offerings which are more accurate but less easy to build.

Until now, options in 1/32 scale have been less attractive. The old Revell kit is now mercifully unavailable. In the late 1980s Hasegawa mated a new-tool fuselage with their old Fw 190A wing to create a “Hi-Tech” 1/32 scale Dora. This kit was re-released a few years ago with new markings. Although the new fuselage featured crisply recessed panel lines and multi-media details, the wing (with its masses of raised rivets and incorrect structural details) was poor by the standards of the day.

When Hasegawa announced a new-tool Fw 190D-9 in 1/32 scale, the rumour mill was rife with stories that the old “Hi-Tech” fuselage would be mated with a newly tooled wing.

The rumour mill was wrong.


Hasegawa's 1/32 Scale Dora In the Box


Hasegawa’s 1/32 Scale Fw 190D-9 is an all-new kit. It is a conventional model presented entirely in injection moulded styrene.

Highpoints
  • Excellent overall fit.

  • Very accurate in size and shape.

  • Sharp and consistent engraved surface detail.

  • Detail in gear bay and into open lower rear engine bay looks great.

  • Clever engineering for precise construction (eg wing root, location of cockpit and engine plug).

  • Fast build.

  • Option of flat or blown canopy.

  • Permits 3 piece or 5 piece gun cowls by filling panel lines.

  • Excellent, positive alignment of undercarriage legs.

Nit Picks
  • Some visible ejector pin marks in wheel wells.

  • Perfect fit at wing root requires patience

  • Tail wheel leg too tall

  • Inaccurate cutout for Revi Gunsight on instrument coaming

  • Oval cannon barrels

The kit is very accurate in outline and dimensions. Surface detail is restrained and consistent, with crisply recessed panel lines.

A number of nice touches are present, including an engine plug (with details of the rear of the engine block, the supercharger, engine mounts and plumbing) that can be seen through the open wheel well, dropped flaps, optional canopies (flat or blown), and a gun cowl supplied in the early configuration with five panels. Conversion to the later three-panel gun cowl is a simple matter of filling a few panel lines on the part.

The new Dora is extremely well planned and engineered. The engine plug and cockpit add structural stability to the fuselage. The separate tail section is a perfect fit with the main fuselage. A wing spar is integrated with the rear wall of the main wheel well to ensure correct dihedral. The fuselage wing root fits positively into a slot in the wing spar.

The kit does not include "bells and whistles" such as movable control surfaces, displayable engine and multimedia cockpit parts noted in some other recent 1/32 scale releases. In fact, the cockpit detail is really only just adequate in a kit of this size.

However, this approach keeps the price down and makes the kit easier to build straight from the box. Furthermore, for those modellers who really want to go to town with Hasegawa’s Dora, the aftermarket industry has already leapt on this release with announcements of resin detail sets and alternate markings.

There are a few minor shortcomings including an inaccurate instrument coaming cutout for the gunsight but, on balance, this is a great kit straight from the box.


Construction


Cockpit

The cockpit tub of the Dora 9 was simple, but not quite as simple as supplied by Hasegawa.

I had the 1/32 scale Cutting Edge cockpit for Hasegawa’s old Fw 190A-8, so I decided to cannibalise this set for the new kit. I am not recommending that you go out and buy the Cutting Edge cockpit for the purpose (I am sure that Cutting Edge would not be recommending this either), but it worked for me in the absence of any other available resin. By the way, the Cutting Edge 1/32 scale Fw 190D-9 cockpit was designed for the old “Hi-Tech” version of the Dora, so most of the parts (including the cockpit tub and the instrument panel) won’t fit this new kit either.


The Cutting Edge seat was a major improvement in detail and subtlety. It also has the resin harness moulded in place. Other parts used from the set were the throttle quadrant, rudder pedals and control column. The resin control column was cut down in size to fit on top of the cone-shaped boot at the base of the kit joystick. The parts were glued to the kit cockpit tub and painted.

The pilot’s stowage hatch on the kit’s rear canopy deck has two open holes. Apart from photos of the Dora at the US Air Force Museum, I could not find much reference to suggest that these open holes were common. Responding to my inquiry, Jerry Crandall advised that the holes on the US Air Force Museum D-9 stowage hatch were originally covered with canvas or some other fabric. I therefore decided to fill the holes with plastic rod and putty.


Hasegawa includes the canopy crank wheel on the cockpit sidewall but has omitted the prominent canopy jettison lever. I added this item from plastic card.
 

Click the thumbnails below to view larger images:

The canopy jettison lever was added from scrap styrene


Engine Plug

The open centre section of the wheel well was a feature of the Fw 190D-9. However, no mass-produced injection moulded kit has represented this feature to date.


Hasegawa’s engine plug is relatively simple, yet looks busy and convincing when painted and weathered. I partially assembled the plug and airbrushed the components. Before completing the engine plug, I brush-painted details with gunmetal and Tamiya Titanium Silver, then added oily streaks with a thin mix of Flat Black and Red Brown applied with my Testor Aztek airbrush. A sharp 2B pencil was used to add simulated scratches to the painted parts.

The engine bay sidewalls were painted in a similar fashion so that they would blend with the engine parts.
 

Click the thumbnails below to view larger images:

The engine plug is made up from relatively few parts

Even so, it looks quite convincing when assembled. Basic painting has been completed at this stage.

Heavy staining and weathering has now been applied, as appropriate for a hard-working engine bay.

The detail looks good from all angles. The ejector pin marks on the bottom of the engine block are hidden when the wing is installed.


Wing and Fuselage Assembly

The wheel wells, interior of the wing and interior of the landing flaps were sprayed RLM 02 Grey before being dirtied up with the same thin mix of brown and black that was used for the engine plug.


The main wheel well is integrated with a spar that guarantees the correct dihedral for the kit wing. The wing spar also incorporates a cutout that the fuselage wing root slots into, ensuring perfect alignment between the wing and the fuselage. However, all the parts must be lined up perfectly. The first critical stage is the installation of the main wheel well.

In order to ensure that the wheel well and wing spar were completely flat against the inside of the bottom wing, I used multiple plastic clamps to position the part then applied liquid cement to the edge of all the mating parts.

While this was set aside to dry, I assembled the fuselage. The cockpit tub is designed to be trapped between the fuselage halves with the assistance of a rectangular locating point on the inside of the fuselage. I decided to glue the tab on the cockpit tub to just one side. The fit was tight without glue anyway, and this made sure that I had a little leeway if the fuselage had to be spread at the wing root.

The cockpit tub and engine plug were glued to one fuselage half, then the fuselage was joined. I did not add the tailwheel at this stage (as suggested in the instructions). It fitted without trouble after all the assembly and painting was completed.

The gun cowl and forward top cowl are moulded as a single part. Initial test fitting did not look promising near the front, but I found that the part fitted well when pushed firmly into place then taped down until completely dry.

Click the thumbnails below to view larger images:

The wheel well was weathered by spraying a thin mix of brown/black along various structural features.

The interior of the flaps and main landing gear doors received the same treatment.

It is essential that the integrated wheel well back wall and wing spar is exactly mated to the lower wing. I used plastic clamps to help.

The wing spar guarantees the dihedral of the wing.


It was now time to bring together the wing and fuselage.

Similar to the gun cowl, dry fitting was not initially encouraging. It looked like I was going to have to deal with a noticeable step on one side and gaps at both inside leading edges. I took a deep breath and glued the parts together. Glue improved the situation. I also ran a long piece of masking tape from under one wingtip, across the top of the fuselage then back under the other wingtip. This tape was tight enough to squeeze together the wing root and fuselage - although I held it tightly between my fingers for several minutes before trusting the tape. To my delight, when the cement dried there were no gaps and no steps.

This assembly stage did require some fiddling and provoked a few anxious moments, but with care and time a very close fit is possible.

The rear fuselage/empennage was assembled and glued to the main fuselage. The fit was perfect. I scribed a double-panel line on top of the fuselage extension as seen in some references.

The only other tricky aspect of construction is the lower mid-fuselage insert. I did need to trim the front forks of this part to get a good fit.


Fuselage Flush Rivet Detail

Hasegawa has not attempted to depict the characteristic lines of flush rivets on the fuselage sides. This is not a criticism as the panel lines are very nice, and there are many differing views on how surface detail should be represented. Modellers who want to add texture can do so in a number of ways.

I chose to add the flush rivets only to the mid fuselage. They seemed to be most prominent in this area – especially the multiple rows of diagonal rivets.

I bought a dressmakers marking wheel while accompanying my wife on a visit to a craft shop some years ago and now I finally had a chance to use it. Self-adhesive Dymo tape was used as a guide. A short length was stuck to the fuselage side then the marking wheel was firmly run along the edge. This process was repeated until the basic pattern was achieved. A heavy steel scribe was then used to emphasize the holes although, in retrospect, I probably could have skipped this step.


Click the thumbnails below to view larger images:

I wanted to add the missing structural detail on the mid-fuselage. Dymo tape is used as a guide for a dressmaker's marking wheel.

The result is not perfect, but it is easier and probably more precise than using a hobby knife or drill to make individual holes.

This feature was quite obvious on many Doras. The final result on the model is not too overpowering.


Finishing Construction

Summary of Additions and Modifications
  • Replaced seat, control column, throttle quadrant and rudder pedals with Cutting Edge items from their cockpit for the old Hasegawa Dora.

  • Filled the two holes in the pilot's stowage hatch on rear decking.

  • Added lines of flush-rivets to mid fuselage with dressmaker's marking wheel and scriber.

  • Hollowed out exhaust stubs and cowl machine gun barrels.

  • Hollowed out small fresh-air intake on top of cowl.

  • Replaced wing cannon barrels with brass tubing.

  • Rescribed panel lines on spine (off-centre panel line on rear fuselage and double panel line on top of fuselage extension).

  • Repositioned flap hinges to reduce angle of "droop".

  • Sanded flat spots in kit tyres.

  • Added Jerry Rutman's 1/32 scale "cigar shaped" drop tank (typically seen on very late Doras).

  • Added slack antenna wire from stretched sprue.

  • Used decals from EagleCals #58 - Fw 190D-9

More work that I should have done!

Next time, I will also:

  • Fix the instrument coaming and replace the gunsight.

  • Mount the tail wheel assembly deeper inside the fuselage (to shorten the tail gear).

  • Improve the DF Loop.

  • Add hydraulic lines to main gear legs.

  • Fill the centre seam on the supercharger intake.

  • Fill some of the ejector pin circles in the main gear bays (but then again, maybe I won't!)

Smaller details were now gathered for final assembly. The exhaust stacks, machine gun barrels and the small fresh-air intake on top of the cowl were all hollowed out. I used a scriber and a not-too-sharp hobby knife for the MG barrels and the intake, and my Dremel motor tool fitted with a small dental burr for the exhaust stacks.

The wing-mounted cannon barrels were badly out of round. Rather than going to the trouble of sanding and hollowing, I replaced the barrels with brass tube.

Three locating tabs are moulded to each landing flap. This makes for a firm fit but unfortunately the flaps are dropped too far – almost to the vertical. I simply bent the locating tabs back to a more representative angle using a pair of pliers, then glued the flaps along the edge before attaching them to the wings.

Some late-war Doras were fitted with a different style of drop tank. Various sources state that this was a new 300 litre tank, but it looks a lot smaller capacity than the conventional Luftwaffe drop tank to my eye. Jerry Rutman manufactures this style of “cigar” drop tank in resin, and I decided to use one on my Dora.

The remainder of assembly proceeded according to the instructions.

Apart from filling the panel lines on the gun cowl, this model did not require a single spot of putty during construction.


Painting and Markings


Preparation

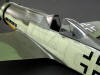
I decided to follow one of Dave Aungst's tips and mask the canopy with Parafilm "M". For details of how to use this interesting masking material, see Dave's article in the Reference Library.


Wheel wells were stuffed with tissue then the undercarriage doors were tacked in place with Blue-Tack.

I cut out a circle from a Post-It Note to mask off the big annular radiator, which had already been painted and received a wash of black oil paint.

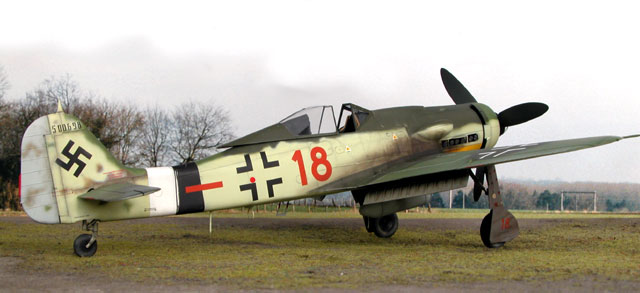
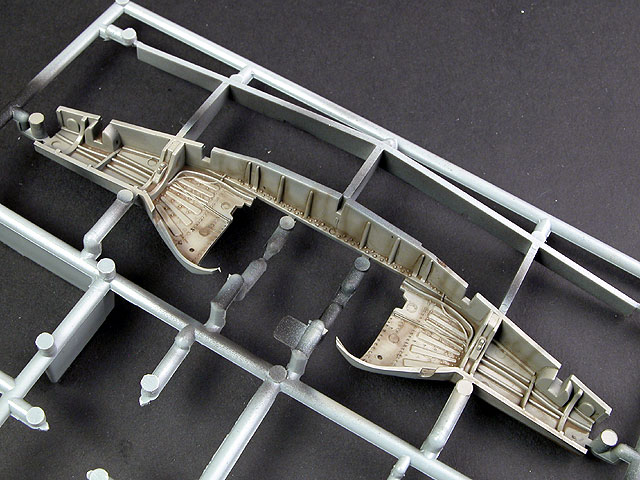
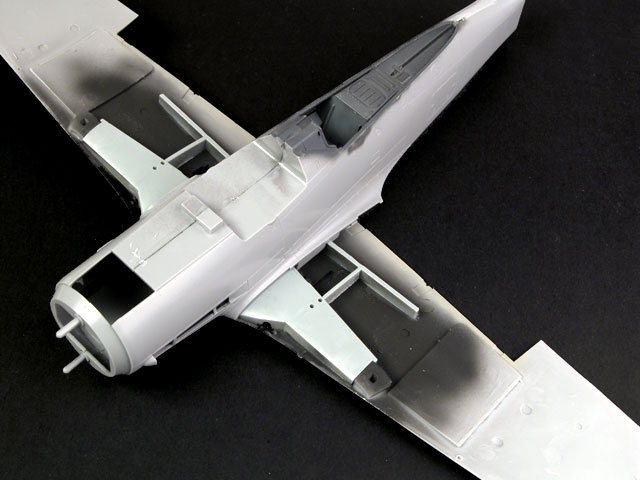
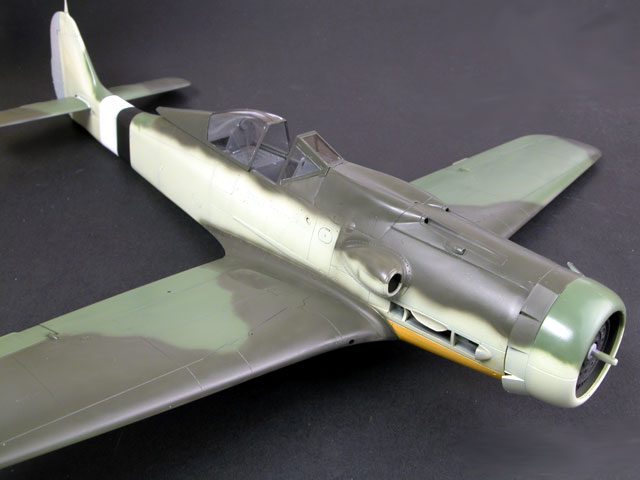
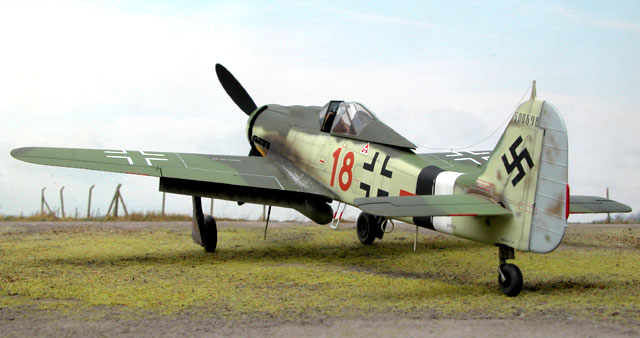
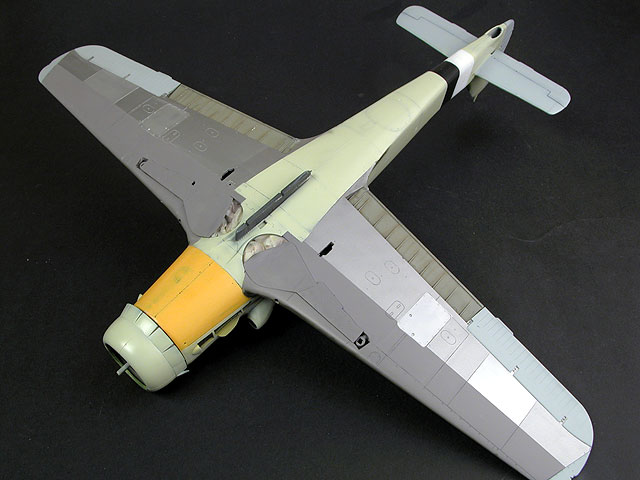
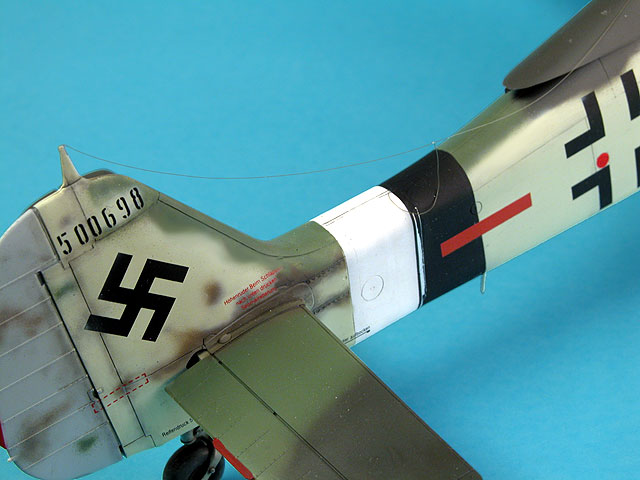
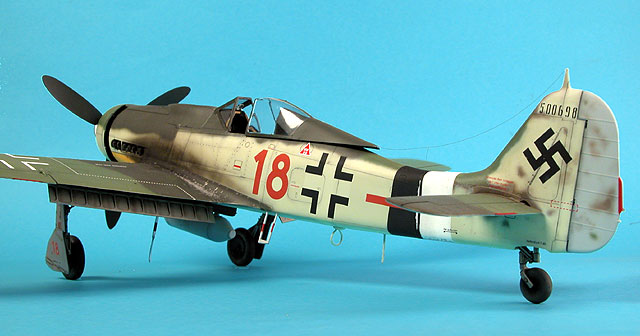
This Fw 190D was from the 500XXX werknummer batch. Aircraft from this batch shared some interesting colour attributes, including the lower wing with a grey forward half and natural metal trailing half. The fuselage of these aircraft also seem to be finished in one of the late-war “Sky” shades. Just to add even more variety, the lower engine cowl of "Brown 18" is a different shade to the rest of the fuselage, suggesting that it might be yellow or natural metal; and JG 26 added their own unique colours to the mix with a Black and White RV band and “greened-up” top surface camouflage.


Painting

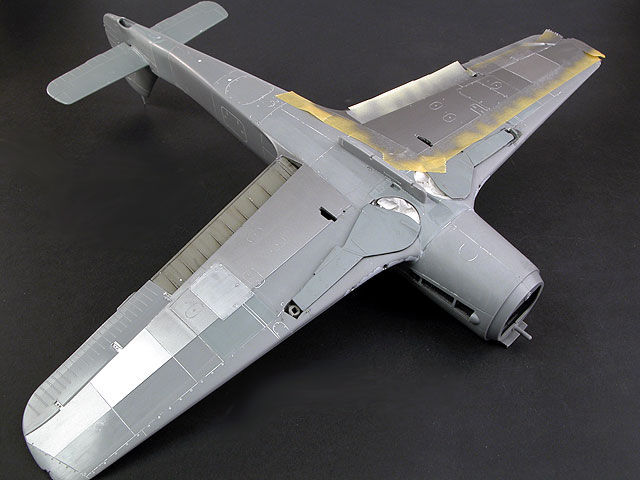
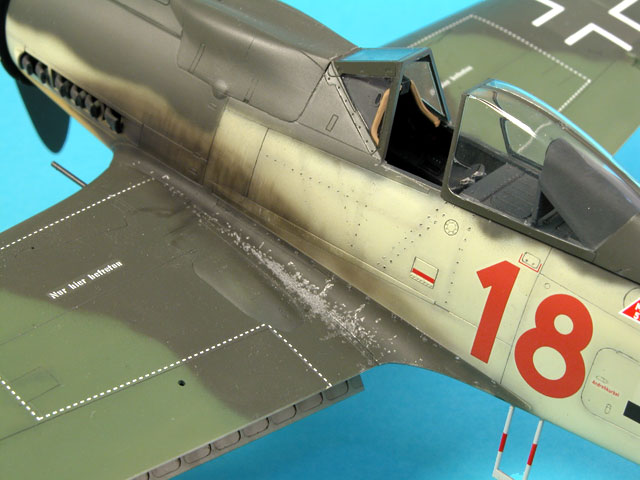
The first task was depicting bare metal on the lower wing.

I like Tamiya's AS-12 Bare-Metal Silver from the spray can, but the aerosol application sometimes leaves a slight orange-peel texture. I therefore took a small container, covered it with Cling Wrap, poked a small hole in the corner and sprayed some of the contents of the can into the hole. This is definitely an outdoor job. Keep your face away from the billowing toxic lacquer vapours too!

The cling wrap was removed and the contents poured into an empty Testor glass jar. I left the jar open for a few minutes before use to permit some of the remaining aerosol to evaporate.

Now the silver paint can be used just like normal lacquer. I poured the thin liquid straight into my Aztek paint cup and covered the rear part of the lower wing with a slightly dull, perfectly smooth and metallic finish. This is a great undercoat for Testor Metalizers. In fact, I mixed Metalizer with the Tamiya lacquer in the paint cup to vary the shade of selected panels.

Final tip for the decanted spray paint - take care the first time you re-open the jar as the contents may repressurize slightly.


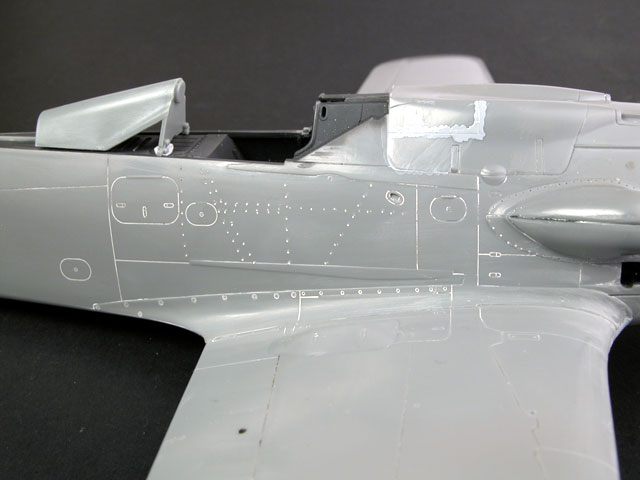
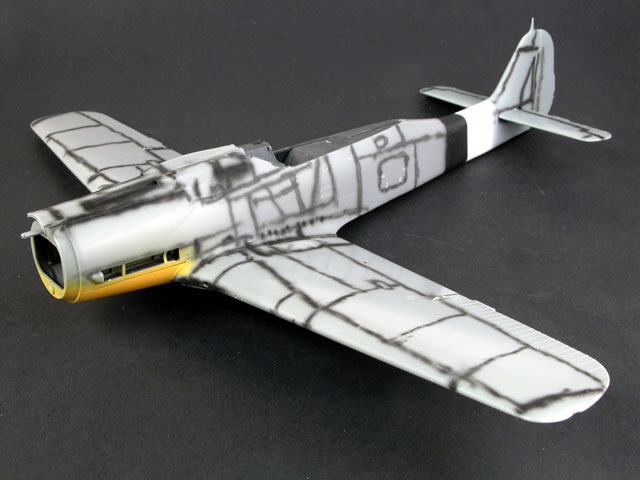
The metallic rear section was masked and I pre-shaded the remaining panel lines with narrow lines of black paint applied with the airbrush. Next, the black and white of the RV band was sprayed and masked, 
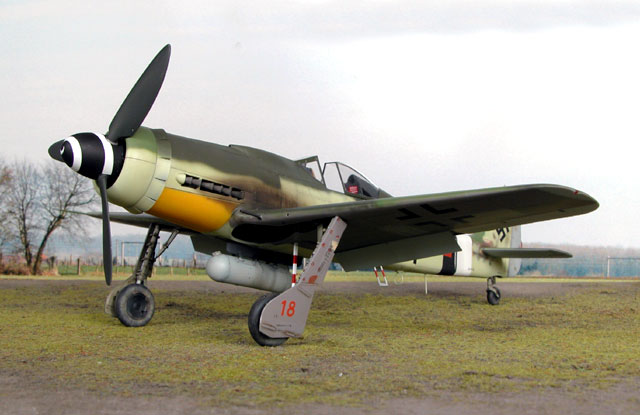
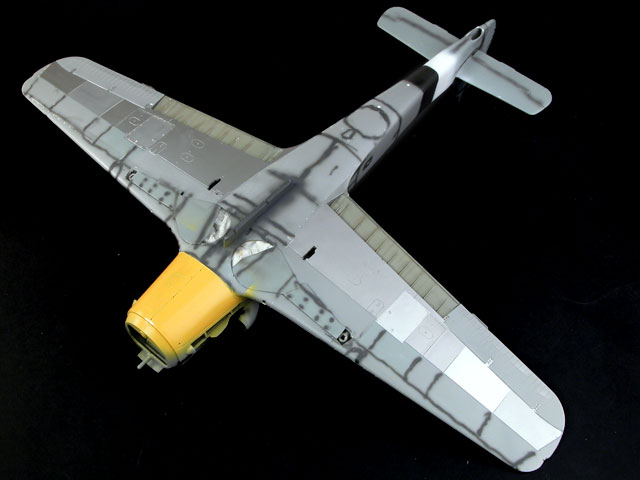
followed by the yellow undercowl. The remaining colours of the patchwork underside were then painted - RLM 75 Grey Violet for the forward lower wing; RLM 76 Light Blue for the ailerons, wing tips and horizontal tail surfaces; and "sky green" (RLM 76 variation) using RAF Sky.

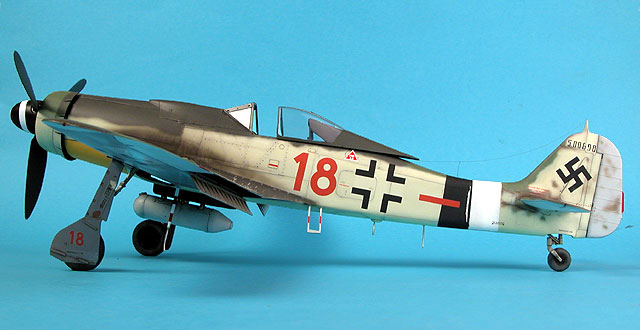
The one known decent photo of this aircraft (on page 303 of Axel Urbanke's wonderful book, "Green Hearts - First in Combat with the Dora 9") indicates a fairly high, hard demarcation line on the fuselage side with almost no mottling. The fin has a line of dark camouflage on the leading edge, but only sparse mottling aft of this. The rudder has been removed in the photo so camouflage of this area is anyone's guess.

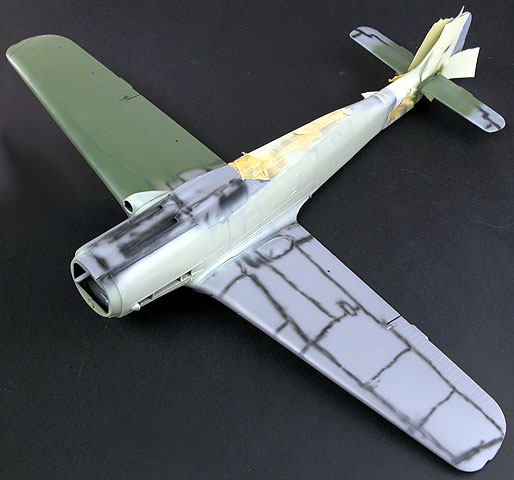
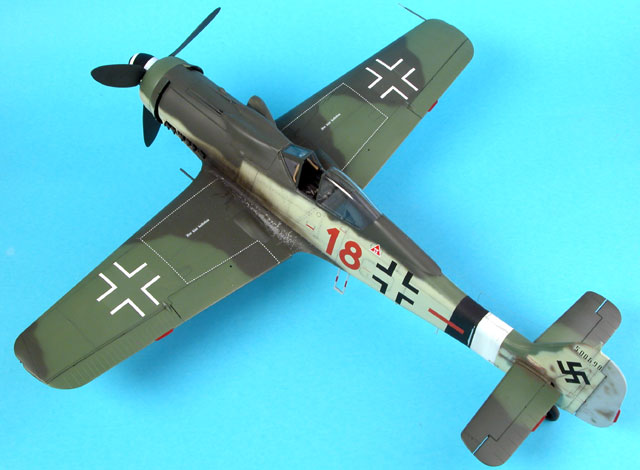
Upper surfaces were painted with RLM 82 Dark Green and RLM 83 Bright Green in accordance with JG 26's camouflage practices. I painted the rudder RLM 76 Light Blue. The mottle comprised RLM 81 Brown Violet (presumably field applied) and RLM 83 Bright Green.

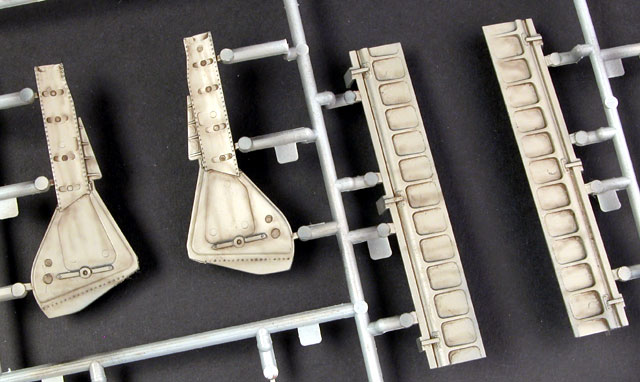
A few weathering features are apparent in the reference photo, including chipped paint on the RV band and putty/primer on the gear doors.

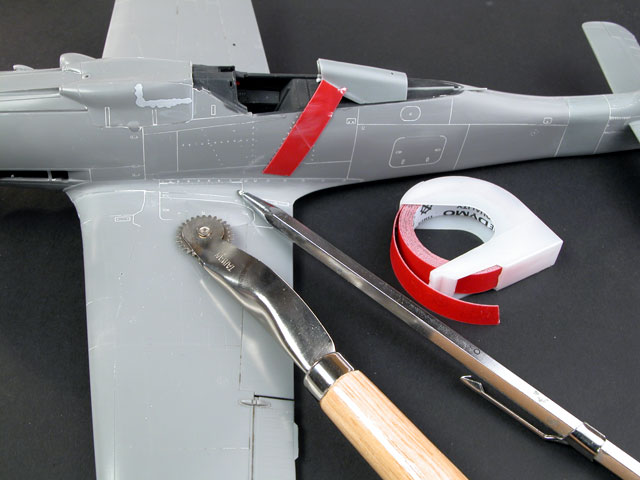
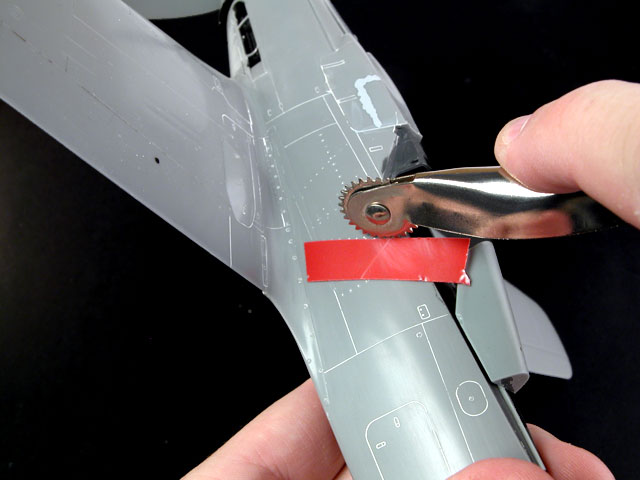
When all the masking was removed I applied a narrow strip of self-adhesive aluminium foil each side of the fuselage extension join. This was rubbed down into position then smaller strips were sliced off the top and the bottom. These strips represent metal under damaged paint - fairly common in this spot on Doras.

I also brush-painted beige and dull red spots on the main undercarriage doors representing patches of putty and primer.

Click the thumbnails below to view larger images:

The natural metal rear section of the wing was first painted with Tamiya Airframe Silver from a spray can, decanted into a jar.

Testor Metalizer was used to add variety in panel shades.

The airframe was pre-shaded with thinly applied flat black.

Camouflage colours were applied to permit a hint of the pre-shading to show through.

Ready for decals!


Decals and Finishing Touches

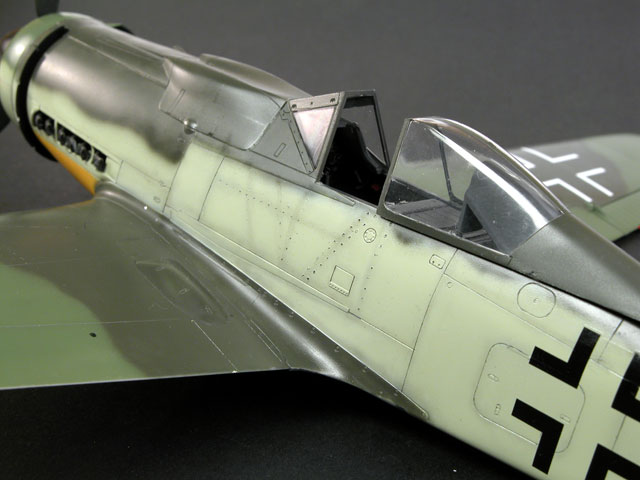
With the large expanse of pale paint on the fuselage side, I decided to subtly highlight the panel lines with a very thin wash of Lamp Black and Raw Umber oil paint.

Decals for Brown 18 were sourced from EagleCals' brand new sheet number EC#58. A detailed review of these decals may be seen elsewhere on HyperScale.

The decals behaved perfectly on application.

Click the thumbnails below to view larger images:

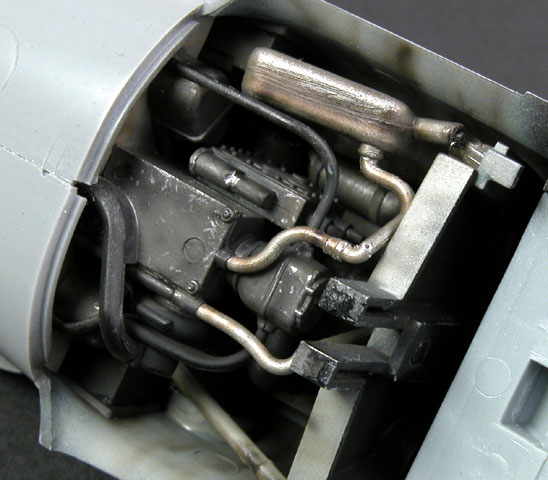
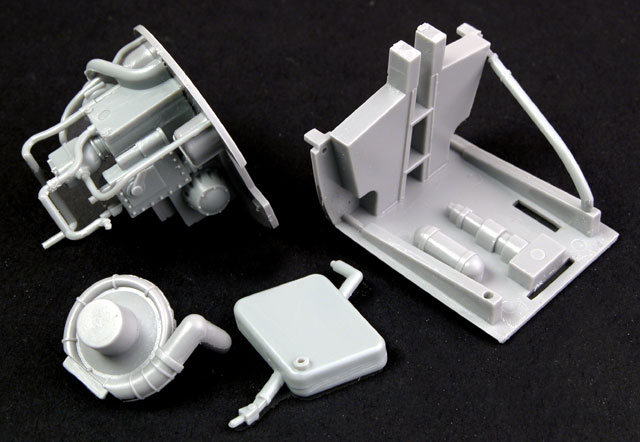
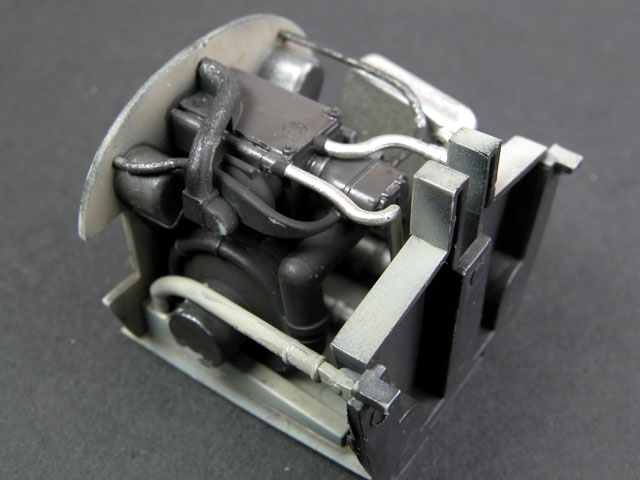
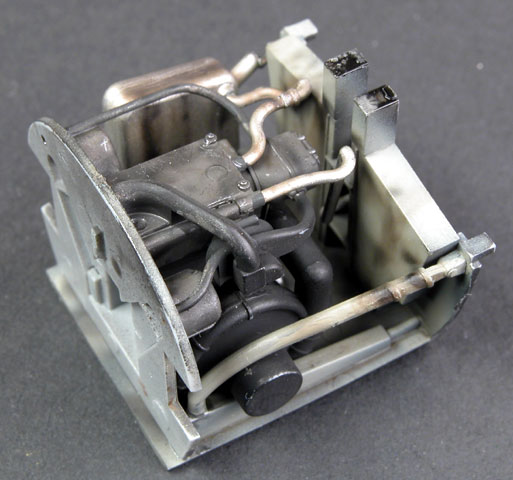
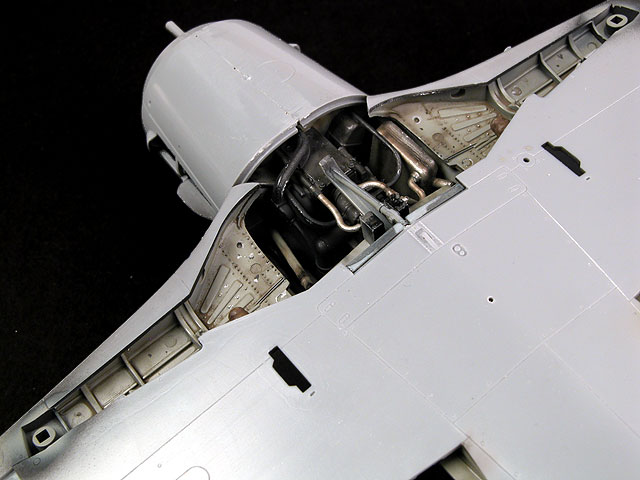
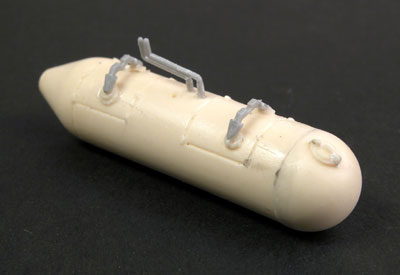
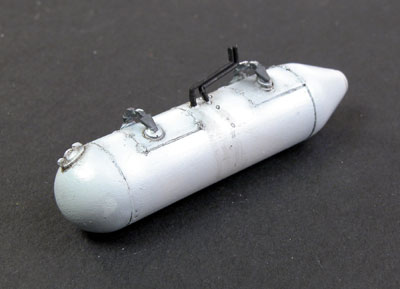
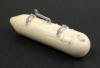
The resin cigar fuel tank from Jerry Rutman. The resin sway-brace mounts were sliced off the front position and relocated to suit the kit parts.

The kit fittings only needed a little work to adapt to the Rutman drop tank.

Panel lines were slightly highlighted before decals were added.


After the decals had thoroughly dried, I sprayed a sealing coat of Polly Scale Flat. There was still some work to be done though.

The reference photo shows a dark exhaust streak on the forward part of the aircraft. I mixed some Flat Black, Red Brown and a spot of Flat Base with approximately 80% thinner. This thin mix was first applied in tiny vertical streaks on the fuselage sides, then along panel lines that were destined to lie under the stain, and finally built up gradually for the entire length of the dirty streak.

Scuffing and chipping of paint along the wing roots was achieved with a silver artist's pencil. It is important to keep the pencil sharp for the whole job. I re-sharpened the pencil several times before I was finished.


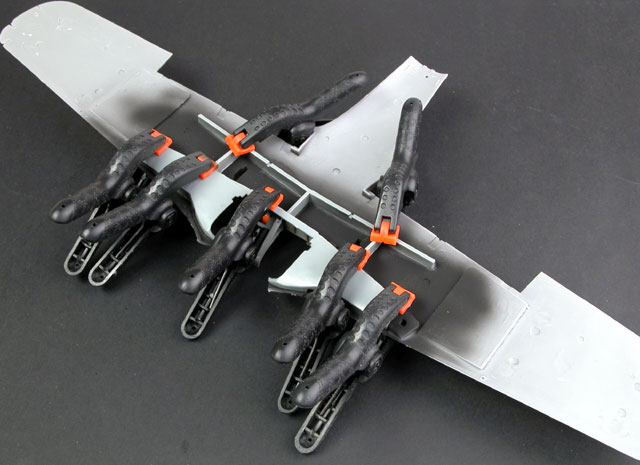
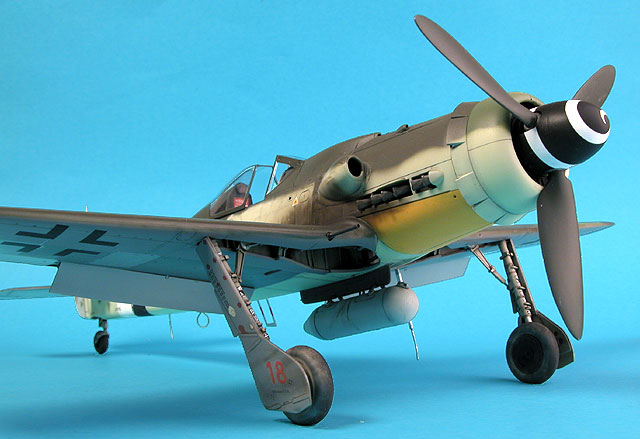
The characteristic toe-in and forward angle of Fw 190 undercarriage legs has been a problem for model companies until now.

On my kit, the undercarriage legs were such a tight fit that I could not dry fit them in the locating holes without risking damage. Fortunately, a thin application of glue was enough to lubricate the plastic and they almost clicked into place for a magnificent fit and perfect alignment.

By the way, I accidentally sliced off the locating pins for the retraction struts on both main undercarriage legs when removing them from the sprues. This is an easy mistake to make, but also an easy one to fix. I drilled a shallow hole in the appropriate position on each leg and superglued a short pin of brass rod as a replacement.

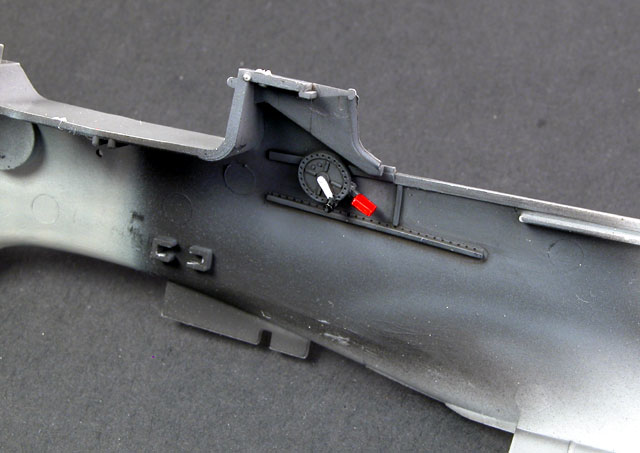
Small detail parts such as the striped Morane mast and footstep were painted and glued to the model.


Focke-Wulf 190 aircraft equipped with the standard (flat) hood had a pulley system inside the canopy that kept the antenna wire taut whether the sliding section was open or closed. The blown hood did not have this mechanism. The wire simply hooked onto the top of the canopy and slackened off when the hood was open.

I usually use invisible mending thread for antenna wire, but I have not had much luck getting this material to look convincingly slack. I therefore stretched a length of dark green sprue using a candle. The stretched sprue can be positioned to a certain extent. A long section of stretched sprue was strung between the fin antenna post and the top of the canopy. A short piece was curled at one end to depict the slack lead-in wire on top of the fuselage entry point.

The Dora was finished, and in fairly quick time. I estimate that construction took around 12 hours, with painting and detailing another 15 hours or so.


Conclusion


Since its release in late 2001, I have seen far more photos and articles of Hasegawa 1/32 scale Bf 109G-6 submitted to HyperScale than any other single model – and with good reason. That kit is quite accurate, pleasant and fast to build, offers a staggering range of finishing options, is an impressive size without making big demands on display space, is not burdened with esoteric gimmicks and the price is affordable.

Hasegawa’s new 1/32 scale Focke-Wulf 190D-9 continues this sensible philosophy with all the same qualities as the earlier Gustav.

The Dora is slightly more demanding than the Bf 109 with respect to the wing/fuselage join, but it is still well within the scope of most modellers.


I think that Hasegawa’s 1/32 scale Focke-Wulf Fw 190D-9 is a terrific kit that deserves great sales success. It will look good built straight from the box, but also represents an excellent platform for superdetailers to weave their magic.

Tamiya, Revell and Trumpeter are doing a good job with large scale jets. We can only hope that Hasegawa continues to cover more 1/32 scale WWII subjects. Who wants to see a state-of-the art Mustang, Fw 190A/F/G, a late mark Spitfire or a Hurricane in this scale?

Who wouldn’t!


Acknowledgements


This project was a much more enjoyable experience thanks to the assistance of:

  • Jerry Crandall from Eagle Editions for the commentary on his construction; assistance with reference questions on the subject aircraft and the provision of decals.

  • Jerry Rutman of J. Rutman Productions for the provision of the resin "cigar" fuel tank last year in the "Focke-Wulf Fw 190D-9 Late Style Conversion" (for the old Hasegawa Dora)

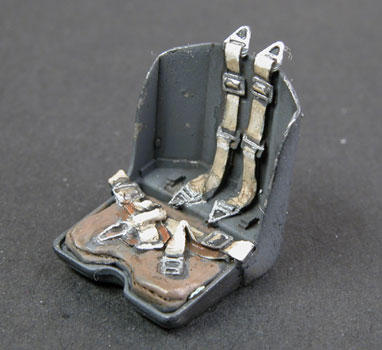
  • Meteor Productions for the review sample Fw 190A-8 cockpit way back in 2000 - I knew that I would use it eventually!


Additional Images


Click the thumbnails below to view larger images:


Model, Images and Text Copyright © 2003 by Brett Green
Page Created 26 April, 2003
Last Updated 17 March, 2004

Back to HyperScale Main Page