|
Focke-Wulf Fw 190D-9
by Jeffery S. Harrison
|
|
|
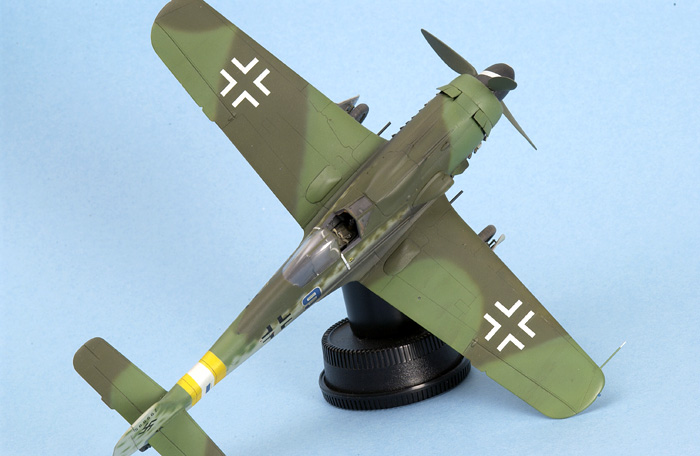
Focke-Wulf Fw 190D-9 |

HyperScale is proudly supported by
Squadron.com
"Sherman, is the wayback machine ready?"
"Sure thing Mr. Peabody. Where are we going today?"
"We're going into the deepest, darkest recesses of antiquity. Set the
wayback machine for November 1992 - we're going to Philadelphia."
November, 1992. I still live in civilization, still build satellites for
a living, George Bush is about to lose his bid for re-election, Eagle
Editions is 6 years away from releasing their first decal sheet, I won't
own a computer for another a year, sites like Hyper Scale are unheard
of, THE reference for painting Luftwaffe aircraft is The
Official Monogram Painting Guide to German Aircraft 1935--1945 and I
still actually complete models.
 At
this time I was working on a Trimaster FW 190A-8 for a club contest and
was less than thrilled with the progress I was making. I wasn't really
into the notion of repairing whatever it was that was wrong (probably
the nose) so I decided that I'd start a new project instead. I had a
little under three weeks to the contest and chose the Trimaster FW
190D-9 as the replacement. At
this time I was working on a Trimaster FW 190A-8 for a club contest and
was less than thrilled with the progress I was making. I wasn't really
into the notion of repairing whatever it was that was wrong (probably
the nose) so I decided that I'd start a new project instead. I had a
little under three weeks to the contest and chose the Trimaster FW
190D-9 as the replacement.
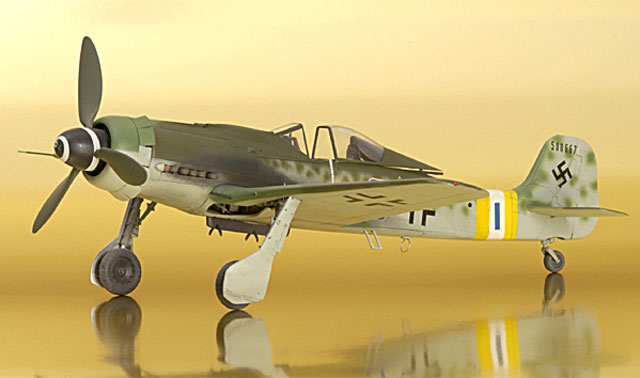
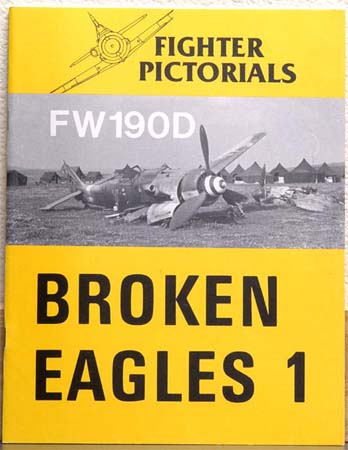
At some point I had been looking through the Broken Eagles 1 book,
written by Carl Hildebrandt and published by Fighter Pictorials, and had
come across a photograph of what appeared to be Ta 152 tail section with
a GI standing on the right horizontal stabilizer. The author identified
the tail as belonging to a FW 190D-9 and claimed that the RVD band was
yellow-white-yellow even though the color appeared darker (he claimed
the dark bands were a result of using orthochromatic film). This became
the basis for my project.
Knowing what I wanted to do the next step was to figure out how to
accomplish it. I turned again to Trimaster. A year or so before I had
built the Trimaster FW 190D-12 (kit #MA-2) by 'accident'. Really, it was
an accident. I had been playing around with the kit seeing how
everything fit and before too long I had most of the major parts of the
airframe complete. At which point I decided to finish it and did so.
There were no fit problems at all and this is what led to my choice of
the D-9 kit for the contest. Trimaster also had model of a FW 190D-12
Torpedoflugzeug which happens to have the enlarged tail section of the
Ta 152. I knew I could switch the fuselage halves of this kit with those
of the 190D-9 for the project I had in mind.
With my project decided, a game plan in place and the deadline fast
approaching it was time for me to get started.

Monday, November 9th, 19:00 local
Work begins. Over the next 3.5 hours I assembled the fuselage,
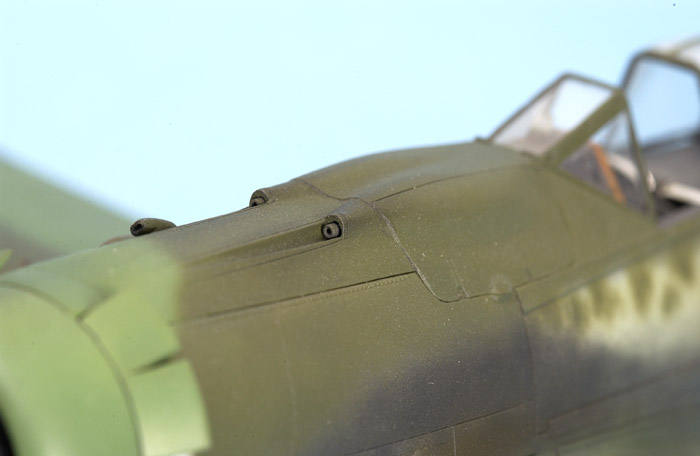
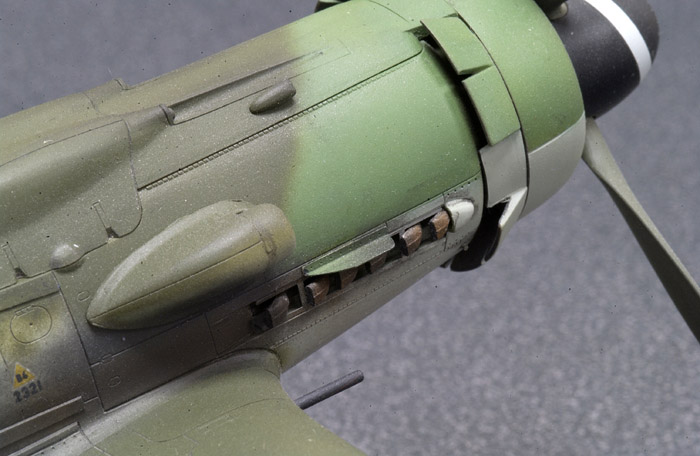
painted and installed the gun cowl, inserted the cockpit and began
working on the wheel wells. I was helped by the fact that the cockpit
had already been completed when I started this project. It is the
Verlinden cockpit for the FW 190A-8 and had originally been intended for
the project I had been working on prior to this one. Yes, that is the
wrong cockpit but it was available and the differences are small enough
that nobody would call me on it. Aside from the new cockpit and the wing
tip navigation lights the rest of the project was done using the parts
found in the kit.
Tuesday, November 10th, 16:30 local
Day 2 finds me working on the wings. By the end of day 2 I had built
and attached the wings, cleaned up all the seams, re-scribed any panel
lines that had been damaged and painted the bottom color. With two days
of work completed I've managed to put in 7 hours plus an estimated 3
spent earlier on the cockpit.
Wednesday, November 11th, 17:45 local
Day 3 was largely spent on painting the camouflage and cleaning some
seams. The first hour saw the photo-etched reinforcing plates (?)
attached to the wing roots and some minor seams were touched up. Hour
two saw the horizontal stabilizers get cleaned up, the bottom got a
little touch up and most of the RLM 81 upper camouflage color was
applied. The last Hour had the gun sight painted and installed, some
detail painting was completed in the cockpit, the canopy was tacked on
and the bulk of the RLM 83 camouflage was applied. Not too bad -- three
days into the project, approximately 13 hours of work and I have a
mostly complete airframe with the bulk of the camouflage applied.
I'd like to make a brief comment at this point. The color designations
I'm using in this article are what were 'correct' at the time of the
build. At the time RLM 83 was the lighter of the colors 82, and 83 while
the greenish bottom color was tentatively identified as RLM 84 though
nobody had found proof of that yet.
Thursday, November 12th, 17:45 local
Day 4 and I've permanently attached the canopy, attached the
horizontal stabilizers, assembled/painted the cowl and then did some
touch up of the camouflage.
Friday, November 13th, 16:15 local
Day 5 was pretty light, guess I needed a break. I only worked for
1.25 hours and spent that time cleaning up the camouflage.
Saturday, November 14th, 08:45 local
Day 6 started bright and early. I was actually working on the model
by 8:45 in the morning (those who know me can tell you that this is
practically bedtime for me most of the time -- I'm definitely what you'd
call a night owl). The first part of the day (8:45-10:30) was spent
attaching the cowl, doing some final touch up of the camouflage and
painting the RVD bands. Later on (3:15-4:30) I touched up the RVD bands,
gloss coated the model and started decaling. I finished up with one
final session (5:30-6:00) where I added some more decals.
 Sunday,
November 15th, 20:15 local Sunday,
November 15th, 20:15 local
Day 7 saw the decaling finished. I then chased any silvering and
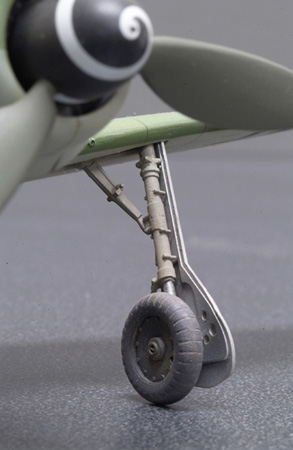
started working on the landing gear.
To summarize the events so far. I'm 7 days into the project with 5
remaining until our club meeting/contest. I have put about 17.75 hours
work into it (plus approximately 3 for the cockpit) and now have a
complete airframe that has been camouflaged and has most of its decals
in place. Things are looking good but I'm not done yet...
Monday, November 16th, 18:00 local
Day 8 dawned a blustery gray day that was threatening the region with
its first snowfall of the season...OK, I don't remember what the weather
was like, it was 10 years ago but it sounded good. Anyway the first part
of the night (6:00-8:00) was spent chasing the last of the silver,
prepping the landing gear for painting, painting the gear doors and
applying the final gloss coat over the decals. Later that night
(10:45-12:15) I highlighted the panel lines (a technique I've since
decided I don't care for) and then applied the flat coat.
Tuesday, November 17th, 21:00 local
Day 9 was used to paint the wheels and landing gear and then to paint
and install the exhaust stacks. After that I sprayed the exhaust stains
as a kick-off for the weathering process.
Wednesday, November 18th, 19:15 local
Day 10 and I'm into the slow stuff now. No more major changes during
a modeling session. Over the next 3 hours I built/attached the pitot
tube, landing gear, boarding step and IFF antenna. I also unmasked the
canopy, added the main gear doors and did any clean up to the
paint/weathering that was required. Things are definitely slowing down.
Thursday, November 19th, 15:00 local
Day 11 and I'm running out of time, the contest is tomorrow --
fortunately I'm also running out of things to do. This is my last big
push and I worked for a total of 6.5 hours in 3 different sessions.
In that time I attacked what seemed to be a never-ending list of
details. I attached and/or painted the bomb rack, morane mast, tail
wheel, flap indicators, tail light, prop, wing cannons, gear down
indicators, exhaust deflector, antennas, seat belts and finally I made
and attached the wing tip lights, applied the spiral decal to the
spinner and did some more weathering.
Friday, November 20th, 16:15 local
Day 12. It's the day of the contest and I'm doing the final touches.
I attached the shoulder harness, did a little more clean up and broke
off the radio antenna (never did manage to re-attach that).
Grand total for the project was 12 days and 36.75 hours. I even
managed to pull off a first place in the contest.
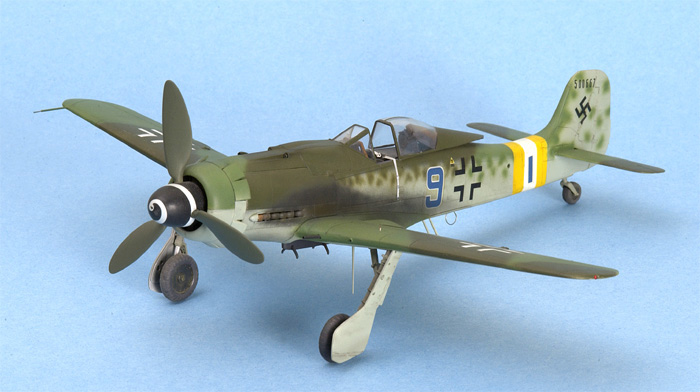
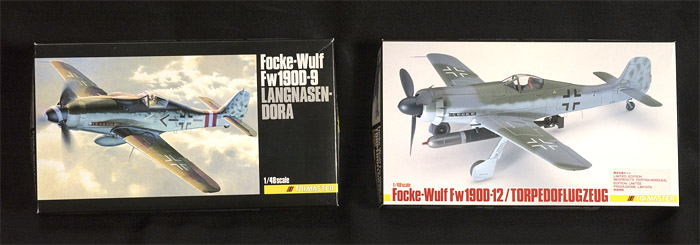
For this project I used two Trimaster kits. The FW190D-9
Langnasen-Dora (MA-1) and the FW190D-12 Torpedoflugzeug (MA-15).
Additionally I used a MSAP decal sheep for the Blue 9 and third group
bars in the RVD band. Decals for the serial number on the tail came from
a source I can't identify. As I mentioned earlier the cockpit came from
a Verlinden detail set for the FW190A-8.
Actual construction was simplicity itself. The
conversion consisted of swapping out the two fuselage halves from the
D-9 kit and replacing them with the fuselage halves from the D-12. The
only problems arose from using the Verlinden cockpit. The parts are
supposed to be a drop-in replacement and for the most part it is. The
problem is that the instrument panels sit too deep in the cockpit making
them almost invisible. Correcting this is a little more complex than it
would seem so I didn't fix it on this project due to time constraints. I
will be using this cockpit one more time to see what I can do with it
but will probably not use it again after that. For the most part it
isn't that much of an improvement over the kit pieces.
Construction techniques were pretty standard for me. Pieces were removed
from the sprue with diagonal cutters. Most part clean up was done with
the ever-popular Xacto #1 handle mounting a #11 blade. Plastic was glued
together using IPS Weld On 3 which I applied using an insulin syringe
(best glue gun ever made for plastic modeling) while PE, white metal and
resin were attached with CA (probably gap filling Zap). No putty was
used in construction. Seams were either filled with plastic ooze that
came out of the joints or possibly CA for the "really bad" seams (and
there were no really bad seams with this kit).
 The
only places during construction that require special mention are the
navigation lights on the wing tips and the photo-etched pieces. The
only places during construction that require special mention are the
navigation lights on the wing tips and the photo-etched pieces.
For reasons know only unto themselves Trimaster uses
stainless steel for the PE parts instead of the much more user-friendly
brass that most companies use. To remove these pieces without a] losing
them and b] destroying them I use a pair of needle-nose pliers and my
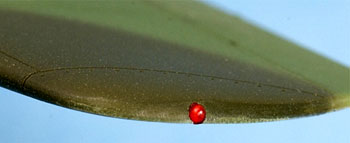
Dremel tool mounting a cutoff wheel. The navigation lights that came in
the kit were somewhat anemic so I chose to make my own. I did this using
styrene rod, super glue, accelerator and Tamiya clear paints (blue and
red). All you do is take an appropriately size piece of styrene rod and
touch on end of it to a puddle of supper glue. Pull it away, hit it with
accelerator and repeat until you have a clear ball about the right size.
Once you have the right sized "light" just dip it into the appropriate
color of clear paint and let it dry. Insert it into the wing tip and
you're done. Variations of this technique can be used to create
streamlined lights using airfoil shaped stock for the base and some
sandpaper for final shaping. Clear lights are created the same way but
dip them in Future or similar. You can also create colored lights in a
wing tip covered by clear Plexiglas (like on a Bf109) by building the
colored bulb as described here, mounting it into a cut out in the wing
tip then filling the cutout with super glue and filing/sanding to shape.
This model was painted using Floquil, Humbrol and Model Master
paints. The only water based paint used was the final flat coat which is
Polly S Flat Finish. I airbrush everything I can get away with resorting
to a paintbrush only when there is no way to make the airbrush work. All
camouflage colors were lightened with about 15% (my usual for 1/48th
scale) white for scale effect. For the main camouflage I used the
following colors;
-
Humbrol Matte 90 = bottom color
-
New Floquil RLM 83 = RLM "83"
-
New Floquil RLM 71 = RLM 81 (this is a
better match for 81 than it is for the 71 it claims to be)
-
Model Master FS34079 = RLM 71 propeller
blades
-
Floquil RLM 02 = RLM 02
I want to say I used Floquil Reefer Yellow for the RVD band but my
paint chips show that to be more orange than the yellow on the model and
I don't think scale effect can explain the difference. So I'll have to
leave that as a mystery lost to time. Reefer Yellow is a very good match
for RLM 04 though.
All camouflage painting was done using a Badger 150-IL double action
airbrush. Paint was thinned to a milk consistency using Xylene or Xylol
and I typically spray at a pressure of 12-13 PSI. Actual camouflage
painting was done freehand with the only masking being done for the
canopy, RVD bands and to protect the wheel wells. I mask mainly with
Scotch Magic Tape and that was what I used throughout this project.
Finally, weathering consisted of a black-wash to highlight the panel
lines, dark gray/scale black airbrushed for exhaust staining and a light
dry brushing to dirty it up a bit. I purposely kept the weathering light
as this plane would not have been operational very long before the war
ended.
 I
submitted this article for two reasons. First, this model had originally
been seen here as part of a mini-gallery that no longer exists. Second,
I recently got a new toy for use in my studio and this was as good a way
to play with it as any. I
submitted this article for two reasons. First, this model had originally
been seen here as part of a mini-gallery that no longer exists. Second,
I recently got a new toy for use in my studio and this was as good a way
to play with it as any.
The new toy in question is a Nikon D1x digital SLR. This is my first
digital camera and I went this route primarily so that I would be able
to use my existing lenses with it. It is way overkill for this purpose
but in photography more is always better.
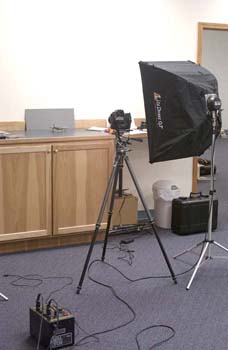
Anyway, I'm including a picture to show the basic setup I used for these
pictures. The only thing changed between this picture and the actual
setup was that I chose to use gold poster board for the opening shot and
light blue most of the rest of them.
The shots without blue or gold in them were shot with the set up in
the picture.
To the right of the camera you can see the main light source which is
one of my flash heads mounted in a 24" x 30" soft box.
Just outside of the frame to the left is another flash head aimed at
the ceiling as fill light. All exposures were taken using a Nikkor 105mm
F2.8 Micro lens set to between F:16 and F:22.
Click on the thumbnails
below to view larger images:
Model, Images and Text Copyright © 2003 by
Jeffery S. Harrison
Page Created 16 January, 2003
Last Updated 17 March, 2004
Back to HyperScale
Main Page
|
 Home |
What's New |
Features |
Gallery |
Reviews |
Reference |
Forum |
Search
Home |
What's New |
Features |
Gallery |
Reviews |
Reference |
Forum |
Search