|
Grumman
F3F Gulfhawk
by Gil
Hodges
|
 |
|
Grumman Gulfhawk |

HyperScale is proudly supported by
Squadron.com
Are you looking for something a little more
colorful to put on the shelf? There's nothing quite like a show plane to
fill the bill!
Test pilot (and stunt pilot) Al Williams flew "Gulfhawks"
of various kinds from the 1930's through the late 1940s. He did so to
demonstrate both the aircraft capability and the qualities of Gulf Oil's
aviation products. He began with a modified Curtiss biplane, and then
moved into Grumman products. He flew a 2 seat modified FF-1, the
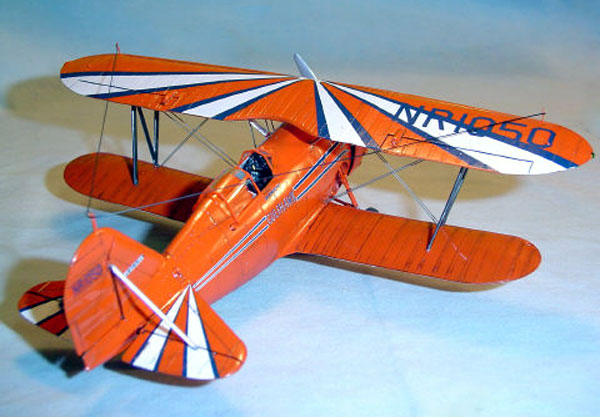
modified F3F of this article, and ended up in an F8F Bearcat. This model
is Accurate Miniatures mixed media kit of his most familiar mount from
the late 1930's, the F3F Gulfhawk. This is one of my dad's favorite
airplanes, so I decided to build it and give it to him for his birthday.
Accurate
Miniatures 1/48 F3F Gulfhawk
|
Accurate Miniatures is known for fine detail and
their commitment to accuracy in scale. This kit is a limited edition
version of their F3F series. It includes resin components to modify the
wings, cowling, upper fuselage, tires, and tail cone. It also includes
photo-etched flying wires and assorted details. The instructions are
much more extensive than what's normally included in other
manufacturer's kits. This is a big help to newer builders. In this kit,
there is an extra set of instructions that shows where to deviate from
the normal kit instructions, and how to do the conversion work.
The decals for the Gulfhawk are sharply printed and
in register. There is a separate placement guide for them.
Construction
Assembly begins in the cockpit. There are no big
surprises here. Everything fits well. I would mention that you can skip
painting the O2 bottle molded beside the seat. It's practically
invisible once everything's in place. Another noteworthy item is the
clear instrument panel and it's decal. This worked out very well. I
simply put a drop of Micro Krystal Clear over each instrument position,
sprayed the panel black, popped off the dried Krystal Clear with the tip
of a #11 blade, and applied the decal to the rear of the panel. It came
out with amazing depth and clarity. More manufacturers should try this!
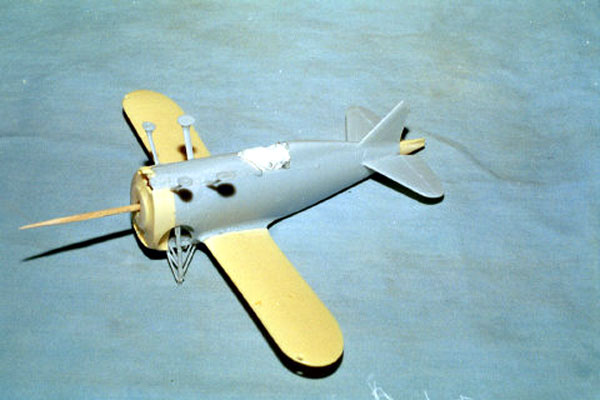
The basic fuselage assembly was straight forward,
following the recommended sequences. The next step was minor surgery to
remove the kit tail and put the resin tail cone in it's place. Also, the
resin forward fuselage sections were substituted. I then ran into the
one trouble spot in my kit. The resin upper fuselage decking that fits
between the cabanes was a bit short shot in my kit. To get around this,
I modified the normal F3F kit upper decking by filling in the gun
troughs and grinding off the gun bulges. This worked well, but it did
create one more problem. If you use the kit upper decking, be aware that
the Gulfhawk windscreen will not mate to it without filling a large area
just ahead of the windscreen. I found this out very late in the game and
had to use white glue to fill the gap.
The landing gear on the F3F Barrel is complicated.
The AM kit does a good job of reproducing this while keeping the
assembly somewhat simple. The one thing that is trouble is the main gear
door/fuel tank sides. The instructions say they'll fit. I found it took
quite a bit of fiddling, modifying, and "blue" language to get them on!
Still, the finished assembly looks authentic.
The engine is nicely detailed and goes together
without any hitches. A photoetched wiring harness is included if you're
so inclined. There is a small modification to be made. Two pushrods and
the carburetor intake have to be removed and replaced with two simple
pushrods. The instructions show how to do this clearly.
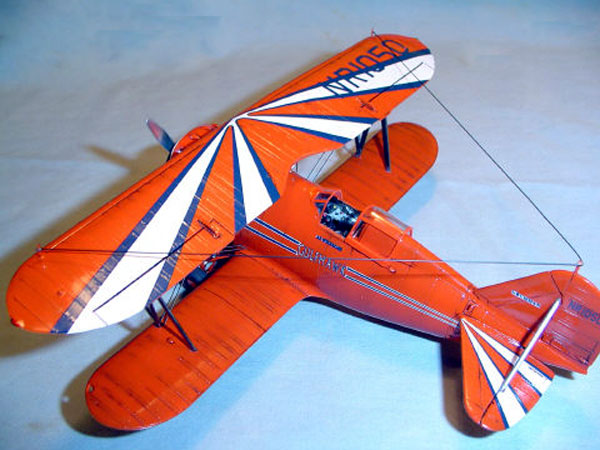
The assembly of the wings is the place where I
decided to deviate from the instructions. AM would have you attach the
top wing and then attach the bottom wings. This should work, at least in
theory, since the cabanes are molded as part of the fuselage. However,
when I test fit the upper wing, it was both skewed in the upper view and
not level from side to side. Therefor, I resorted to the time tested
method of attaching the bottom wings first, aligning them with the
stabilizers. That then allowed me to gently "bend" the cabanes to get
the upper wing aligned. The rest of the wing assembly was a breeze. I
especially like the positive attachment features molded into the N
struts. As is typical with biplane construction, the upper wing was left
off until all of the painting and decalling was done.
The model was painted using Model Master gloss
orange, thinned with lacquer thinner. It was then given 2 light coats of
Future floor wax to prepare the model for decals. The decals went on
well with the exception of the two for the cowling. Those did not even
come close to fitting! This was not a matter of compound curves. It
simply appeared that they were made to fit a smaller diameter cowl. I
resorted to masking and painting the scalloping on the cowling. I then
applied a thin black wash (I'd skip this if I had it to do over again).
Everything was sealed with another application of Future.
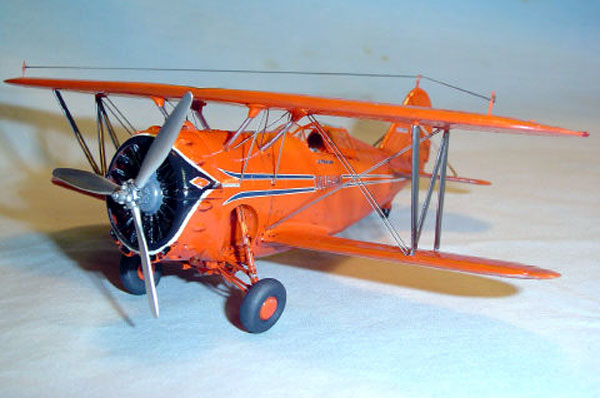
All of the details and the upper wing were now
added to the model. The prop was painted Model Master Buffing Aluminum.
The kit photoetched flying wires were glued into position. These fit
well, with the exception of one (of course). A little snip to shorten it
solved that problem. The engine, cowling, canopy, tail braces, and
tires, finished up the assembly sequence. The wing lights were painted
and a stretched sprue antenna finished things off.
The result is the 4th "Gulfhawk" model for my dad's
collection. He now has the 1/48 F3F Gulfhawk to compliment his Monogram
1/32 version. He also has the Curtiss "Gulfhawk 1" (scratch/conversion)
and the F8F Bearcat "Gulfhawk 4" in 1/48. Now, where did I put that
Glencoe Grumman Duck that I can convert to the FF-1?
Click on the thumbnails
below to view larger images:
Model, Images and Text Copyright ©
2003 by Gil Hodges
Page Created 24 August, 2003
Last Updated
17 March, 2004
Back to
HyperScale Main Page |
 Home |
What's New |
Features |
Gallery |
Reviews |
Reference |
Forum |
Search
Home |
What's New |
Features |
Gallery |
Reviews |
Reference |
Forum |
Search