|
BAe Hawk T.Mk.1A
“Red Arrows” from
Premiere 1/48 Kit
by Michael Johnson
|
 |
|
BAe Hawk T-1A “Red
Arrows” |

HyperScale is proudly sponsored by
Squadron
The British Aerospace Hawk
has been in RAF service for more than 20 years. During its first 10 years,
the Hawk has been used as the RAF’s advanced trainer, taught pilots
tactics and weapons skills, became a fighter and thrilled millions as the
mount of the Red Arrows aerobatic team.
Today the Hawk is still in
production at Warton – but as a very different aircraft to that conceived
over a quarter of a century ago. The sound performance, structural
integrity and handling characteristics of today’s Hawk have their roots in
a RAF requirement of the late 1960’s.
By the late 1960’s, the RAF’s basic trainer, the Folland Gnat and the
advanced trainer, the Hawker Hunter needed to be replaced. In 1970 a new
Air Staff Requirement (ASR) 397 was issued, outlining the requirements for
a new trainer.
At the onset, it was realised that the new trainer needed to be
exportable, which required it to be ground attack capable. The contenders
were the Franco German Alpha Jet, the Hawker Siddeley HS 1182 and the BAC
P.59. By March 1972, the contract for 176 aircraft for the RAF was awarded
to the HS 1182, the name Hawk was chosen in August 1973. By the early
1980’s the Hawk was the principal trainer of the RAF and the mount of
choice for the world renowned Red Arrows.
The Hawk was designed from the onset to have 5 hard points, allowing a
flexible weapons load to be carried. Weapons training and airfield defence
roles began in 1977 and 1983 respectively with Hawks carrying 30mm
centreline Aden guns, rocket pods and bombs for ground attack training. In
early 1983 89 Hawks were converted to be adaptable with the AIM-9L
Sidewinder AA missile. After this conversion, aircraft were designated
Hawk T.1A.

The Hawks first export success was in 1977, when Finland purchased 50
Mk.51 export versions from Hawker Siddeley (later BAe and now BAe
Systems). Export success grew, with Air Forces around the world purchasing
the Mk50/60 series.
The Hawk100 and single seat 200 series aircraft are now in production,
with the US Navy now flying a highly modified carrier capable variant, the
T-45 Goshawk. Australia and Canada have also recently commenced using
Mk100 Hawks for trainer operations.
The success of the Hawk continues unabated, with many more countries
expressing interest in a versatile aircraft seen as the optimum solution
to meet a number of firm requirements.
I get pretty keen on many
aircraft, but the one plane apart from a Spitfire that really captures my
attention is the BAe Hawk. My attraction to the Hawk began when I was a
raw modeller of 14, at that time I had three of the Matchbox 1:72 Hawks in
various stages of construction and I still have one of them, a Red Arrows
version, with me today. See Tim Beales
Matchbox Red Arrows Hawk for a snapshot of my modelling skills
in 1980! These were all purchased for the princely sum of $2.50 from my
local newsagent, which was a major “dealer” supplying me with a continuous
flow of kits to feed my addiction.
In those halcyon days, only Matchbox and Airfix produced a model of the
Hawk. Matchbox in particular produced a Hawk T-1 Red Arrows, RAF airfield
defence, Mk50 Finnish variant as well as the single seat prototype Hawk
200. Fujimi produced a selection of Hawk T.1’s as well.
However the most prolific of Hawk kit producers has been Italeri. They
have released a Hawk T-1A, Hawk 100 and a T-45 Goshawk (USN carrier
capable variant). The recent Revell kit is an Italeri re-issue with new
Red Arrow decals. For RAAF modellers, the Hawk 100 needs considerable work
to represent a RAAF Hawk 127 LIF.
Late last year Max Shaw from JB Wholesalers informed me that High Planes
were producing the RAAF Hawk 127 LIF version in 1:48 and added that Airfix
had a Hawk 100 on the way as well. To completely knock me over, he further
added that Italeri were “upsizing” and producing a new Hawk T.1A, which
may well be a cross-kit boxing of the Airfix T.1A release.
The High Planes multimedia kit retails at a hefty AUD$70 and is difficult
to build, while the Airfix and Italeri kits should come in at around
$35-50. I have ordered both the Airfix and Italeri kits to date. There is
no doubt in my mind that now these kits have been released, a multitude of
new aftermarket decal sheets and update sets will hit the market. There is
also some strong rumours around that High Planes will release their
resin/white metal/etched components as an aftermarket set to make the
Airfix Hawk 100 into a true RAAF Hawk 127 LIF version.
However the only current kit available in my preferred scale of 1:48 scale
currently is the very basic Premiere kits, which are very limited run,
looking like an up-scaled version of the old Matchbox kit, complete with
Matchbox’s trench like panel lines. I purchased 3 of the T.1A kits four
years ago at only $5 each. For those who would like one of these “gems” in
their collection, they can be picked up at club auctions or eBay for
around US$3-$7.
Premiere released two boxings of the Hawk. The T.1A trainer/airfield
defence fighter and the other was a T.1A Red Arrows release, with both
kits sharing the same moulds.
I could have waited until the new kits arrived but I enjoy a challenge and
it is very gratifying to say
“That’s the Premiere kit!”
At recent club build nights Max would walk by and make a comment…
“You still building that! Why don’t you wait until the new kits come out?”
I have been working on this kit for the last 6 months (construction
actually started back in 1999). I will provide a snapshot of my
experiences in this article.
Premiere's
1/48 scale Hawk T.Mk.1
|
 The
box of Premiere's 1/48 scale kit is a typical top-opening type, with two
red plastic sprues, one clear and a decal sheet of dubious quality
depicting Red Arrows Hawks, plus the instruction sheet. On the whole,
parts are clean with minor amounts of flash, but with deeply defined
engraved panel lines (a la Matchbox). Underwing ordinance provided in the
kit includes the Red Arrows centreline smoke pod, two AIM-9 sidewinders
with the accompanying hard point attachments and a centreline Aden 30mm
cannon pod. The
box of Premiere's 1/48 scale kit is a typical top-opening type, with two
red plastic sprues, one clear and a decal sheet of dubious quality
depicting Red Arrows Hawks, plus the instruction sheet. On the whole,
parts are clean with minor amounts of flash, but with deeply defined
engraved panel lines (a la Matchbox). Underwing ordinance provided in the
kit includes the Red Arrows centreline smoke pod, two AIM-9 sidewinders
with the accompanying hard point attachments and a centreline Aden 30mm
cannon pod.
It is clear upon studying the sprues that Premiere intended to release
different versions of the Hawk, perhaps the Hawk 200 or the demonstrator
version of the USN T-45 Goshawk as the fuselage is made up from 7 separate
parts (more on that later).
The clear plastic sprues are bagged separately thus protecting them from
scratches and the like. However after removing them from the bag, it was
to my disappointment to see the main canopy hood marred with surface
scuffs and scratches.
I elected not to use the kit decals as I intended to use an aftermarket
set by Mike Grant Decals. I had read elsewhere that the kit decals are
very fragile, certainly they were sharp and in register but suffered badly
from a lack of detail. Mike Grant’s sheet is for a later era Hawk, but
there is nothing readily available at this point in time for a 1:48
Hawk T.1A so I was going to use the aftermarket ones I could get!
I also sourced a long out of production etched brass set by Airwaves from
a kind soul on rec.models.scale. The fret contained improvements for the
airframe and the cockpit, such as wheel hubs, harnesses, replacement
instrument panels, side consoles, other bits for the seats and other
cockpit goodies. I ended up with getting two of these sets from the same
source for a paltry AUD$15, which pleased me no end!
Construction (as always)
started in the cockpit. Premiere provides a very basic cockpit interior of
which all parts were painted in appropriate colours. There are some nasty
ejector pin marks on the cockpit insides that need filling and careful
sanding to remove. Unfortunately this removed sidewall detail which proved
very difficult to replace. I am still not entirely happy with my efforts;
fortunately the areas are partially concealed by the ejector seats and
cockpit side consoles.
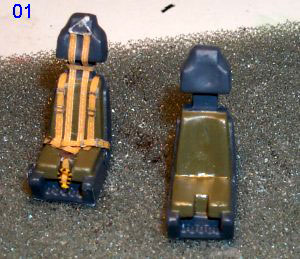
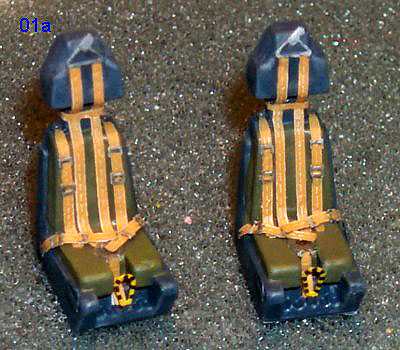 Filling
needed to remove an ejector pin mark on each of the early style winged MB
Mk10B ejector seats. Once this was done I painted the seats with
Aeromaster extra dark sea grey and cushions Humbrol Olive Drab. I then
attached all the etched brass harnesses, grab handles etc from the
airwaves set. Photo-01 and 1a show the difference between the kit seat and
the enhanced seat. I then dry brushed appropriate shades to lift detail
and impart some service wear and then set them aside to add to the cockpit
at the end of the project. Filling
needed to remove an ejector pin mark on each of the early style winged MB
Mk10B ejector seats. Once this was done I painted the seats with
Aeromaster extra dark sea grey and cushions Humbrol Olive Drab. I then
attached all the etched brass harnesses, grab handles etc from the
airwaves set. Photo-01 and 1a show the difference between the kit seat and
the enhanced seat. I then dry brushed appropriate shades to lift detail
and impart some service wear and then set them aside to add to the cockpit
at the end of the project.
The winged style ejector seats were replaced in 1986 by later MB Mk10
seats with the more rectangular shape drogue/parachute pack-headrest. I
fully intended to replace the seats but could not find any MB Mk10 seats
of the correct type here in Australia!
The etched brass side consoles were added with throttle controls and
painted flat black. Detail was picked out by a dry brushing with light
grey. Whilst that was drying I attached the etched brass instrument panels
and detail painted them. The brass instrument panels were bigger than the
plastic kit parts and subsequent dry fitting indicated that some trimming
of the brass was needed to allow correct placement of the cockpit tub
within the fuselage forward half.
Premiere provides no locating points for the cockpit tub which made
alignment very difficult, but this was achieved by perseverance and by
using scrap sprue supports to keep the tub square. I then added nose
weight forward of the cockpit and beneath the cockpit tub to prevent a
tail sitter.
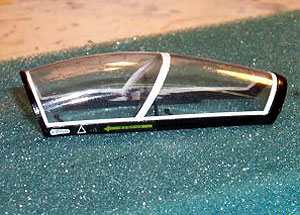
The forward fuselage halves were joined together and set aside to dry.
Once the assembly had dried and seams treated with filler, the
transparency representing the landing light at the tip of the fuselage was
added. This needed to be shaped with wet and dry so as to smooth it into
the fuselage. Some polishing with Novus plastic polish soon restored the
shine.
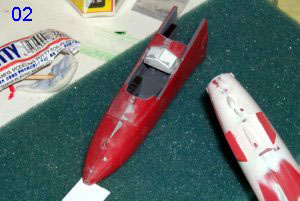
Attention was then turned to extending the instructors instrument panel
shroud behind the student seat. I used blue tack to position the internal
armour glass inside the canopy and noted where the glass sat over the
shroud area. Plasticard was then used to construct the extension, with
filler and sanding needed to blend everything together. Photo-02 shows the
completed addition.
 Setting
the forward fuselage aside, I started construction of the rear fuselage.
This comes in no less than 7 parts including the jet exhaust and tail. The
rear fuselage was assembled first with the jet exhaust pipe sandwiched
between. The middle fuselage assembly was then assembled and offered up to
the rear fuselage. Whoops! I had to grind away the rear of the pipe to
enable the rear section to fit into the middle fuselage assembly. Correct
alignment of the two rear fuselage assemblies was critical to avoid ending
up with a banana shape. I achieved this by using my steel rule and
constant checks to get everything straight and square. Setting
the forward fuselage aside, I started construction of the rear fuselage.
This comes in no less than 7 parts including the jet exhaust and tail. The
rear fuselage was assembled first with the jet exhaust pipe sandwiched
between. The middle fuselage assembly was then assembled and offered up to
the rear fuselage. Whoops! I had to grind away the rear of the pipe to
enable the rear section to fit into the middle fuselage assembly. Correct
alignment of the two rear fuselage assemblies was critical to avoid ending
up with a banana shape. I achieved this by using my steel rule and
constant checks to get everything straight and square.
The resultant fit is very poor and I spent a very long time filling and
sanding to achieve a smooth end result. I cannot remember spending this
much time filling and sanding any model, even the Airfix Rotodyne, but the
end result is certainly worth the work. I then added the tail and faired
it into the fuselage with filler and a nail polish remover laden cotton
bud (Q-tip). Acetone type nail polish remover is a fantastic way to fill
wing roots and tight areas and avoids the need to sand the filler smooth
with wet and dry. I re-scribed areas that were filled in by the filling
and sanding operations and sprayed the fuselage with some flat white to
check for any areas that needed additional work.
It was at this point, sitting back and admiring all my hard work that I
realised that the tail seemed too far forward. Further research indicated
a fillet running from the base of the rudder to the rear of the plane
varies in angle and that it varied even on the same version, especially
the Red Arrows mounts. The tail fillet on this Premiere kit sloped down
before the end of the fuselage, correcting it would not be unduly
difficult but I decided not to do so. Premiere also provides a tail plate
that is suitable for a Red Arrows Hawk but not the normal trainer version.
All that needed to be done at the rear was to scratch build a light, this
was done with some clear stretched sprue after painting was finished.
A quick dry fit ensured the completed forward half fitted well, so this
was added to the assembled rear fuselage. The jet intakes and splitter
plates were then added and once again fit was poor. One side fit flush but
required filler to remove the seam and smooth out the join, whilst the
other side needed shimming with scrap plasticard at the rear to avoid a
1mm step at the join. Filler was then used to fill up gaps and subsequent
sanding smoothed all fit issues away. The jet engine intake openings are
not correct, being smaller that the 1:1 Hawk, but I left this one alone as
well.
The wing wheel wells have no details and are not boxed in, leaving large
gaps which show the inside of the fuselage. To remove this unsightly pair
of holes, I used some plasticard to provide a roof for the wheel wells.
Some minor filling and sanding followed and the assembled wings were
offered up to the fuselage. The wings attached very well, with small
amounts of filler required, smoothed over with the nail polish remover
dipped cotton bud. The tail planes were added and adjusted once attached
to ensure that they sat at the correct “stance”. Being of the all moving
type, I did not need to use filler although the gap was a little wider
than I was happy with.
 At
this stage I added the wing fences and ventral strakes. The ventral
strakes situated at the rear of the fuselage, either side of the airbrake,
are butt joined to the fuselage. The resulting join is weak and needed
careful reinforcement to ensure that they stayed in place (They broke off
three times anyway). At
this stage I added the wing fences and ventral strakes. The ventral
strakes situated at the rear of the fuselage, either side of the airbrake,
are butt joined to the fuselage. The resulting join is weak and needed
careful reinforcement to ensure that they stayed in place (They broke off
three times anyway).
The Airwaves set contains etched brass replacement items for the ventral
and dorsal aerials and the wing fences. They seemed a bit too thin, so I
left them off in favour of the kit items. Also included in the Airwaves
set are the wing vortex generators, however they are far too large and I
elected to leave them off. I find the problem with adding etched aerials
to any kit is that the attachments are precarious at best, resulting in
the etched part snapping off and disappearing into the ever hungry maw of
the carpet monster.
Knowing full well that filler shrinks as it cures; I left the completed
fuselage aside for a week.
I decided to give my Hawk some “claws” in-keeping for the Hawk’s more
usual role of airfield defence and aggressor training. Premiere supply a
30mm Aden cannon pod, which although basic is accurate in outline and
shape. However the cannon barrel was poorly moulded and I decided to
replace it with some plastic tube of the appropriate diameter, cut to the
correct length. Flash vent holes were carefully drilled through the tube
using a hobby drill and the new barrel was then attached to the pod body.
The cannon barrel was painted flat black, washed with brown ink and dry
brushed with Citadel Boltgun Metal, while the pod itself was painted
Citadel Chaos Black. This paint, produced by Games Workshop and suitably
thinned, is superb for brush painting and I have had friends use it
through an airbrush with equally impressive results.
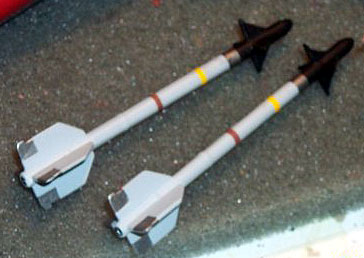 The
sidewinder rails were painted black as well, with the sidewinders cleaned
up, exhausts drilled out with a hobby drill and finally painted out in the
appropriate colours. Decal strip was used to represent the brown and
yellow bands on each missile. The
sidewinder rails were painted black as well, with the sidewinders cleaned
up, exhausts drilled out with a hobby drill and finally painted out in the
appropriate colours. Decal strip was used to represent the brown and
yellow bands on each missile.
To protect the lens array on AAM’s, ground crew place rubber covers over
the lenses, using flexible rubber or elastic straps looped over the
forward fins to hold the cover in place. To replicate this feature and to
avoid having to create lenses for the ‘winders on the Hawk, I used some
scrap plastic tube of the appropriate diameter, capping each end with a
film of PVA glue, built up over several layers. These were then painted
yellow, dirty wash applied and attached to each sidewinder head.
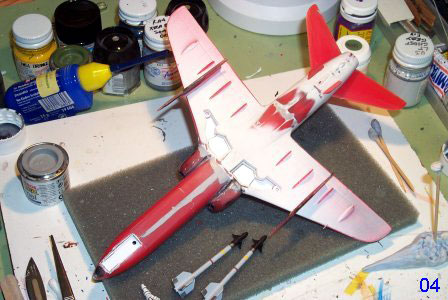
The fuselage, which had been left for a week allowing the filler to cure,
was examined for shrinkage and any suspect seams were re-treated to the
filler/sand/polish regime. I had to repeat this several times to ensure a
seamless finish. Photo-04 shows the extent of filler used to remove all
the seams and joins.
Whilst waiting for the fuselage to “cure”, I painted all the wheel wells,
undercarriage doors and undercarriage legs with Citadel Skull white
followed by future, once dry, a wash of Tamiya Smoke with a small amount
of dishwashing liquid added was applied to “dirty up” the white (see
photo-05, the main gear wheels have the etched hub from the Airwaves set
added). The dishwashing liquid serves two purposes, to improve flow of the
wash and to retard the drying time of the wash. After 10 minutes I wiped
away excess wash with a cotton bud, leaving the wash in all the recesses.
Aeromaster flat coat was then applied to flatten the shine and blend
everything together.
Turning my attention to the two part canopy, I polished the worst of the
scuffs out with Novus plastic polish and brushed a thin coat of Future
inside and out to try and improve clarity. This was pretty successful,
with most of the marks and scuffs disappearing under the polish and
Future. I set the canopy pieces aside for a week to allow the Future to
cure fully.
At this stage I added the remainder of the fuselage aerials and decided to
attach the nose pitot tube. The kit supplied pitot tube is accurate in
outline but needed considerable cleaning up before attaching it to the
nose of the Hawk. Concerned with the fact that it might break during
cleanup (which it did), I procured stainless steel tubing and wire of
appropriate length and diameter and scratch built a new pitot tube. This
was attached into a support sleeve constructed from a short length of
brass tube and plasticard with CA glue. The finished result looks most
convincing.
While the metal rod and tube was on the work bench, I scratch built the
retract struts for the main undercarriage legs. These items were not
present in the kit and adding them to the main gear legs is an important
but straight forward operation.
 Each
of the two canopy pieces were then masked using Tamiya masking tape. Each
of the two canopy pieces were then masked using Tamiya masking tape.
Framing on the canopy
pieces were well defined, making it fairly easy to mask. The forward
windshield was then attached with a careful application of liquid cement
and PVA glue run along the join to seal any gaps, excess glue was wiped
off with a moist finger and a step at the front was fixed with some more
filler.
I attached the side opening
main canopy to the cockpit sills with Humbrol Maskol so it could be
removed and repositioned after the painting and decaling had been
completed.
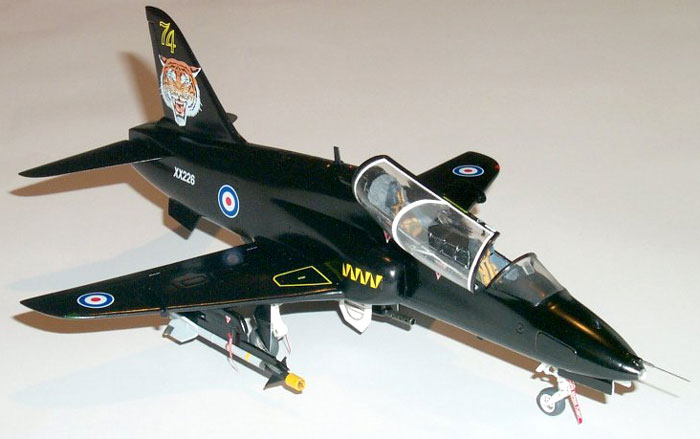
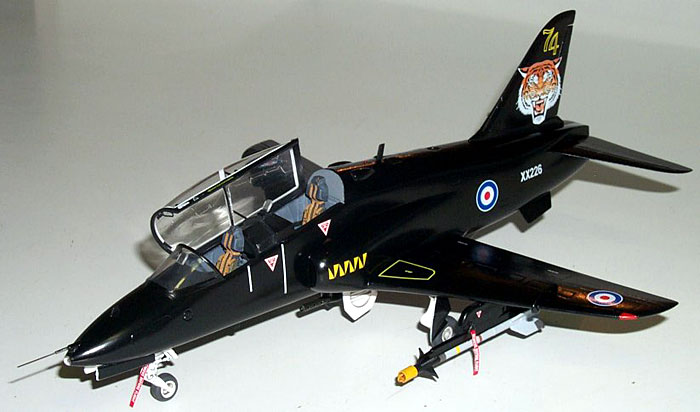
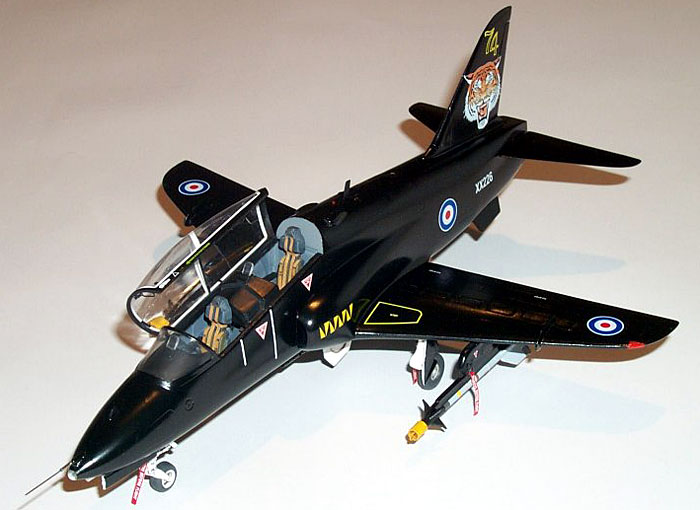
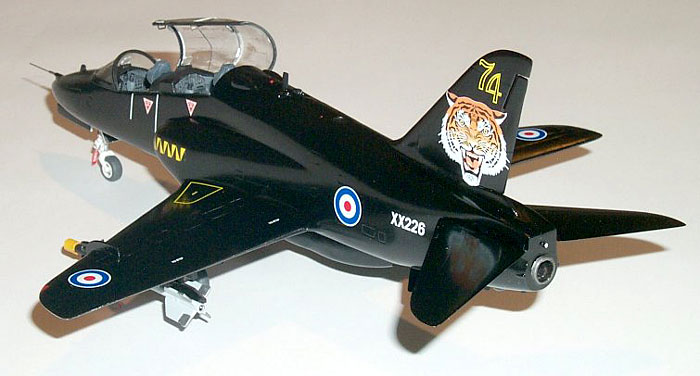
Decal options are provided
for the RAF Red Arrows Hawk aircraft, with enough serials to construct any
of the aircraft in the team. The decals are crisply printed and thin but
lacking in detail. However I had purchased an aftermarket sheet by Mike
Grant Decals so the kit decals went into the decal bank. Mike produces
superb decals using the Alps printer system. I purchased two sheets
(1:72/1:48) of a RAF 74 Squadron Hawk in full 1992 Tigermeet livery. 74
Squadron’s Hawks are black overall with the squadron badge on the tail
fin. The “re-dressing” of this Hawk for Tigermeet replaces the squadron
badge with a tigers head covering almost all of the tail.
I ordered the decals off the net last year using my credit card and within
a week had them in my eager hands. They looked as good in real life as
they did on the monitor, their only vice is that they required careful
handling. Mike was of great assistance at the time and I intend to check
out more of his other subject sheets. In anticipation of the impending
release of the new Airfix and Italeri Hawks Mike has re-released this
sheet in both 1:48 and 1:72.
Moist tissue was then used to stuff the pre-painted nose wheel well and
the kit supplied one piece “closed up” main gear doors. Using moistened
tissue paper is a great way to mask cockpits, wheel wells and the like.
The moist tissues can be shaped using a toothpick whilst in place and once
dry create an almost perfect mask. To remove the tissues after painting is
complete, just use an eyedropper to re-moisten and remove with a pair of
tweezers. Any over spray can be then corrected.
First step was to paint the white framing over the central section of the
canopy covering the internal glass shield, for this I used Citadel Skull
White. Once this had dried I masked the white frame area off and
airbrushed the entire airframe Tamiya Flat Black. It may have been me but
these new formula, smaller pots seem to need a lot more mixing than their
larger predecessors. At this stage I also sprayed the undercarriage doors
as well. I am not overly happy with Tamiya Flat Black at this point in
time as the paint seems overly fragile with a tendency to rub off at the
slightest touch. I cannot remember the older and larger pots having this
problem.
Once all the paint had cured, I applied several coats of Johnsons Future
with a wide flat brush, kept especially for this purpose, to seal
everything in and prepare the surface for the decals.
I went very carefully when applying the decals, which settled wonderfully
onto the model with no silvering at all, the only aid being the use of
Aeromaster Sol II decal solvent.
I pillaged the kit decal sheet and other sheets sourced from the decal
dungeon for RAF style warning labels and placards that were not provided
on the Mike Grant sheet.
After the decals had dried, the fuselage was washed very carefully with a
damp cloth to remove any glue residue and the decals where then sealed in
with yet another coat of Future.
Once again the model was put aside to cure and finally sprayed with
Pollyscale Satin Clear, to give an “in scale” gloss appearance.
The main canopy was
carefully detached from the fuselage and the residue Maskol was removed. I
then removed all canopy masking and added the pre-painted etched brass
rear vision mirrors, stretched sprue struts, canopy release levers and
grab handles to the inside of the main canopy. This tasked my patience to
the limit; thank the modelling gods for my new magnifying glasses!
The Tamiya masking tape had also marred the Future coated finish of the
canopy, so I used a micro-brush loaded with ammonia to “melt” the Future
and smooth out the marks. This worked really well with no sign of the tape
marks after the Future had re-cured.
Delving into my decal bank I emerged with a sheet of Scalemaster white
decal, which I cut into strips of the appropriate width and applied to the
cockpit canopy to represent the canopy seals. A much neater and quicker
way than masking and painting! A quick brush paint with the Pollyscale
Satin Clear sealed the white decal strips. Clear flat was also used to
simulate the internal framing.
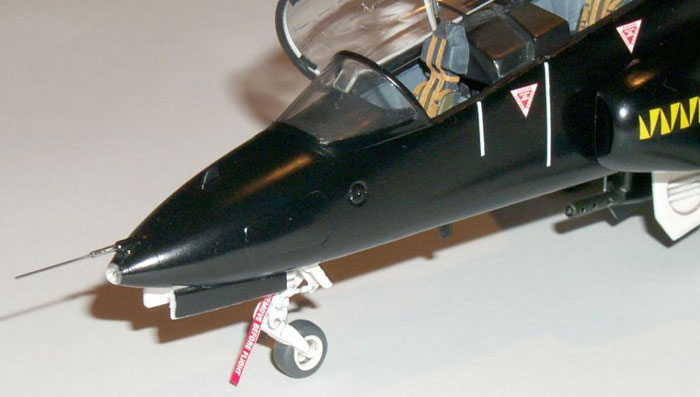
The undercarriage, undercarriage doors and underwing ordinance were then
attached without too many problems and my Hawk was completed. Finally, I
added some Remove-Before-Flight tags to add some more visual interest,
which I made after reading the excellent “how to” article from the
tools-n-tips section of the
Aircraft Resource Centre
web site. The NATO style RBF tags are provided on the Mike Grant decal
sheet.
The ejector seats completed some months earlier were added into the
cockpit and the canopy was attached in an open position. I then gave the
model a quick buff with a lint free cloth to remove my fingermarks from
the model surface and my Hawk was done!
I built this kit even
though a new much better kit was due for imminent release, simply because
I wanted to build it. It was at times frustrating, parts did not fit, were
mis-moulded and the detail is crude and in some places inaccurate. The use
of the Airwaves aftermarket set and Mike Grant decals went a very long way
to improve the end result. In the end, I had to draw the line somewhere
and elected not to correct certain aspects or re-build items.
Was it worth it? Yes it was, because building model kits is always about
fun, enjoyment and a having a well earned sense of satisfaction when
completing a hard to build kit. Some frustration is a side effect! To top
it all off I discovered or learnt new skills and techniques.
Hey, Max, I did it!
As I write this conclusion to my review, the rumour that Airfix had
released the Hawk T.1A in the UK for the princely sum of ₤10 was confirmed
by Max, however I believe that we will not see the arrival of this kit in
Australia until the end of the year.
I also read an in-box review of the kit on another web site which reveals
that the kit is not well detailed but still far superior to the Premiere
kit. It may well be that Airfix are moving down the middle road, providing
enough for the more “casual” builder and relying on the aftermarket
industry to provide for the modeller after more detail.
I reckon it is time to build a Tamigawa kit now and in another colour
other than black!
The Internet
Click the
thumbnails below to view larger images:
Model, Images and Text Copyright © 2003
by Michael Johnson
Page Created 01 October, 2003
Last Updated
17 March, 2004
Back to
HyperScale Main Page |
 Home |
What's New |
Features |
Gallery |
Reviews |
Reference |
Forum |
Search
Home |
What's New |
Features |
Gallery |
Reviews |
Reference |
Forum |
Search