|
USS Hornet CV-8
by Dan Hamilton
|
|
|
USS Hornet |

Trumpeter's
1/350 USS Hornet is available online from Squadron
Knowing from the beginning of World War II
that the surprise attack on American territory at Pearl Harbor required a
quick answer in kind, President Franklin Roosevelt consistently had been
pressuring the U.S. military to somehow strike back at the Japanese home
island. The plan finally settled upon was to strike the Japanese capital
and other cities with land based B-25 medium Army bombers from a aircraft
carrier. No one knew for sure if a B-25 with full crew, bomb load and a
mandatory extra fuel tank could actually get into the air from a crowded
carrier deck. It was a far fetched, near suicidal plan, but America
needed a victory fast.
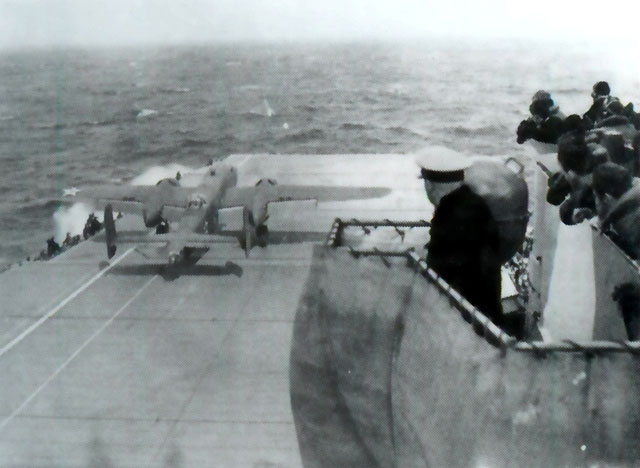
On April 18, 1942,
with waves crashing over the Hornet’s pitching deck in front of him, Lt.
Col. James (“Jimmy”) Doolittle started his B-25 lumbering slowly down
the crowded deck of the USS Hornet. Despite the pitching deck and the
strong wind, Doolittle expertly kept the front and left wheels on the
deck’s newly painted white lines to ensure his right wing would not
collide with the Hornet’s island and his left wheel would not slip
overboard. As the Hornet’s bow reached its lowest and started again its
upward pitch, Doolittle passed the ship’s island, lifted the nose of the
Mitchell and then the rest of the plane gently off the rising deck.
Thereafter 15 other B-25’s followed their leader and similarly launched
successfully from the Hornet. Admiral William (“Bull”) Halsey would
later write: “In my opinion, their flight was one of the most
courageous deeds in military history.”
Though the Doolittle
Raid was later claimed by Japanese propagandists to be the “Do-nothing”
raid because it resulted in relatively minor damage to the Japanese cities
bombed, it has gone down in history not only as a remarkable story of
courage and badly needed morale boost but as the motivating factor that
would lead to the turning point of the war in the Pacific -- the Battle of
Midway. It also, by the way, makes a great subject for modeling.
As someone who just
got back into modeling after a 20 year hiatus and had last built a 20th
Century warship back in the 20th Century when he was around 12,
my reaction when I opened the box was: “Boy is 1/350th a big
scale for an aircraft carrier (over 28” long)!” The shelf my wife has
granted [er, . . . tolerated] me to use for model display is now far too
small. On the other hand, boy is this scale small for all the airplanes
(my project has 16 B-25s [18 parts each!], and one each of a token F4f,
Devastator and Dauntless) and men (103) that I have chosen to build, paint
and put on! My fingers are too big, my vision too dull and my patience
too short! Welcome to modeling in the 21st Century! The kit
provides only enough aircraft parts to make two B-25s, two fighters, two
dive bombers/scouts and two torpedo bombers. Hence, because I wanted to
do the Doolittle raid, a supplemental kit containing a set of 10 extra
B-25 parts are not enough – I needed two sets -- which left me with many
more extra B-25’s than I needed to canabalize for all the microscopic
parts that disappeared when they slipped out of my fingers.
There were few decals
needed for the ship, though the ship’s name on the stern seems to have
been in the wrong color according to dry dock pictures in Warship
Pictorial # 9 at p. 45 (white instead of back). The decals for the planes
were good for the carrier based aircraft, but a major headache for
the B-25’s. This is because only some of the serial numbers reflected
those on the actual planes – while the majority were made up
numbers! You would expect a kit designer either to not care and make them
all up, or try to do everything authentically (like Accurate Miniatures
kits). But why did the Trumpeter designers put in the effort to be right
on some serial numbers (e.g., Doolittle’s, Ted Lawson’s) and simply
pretend about the others? No photo-etch parts are included in the kit and
in this scale they are needed. Hence I used a set from Tom’s Model Works
which were great and, though not as detailed as others that I lusted
after, they were far more reasonable in cost – especially as the total
costs of this massive project (for me anyway) added up.
For a novice at
massive ship models with massive detail and photo-etch, construction of
the ship itself was amazingly smooth. Far less filling and sanding than I
expected. The parts fit well and the pictures only instructions were
quite helpful. Being inexperienced with photo etch railing, Tom’s
instructions took some time to get used to but I finally figured it out
and they looked good after I got the hang of how to do it – however there
were no instructions telling me what to do with all that railing so I just
guessed from photos and did my best. (Like working on a car, its
bothersome when you have some parts left over!) Now for the complaints:
the designers again made some odd choices. Much internet comment was
given to the apparently inaccurate bow shape (to be honest, I could not
tell), but nowhere have I seen anyone complain about some real obvious
design errors. They range from relatively minor mistakes like the
mislocation of the deck crane (which, if not changed to where photos show
it should be, would in real life be an obstacle to flight operations!).
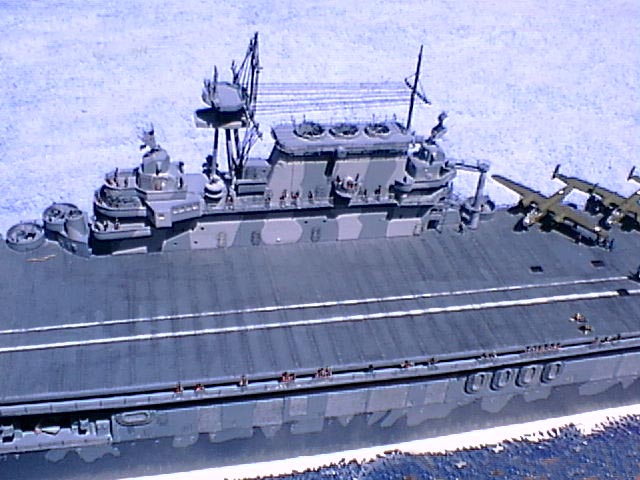
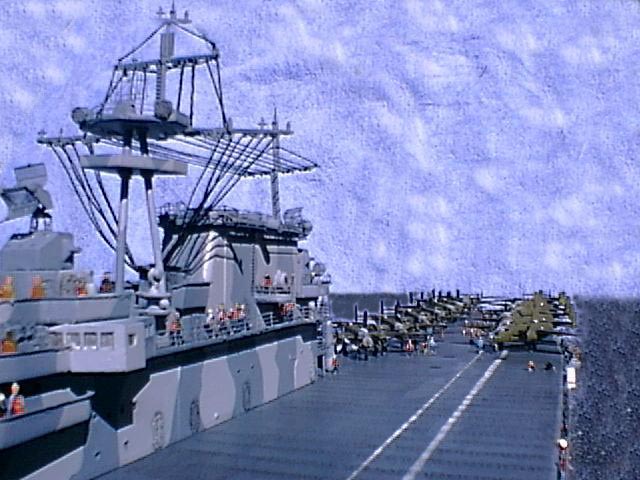
More obvious, the designers for some reason added a second yard arm to the
island’s aft mast – which every photo of the Hornet and
Yorktown
class ship shows only has one. This becomes obvious when trying to rig
the masts which, again, must be done from photo research in that NO
guidance is provided.
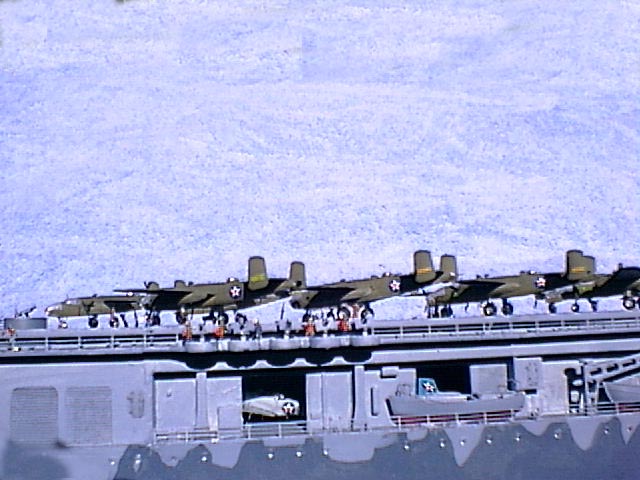
Besides the above
noted necessary changes for accuracy, I found a fortuitous mention in “The
Ship That Held The Line,” at p. 70, that a hanger deck door was open at
the time Doolittle took off. Because all the Hornet’s ship based planes
were in the hanger at the time, an open hanger deck door would allow me to
show off an example of each kind of the three types of Navy plane.
However, the only pictures and films taken of the ship during launch seem
to show the starboard side and that the roller doors were closed on that
side (understandable because of the storm they were in at the time).
Hence, I chose to open the roller doors on the port side only. A hot
exacto knife did the trick to cut away the molded in place doors. In that
the kit provided only two of each type of carrier plane and little of the
ship’s interior can be seen away from the doorways, things worked out
fine. The airplanes are amazingly accurate for their scale, but when you
have to build 16 of the same kind the joy evaporates over time and I had
to fight the urge just to slap the little suckers together! However,
patience, patience, patience and a purposeful decision to act in shifts
over time was my salvation. The same is true for the 1/350th
scale photo-etch sailors from Tom’s Model works. Another hundred or two
would have been great, but there are limits to my now Zen-like purposeful
patience! However, the extra ships railings that I did not know what to
with from Tom’s Model Works were perfect for use -- after being cut down
-- as double machine guns for B-25’s. A missing touch that I can’t
believe the after market folks seem to have so far overlooked.
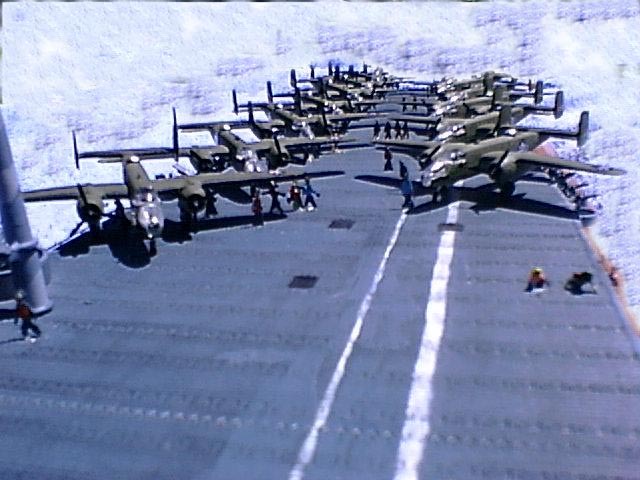
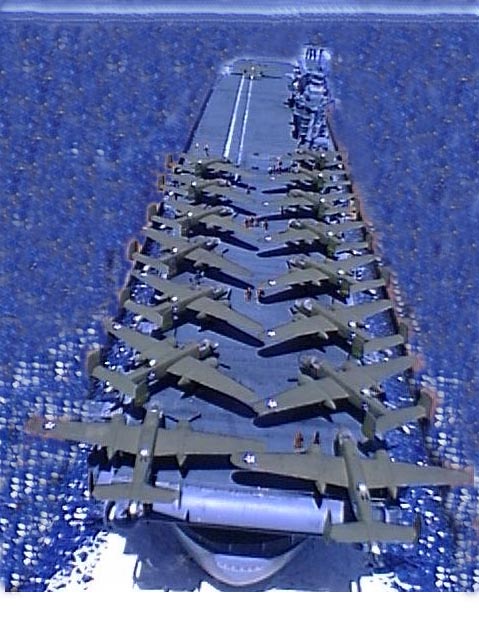
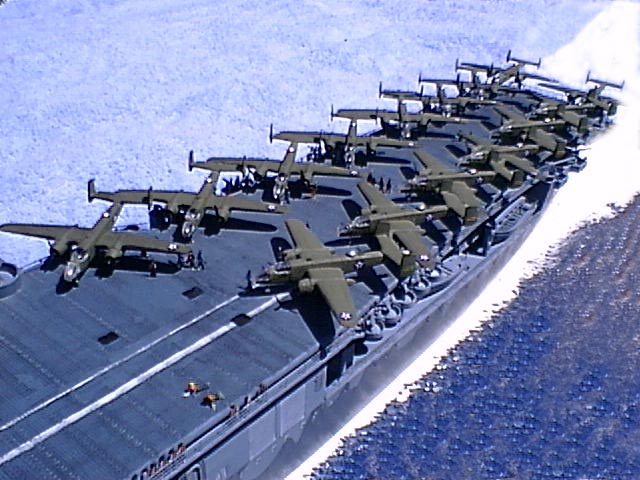
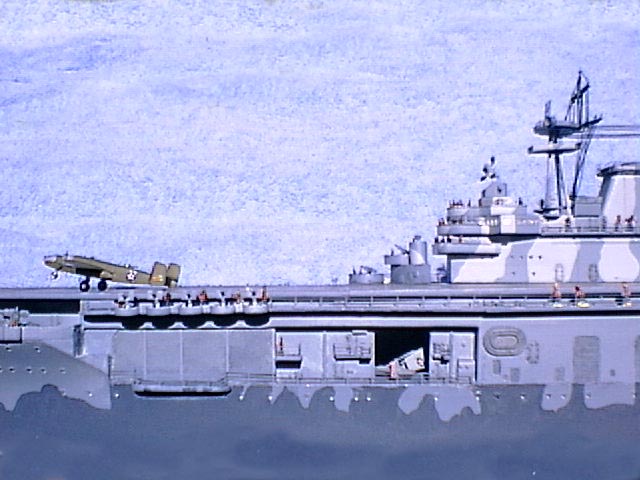
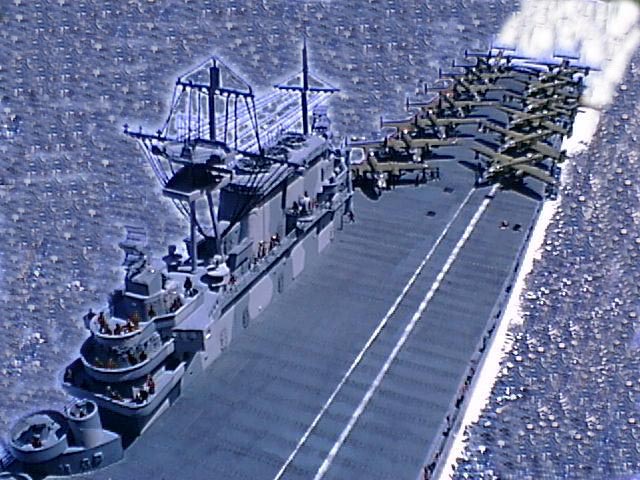
Finally came the
“spotting” of the bombers on the deck. After studying photos and reading
accounts, it is clear at the time of the launch that the tails of the last
two Mitchells extended precariously over the stern of the ship while the
rest were cheek to jowl on the deck in two lines at an angles facing each
other. (Indeed, DeShazer’s B-25 #16 was discovered at take off to have a
hole in its Plexiglas nose -- making his bombing duties over the city of
Nagoya exceedingly unpleasant with a couple hundred mile an hour wind in
his face).
The single item that
was most time consuming however was dealing with the B-25 decal problem.
I could find no 1/350th scale after market decals of the
Doolittle planes. My only solution was to buy Accurate Miniature’s 1/48
B-25B model that has a wonderful set of decals containing markings for
EVERY ONE of the 16 planes – including the way cool nose art for those
planes that historians think had them! Only problem of course is that
they are WAY too large a scale. Hence, much time was spent scanning the
decals into my computer, reducing them to the proper miniature scale and
laboriously using Corel Print Office software to outline them to be
visible at 1/350th scale. Its not as sharp as properly
designed 1/350th scale decals but better in my mind than having
phony serial numbers -- plus I got to put on some really microscopic nose
art. Someone PLEASE fill this need! The Accurate Miniatures B-25 kit’s
painting instructions also came in handy – not only telling me where to
paint what, but giving me the exact paint numbers from various
manufacturers that would be appropriate. (Why doesn’t Accurate Miniatures
do ships?) I chose the Model Masters Acrylic Olive Drab (Tes4728) and
Natural Grey (Tes4757). The rest (e.g. leading edge de-icers, prop
warning stripe) was hand painted with artists acrylic tube paint.
As to painting the
ship, Trumpeter provided a nifty glossy color profile -- ignore it. It
shows only two colors for the Ms 12-modified camouflage pattern, but in
reality the photos show and the resources confirm it used three colors
(Navy Blue 5-N, Ocean Gray 5-0, and Haze Gray 5-H). Again, Model Masters
had just what I needed (Tes4241, Tes4239 & Tes4238 respectively). The
flight deck was, according to Warship Pictorial # 9 at p. 53, the color
“Norfolk 250N Flight Deck Stain.” The closest I could find to that
description was what Model Masters calls “Flight Deck Grey” (Tes4243).
Guides for the wave-like contours of the camouflage were found in the
great colored picture on the cover of Warship Pictorial #9 and several B&W
photos inside it. As to the flight deck, the Hornet crew had painted two
white lines of different widths and lengths for the Army pilots to follow
so as not to collide with the island or overcompensate and runoff the
other side. I did -- as some resources suggest -- and masked off lines
using tape and then painted the surface exposed between them which
produced two nice straight lines (though perhaps too wide for the scale).
But still being a newbee I stupidly used regular scotch tape which took
off all the deck paint beneath it when I removed the tape. (I blush to
admit this!)
Finally because of
the heavy seas, and I think some defective paint, the real Hornet came
back from the raid with serious chipped paint at the waterline on the
bow. See e.g. Warship Pictorial #9 at pp. 56 & 57. Because the
underlying molded plastic seems to be similar to the color showing under
the chipped paint in the photos, I simply scratched the paint off like the
real thing and I think it passes. Though I found a reference in “The Ship
That Held The Line” and in “The First Heroes” to the words “REMEMBER PEARL
HARBOR” being painted on the Hornet’s stack (which would be a really nice
touch to add to the model), I could find no pictures of the same and the
scholars and vets (who were actually there) graciously responded to
e-mails sent via the Battle Of Midway Roundtable (lodinet.com/rruss/midway/index.html)
that it simply was not there. Though disappointing, that settled the
issue for me. Likewise, help from Doolittle discussion groups (e.g.
doolittleraider.com/ and doolittleraid.com/) pointed out the prominent
presence of non-skid squares on the flight deck that can clearly be seen
in the photos of the launch, but for which I have found no other
reference. Modeling in the 21st Century does have some
advantages apparently.
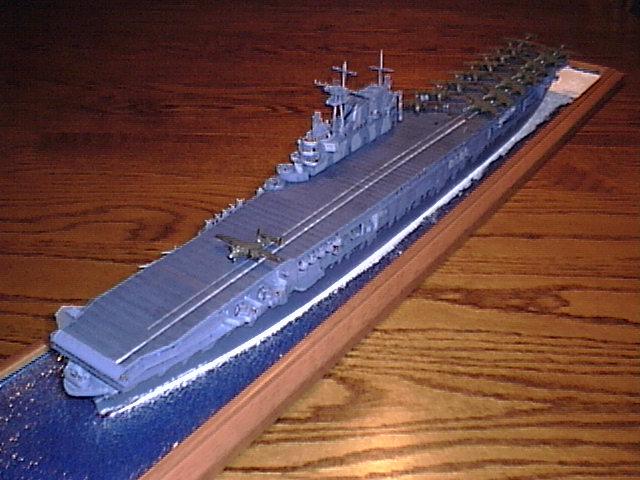
Sea Surface
Base and Display Case
|
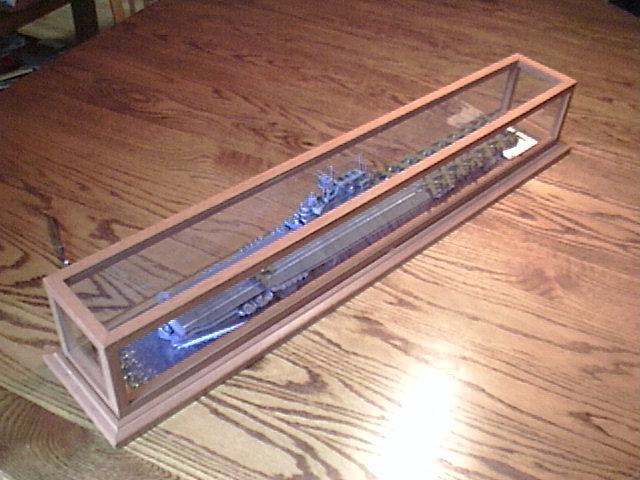
Finally, the question
I seldom see discussed: what the heck do I do with it when its finished
so that it can be seen but not destroyed by dust fixated housekeepers and
curious children? I still have “issues” from childhood memories of coming
home waiting to learn of the latest in the slow attrition of my models
from my mother’s efforts to dust “Danny’s models.” Decades later, I’ve
learned to protect my other more workable size models from my wife and
children by using cheap car model display cases. With a little
creativity, you can make some interesting (and dust proof) mini dioramas.
But what do you do with a 28 inch aircraft carrier with fragile 1/350th
scale planes in precarious positions on its deck? My solution: buy a
baseball bat memorabilia case -- a bit long and a tad narrow, but with
some modification and building the Hornet in a waterline version, it just
fit. However a carrier launching planes while steaming through a nice
wood stained base just would not look right. So, with some advice from a
local hobby store, I painted the base dark blue and placed a cut piece of
plastic fluorescent light cover (easily obtained from a hardware store) on
top -- creating a great rippled sea look. I then used white silicon from
a caulking gun for the wake (as suggested in “How to Build Dioramas,” at
p. 90) and was done.
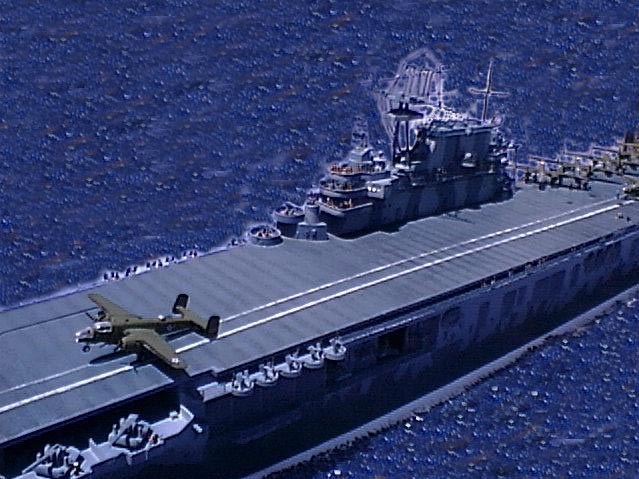
Thereafter I took
some pictures in by backyard and realized it just did not look right with
green (ok, there’s a lot of brown in there too) grass in the background.
Accordingly, I manipulated the background with Adobe Photo Shop software.
All I had to do was repeatedly use the “clone” feature on an area from the
“sea” base to create a digital “ocean” for my ship to sail over rather
than the grass. Likewise, an old blue towel placed in the background
allowed me to create a sky by the same “cloning” feature. Now if I could
only figure a way to digitally manipulate my ship to cover up all the
mistakes I know I made in its construction!
In that even an
unsophisticated and retro modeler like me could make something presentable
speaks volumes about the Hornet’s quality as a kit. Further, though
sometimes irritating, the little historical inaccuracies that I fell
across were kind of satisfying finding and correcting. If I could
complete it, it certainly is not beyond the average modeler. However, you
definitely have to do it as a long term project and not as a short term
fling. As the phantom voice said to the hero in the movie and book “Field
of Dreams“ -- “GO THE DISTANCE.” I also would plead, PLEASE do your
research -- the story of the Doolittle Raid, the USS Hornet and the brave
men involved more than deserve your study and will give meaning to what
you build.
Click on the thumbnails
below to view larger images:
Model, Images and Text Copyright ©
2003 by Dan Hamilton
Page Created 09 August, 2003
Last Updated
17 March, 2004
Back to
HyperScale Main Page |
 Home |
What's New |
Features |
Gallery |
Reviews |
Reference |
Forum |
Search
Home |
What's New |
Features |
Gallery |
Reviews |
Reference |
Forum |
Search