|
De Havilland Hornet F.1
by John
Valo
|
|
|
De Havilland Hornet F.1 |

Classic
Airframes' 1/48 Hornet F.1/F.3 is available online from
Squadron
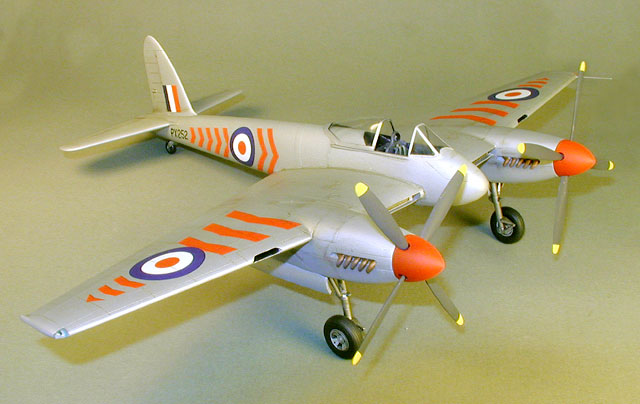
If ever an airplane could be described as 'sexy',
DeHavilland's Hornet certainly would qualify. Using redesigned
small-frontal-section Merlin engines, the Hornet took the elegance of the
Mosquito and refined it to aesthetic perfection. With aerobatic
performance described by Captain Eric Brown as 'sheer exhilarating joy',
the Hornet was one of a handful of airplanes that defined the pinnacle of
piston-engined fighter development.
Classic Airframes recently released the Hornet F.I/F.3 as well as the Sea
Hornet F.20/NF.21 in 1/48 scale. As usual, the kits contain crisply molded
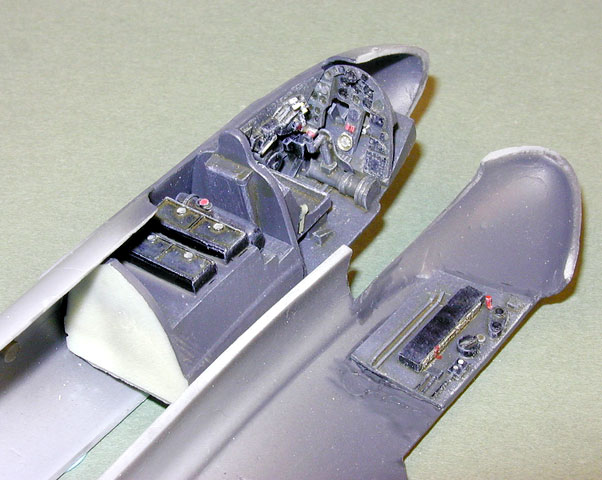
resin cockpit and detail parts, with the majority of parts in plastic. The
scribing on the Hornet kit is excellent, on a par with the CA S.79
Sparviero, and every bit as crisp as any other 'major' manufacturer.
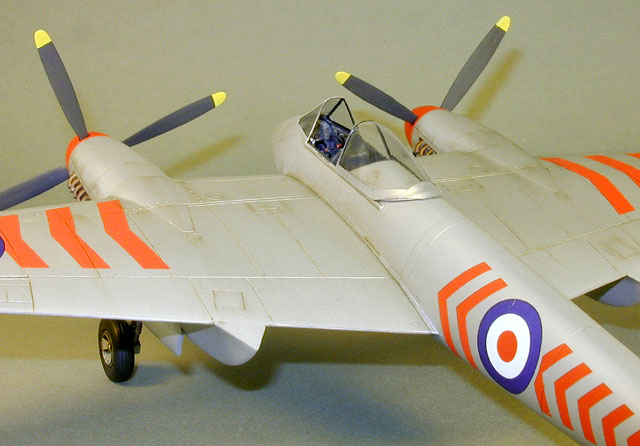
After the usual cleanup of the pour stubs, the cockpit parts fit
beautifully. One fuselage half has a set of scribed lines inside to assist
with lining up the resin parts. The cockpit detail is well done, and
nicely represents the tight accomodations for the pilot.
The main landing gears are constructed as subassemblies, then located into
the nacelles after all major assembly is complete. The effect is quite
convincing. It would appear that the tailwheel should be of the
'anti-shimmy' type, but a solid type is provided. Likewise, the main tires
are of a straight tread design, while the vast majority of photos show
Hornets with a checkerboard or diamond type tread. Neither of these issues
was important enough to goad me into action to modify the kit parts, and
they look fine when all is said and done.
The assembly of the major airframe parts is straightforward; the wing is a
butt joint to the fuselage roots which demands a bit of care to align
properly. Folks who like to fly their models around the workshop may want
to add a spar to reinforce the wing root joints, lest there be a
catastrophic structural failure in flight.
If your kit has any flash in the exhaust cutouts, use care when cleaning
them out as the soft plastic makes it easy to enlarge the slots and
compromise the fit.
I had to tweak the fit of the nacelles to the wing just a bit, but that
was probably my fault, not the kit. Aside from that, I experienced no
other problems with assembly.
The scribing on the canopy appears to be a bit suspect toward the rear, so
I made a new frame from vinyl electrical tape cut to the proper shape.
 While
I feel the elongated stabilizers and dorsal fin add to the aesthetic
appeal of the F.3 version, I couldn't resist the garish red chevrons of
the F.1 markings provided in the kit. While
I feel the elongated stabilizers and dorsal fin add to the aesthetic
appeal of the F.3 version, I couldn't resist the garish red chevrons of
the F.1 markings provided in the kit.
The model was finished in PollyS Metalline Silver
with a touch of white added, and the Microscale-printed decals went on
flawlessly.

In a fit of cocktail-inspired silliness, before adding the landing gear
and propellers, I took a few shots of the model and made a quickie
inflight illustration with Painter and Photoshop. That's me flying the
Hornet!
What a view!
Thanks to Classic Airframes for finally releasing a very nice kit of this
aircraft - long overdue. I recommend it to any reasonably-experienced
modeler who wants a companion for his or her Mosquito sitting on the
shelf.
Click the
thumbnails below to view larger images:
Model, Images and Text Copyright © 2003
by
John C. Valo
Page Created 29 January, 2003
Last Updated
17 March, 2004
Back to
HyperScale Main Page |
 Home |
What's New |
Features |
Gallery |
Reviews |
Reference |
Forum |
Search
Home |
What's New |
Features |
Gallery |
Reviews |
Reference |
Forum |
Search
