|
Henschel Hs 123B
by
Floyd S. Werner Jr.
|
|
|
Henschel Hs 123B |

AMtech's 1/48
scale Henschel Hs 123B may be ordered online from Squadron.com
A product of a 1934 aircraft bid for a dive-bomber, the little
Henschel Hs 123 biplane preceded the famous Ju-87 Stuka in the
dive-bombing role for the Luftwaffe.
A direct result of Ernst Udet’s love of the dive bomber and the
Curtiss fighter plane, the Hs 123 served as a transitional aircraft in
the Luftwaffe’s earliest days. The Hs 123 served as a dive-bomber well
into the Second World War after being irst blooded during the Spanish
Civil War by the Condor Legion. Adolph Galland flew this airplane during
his formative flying years with the Condor Legion.
The Hs 123 was relatively obsolete by the start of World War II. With
the advent of the Stuka, the Hs 123 was relegated to second line and
training units. Production on the Hs 123 ended in 1940 but it soldiered
on until late 1944 when it was finally retired from active units. The Hs
123 served in Spain, Poland, Belgium, France, the Balkans and in Russia.
Always overshadowed by the roaring Stukas the Hs 123 nevertheless played
an important part of the Luftwaffe.
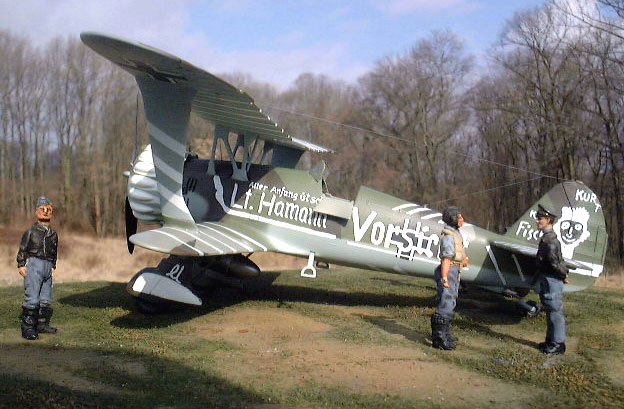
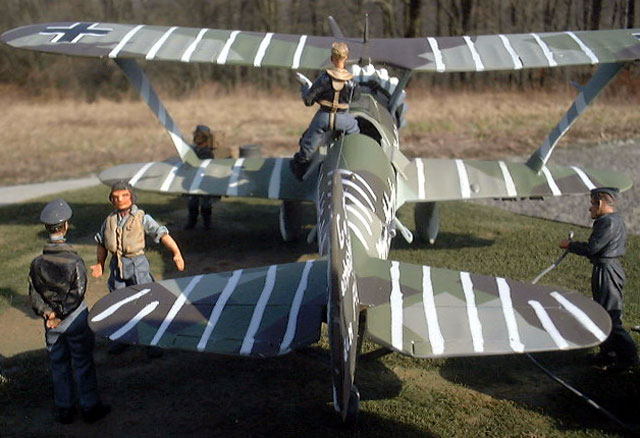
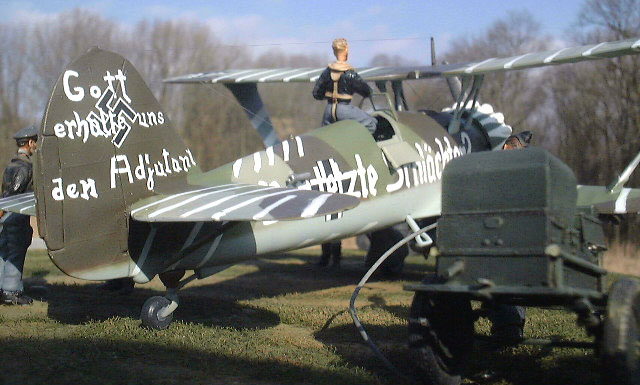
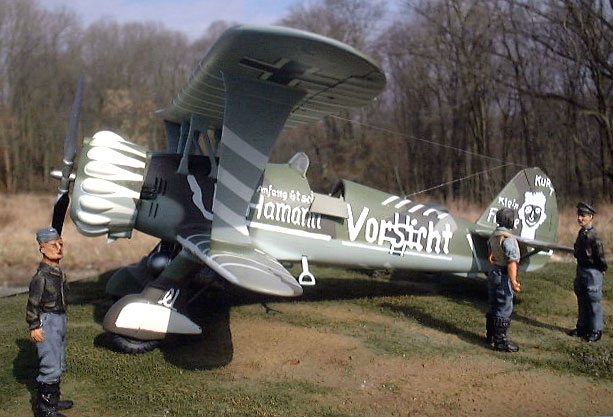
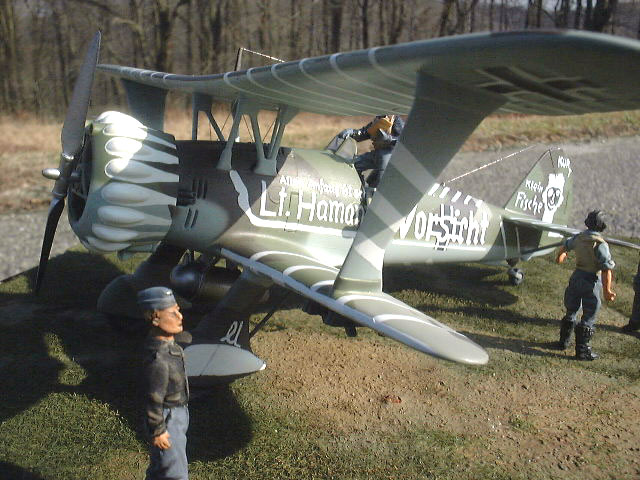
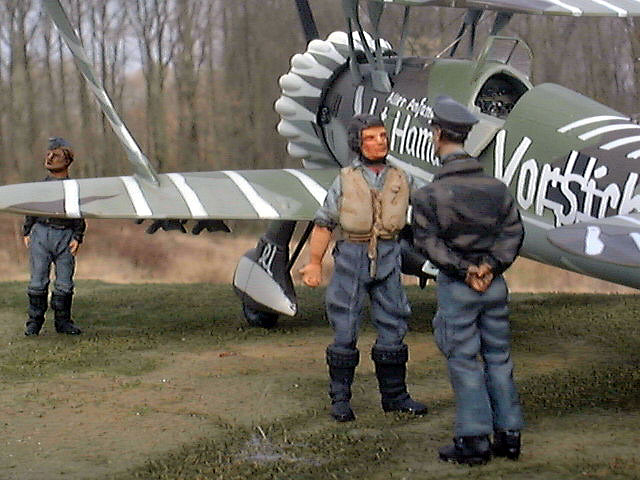
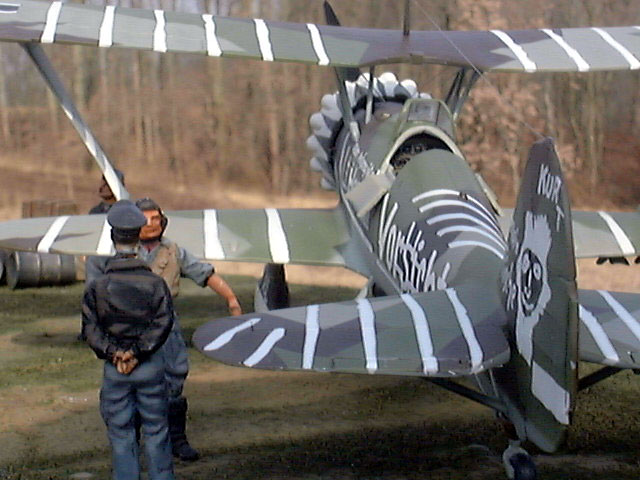
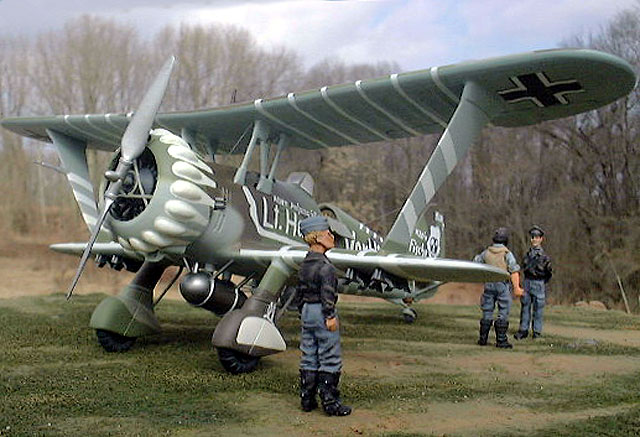
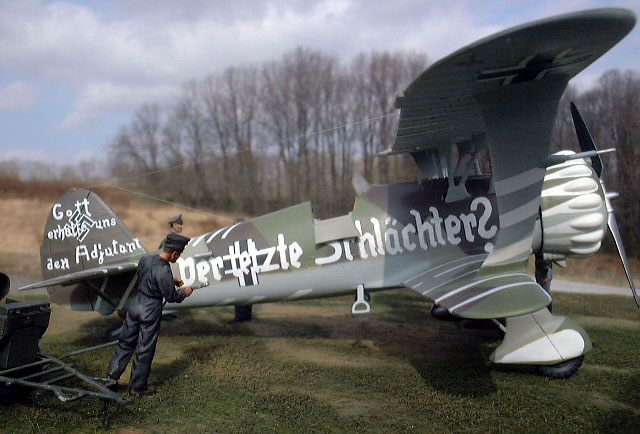
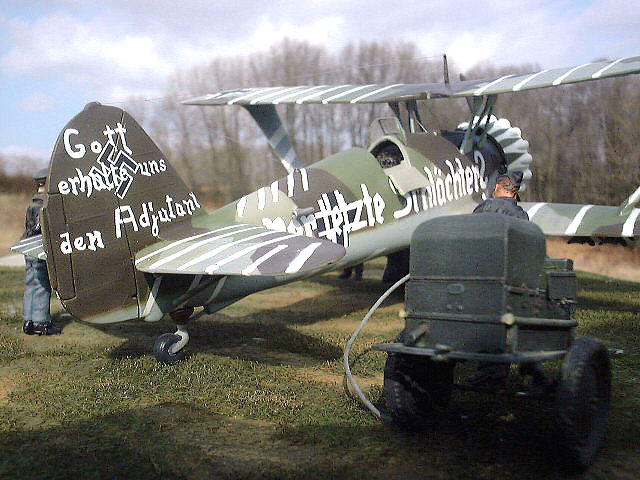
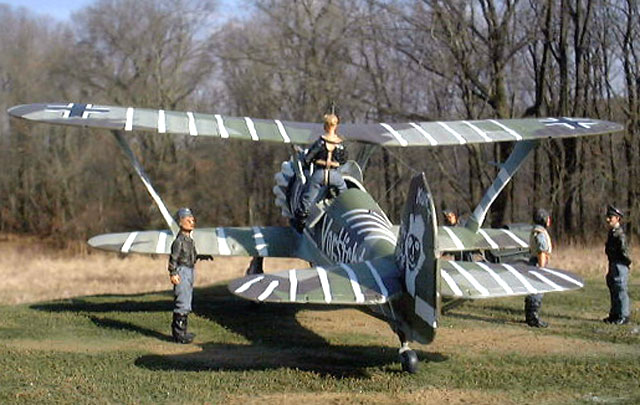
The Markings for my Model
The first thing you will notice about the kit is the gaudy graffiti
on the sides and around the aircraft.
The story behind the markings appears to center on a young Lieutenant
assigned to 3./Fliegergruppe 50 in 1938 as the Group Adjutant, Lt. Kurt
Hamann. It appears that Lt. Hamann had very little formal flight
training and was taking this Hs 123 for training flights. His unit was
giving him lessons in their off time. You may have noticed that the Hs
123 is a single seat airplane so Lt. Hamann always flew solo.
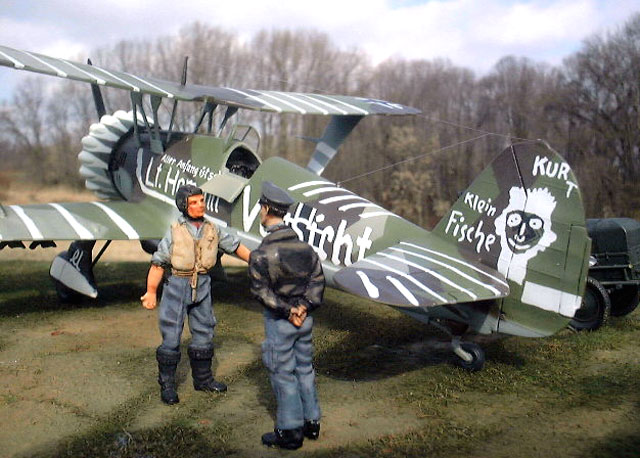
Whether loved by his comrades or tolerated by his superiors is not
quite clear, but it is quite obvious that he was flying. Lt. Hamann did
attain his wings and was killed in combat over France in 1940 while
flying a Ju-87B. For those of you that don’t speak German here are the
translations to the markings.
-
Der letzte Schlatchter? The last
Butcher?
-
Gott erhlate uns den Adjutant God
hold us the Soldiers
-
Aller Anfang ist schwer All
Beginnings are difficult
-
Vorsicht Caution
-
Klein Fische Small Fish
If you are like me you have been holding onto your Esci Hs 123 kit
for years.
While it is a nice kit it could never match up to today’s standards,
besides it is not a very attractive aircraft. I mean it is a biplane -
my first biplane might I add.
When AMTech decided to “upgrade” this kit it just made sense to me.
The only thing really missing from this kit was the cockpit. The kit is
made up of the same sprues as the Esci kit just different colored
plastic. The plastic is a little soft, but if you have seen the P-40
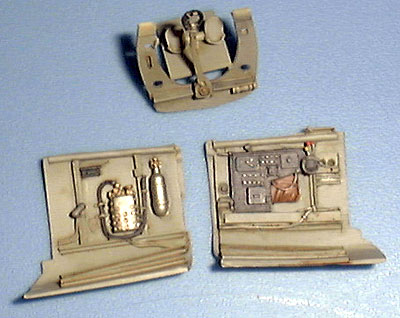
kits it is the same plastic, easy to work with. AMTech includes a resin
cockpit mastered by Black Box and unspatted gear struts.
My review example did not include instructions or decals so I can’t
comment on them. I used the Esci instructions, which shows an unspatted
Russian front Henschel on the instructions. The kit also includes a
cockpit windscreen that is thick, but usable.
I wanted to build this kit as much out of the box as possible. So
with that said, construction begins as usual in the cockpit.
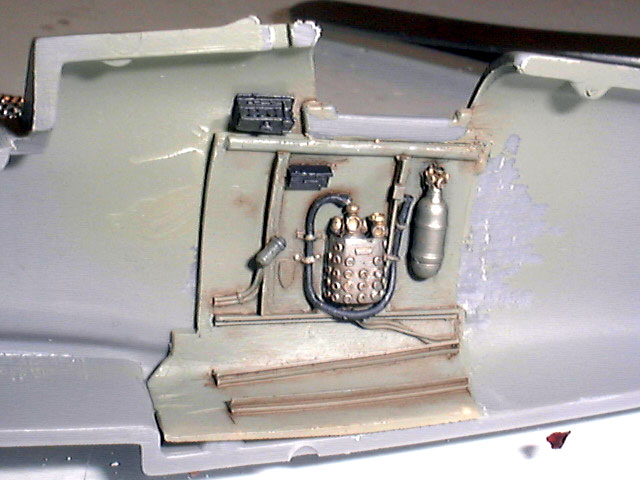
The all resin cockpit is an easy addition that requires no
modifications to the kit. Just remove the parts from the pour blocks and
your ready to assemble.
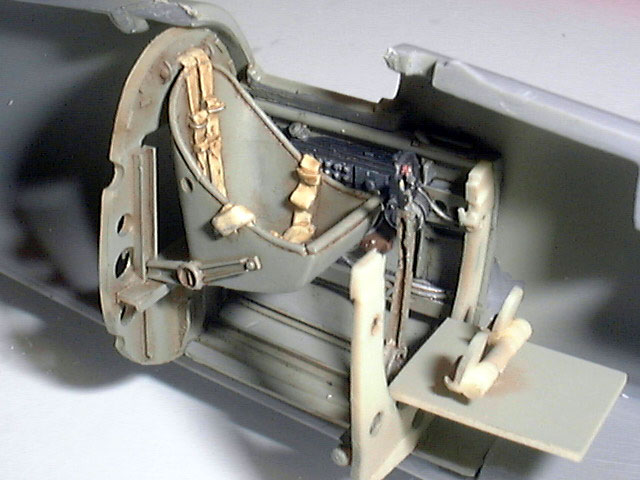
I painted my cockpit Model Master Acrylic RLM 02. The details were
picked out with RLM 66 and some Alclad II Aluminum. A wash of burnt
umber and a dry brush of silver and white made the whole cockpit come
alive. The seatbelts were painted Polly-S Dirty White and Model Master
Acrylic Leather.
Click the thumbnails below
to view larger images:
Before I knew what was happening it was time to put the fuselage
together. There was no big deal here, except for the upper cowling,
which had big gaps. Remember this is not a new kit, this kit was made in
the early 1980s. The gaps were easily taken care of with some 3M Blue
Acrylic Body Filler. Use either a little bit of sanding stick or a
cotton swab dipped into fingernail polish remover (acetone) and your
done. I had never tried it before but I must say it is now my favorite
filler next to superglue and accelerator. Thank you, Rafe Morrisey. I
then attached these strange things called cabane struts. Lord knows what
they are for. The tail wheel fit was ok but I built up around the
attachment with epoxy putty to smooth it into the fuselage. I did drill
out the gun barrels in the upper cowling. The guns may be a bit on the
big side but they look good.
Next came the engine. The engine comes in a solid one piece for the
cylinders. You’re probably saying, My God what were they thinking? Relax
the engine is encased in the forward cowling and the mold lines are
invisible to the naked eye. The cylinders were painted Alclad Stainless
Steel over a gray primer. The nose cone comes next. This could have been
enhanced by cutting off the pushrods and replacing them with tubing as
they are slightly too short. Again you can’t really notice it with the
cowling installed. Now comes the hardest part of this whole kit. The
cowling has cooling bulges around the circumference of the cowling. I
found that if you flat sand the entire cowling the bumps are not a big
deal. I only added a little bit of putty to one or two of the bumps. I
think this was one of the reasons I never built the kit in the first
place, that and that second wing.
The tail planes are place on the fuselage and the struts are a little
too long. Better too long than too short. Some swipes with a sanding
stick and done. The tail and later the wings are a little thick in my
opinion, especially the trailing edges but it adds to the robust nature
of the Hs 123.
The wings are easily assembled and represented no major problems other
than being thick. The lower wing to fuselage attachment indicated big
gaps at the front and back of the join. The sides of the fuselage
weren’t nearly as bad. Again out with the 3M Acrylic Blue and I was done
in no time. Now was a good time to add the interplane struts. A little
filler was needed but nothing drastic.
My prop had a sink mark at the hub but again this was not difficult to
cleanup with some filler.
AMTech gives you the unspatted struts but I could not use them with my
particular subject but I did test fit them and they worked like a champ.
The kit was rapidly coming together. With the wheels and struts
completed, they were fit into the wings and a little filler and they
were done. A little bit of work on the external fuel tank and I was off
to the paint booth.
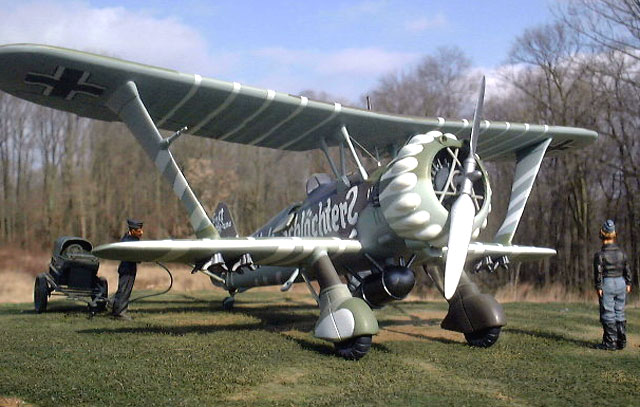
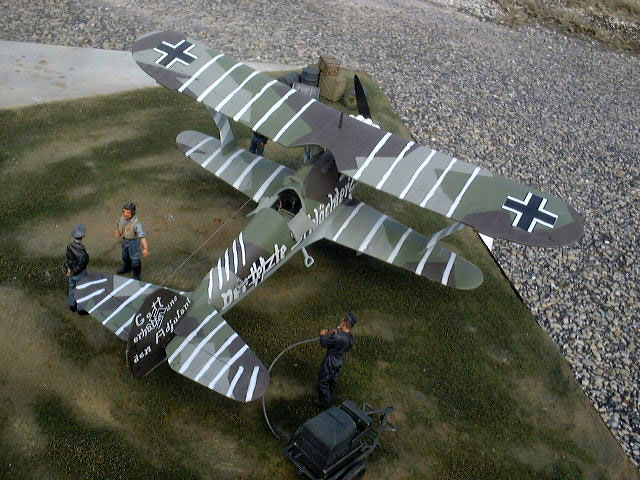
The Hs 123 comes in three basic schemes. Overall RLM 02 for very
early machines, RLM 61, 62, 63, 65 (tri-color) scheme, and RLM 70,71,65.
Within these colors are many varieties, especially the tri-color scheme.
 The three upper surface colors could be moved around in any number of
combinations that were “negative” of each other. Be careful if you use
these colors and check your references. JBOT, who produced the decals I
used, indicated one scheme that I think is wrong. My model, my opinion.
After looking at the pictures of the real machine I decided to paint my
model as you see. The three upper surface colors could be moved around in any number of
combinations that were “negative” of each other. Be careful if you use
these colors and check your references. JBOT, who produced the decals I
used, indicated one scheme that I think is wrong. My model, my opinion.
After looking at the pictures of the real machine I decided to paint my
model as you see.
My major reference for the scheme is found in the
Model Art special, Camouflage & Marking of the Luftwaffe Aircraft Vol 2.
With that decided I pre-shaded the model with RLM 66 and fixed anything
not quite right. After spraying the bottom and part of the top with RLM
65, it was time to attack the top.
Black Magic Masks
If you are going to attack something as complicated as this paint
scheme is you will want help. Meteor Production has that help. They
produce a Black Magic mask for this kit in the tri-color scheme, thank
God or I would still be masking.
The Black Magic set is designed for the paint scheme that JBOT
depicts which is the “normal” paint scheme, but with careful planning
and connecting the panels on the Black Magic sheet you can do my paint
scheme. No real big problems after that. Just spray the colors and add
masks until you are done. You may have to touch up but it is infinitely
easier now that the basic outline is done.

I used Model Master Acrylic RLM02 for my RLM 63. There will be some
discussion on the shade of RLM 63 but in “Luftwaffe Colors” (see
references) it explains how there came to be two different RLM
63s, one very light gray and the other very similar to RLM 02, except
used on external surfaces. I decided to use Polly-S for the 61 and 62
because in my eye they were closer to the chips in “Luftwaffe Colors”.
The Model Masters were close but I liked the Polly-S. Your choice
really.
A quick coat of Tamiya Clear and it was time for the decals.
The JBOT Decals
The decals come on two sheets of decal paper with a “blurry”
instruction sheet that is marginally helpful. The decals were made on an
ALPS printer so each sheet is one piece of decal. This is no big
problem. You just have to trim close to the printing, which is fragile.
The JBOT decal sheet provides you most of the markings. It may have been
me but when I looked at the photos I see a leading edge white stripe on
the lower wing that JBOT does not provide. The decals react well with
setting solution and are adequately opaque.
It was apparent with the decals set up as they were that the distances
were as they would appear on the model. This is good because of the
instruction sheet. I tended to leave whole sections of decals together
so that they would be the right distances from one another. This caused
some silvering problems because of the vast areas of clear decal paper.
This was definitely my fault.
I did have a few markings that were slightly out of register but nothing
overly noticeable. I did find other problems though. They included that
the upper wing stripes were too small and did not fit completely around
the wing. This appears again on the interplane struts. Another
observation was the upper and lower wing crosses appear to be mis-marked.
The top one should go on the bottom and vice versa. Both appeared too
small. I eventually decided on some Aeromaster markings. The wheel-spat
markings were too small and I ended up having to mask and repaint them.
The one thing that gave me fits was the cowling bulge decals. I thought
that MicroSol would be able to make it happen, I was wrong. The decals
looked terrible all shriveled up and never would settle down. I
eventually had to remove them. This proved to be a big problem. The
MicroSol had made the decals bite into the paint and they refused to be
removed. When I did remove them I removed the underlying paint. Of
course it was acrylic and it just chunked off. Never to be smoothed out
again. I ended up chipping off the remaining paint on the whole cowling
with a toothpick and sandpaper. It came off nice but in the process I
ended up destroying the fuselage markings. Remember I said they were
fragile. I tried to hand paint them back on but that failed miserably. I
took off my attempt at graffiti and ordered another set of decals from
Meteor. I eventually painted the whole cowling Flat White and then using
Tamiya masking tape (love this stuff, if you haven’t you have no idea
how good it is) I masked the bulges and resprayed the camo pattern.
Finally I had a cowling that I liked.
One good thing about this fiasco on the fuselage was that I noticed that
my camouflage line was too high on the fuselage so I had an opportunity
to repaint it properly and the cabane struts which I had painted the
wrong color were corrected. So there was some good from it. I used a
trick to make sure my camouflage line was straight on the fuselage. I
used Silly Putty rolled into a long worm and laid it down over the
fuselage where I wanted the demarcation line to be. Then I sprayed the
undersurface color at slightly more than 90-degree angle to the putty
and I had a nice straight and slightly feathered edge exactly where I
wanted it.
Now that the decals were on I sprayed a coat of Tamiya Clear over the
entire kit and then some Model Master Acrylic Flat. I noticed some
silvering on the clear panels so I cut them slightly and used MicroSol
on them. The ones that didn’t sit down were then painted over. Can you
tell where? Me neither.
Now it was time to finish bring everything together. One thing nice
about the instruction sheet is that it shows you how to add the support
wires and the antenna so in keeping with the out of the box. I added
mine from styrene.
Attaching the top wing required a clamp in the middle but everything fit
rather well. I did have to add some filler to the cabane struts at the
top but it wasn’t too difficult. The windscreen was added and filled in
with white glue. I touched up the paint and called the kit done.
The Black Magic masks were indispensable, even though I had to adjust
them for my particular paint scheme. Meteor even addresses this in their
instructions. Use the masks they save lots of time, especially on this
tri-color scheme.
As for the JBOT decals, if you want to model this machine you have very
little choice than these decals. The difficulty I had was largely
self-induced, but the decals were slightly undersized, except on the
personal markings. It appeared that the decals were first made for a
smaller kit and then just enlarged to the appropriate scale. They do
make quite a colorful machine. Use caution on the paint scheme as I said
I think the one JBOT represents is incorrect.
The kit is an old kit. Once you come to terms with that no problem. I
really enjoyed it. It kind of brought back a little of my childhood
memories. The new resin interior was beautiful. I would love it if
AMTech brought out the resin interior and the unspatted struts as a
separate upgrade to my old Esci kit. A word of caution there are only
going to be 5000 made so get yours early and avoid the markup on the
secondary market. Overall, a very enjoyable and quick build. I may even
attack more biplanes now that I’ve gotten over my fear of the upper
wing.
Bring on the He 51 or Ar-68!
Thanks to AMTech for the review copy.
-
Flugzeug Dokumentation- Von der
Fliegerschule zum Einsatzverband; Michael Mayer and Paul Stipdonk;
Flugzeug Publications; 1991; ISBN 3-927132-05-5
-
Camouflage & Marking of the Luftwaffe
Aircraft Vol 2; Model Art special No 356.
-
Luftwaffe Colors 1935-1945; Michael Ullman;
Hikoki Publications, 2002; ISBN190210934-1
-
Luftfahrt Volume 1; E.S. Mittler & Sohn
GmbH publishers; ISBN 3 87547 178 4
-
Hs 123; Wydawnictwo Militaria; 1995
Click on the thumbnails
below to view larger images:
Model, Images and Text Copyright © 2003 by
Floyd S. Werner Jr.
Page Created 12 April, 2003
Last Updated 17 March, 2004
Back to HyperScale
Main Page
|
 Home |
What's New |
Features |
Gallery |
Reviews |
Reference |
Forum |
Search
Home |
What's New |
Features |
Gallery |
Reviews |
Reference |
Forum |
Search