|
Polikarpov I-16
Early Type-5
|
|
|
Polikarpov I-16
Early Type-5 |
by Aleksandar Šekularac

Hobbycraft's
1/48 scale I-16 Type 18 is available online from Squadron.com
The I-16
was the last operational fighter from one of the most successful Russian
design bureaus of the golden age of aviation.
Often misunderstood in the west, and derided by names
such as “Rat”, or “The Fly”, this small plane was truly a revolution in
aircraft design. When it entered service in 1934, it was world’s most
advanced fighter aircraft. It marked the shift of seasons in aerial combat
tactics, from tight-turning dogfights, to high-powered manoeuvres in the
vertical plane.
Introduction of I-16 to service was nothing if not
controversial. A series of accidents due to inexperience of the pilots,
very sensitive controls, poor visibility compared to open cockpit
biplanes, landing gear that one needed to manually lower before landing,
and high approach speeds, plagued its first year in service. Some pilots
simply refused to fly it. The test pilot team involved in the development
program had to organize a series of demonstration aerobatic flights at
different airfields, to show a true potential of this new aircraft to the
units. Only after this tour de force did perceptions started
to change, and with time I-16 turned from a most hated to a most loved
piece of equipment.
From Spain, over the Far East, and back to Mother
Russia, this aircraft spent most of its days with warm gun-barrels. It
evolved through series of variants, none of which changed the overall
appearance of agility and ruggedness of this little plane. At the end of
its career it looked pretty much the same as at the beginning, with just a
few scoops and hatches added.
The true test of will came with Operation
Barbarossa, and commencement of the Great Patriotic War. The I-16 was the
most numerous frontline fighter in Russian service at that time. No longer
capable of matching the speed of the newest Messerschmitts, I-16 had only
its superior maneuverability to its advantage. Ironically, velocity
fighter was no longer fast enough. Yet, I-16 fought on.
Early confrontations produced some high scoring
I-16 pilots. This was also the time of epic battles in most dire
conditions, with aviators running out of ammunition, and ramming their
machines into enemies in desperation. Despite great difficulties I-16
continued to fly in many roles, and only in the last year of the conflict
faded out of the airfields. Its service spans across ten years - the same
ten years in which aviation made its journey from string-bags to jets. An
amazing fact.
I-16 Type-5
The first
series (although small) of I-16 to see production was called Type-4. This
was due to the simple fact that Zavod-21 (factory) was already producing
three other aircraft types of different design. In consequence, later
variants of I-16 simply continued with the numbering system.
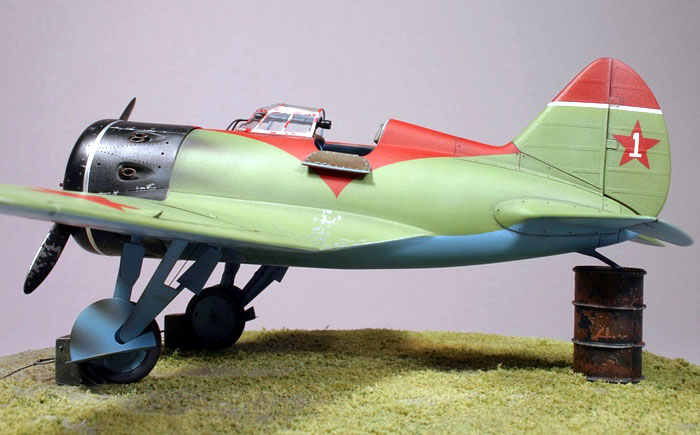
Type-4 was quickly superseded by much improved
Type-5. It incorporated a major redesign of engine cowling, which will
define a characteristic look of this fighter for the rest of its life,
with front cooling louvers, radial exhaust pipes coming out on the
circumference of the cowling, and a silver clamp-band around it. It
maintained the original enclosed forward-sliding canopy and a telescopic
gun-sight, as well the full span ailerons. Type-5 stayed in production for
several years with further modifications made in 1938.
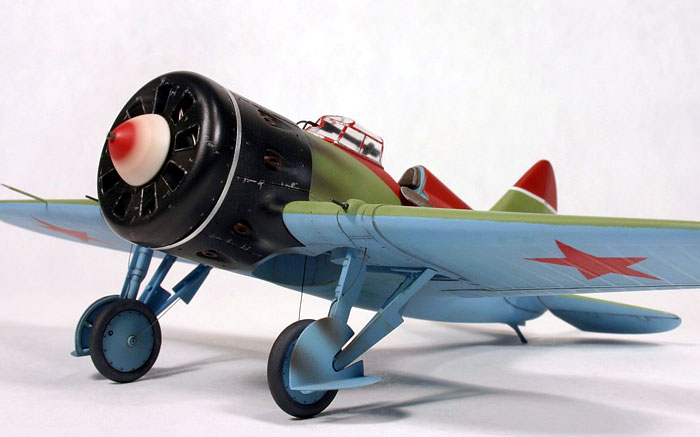
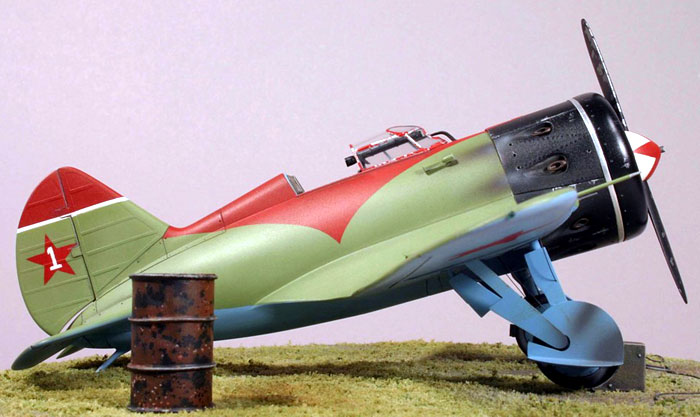
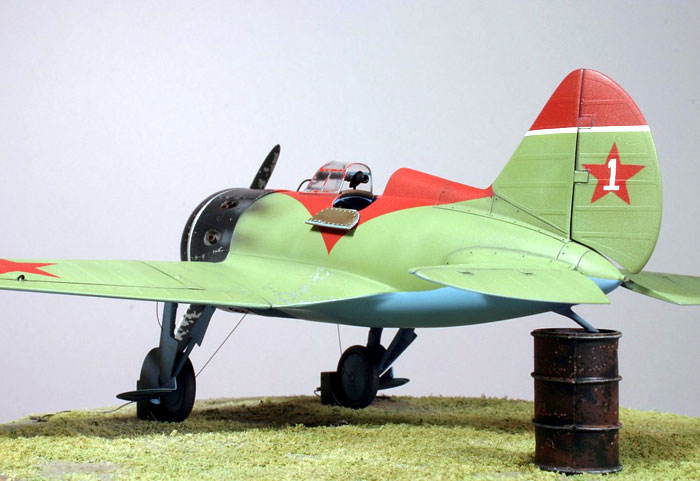
Particular aircraft that I wanted to model was “White
1”, belonging to 33 IAP Regimental Commander Pavel Petrov, photographed
during 1940. Big red spearhead painted on top of the fuselage exemplifies
really well the influence of art deco in “Soviet glory period”. Profile of
this aircraft appears on the excellent “Modeling the Aircraft of VVS”
website of Matt Bittner and Erik Pilawskii (http://vvs.hobbyvista.com/index.php).
Painstaking research done by Erik Pilawskii, sublimated on this site and
in his new book, “Soviet Air Force Fighter Colours 1941-1945”, made a
quantum leap in understanding many facets of this subject, and I can
highly recommend both for anyone interested.
What
really made this project possible is the series of aftermarket sets
produced by Airwaves, aimed at correcting generic I-16 Hobbycraft /
Academy kit in 1:48 scale. So far, Airwaves has released sets for the
I-16: Type-5, Type-10, Type-29, and Cockpit Detail sets. I incorporated
two of these sets to make an accurate model of Petrov’s aircraft.
1. Wings &
Fuselage
Usually, the work would start in the cockpit, but my
mailman arrived with the Type-5 conversion first, so I started to hack on
the airframe. Hobbycraft kit doesn’t really represent any particular
variant of this aircraft. It is rather a medley of details from different
I-16’s in one box. To make an accurate early Type-5, one would have to
make a serious scratch-building effort, or use this Airwaves set.
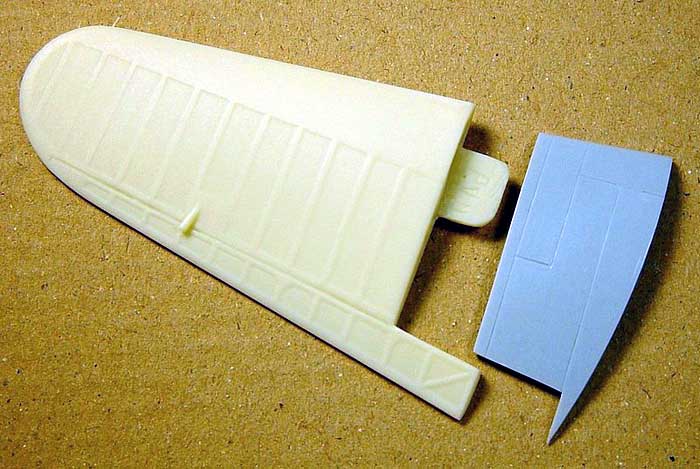
The set is cast in vanilla-colored bubble-free resin
that can be cut, and sanded just like styrene plastic. It includes the
outer section of the wings, with ailerons, and the whole engine cowling
with the spinner. This means that all the major components of the kit will
have to yield to the cutter.
Click the
thumbnails below to view larger images:
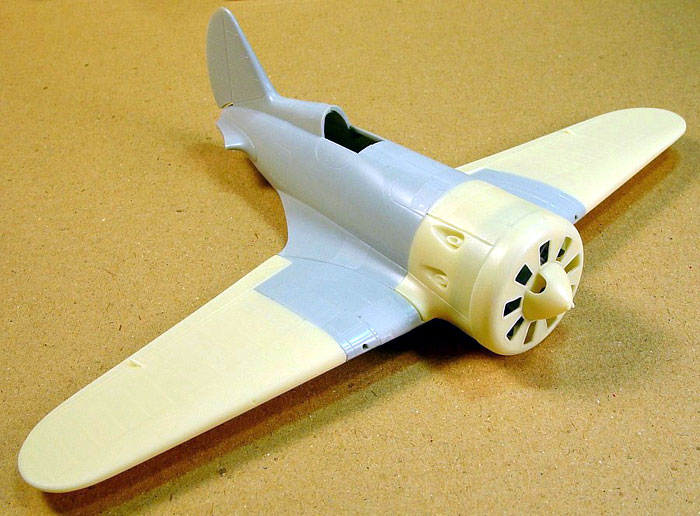
The fuselage needs to part with the cowling. All
that remains from the wings are inner panels on the upper side, and a
central bottom section including the landing gear bays. Cuts need to be
well planed, but are not hard to make. I marked all the parts in question,
and made the initial cuts little bit outside of the marks, to leave some
room for mistakes.
Final dimensions were achieved with sand paper. If
everything is done properly, resin parts fit very well, and bring a
glimpse of a familiar shape.
Once the main operation with resin was over, I
continued to modify the exterior of the airframe. Type-5 had access door
for the pilot only on the port side of the fuselage. It also did not have
a radio. Starboard side door, and the radio hatch on the same side of the
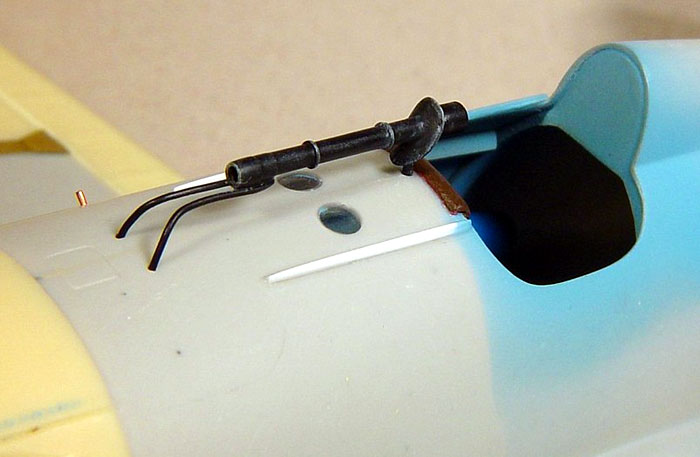
fuselage had to be deleted. I-16 had its instrument panel buried quite a
far way under the front deck of the cockpit. To allow for some light to
come in, two circular cutouts were present through the top of the
fuselage, just in front of the instrument panel. On Type-5 aircraft these
two holes were covered with glazing, as they were “in the open wind”, when
the canopy was closed. I first drilled out a pair of holes in the
fuselage, used cylindrical cuts form a clear sprue to superglue in these
holes, and then sand, and polish them flush with the fuselage surface. The
result is very convincing. I also created rails for the sliding canopy
from lengths of Evergreen rectangular plastic strips, and added leather
padding on the front edge of the cockpit opening, made from electric wire
insulation.
Some surface paneling detail was made of brass sheet,
cut to shape and then glued on, instead of just having the 2D panel lines,
this was done for the oil tank filler cap on top of the cowling, the
cowling band, wing outer section fastener, and some other miscellaneous
panels. Rows of rivets were added on the cowling, and inner wing panels.
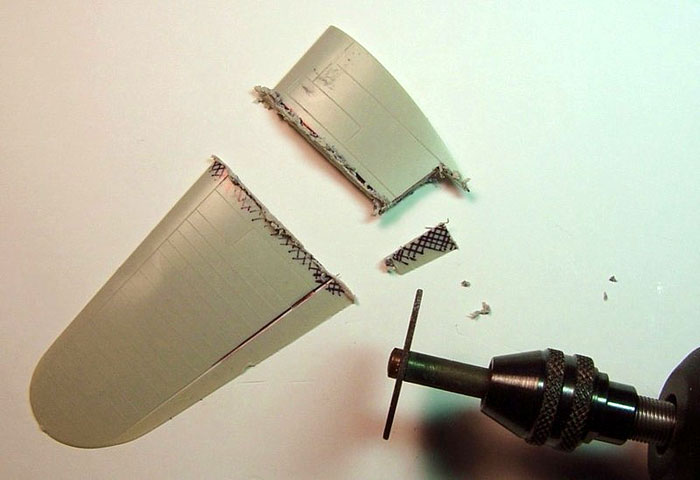
2. The Tail
I wanted to depict a typical droop of elevators,
present on literarily all pictures of I-16s at rest. I also wanted to
reposition the ruder slightly. As I was working on cutting these surfaces
and repositioning them, I realized that rib detail of the tail surfaces is
lame, when compared to the rest of airframe that was now very accurate.
At this point I was still feeling fresh into the
project, and having quite a reserve for stretching, so I decided to
rebuild this detail completely, using a trick I learned from Aleksej, of
Gremlin Models. First part was to sand smooth all the tail surfaces. Next
step was a time consuming one, and included masking off accurate ribbing
detail in negative using strips of Tamiya masking tape.
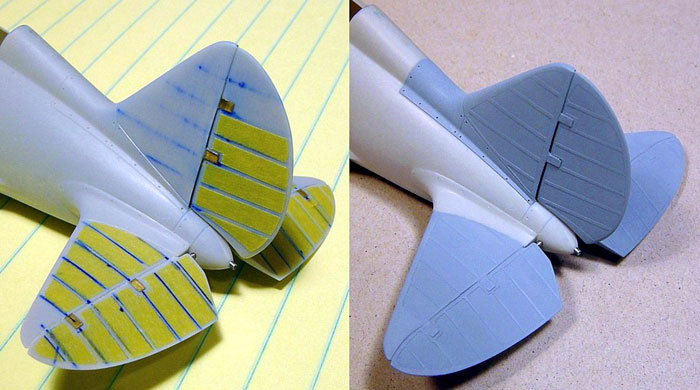
After this was done, I sprayed some neutral gray
color in thick layers, so that when I removed the masks it produced nice
3D rib effect, similar to the one present on the wing and ailerons. One
more layer of gray over the whole tail served to smooth all the edges.
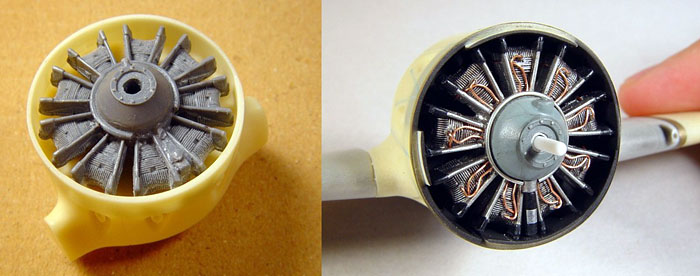
3. Nine Cylinders
on Two Wheels
Hobbycraft kit includes M-25 engine which is decent
enough, considering that it will be hidden in good part under the front
cowling. The problem was that I used mine for I-153 built two years ago.
So I used “Engines & Things “ Shvetsov unit that is a slight improvement
over the kit part, but can be made into a really nice looking radial
engine with some scrap plastic and copper wire.
I also used the excellent vac-form acetate canopy
from Falcon, because one in the kit was a bit on the absurd side.
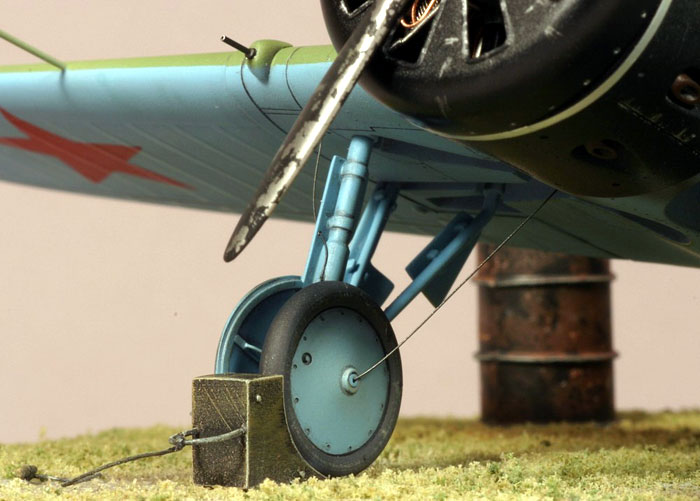
The main landing gear needed some attention as well.
I detailed wheels with some rivets along the rim, and rebuilt the covers
completely, with structure made out of Evergreen stock, thin wire, syringe
tubing and such. I used available photos to work from, and ended up with
something that can pass closer inspection.
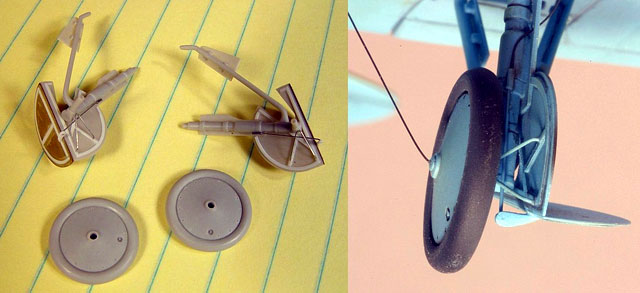
I also opened up a trapezoidal window in the back
wall of the right wheel well, and covered it with acetate sheet. This
opening offered quite limited view to the pilot, of what was below him in
critical moments of landing.
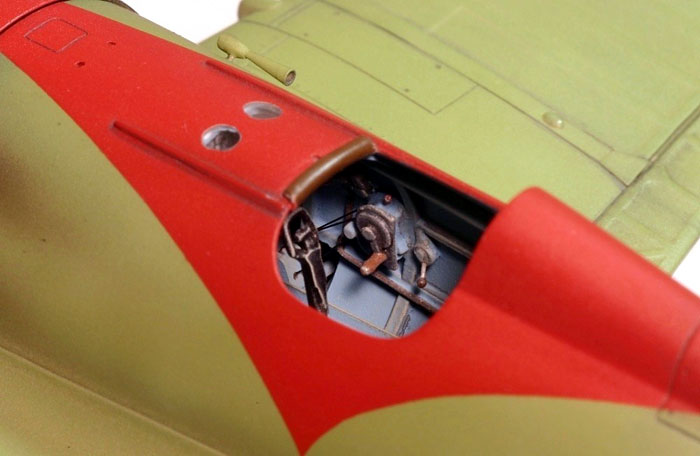
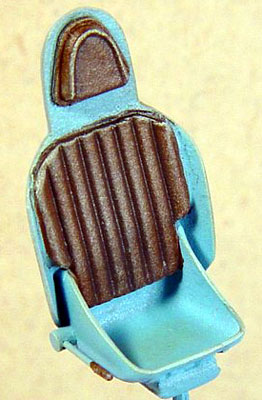
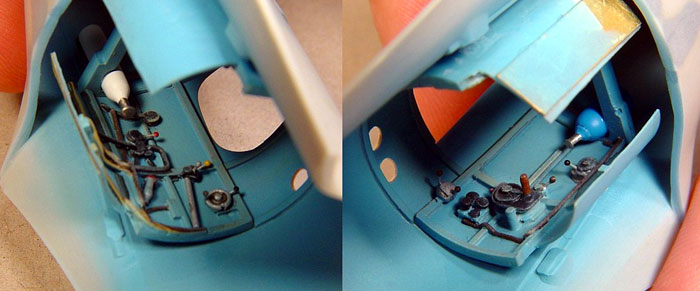
4. Cockpit
Just when I started to despair, mailman arrived
again. This time a cockpit set was packed in a box, and not a minute to
early. Airwaves cockpit is once again done mostly in light tan resin, but
there are also small bits in white metal. This set is beyond comparison
with whatever was originally in the box. I will let images speak for
themselves.
Click the
thumbnails below to view larger images:
At this point two fuselage halves were already glued
together, which meant that I would have to install the cockpit through the
bottom opening of the wing area. But this didn’t seem to be very hard;
after all, people build ships in bottles don’t they? As a matter of fact,
design of the set made this task really easy. I first inserted main
fuselage frame behind the pilot’s seat into the fuselage cavity, and fixed
it there with CA glue.
This helped to align side panels that also wrap under
the partial floor element, which also anchors on mentioned fuselage frame.
After a bit of adjusting everything seemed to fit well, so I painted all
the separate bits, applying some washes and dry-brushing to make it all
come alive. Interiors of I-16 were commonly painted with undersurface
color of the time (if not left unpainted), this being rather bright shade
called AII Blue. I mixed this myself, trying to follow the hints given by
guru Erik.
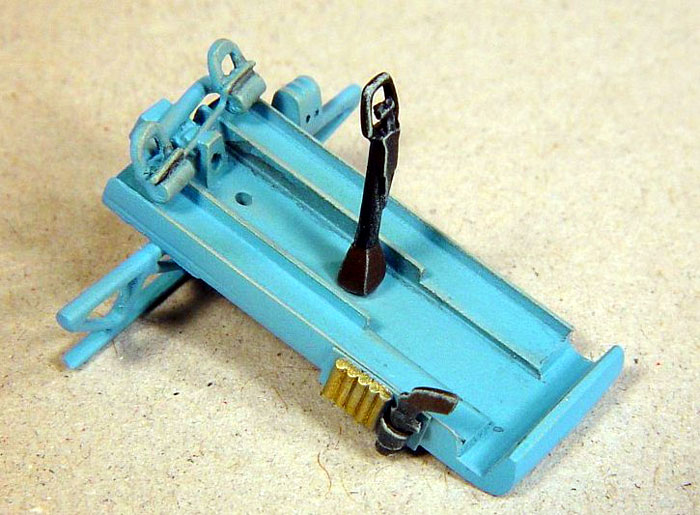
Few bits that came in white metal form are:
telescopic gun-sight, nitrogen and oxygen bottles, ruder pedals, control
stick, flare pistol, as well as small levers for different controls left
and right (I replaced these with spares from photo-etched bin, for more
“to the scale” appearance). I turned both bottles, and the gun-sight using
my Dremel as the lathe, with sand-paper pressed against their surface, to
clean them up and improve cylindricity. The gun sight needed some more
work to bring to the standard. I made forward “spider-leg” supports from
the copper wire, and the oval canopy seal from the brass sheet, cut and
bent to shape. After touch of black paint it looked nice and proper.
The only slight let down of the cockpit set is the
instrument panel. There are three of these, mind you, for different I-16
types, but they all have blank instrument faces. Now, after all is
assembled it won’t make a big difference, but it would be nice if an
acetate sheet for instrument faces was included. Well, I would be dammed
to leave it like it is, so I went to make my own instrument mask.
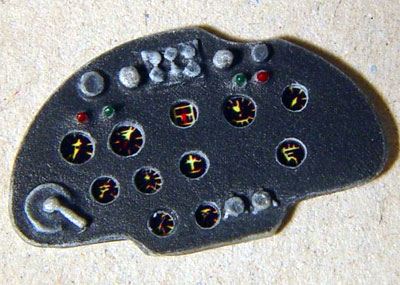 I
drilled through holes for all of the instruments with drill bits of the
proper diameter. Then, I laid the piece with its back down on the sheet of
sand paper, and sanded off most of its thickness. After this, I scanned
this part (face down) to get a computer image of the instrument placement.
Using the magnified image, I created simple instrument faces in a program
for manipulating bitmaps, “MS-Paint”. After this is finished, I printed
the scaled version of this mask on a glossy photo paper. When the print
dried, I applied a cote of “Future”, for that reflective glass look. Now,
all that is left is to paste that mask on the back of pre-painted resin
panel, just like with photo-etched/acetate combination. Voila, home made
instrument panel! This process may sound complicated but its actually very
easy to do (if one has a computer). I
drilled through holes for all of the instruments with drill bits of the
proper diameter. Then, I laid the piece with its back down on the sheet of
sand paper, and sanded off most of its thickness. After this, I scanned
this part (face down) to get a computer image of the instrument placement.
Using the magnified image, I created simple instrument faces in a program
for manipulating bitmaps, “MS-Paint”. After this is finished, I printed
the scaled version of this mask on a glossy photo paper. When the print
dried, I applied a cote of “Future”, for that reflective glass look. Now,
all that is left is to paste that mask on the back of pre-painted resin
panel, just like with photo-etched/acetate combination. Voila, home made
instrument panel! This process may sound complicated but its actually very
easy to do (if one has a computer).
Now all that remained was to assemble
everything, sand, polish, prime, sand, and polish again...
Erik, the
compassionate soul that he is, offered help even when decals were
concerned, and printed two tail stars with white no. 1 on them. In the
mean time I managed to find appropriately sized number 1 in my
spare-decals pile, and after all decided to spray paint the stars
(unappreciative bastard that I am), mainly to be able to color match with
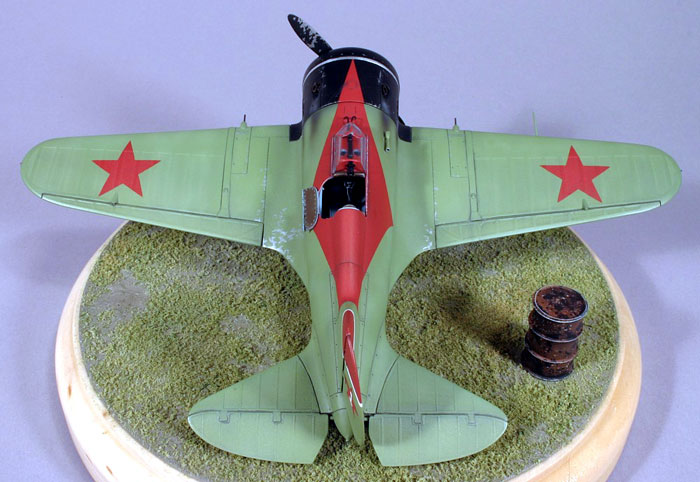
the red spearhead. So, everything on the model except the white number 1
on the ruder is masked and airbrushed. Red flash on the vertical tail
should actually be a slightly darker shade, but on most of my photos, this
in unnoticeable.
Otherwise, shades for AII Blue (bottom) and AII Green
(top) were mixed at home, and after first application tweaked slightly to
come back second time, and add some depth at places.
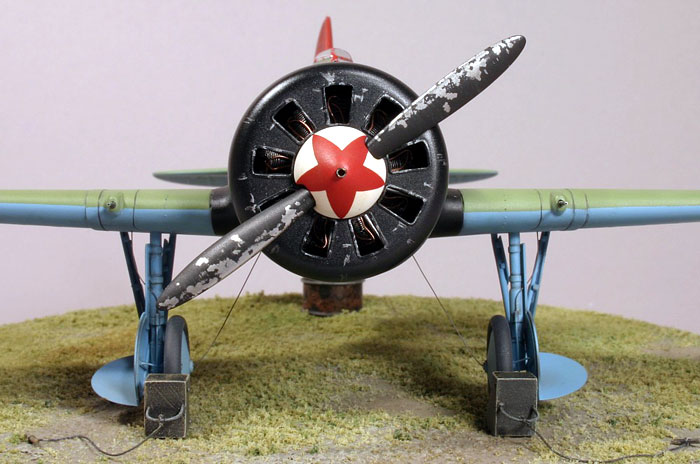
I read somewhere about a technique of achieving
chipped paint by applying wet salt over pre-painted silver surface, and
then airbrushing main color. Dry salt can be easily removed to expose
chipped bits. It sounded crazy enough to try, so the propeller and the
canopy frame were done in this way. Later, I would use the same technique
for discoloration of rusty oil drum. I am pretty happy about the whole
affair.
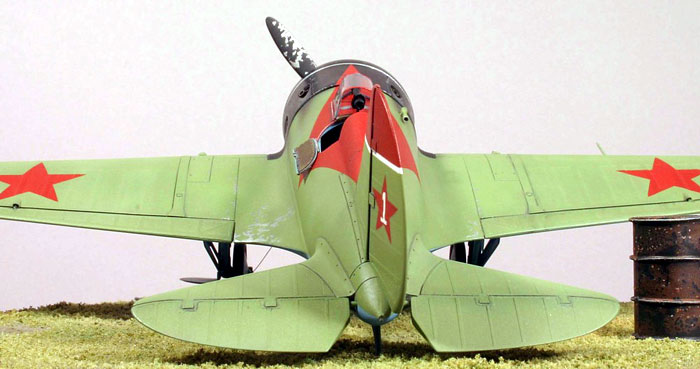
The idea
to build a base came after finding several photos of I-16 with its tail
propped, so that the fuselage is leveled. I liked the looks of it, and
thought that a rusty fuel drum as a tail prop, and a pair of wheel chocks
may add right amount of character.
The fuel drum was made from brass sheet, rolled
around a pen, with copper wire for the drum rings. I also added some small
dings to its surface. The drum has a pin in the bottom, with which it can
be secured in two different places on the base (where I drilled the
holes). Now I am able to display the model propped on the oil drum, or
resting on the ground, with the drum standing next to it.
Wheel chocks were made like little boxes of plastic,
with half rings in the front made from copper wire. Again, shape
corresponds to the one seen on photos. I roughly sanded them, painted them
black, and then weathered them with browns.
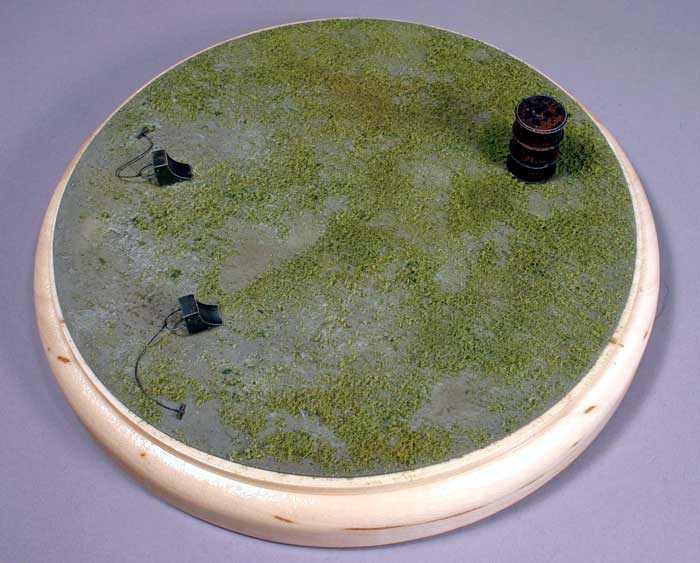
The biggest challenge was the grass, as I never did
this before. I bought two bags of “railroad grass” of different color, one
fine, one course. In retrospect, I would get only the fine one next time,
as only that really looks good in 1/48 scale. I also discovered that
hairspray is much better bonding agent for grass then recommended white
glue. Just don’t let my wife know... Once fixed to the base, I dry-brushed
different shades over the grass to achieve more natural look. Not bad for
the first time...
Conclusion and
Acknowledgements
|
This
particular I-16 early Type-5 turned out to be much, much more than a
simple, and quick build. It rather became a proof that you can condense a
lot of attention and detail in a very small space, while still keeping
most of it appreciable, and visible!
Airwaves accessories hold same essential importance
to this Hobbycraft kit, as plastic surgery holds to Hollywood film
industry. And I will venture to say that using the first-mentioned
combination produces much more authentic and satisfying result, than ...
well the second mentioned case.
I would like to thank Erik Pilawskii for all of his
knowledge and help, and endless patience in answering my questions.
In the same manner, I am really grateful to Pete
Vill, who firstly mastered these sets, and then spared one copy for my
mailman. He also continues to build my expectations for English beer, and
I just hope that it will live up to it.
Finally, kudos to Airwaves for tackling subjects
that so many others like to ignore.
After all that has been written, I have run out of
words to put here, and “Happy Modeling” is becoming such a cliché, so
‘till the next time...
don’t misbehave!
Click the
thumbnails below to view larger images:
Model, Images and Text Copyright © 2003
by Aleksandar Šekularac
Page Created 11 December, 2003
Last Updated
17 March, 2004
Back to
HyperScale Main Page |
 Home |
What's New |
Features |
Gallery |
Reviews |
Reference |
Forum |
Search
Home |
What's New |
Features |
Gallery |
Reviews |
Reference |
Forum |
Search