|
Ilyushin Il-2 Stormovik
by
Ian Robertson
|
|
|
Ilyushin Il-2 Stormovik |

HyperScale is proudly sponsored by Squadron.com
The IL-2 Stormovik has the distinction of being the
most-produced aircraft in the Great Patriotic War, with almost 40,000
leaving the production line.
The single seat version began production in early
1941 and became a feared ground attack aircraft for the Russians against
Hitler's invading armies during operation Barbarossa. Nevertheless, the
Germans soon exposed the single seat IL-2's vulnerability to fighter
attack, resulting in heavy losses for the Russians.
Mounting losses of pilots and machines led to the
development of the two-seat versions (with rear gunner) which accounted
for the majority of production IL-2 aircraft. These too were vulnerable
to fighter attack, but as air superiority tipped in Russian favor the
Stormovik was a devastating weapon against ground targets.
Accurate
Miniatures' 1/48 Scale Il-2
|
Accurate Miniatures released three versions of this
ungainly yet historically important aircraft: a two seat version, a
single seat version with wheels, and a single seat version with skis.
The ski-equipped version is readily available in
stores and on eBay, and contains all the parts needed to make the
wheeled version.
A minor adjustment to the landing gear is required
for the wheeled version, although this information is not included in
the instructions. In brief, for each main landing gear delete part 56
and to part 93 remove the horizontal brace where the wheel attaches. Be
sure to leave stubs of the horizontal brace in order to click the wheel
into place. For the tail gear replace part 53 with part 103. Consult
with the instructions from one of the wheeled versions if further
clarification is required.
My model is the ski-equipped version with modified
landing gear as outlined above.
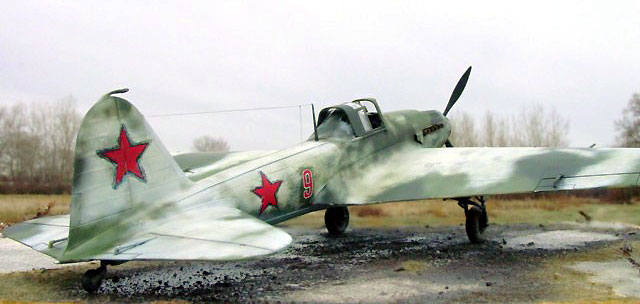
A number of other minor external modifications were
made to the model. (1) The sand filter on the starboard wing leading
edge was removed because according to Squadron's "IL-2 In Action" the
filter was uncommon on single seat IL-2s. (2) Styrene strips were used
to simulate external strengthening ribs on the upper and lower fuselage
between the cockpit and tail. These ribs were added on many early IL-2s
for reinforcement of the wooden fuselage. Later IL-2s had the ribs
installed internally while on the factory line.
During construction the cockpit, wheel wells, and landing struts were
painted a bluish-gray-green.
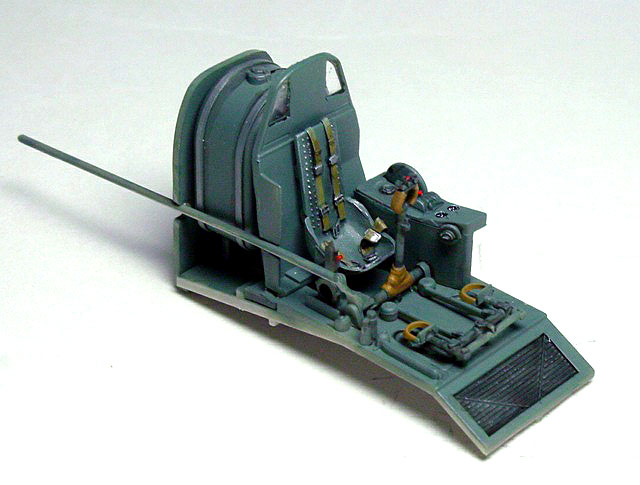
 Using Polly Scale acrylics I mixed 3 parts Soviet
green, 1 part navy blue, and 1 part RLM66 (dark gray). Using Polly Scale acrylics I mixed 3 parts Soviet
green, 1 part navy blue, and 1 part RLM66 (dark gray).
After completing
the model I came across an article that suggested a dull aluminum color
would be more likely for the IL-2, whereas the blue-gray color I used
would perhaps be better suited to aircraft constructed primarily from
wood (e.g., Yaks, Lavochkins).
The etched metal seatbelts are from Eduard.
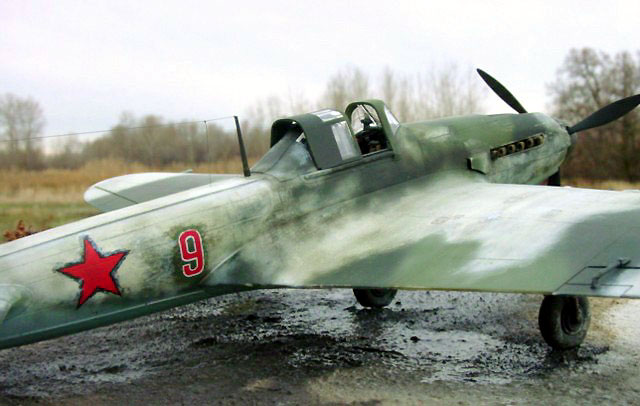
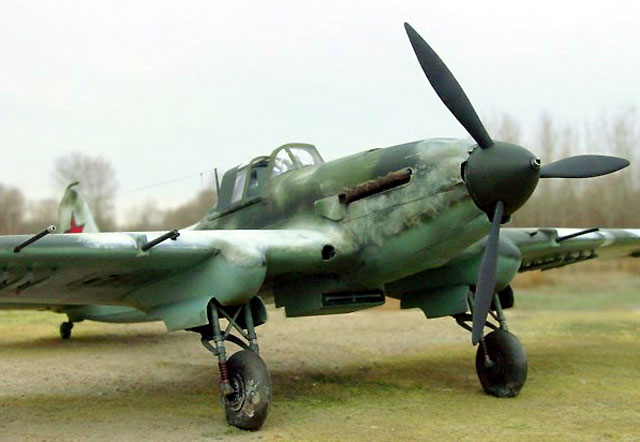
Winter Camouflage
My model represents a war-weary aircraft from the
Russian front during the winter of 1942. To achieve the effect of field
applied winter distemper I painted and weathered the model in four
steps:
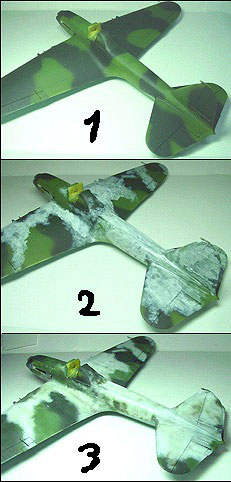 Step
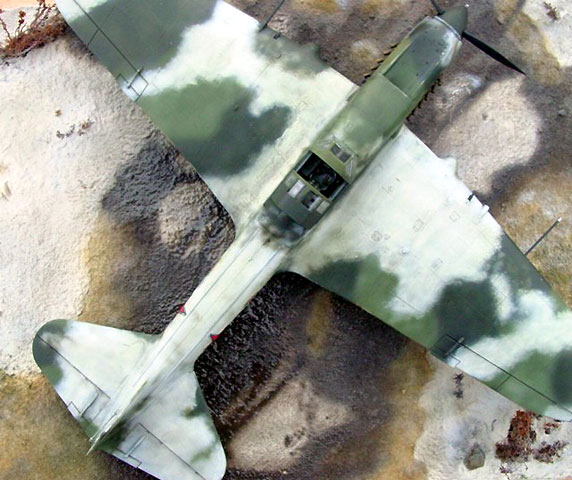
1 - Basic Camouflage. After pre-shading the model with black
paint, I painted the undersides light blue (Polly Scale acrylics: 75%
Russian underside blue, 25% RLM65). The upper surfaces were then
camouflaged using Testors Russian Armor Green and Polly Scale
Black-Green with a small amount of black to darken it further. The
camouflage was sprayed freehand to create soft edges. No weathering was
applied at this point. Step
1 - Basic Camouflage. After pre-shading the model with black
paint, I painted the undersides light blue (Polly Scale acrylics: 75%
Russian underside blue, 25% RLM65). The upper surfaces were then
camouflaged using Testors Russian Armor Green and Polly Scale
Black-Green with a small amount of black to darken it further. The
camouflage was sprayed freehand to create soft edges. No weathering was
applied at this point.
Step 2 - White paint was applied with
a 3mm wide flat-edged brush to the areas I wanted covered with
distemper. No effort was made to paint the white evenly on the model. I
broke all the rules of painting with a brush, and at this point the
model looked terrible.
Step 3 - Next I airbrushed white
paint over the areas that I had roughed-in with the brush. I made sure
to leave a hint of the uneven coverage produced by the brush (otherwise
why not just skip the brush step, mask the model, and apply white paint
evenly with an airbrush?).
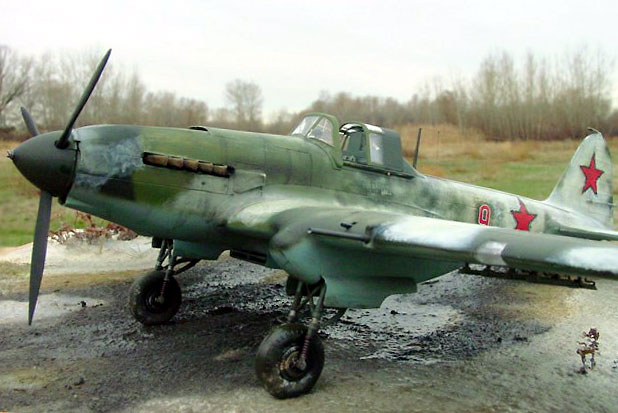
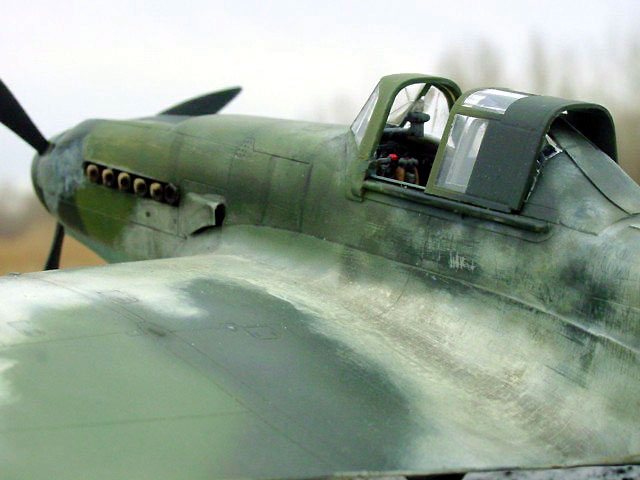
Step 4 - Weathering. To remove the
"clean & fresh" look of the white paint I sprayed a highly thinned
mixture of black and burnt umber paint over the model's surfaces. Once
the paint had dried I used medium and fine grain sandpaper to scuff the
distemper and in some places expose the camouflage beneath. Greatest
attention was given to the wing roots and fuselage near the cockpit. A
Micro-mesh 4000 grit sanding cloth was then used to smooth and polish
the surfaces prior to the addition of decals.
The undersurface of the wings was weathered lightly
with mud, particularly behind the wheel wells. The tires were blotched
with dark brown paint as well as some white for snow and ice. I then
applied a patchy gloss coat to the tires to give them the appearance of
being wet.
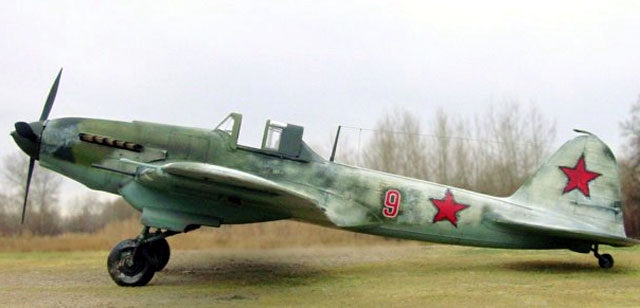
Decals and Final Touches
The model was sprayed with Future floor wax prior
to the addition of decals. I opted to apply the decals after adding the
winter camouflage even though in reality distemper would have been
applied around the aircraft's markings.
Small amounts of dark green paint were hand-brushed
around the stars on the fuselage and tail to give the appearance of
distemper that had been applied in the field. Exhaust stains were
sprayed with highly thinned black paint. The model was then coated with
a 50:50 mixture of Polly Scale clear flat and clear satin.
A wooden cutting board was used as the base for the
diorama.
Celluclay, a papier mâché product available in
craft stores, was used to make the basic ground cover. Celluclay powder
was mixed into a paste with water and white glue and then spread thinly
over the cutting board. The cutting board had previously been treated
with clear lacquer to prevent warping while the celluclay dried.
While the celluclay was wet I added fine sand and
dull green static grass to simulate areas of dirt and grass. Some
patches of celluclay were left bare to simulate areas of snow.
Areas of grass, mud and snow were painted
appropriately once the celluclay had dried thoroughly. The taller
vegetation is represented by various dried mosses.
Clear gloss epoxy resin was poured onto the areas
that I wanted to appear wet.
All images were taken outdoors on an overcast day
(for mood) with a SONY digital camera set at its highest picture
resolution (2048 x 1536 pixels).
Other camera settings were as follows:
-
200 ISO film speed (yes,
it's an option on my digital camera)
-
100-150th/sec shutter
speed
-
F-stop 8.0, and fixed
focus distance of either 20 or 30 cm.
Images were cleaned up using Adobe Photoshop 6.0
for the Macintosh. Specifically, the interface between the base and
background were merged using the software's "blur" tool, and edges in
some photographs were sharpened using the "sharpen edges" tool.
Sharpening images in such a way helps to restore some of the clarity
lost during image compression.
Click on the thumbnails
below to view larger images:
Model, Images and Text Copyright ©
2003 by Ian Robertson
Page Created 24 February, 2003
Last Updated 17 March, 2004
Back to HyperScale
Main Page
|
 Home |
What's New |
Features |
Gallery |
Reviews |
Reference |
Forum |
Search
Home |
What's New |
Features |
Gallery |
Reviews |
Reference |
Forum |
Search