|
Junkers Ju 86B
by Julian Herrero
|
|
|
Junkers Ju 86B |

vailable online from Squadron
This is
the first of an occasional series on 1/72 German Interwar Airliners. I’ll
start with the Ju 86 which Ron Firth put a short review some issues ago in
21st Century Modeller. Other featured airplanes will be :
Junkers F 13 (Revell) and Junkers G 24 (VEB), which are already finished.
Still in the workshop are a Heinkel He 70 (Matchbox) and a 1/144 Junkers G
38 (Revell). And still in the box : Focke Wulf Fw 200 Condor (Revell),
Junkers W 34 (MPM), Junkers 52 (Italeri+Heller), Dornier Wal (Huma),
Dornier 18 (Matchbox), 1/144 Dornier Do X (Otaki), and may be some other
kit yet to come ...
Italeri 1/72
Scale Junkers Ju 86B
|
This feature is about the 1/72
Ju 86 B kit from Italeri, ref. 029. This kit is made up of 105 light grey
pieces with raised panel lines and 8 clear parts. There’s a bit of flash
on some parts, but overall detail is fair. This kit is based on the Ju 86
D1 bomber but includes a new fuselage for the airliner version. The rest
of the kit remains the very same. So all in all, there’re 30 plastic and 4
clear parts leftover. The mouldings are quite old, dating back to 1975 ...
when Italeri was called Italaerei and plane kits came with stands … but
it’s still good, though. Moreover it’s the only game in town… Throughout
this feature Tamiya acrylics colours will be used, unless otherwise
stated.
Construction
Construction begins with the passenger cabin. As for
the kit, the cabin is completely empty. So, I made individual seats from
plastic card. The cabin was painted XF-23 Light Blue and seats XF-59
Desert Yellow. I’m not sure about these colours, but let’s hope that I’ve
done it properly ...
And let’s go on with the cockpit. It’s in this area
where kit’s age is so evident : we get a “sofa” for the pilot, passenger
cabin bulkhead, steering wheel, bomb-aimer’s seat and the instrument panel
decal. This item is useless, it’s just a black panel with white spots on
it. I searched thru my spare decal box for a better substitute and I found
a panel from a DH Mosquito (used because its shape) and some scraps form a
Ju 52 and a Ju 88. With some detail painting we can get a quite convincing
instrument panel. Cockpit was also painted XF-23 Light Blue, but could be
XF-22 RLM 02. I’m not sure about this issue. So, any help would be truly
appreciated. The following details were added :
-
Rudder pedals made from plastic card, you can also
use photo-etched, but this would be quite expensive … for an item that
can hardly be seen ...
-
Pilot seat modified from a Matchbox He 70.
-
Stretched sprue folding navigator seat support.
-
Pilot’s seatbelts were made from draughtsman tape
painted XF-52 Flat Earth. Buckles were just painted with silver paint.
These items, like rudder pedals can be substituted by more expensive PE
parts.
-
A new centre console scratch built with 0.8 mm
plastic card. Throttle levers were made from stretched sprue heated with
a candle until it gets a kind of mushroom head.
-
Two side radio panels made from 0.05 mm plastic card
and scrap decals were also added.
Fuselage bulkheads and clear windows cabin were glued
before joining the fuselage halves. Then I glued the part that forms the
central under-fuselage which also serves as wing support. This assembly
leaves some gaps so putty is needed to fair the joints. Under fuselage
entry hatch and the bomb bay covers don’t look “appropriate” in the
airliner version, so they must disappear. I glued these parts, which don’t
have a positive fix, so more putty is needed to fair the gaps. The same
happens with the passengers’ entry door, but this has to be retained. So,
more putty is needed to fill the gaps, and after that I had to rescribe it
to its correct form.
And now we move
to the wings. Upper fuselage to wing joint is perfect, no putty at all. In
order to ease painting I took a detour form the instruction sheet and left
the engines apart for later assembly. Before joining both fuselage halves,
wheel wells must be built-up. As per kit the wells look awfully empty.
Walls were made from 0.1 mm plastic card. Structural details from
stretched sprue and plastic strip were also added. The wing-root slab that
slots into the fuselage interferes with the wheel wells and must be
removed. Anyway this assembly is strong enough. Keeping the wing dihedral
is easy because there’s an under-fuselage piece that takes care of it.
Another jump in the instructions and we straight to the
tail assembly. I only glued the tail plane and left the tail fins until
later on. The joint needs some putty.
And now the model is ready for painting. But, first of
all, let’s sum-up what’s still to be done : Engines + airscrews, rudders,
tail assembly braces, undercarriage legs + covers, cockpit glazing and
last details (antennas, probes, etc…) are left apart until painting is
over.
First of all, cabin windows were protected with masking
tape ... and started the painting job. As this model was to be finished in
bare metal, surface must be almost perfect. Any blemishes, scratches or
even putty will show thru. I washed the model in lukewarm soapy water and
let to dry. Afterwards I primed it with XF-16 Mat Aluminium. When fully
dry (about 2 days) I checked it for any scratch or blemish. If you find
any (and for sure you’ll find some ...), then patience ... more putty ...
more elbow grease and then another coat of primer. You can also check for
any panel lines that may have been erased and re-scribe them. When you are
satisfied with the result, the whole model must be polished to a mirror
like surface. Any polishing compound will do the job, but toothpaste is
cheap and easy to clean. Afterwards I washed the model again to get rid of
any polishing compound residues, at let it dry.
Cockpit was masked with Micro Mask, but any other
liquid mask would do the job. I prefer that blue stuff from Micro, Maskol
being too difficult to clean. Micro Mask is dense, covers properly and can
be cleaned and thinned with plain water. Once masking is dry we can start
painting. A Humbrol Metalcote Mat Aluminium basecoat was sprayed with a
Badger 350 thinned at 1 to 1 ratio with Humbrol thinner. In fact this is a
very thin mix, but I prefer to airbrush several very thin coats at very
low pressure (15 psi). In order to get an authentic finish I sprayed some
panels in different mixes of Humbrol Metalcote Mat. Alu., Polished Steel
and Humbrol Medium grey 165 thinned 1 to 1 with Humbrol thinner, with an
Aerograph Sprite Airbrush and fine-line nozzle. Masking over Metalcote
with tape is very tricky, because making tape lifts the paint behind. To
overcome this problem I varnish over Metal Cote before I mask it. But
let’s explain that. We’ve got the model painted in Mat Alu., then I spray
varnish, let it dry, mask some panels, and spray another colour (f.e. a
mix of Pol. Alu. and Pol. Steel). When dry, I remove the tape, spray
varnish again, mask some other panels and spray another colour. And so on
until all the desired variations in tone are achieved. This may sound
tedious (in fact IT IS VERY TEDIOUS!!!), but just a very thin coat is
needed. This paint can be burnished to a true metal-like sheen. By
burnishing alternate panels a very nice effect can be achieved. I also
covered some panels with Bare Metal Foil to add more contrast. This is
great stuff; it’s like kitchen foil but much thinner and self-adhesive.
Once in place and burnished it looks like real metal. I also used silver
colour decals (matt, satin and gloss) to depict registers and small
panels. I cut them with a sharp X-Acto blade and Eduard scribing
templates. When painting the airframe I also sprayed engine nacelles, tail
and undercarriage covers.
Decals
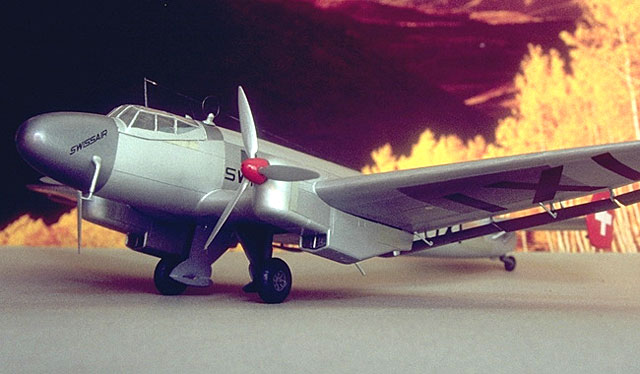
Kit decals cater for two planes : B-0 Lufthansa D-AKOP
“Kismet” and Z-1 Swiss Air Lines HB-IXE. I prefer unusual decors, as can
be seen in my web-site
http://rt0023gv.eresmas.net/indexen.htm. So then I went for a Swiss
plane, but not HB-IXE. Instead I choose the HB-IXI just because I found
more pictures of that plane. Decals are accurate but need some
modifications : just cut some lines to convert an E, to an I (or that was
what I thought ...). Decals are good, as usual with Italeri and conform
well to the details. I didn’t use the rudder Swiss flag. I painted instead
the rudder Red Vallejo ref. 957 and cut a cross from white decal. Decals
react well to Micro Set and Micro Sol conforming to the surface like a
painted on subject. Once dry, residues from Set and Sol were removed with
a damp soft tissue. 24 hours later I re-varnished the model in order to
protect paint and decals. This time I used Superscale Satin with just a
bit of gloss added, thinned 1 to 2 water. Superscale varnish is very good
but temperamental (best suited for hot climates). As water is the thinner
drying times tend to be longer than other paints. When airbrush mat
varnish this is not a problem, but when trying to get a high gloss finish
you must spray lots of paint. So great care must be taken to avoid runs.
Moreover it has a nasty tendency to clog the airbrush nozzle. So an
external mix airbrush like the Badger 350 is more suitable for the job.
Later on a fellow modeller told me to add some ammonia to the water. And
it does work great!!!
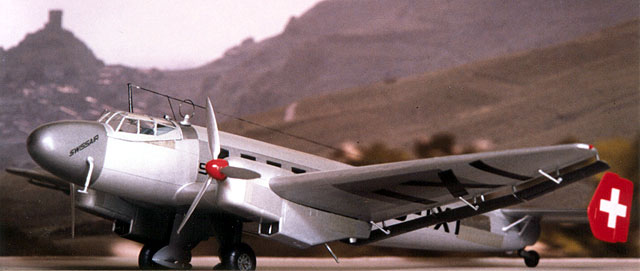
And, at last, all painting is over. When everything was
fully dry, I detached the canopy which was temporarily held in place with
MicroMask and tidied it up.
Let’s go on with the gluing of the engines to the
wings, but keeping the propellers aside until later on. Engine pods make
for a perfect fit. And, speaking of Devil, he appeared … I realised that
I had modified wing codes, but not the fuselage codes, which stood a proud
HB-IXE. Oh, my God!!!! Anyway, it was easy to solve. I just cut two pieces
of silver decal to cover the offending dash and convert the E to an I.
This may sound awkward but it worked …
And then the last details : tail plane supports, tail
planes, undercarriage, propeller, flaps, probes, antennas and balance
weights. Undercarriage is a very simple affair. I painted them XF-22 RLM
Grey. Inside of covers were also painted RLM Grey. I also added some
stretched sprue detail. Covers are also an integral part of the
undercarriage. So extreme care must be taken when gluing them. Tire
bottoms were sanded in order to represent the weight of the plane. I
painted them in a XF-63 Panzer Grey and X-18 Semi Gloss Black mix.
Meanwhile I glued the vertical surfaces taking care of alignment. Let the
assemblies dray for a whole day. Now that the plane can stand over its
wheels lets go on with the last details. I modified the propellers so that
they can be popped into place. My models use to travel a lot, and I always
try to modify parts that are prone to break (propeller, antennas, probes,
etc), so that they can be just pushed into place. Propeller blades were
painted Pol. Alu. Metalcote, burnished with a cotton swab and gloss
coated. Hubs were painted in Vallejo Red 957, the same colour of the
vertical surfaces. Flaps are the typical ‘Junkers Second Wing’, so common
from the Stuka and Ju 52, and so difficult to glue. Were painted a Pol.
Alu. and Pol. Steel mix with just a bit of Gun Metal (Metalcote). Then I
varnished them with the same hue as the whole plane. I glued the flaps to
the wing with small amounts of Loctite. Canopy was glued in place with PVA
glue. Fit is quite good at front and side, but awful at rear. Filled the
gap with PVA glue, smoothing the joint with a damp brush. Let it dry and
repeat until the gap is filled. When all PVA glue was fully dry, I painted
the frames in the cockpit colour. When dry I painted over it Mat Alu.
Metalcote. This way it seems that the frames were painted from the inside,
and is much more easy … Frames were varnished in the same hue as the whole
plane. Checked position of all the antennas and probes with my references.
Added radio antenna made from black stretched sprue with ivory painted PVA
blobs as insulators. All other antennas and probes were refined and also
made a new circular antenna from cooper wire conformed around a ballpoint
pen. And ... c’est fini....
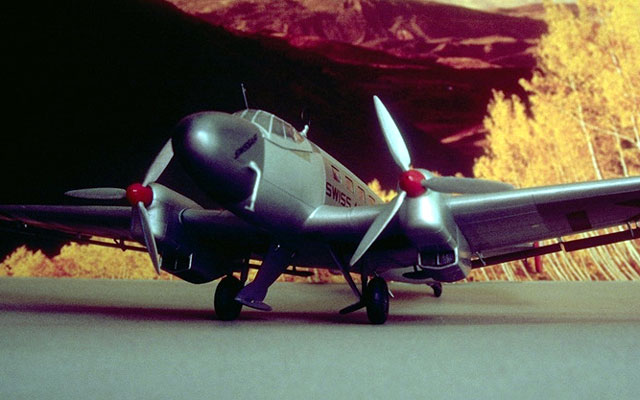
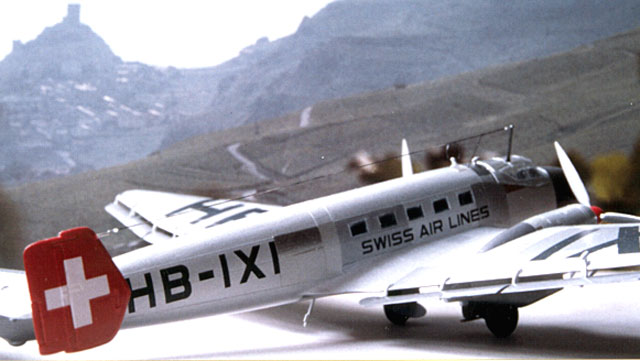
Depicted version: Junkers Ju 86 B-0 Werk. Num. 0008
delivered to Swiss Air Lines on April 1936 and registered as HB-IXI. In
service on night mail duties between Zurich and Frankfurt am Main. This
was the first Ju 86 airliner to enter regular service. Two aircraft had
already been delivered to the Lufthansa, but were used for tests and
“propaganda” flights. HB-IXI crashed on 12th August 1936 at
Wixhaussen and was returned to Junkers for repairs. In 1937 was
substituted for HB-IXE, which was a Ju 86 Z-1, that two years later became
a Z-2 by switching to BMW radials.
These designations may seem confusing because Italeri
refers to this plane as a Z-1 and I say this is a B-0, but both are
correct. Let’s explain why. “My” plane is a pre-production B-0. When
production was launched, export airline models received the designation Z
(Zivil) and the bombers K (Kampf). Z series included Z-1 (Jumo diesel
engines), Z-2 (BMW radials) and Z-7 (Pratt & Whitney Hornet radials).
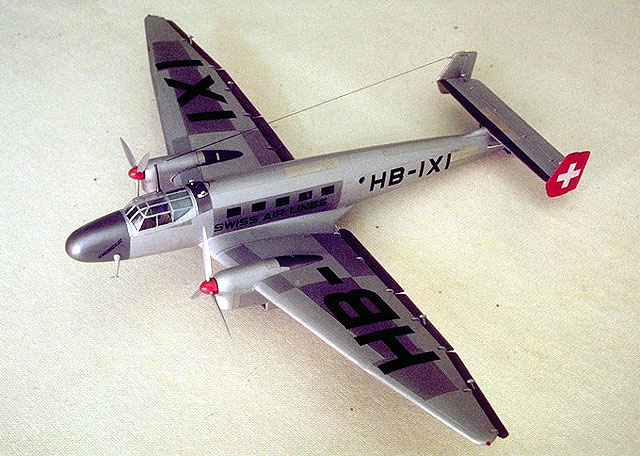
The Ju 86 is one of those less-familiar Junkers
aircraft from the 30s. It was not a very successful design due to the use
of diesel engines. Nevertheless it deserves it place in aviation history.
Designed by Dipl. Ing. Ernst Zindel as a fast airliner or bomber : Low
cantilever wing with 3 crew members and cabin for 10 passengers. Zindel
discarded previous Junkers contraction techniques as the typical oblong
fuselage section and corrugated surfaces, and designed a sleek plane with
an oval section and smooth surfaces. The Ju 86 was developed from the Ju
60/160, as its challenger the He 111 was inspired in the He 70. An initial
order of 5 prototypes (3 military and 2 civil) was placed to Junkers. The
first civil prototype, Ju 86 ba1 (V2) Werk Num. 4902 registered D-ABUK was
in fact the third prototype. Maiden flight was made on April 1935 at
Dessau, four months before its rival the He 111 at Marienehe. Some
stability problems were detected and wings were modified accordingly.
Flying characteristics were still poor and from the C series on (Z-2 for
export) tail was lengthened by 42 cm.
Junkers noticed that export customers were not much in
favour of the “peculiar” Jumo 205 C diesel engines. This engine was in
fact very advanced for its time : six cylinder, twelve opposed pistons,
2-stroke diesel, 600 CV, low consume and reduced frontal section. Even the
Jumo engines offered better autonomy (due to lower consumption), radial
engines were faster by 70 kph. So most export customers preferred radial
engines.
During 1936 17 Z-7 planes with P&W Hornet radial
engines were sold to South African Airways. In 1937 a Z-1 (Jumo engines)
was delivered to Southern Airlines & Freighters from Australia, being
returned to Junkers in short time. AB Aerotransport from Sweden bought a
Z-7 (Hornet engines) which was put into service with the SAF in 1940. The
Z-1 (Jumo engines) from Lloyd Aero Biliviano also was put into service
with the Bolivian Air Force in 1941. The last civil Ju 86s were sold in
1938 and were 8 Z-2 (BMW engines) : 3 to LAN Chile and 5 to Manchuria
Aviation Company.
NOTE – Some techniques used in this model are no longer
needed. For instance now I use SNJ Alu. paint which CAN be masked and
Klear/Future as gloss topcoat which is far superior to Superscale.
-
Air Enthusiast num. 20, Dec 1982/March 1983, Pilot
Press
-
Air Enthusiast num. 22, Aug/Nov 1983, Pilot Press
-
Lufthansa : An Airline & its Aircraft, R.E.G. Davies,
Airlife 1991
-
Junkers Pictorial Record 1910-1945, Motor Buch Verlag,
1990
-
German Aircraft of the 2nd World War, J. Smith & A.
Kay, Putnam 1985
Click on the thumbnails
below to view larger images:
Model, Images and Text Copyright ©
2003 by Julian Herrero
Page Created 10 August, 2003
Last Updated
17 March, 2004
Back to
HyperScale Main Page |
 Home |
What's New |
Features |
Gallery |
Reviews |
Reference |
Forum |
Search
Home |
What's New |
Features |
Gallery |
Reviews |
Reference |
Forum |
Search