|
Junkers Ju 87G-1 Stuka
in 1/32 Scale
by Wayne Bowman
|
 |
|
Junkers Ju 87G-1 Stuka |

HyperScale is proudly supported by Squadron
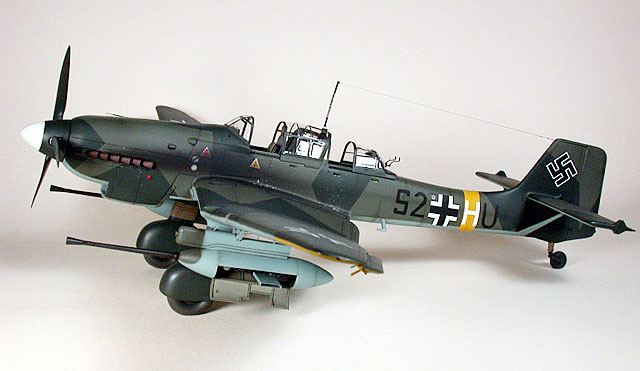
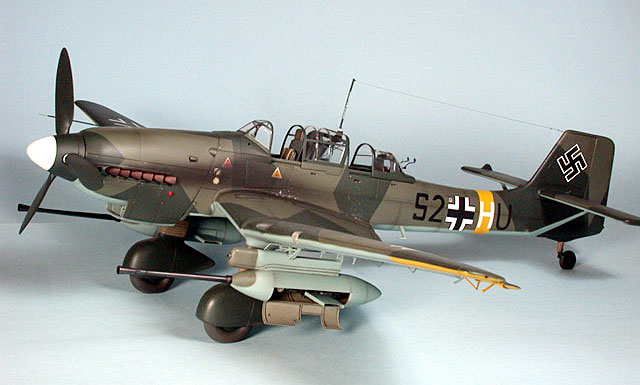
Here is my 1/32 Junkers Ju 87G-1. It utilizes the old Revell Ju 87B (in
this case from Revell of Germany), together with a multimedia kit from
Jerry Rutman to bring it up to the G standard.
The conversion set includes numerous resin components including a new nose
section, under wing radiators, one piece H-Stab struts, interior, as well
as cannon pods, pylons and mounts. Also included are a new vac-formed
canopy, and some photo-etch components.
The set provides a good starting point for this conversion, but as I
researched the subject A/C and got into the build, I found that some
additional effort in the way of, corrections and scratch-building would be
required to bring this conversion up to the level of fidelity that I was
hoping for.
General
The kit’s raised panel lines were all removed and re-scribed (those
appropriate to the G model), and the exaggerated raised rivets were toned
down over the entire model. Pinholes in a number of the resin parts
required some filling effort as well. The fit of the basic kit though, was
surprisingly good considering it’s age.
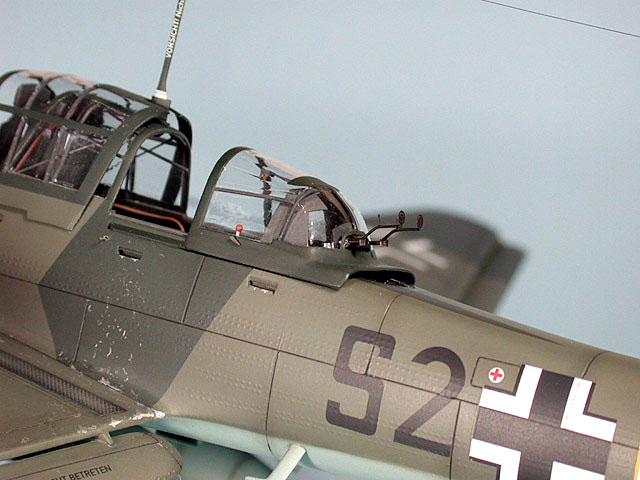
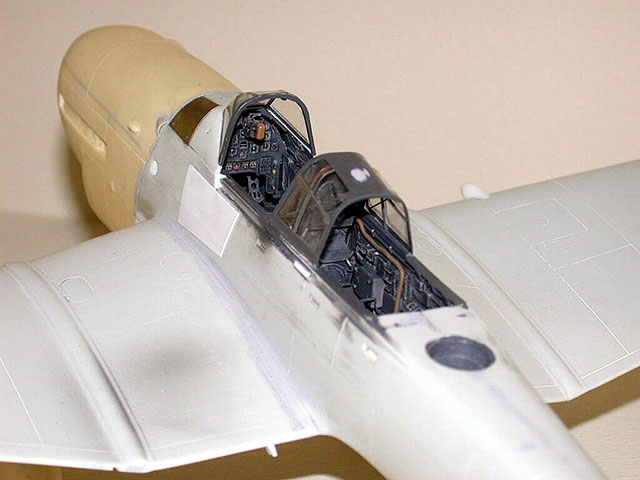
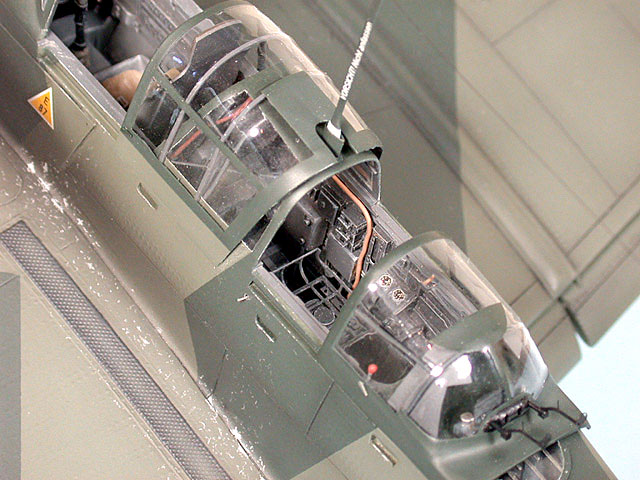
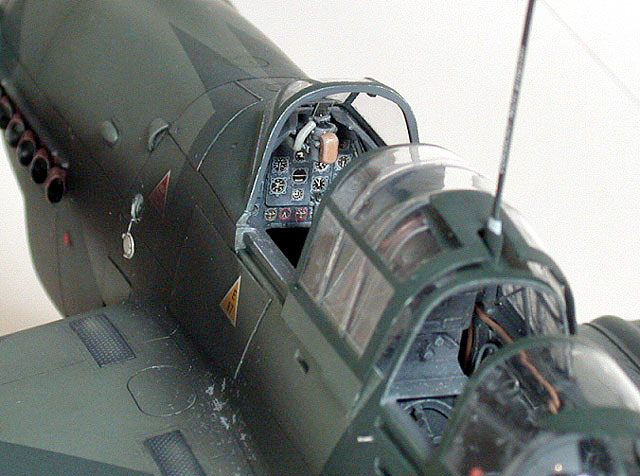
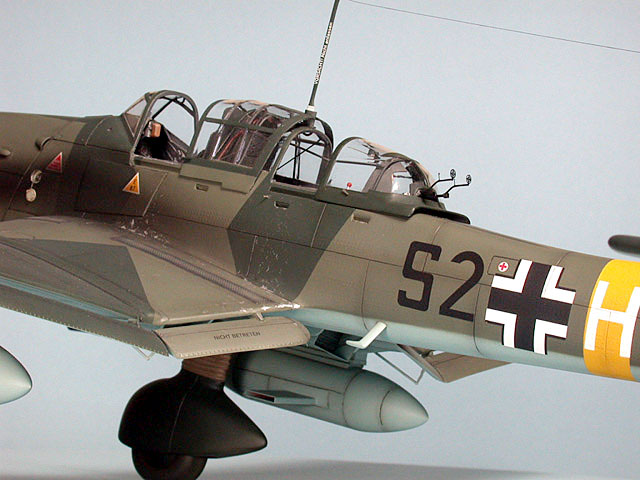
Interior and Canopy
The resin cockpit, required some clean up in the way of pinholes and a few
areas that were a bit “rough”. This is where I faced my first decision,
weighing whether to make the clean-up effort, or to try to bring the kit B
interior up to a standard resembling the G model via scratch-building.
Given my skill level with the file and filler, I decided that I could
achieve a better result using option 2 and set out to fabricate the
necessary modifications. To this end, I found the Eduard photoetch set
intended for the Ju87 B to be quite helpful, and utilized a number of the
components that were “common” to both B and G models. I found the surface
detail on the resin instrument panel a bit too subtle for my skills to
bring out, so again I elected to use the Eduard panel, modified as I was
able.
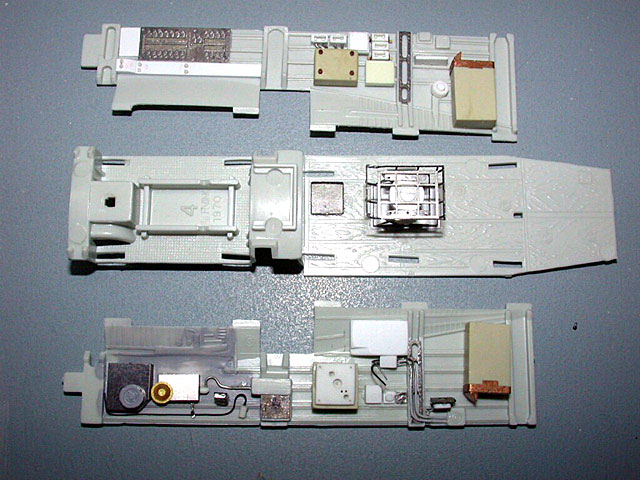
No Revi gunsight is included with the resin set, so I modified a Verlinden
resin sight from the spares box, with the defogging tube/line, which is so
conspicuous on the Ju87 D/G series.
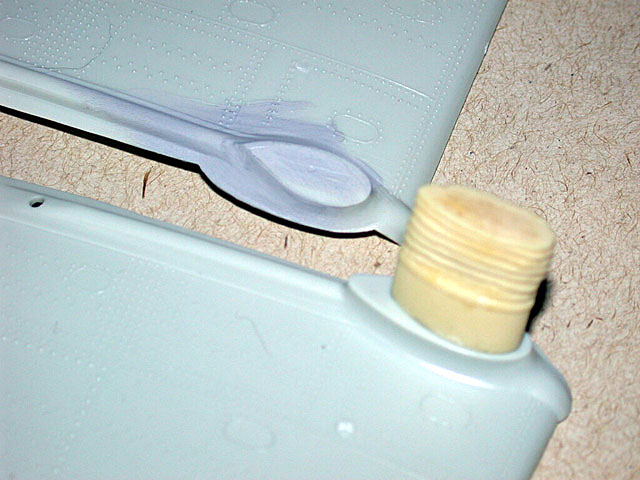
When cutting and mounting the vac-formed windscreen and canopy sections,
some creative filing, filling, and fitting was required to make them align
properly (well, somewhat anyway). On my sample, it appeared that the fore
and aft vac-formed canopy frames on each of the sections, were not quite
perpendicular to the A/C centreline. The canopy of the Ju87 D/G had a lot
of internal framing and this was added to the vac form components using
styrene strip, and lead wire as appropriate (square vs. tubular framing).
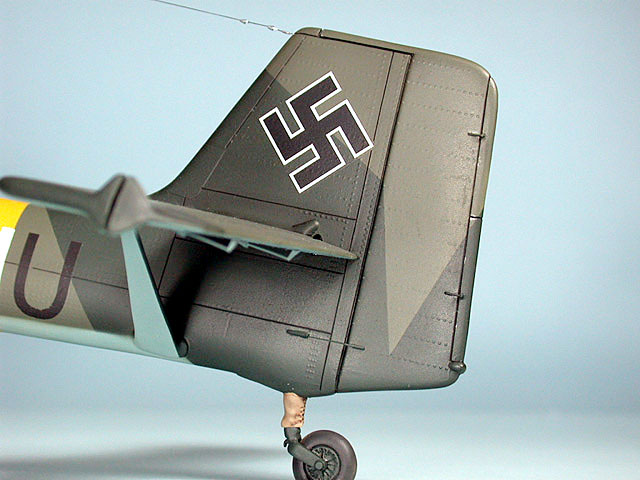
A new antenna mast was also scratch-built to replace the kit one, which
had little or no resemblance to the real mast.
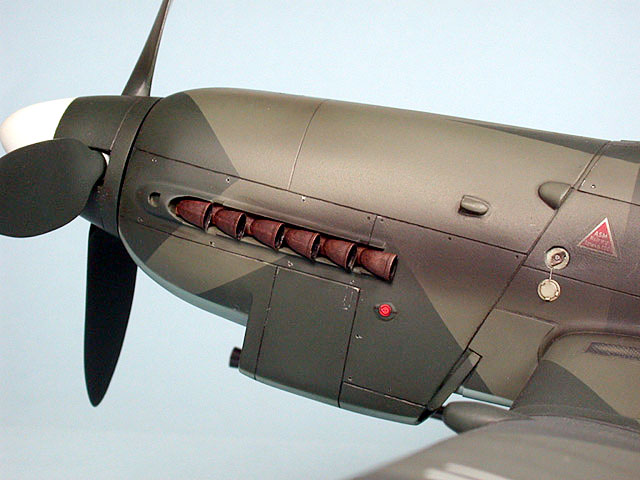
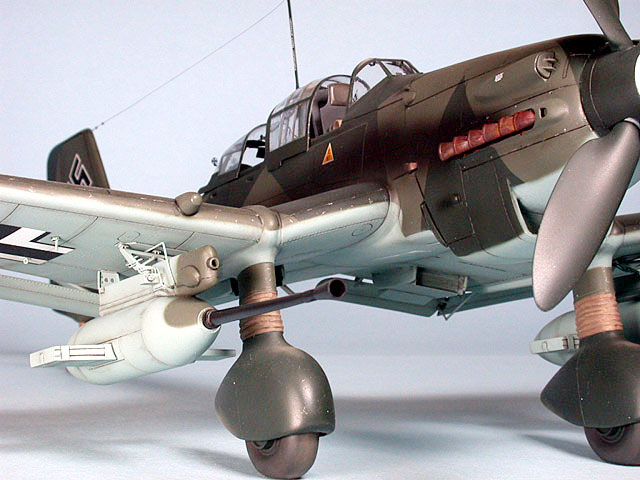
Fuselage & Horizontal/Vertical Stabilizers
On the fuselage, I opened up the fuselage hand holds, and filled the
attachment point for the starboard foot step, as the G series machines
only appear to have the port one in place. A significant amount styrene
and milliput was required to fair the fuselage into new resin nose by
reshaping the area in question to make it a bit more “square”. I also
replaced the upper aft engine mount fairing with scratch-built ones which
I felt where a bit closer to the proper shape. Another area that required
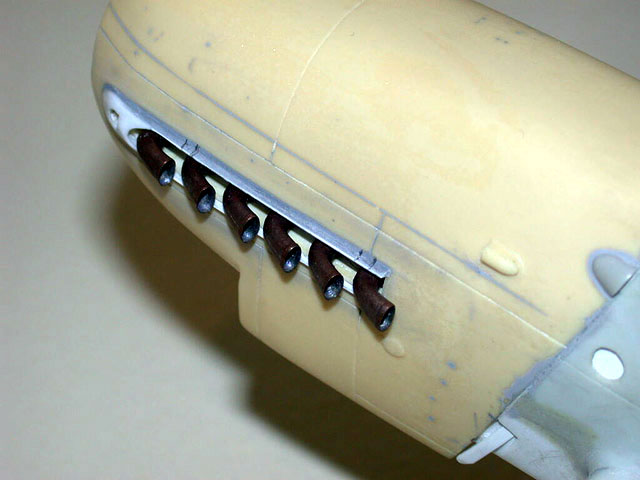
some attention was around the exhausts. Here, I dispensed with the resin
forward fairing, and built up the fairing area to more closely match the
proper profile. I replaced the resin exhaust stubs with a set of Moskit
stubs that were intended for the old Hasagawa Fw190 D9 (Jumo 213). The
actual Ju 87 exhausts (Jumo 211) look very similar to the 190’s, and while
the Moskit stubs look a smidgeon oversize for this application (they look
fine on the 190 though), I still felt they were an improvement over both
the kit and the resin examples. The slots for the exhaust in the resin
nose were suitably deepened to accommodate the Moskit exhausts.
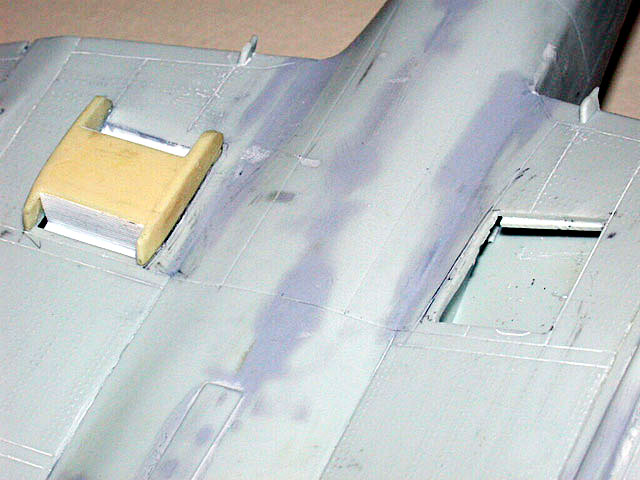
A rather large hole was opened up in the upper fuselage just aft of the
canopy and a well inserted for the scratch-built PRE4 RDF antenna. A piece
of clear styrene was used to fabricate the transparent cover with some
bare metal foil strips added on the inner surface to represent the
dielectric strips.
Various bits of appliqué armour were made from styrene, brass or copper,
and added in areas below the pilot’s canopy, forward of the windscreen,
and at the wing root.
The spinner was opened up at the three blade locations to ensure that the
prop cuff nested below the spinner surface.
A drain tube and the 13th exhaust stub were also added to the starboard
side at the engine join line.
Actuators were added to the v/stab and h/stab trim tabs, and control horns
and cables were added to the rudder.
Landing Gear
I realised early that due to difference in the foot print for the main
landing gear between the B and D/G, that I’d have to reshape the attach
point on the wing lower surface. Before I buttoned the upper and lower
wing sections together, I filled the backside of the attach point so as to
provide some backing for when I filed these areas back to accommodate the
new resin landing gear leg.
The kit main wheels, when installed in the new resin spats, looked far too
narrow, so I inserted some styrene between the two wheel halves to give
them a bit of a “fatter” appearance. The Rutman white metal tail wheel
yoke on my sample was broken on receipt so I elected to modify one from
the spares box. (NOTE: I’m sure that Jerry Rutman would have happily
replaced this part, and I would have gone that route if I didn’t have an
alternative readily available).
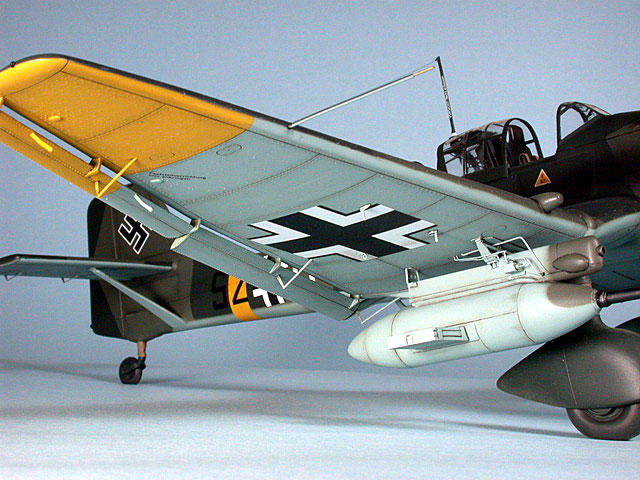
Wing
The left & right one-piece aileron/flap components were separated to allow
the inboard and outboard flaps to be mounted in the lowered position. I
had decided to build my example as a G1 model, thus necessitating the
addition of fairings over the machinegun ports in the wing leading edge,
and the omission of the resin wing extensions.
All the kit actuator rods for the flaps and ailerons, were replaced by
scratch-built versions, as were the aileron counterbalances. Tie-down
rings were also added to the wing lower surface.
The resin under-wing radiators were made to be simply affixed to the lower
wing surface, but references show that much of the radiator was actually
buried into the wing. This was accomplished by deepening the radiator
faces on the resin parts, then making cut outs in the lower wing surface
to sink them.
The references I had showing the G1’s upper wing surface seamed to
indicate that they utilized to wide anti-slip walkways so I utilized to
photoetched ones from the Eduard set.
I performed some major surgery in respect to the 37mm cannons. I elected
to try scratch-building more accurate forward and aft cannon mounts versus
the resin components provided. I also decided that I’d like to open up one
of the cannon pods to show the breach. Here is were I crossed scales a bit
and used the breach from Tamiya’s 1/35 Flak 38 ( I hope the purists can
forgive my “breach” of the laws of scale – and my bad puns). I did this by
cutting our the middle section of the resin pod and substituting an
equivalent length of brass tubing with a section cut out for the door. The
resin ends were hollowed out, styrene strip used to replicate internal
framing, the interior painted RLM02 (a guess on my part) and the breach
mounted internally.
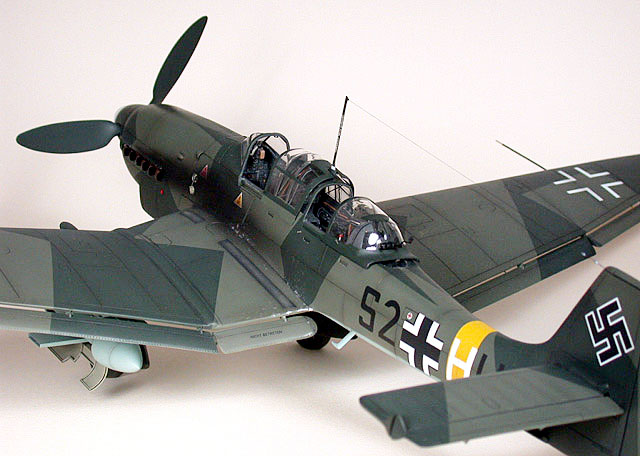
Painting,
Markings and Weathering
|
I used Mr. Surfacer as a primer base, followed by Gunze RLM 65, 70 and 71.
Decals were a mix of the Eagle Strike and various spares, to represent one
of the early machines operated by SG77.
After decaling, came a coat or two of PollyScale clear gloss, followed by
an oil wash and a couple of coats of PollyScale clear flat. Some more
local weathering with the airbrush, pastels, and silver pencil crayon and
there it was done.
The final picture in the series is of my buddy, and consummate modelling
supervisor, Fred the cat.
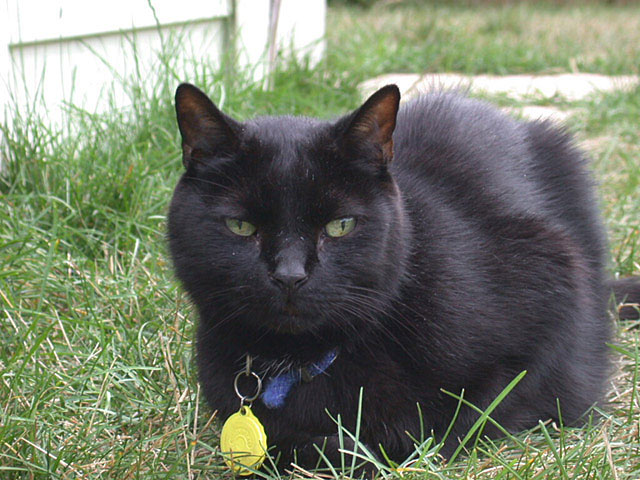
From the time that I started back into modelling, Fred enjoyed nothing
more than to sit on my lap during the build process and supervise, much to
the amusement of my wife. Many a contortion was achieved by yours truly,
while trying to glue three parts together simultaneously, at least one of
which inevitably had no interest in sticking, all the while trying to make
sure that Fred’s tail didn’t become part of the assembly.
Sadly, my companion passed away from cancer just before I completed this
model. It was our last project together.
This model is dedicated to the memory of my buddy Fred.
Click on the thumbnails
below to view larger images:
Model, Images and Text Copyright ©
2003 by Wayne Bowman
Page Created 06 November, 2003
Last Updated
17 March, 2004
Back to
HyperScale Main Page |
 Home |
What's New |
Features |
Gallery |
Reviews |
Reference |
Forum |
Search
Home |
What's New |
Features |
Gallery |
Reviews |
Reference |
Forum |
Search