|
Nakajima Ki-84 Hayate
by
Ian Robertson
|
|
|
Nakajima Ki-84 Hayate |

Hasegawa's 1/48 scale Ki-84 Frank is available online from
Squadron.com
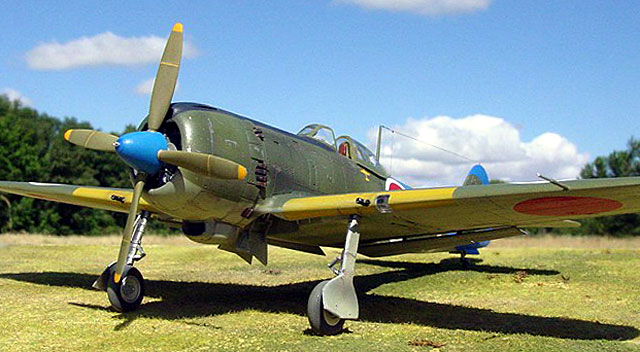
This is Hasegawa's 1/48 Ki-84 Hayate "Frank" built
out of the box in the markings of an aircraft from the 29th Air Combat
Regiment, Formosa, 1945. Decals are from AeroMaster's sheet 48-616 (Best
Sellers: Imperial Hayates, Part II).
Hasegawa's Frank is a simple, well designed, and
well detailed model that goes together without difficulty.
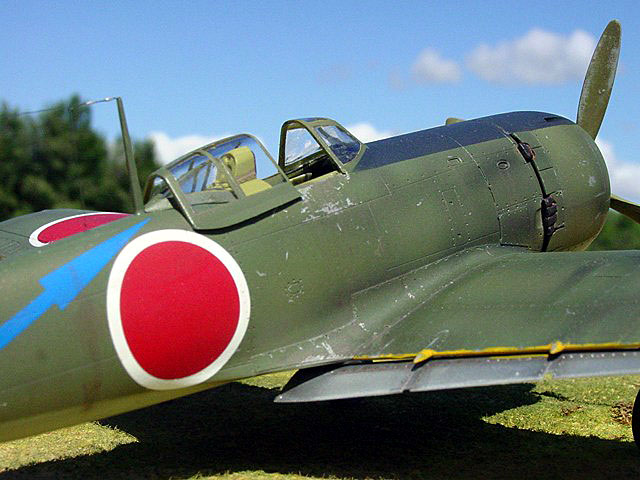
Cockpit detail is very good and visible on the
finished model. The seat comes with a reasonably represented pair of lap
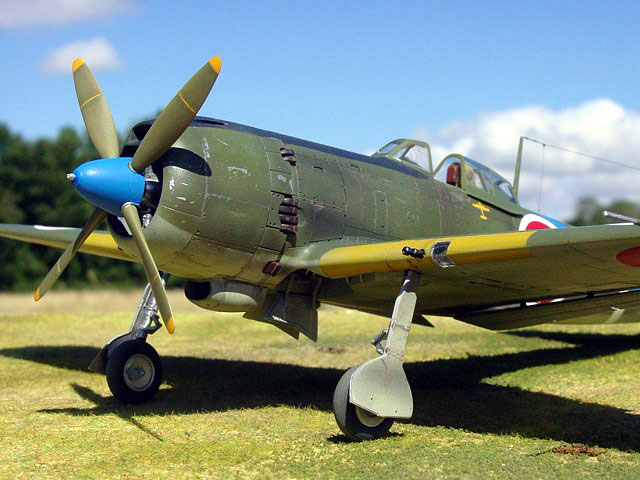
belts which I opted not to replace. Both weighted and unweighted tires
are provided.
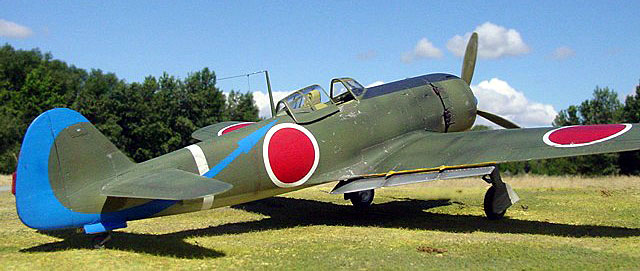
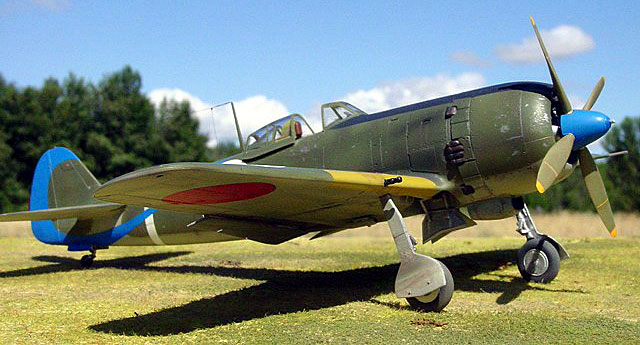
Hasegawa provides wing flaps that are designed to be displayed in the
extended position. These flaps certainly add interest to the completed
model, although I have yet to see a picture of an operational Frank with
the flaps extended. A few years ago I built this kit and modified the
flaps to the raised position; however, the final result was not
satisfying so this time
This time I opted to build the kit as it was
intended, despite the inaccuracy. It just looks better.
 Unless
noted otherwise all painting was done using Polly Scale acrylics. Unless
noted otherwise all painting was done using Polly Scale acrylics.
The cockpit was painted Weyerhaeuser Green (a railway color which is a
close match for Aeromaster's Nakajima interior green). Wheel wells, the
inside surfaces of gear doors, and the inside surfaces of the flaps were
painted with SnJ aluminum metallizer.
The first step in painting the main body of the model was to apply a
coat of Tamiya's gray surface primer from a spray can. I don't typically
use surface primer; however, because I was applying yellow and white to
the model I felt it would provide a better surface for their adhesion
(yellow and white paints often have difficulty covering uniformly over
bare plastic - light gray paint as an undercoat works wonders to remedy
the problem).
Yellow paint was sprayed over the leading edges of
the wings. I opted to paint the leading edge bands rather than use the
decals provided in the kit because I find the painted finish is easier
to weather and looks more realistic. I used the kit's decals as a
template for the masks that were used to cover the leading edge bands
until all other painting was complete. A similar technique was used for
the white fuselage band in front of the tail.
The exterior of the model was then sprayed with several light coats of
SnJ aluminum metallizer, particularly on the front to mid fuselage and
the upper wing surfaces (but not the ailerons - these were fabric). I
did not buff the natural metal finish (NMF). If you do buff the NMF, the
camouflage will not adhere well to the model. This shortcoming can be
used to advantage if you want to create the effect of heavy paint
chipping, as was often seen on many Japanese army aircraft late in the
war.
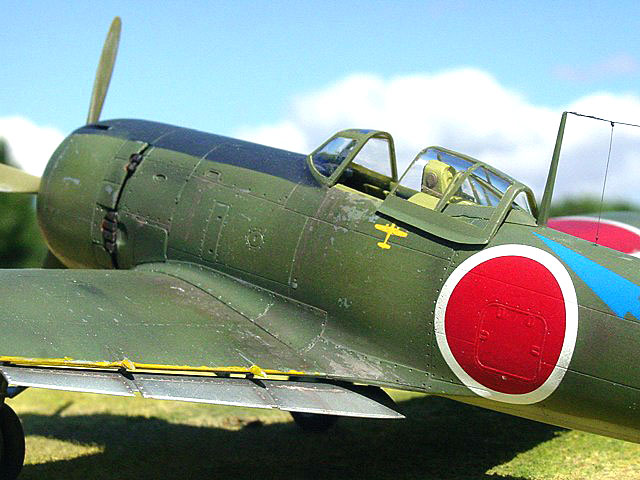
Once the NMF was added I pre-shaded the model with black. Pre-shading
was applied to panel lines as well as to various panels chosen
haphazardly over the model. Light post-shading (i.e., shading applied
after application of the camouflage) with dilute black paint was applied
on the upper surfaces to help break up the monotonous effect of the
solid green camouflage.
The undersurfaces were painted with Tamiya I.J.A. gray acrylic. For the
upper surfaces I mixed 2 parts Polly Scale I.J.A. Green to 1 part
Aeromaster Nakajima Army Green (Polly Scale and Aeromaster acrylics mix
without difficulty). The upper cowl was painted flat black with a touch
of light gray and dark blue for scale effect and fading. The propeller
blades were painted a slightly lighter shade of green than was used for
the upper camouflage. The spinner was painted French blue lightened with
white - this mix made a superb match for the blue arrow decal on the
tail.
Testor's Metalizer sealer was added as a gloss coat prior to the
application of decals. Microset and microsol were used to help settle
the decals on the model. A coat of Polly Scale clear flat and clear
satin (1:1 mixture) was sprayed over the model once the decals had
dried.
Weathering
After painting but prior to the addition of decals,
fine grain sandpaper was used to make surface abrasions and expose small
amounts of the SnJ aluminum beneath, particularly on the cowl, wing
roots and near the cockpit entrance. If too much aluminum was exposed, I
repainted the green camouflage and started the process over.
Washes of dilute raw umber and burnt sienna (Testors enamels) were
applied to the wing roots beneath the cockpit to simulate boot scuffs.
The wash was also applied to some of the panel lines, particularly on
the underside of the model. Note that a soft brush was used to apply the
wash to prevent the thinner from removing the acrylic paint beneath.
Exhaust stains were simulated by spraying highly thinned black paint.
All images were taken outdoors with a SONY S-75
digital camera set at its highest picture resolution (2048 x 1536
pixels).
Other camera settings were as follows: 200 ISO film
speed (it's an option - what can I say), 1000th/sec shutter speed,
F-stop 8.0, and fixed focus distance of either 20 or 30 cm. Images were
cleaned up using Adobe Photoshop 6.0 for the Macintosh. Specifically,
the interface between the base and background were merged using the
software's "blur" tool, and edges in some photographs were sharpened
using the "sharpen edges" tool.
Sharpening images in such a way helps to restore
some of the clarity lost during image compression.
Click on the thumbnails
below to view larger images:
Model, Images and Text Copyright ©
2003 by Ian Robertson
Page Created 15 July, 2003
Last Updated 17 March, 2004
Back to HyperScale
Main Page
|
 Home |
What's New |
Features |
Gallery |
Reviews |
Reference |
Forum |
Search
Home |
What's New |
Features |
Gallery |
Reviews |
Reference |
Forum |
Search