|
Lavochkin La-7
two gun version
by
Ian Robertson
|
|
|
Lavochkin La-7
two gun version |

Gavia's 1/48 scale La-7 is available
online from Squadron.com
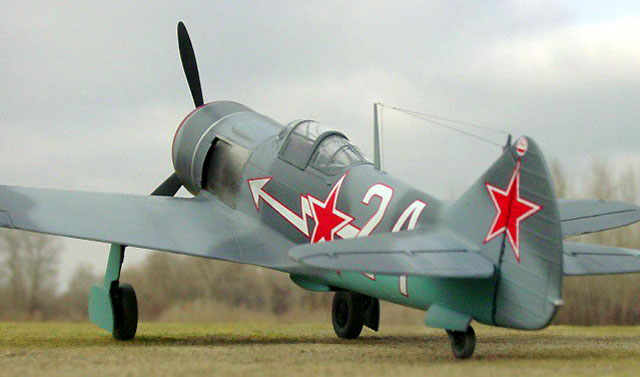
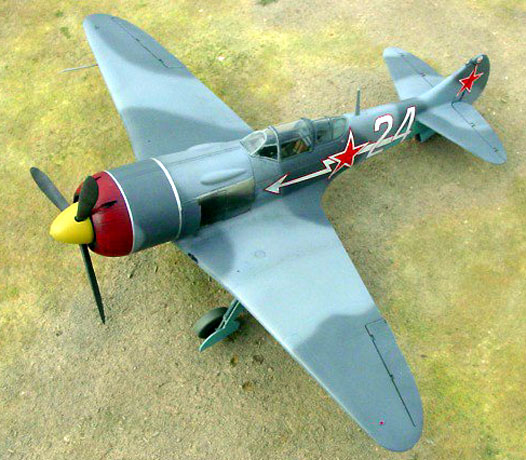
The Lavochkin La-7 fighter went into production in
mid 1944. The aircraft was essentially a refined La-5 airframe, with the
most notable external difference being the repositioning of the oil
cooler from beneath the cowl to midway along the fuselage. In addition,
the long supercharger intake on the La-5's nose was removed and replaced
by intakes mounted in the leading edges of the wing roots.
In terms of performance the La-7 could outclimb and
outmaneuver the Fw190, its most common adversary on the Eastern Front
(94% of all engagements were with Fw190s). An La-7 pilot was even
credited with shooting down an Me.262 in February 1945. Despite its
successes in combat, the La-7 was retired from the Soviet Air Force in
1947, although the Czech Air Force operated the aircraft until 1950.
Production reached a total of just over 5,900 aircraft.
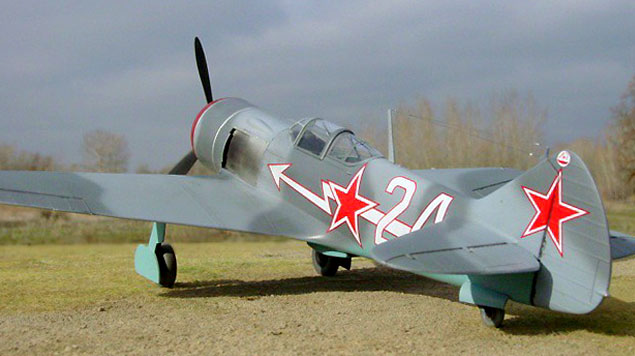
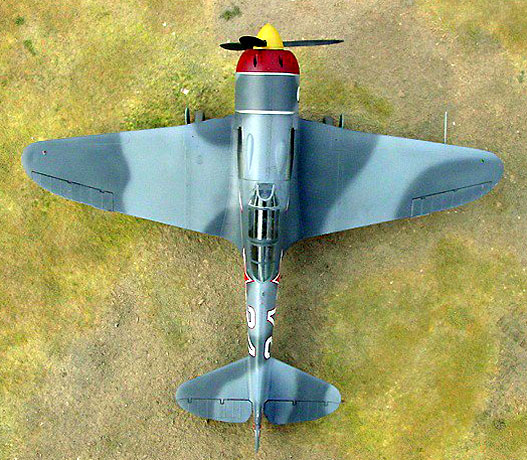
The 1/48 Gavia La-7 is a welcome improvement over
the somewhat dated Hobbycraft kit (for a detailed photographic
comparison of the two kits refer to November 2002 issue of "Military In
Scale" magazine).
Improvements in shape, detail and design bring the Gavia kit much closer
to what we have come to expect from mainstream model companies, or at
least from those companies that charge upwards of $30 (US) for a model.
Overall I was very satisfied with the Gavia kit.
However, there were a few things that I found disappointing. The most
notable shortcoming for me was the 3-piece canopy. Although the clarity
of the canopy was great, the center section was too thick to be placed
in the open position. I tried using Squadron's vacuform replacement for
the Hobbycraft La-7 but found it to be much too large. Thus, I opted to
leave the canopy closed. An alternative is to vacuform a canopy, which
is something I'll consider when building this kit again. Luckily the
cockpit details can be viewed easily through the canopy, and in
retrospect, the sleek lines of the aircraft are better preserved with
the canopy closed than open.
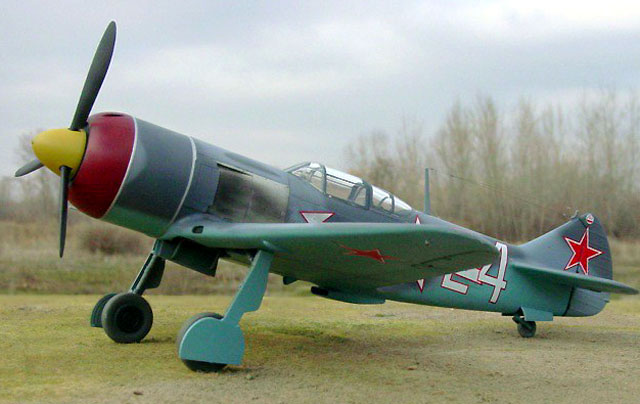
Other things to watch for include the overstated ribbing on the fabric
control surfaces, and landing gear doors which are too large and need to
be trimmed to fit their openings. Also, my primary reference (Squadron's
"La5/7 Fighters In Action") indicated that production La-7's did not
have a starter dog on the tip of the spinner, although I forgot to
remove this from my model.
Lastly, I am not convinced about the length of the main landing struts.
From comparisons with photographs the completed model seems to sit too
high at the nose, although I have not taken any measurements to confirm
my suspicion. If strut length is indeed a problem the fix will be easy.
Because the oleos are molded completely extended, one could cut the
strut at the top of the oleo, drill a hole in the main strut, and then
insert the oleo upwards until the correct length is achieved. The
landing gear covers would have to be trimmed at the top to ensure their
fit. I may go back and correct my model some day, but for now I am
willing to sit on the fence until someone confirms or refutes my
suspicion.
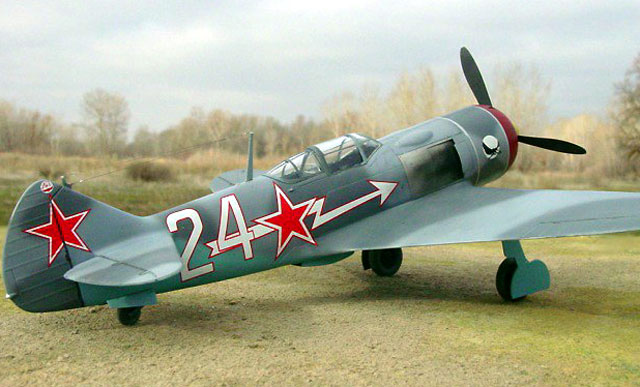
Paint,
Decals and Weathering
|
I painted the cockpit, wheel wells, landing struts,
and interior gear doors a bluish-gray-green. Using Polly Scale acrylics
I mixed 3 parts Soviet green, 1 part navy blue, and 1 part RLM66 (dark
gray). Testors aluminum metallizer was dry-brushed on the seat and some
of the cockpit controls to help pick out the details.
My first step in painting the exterior focused on the metal exhaust
shields. I sprayed these areas with Tamiya gray primer, polished them
smooth with a sanding cloth, and then applied several light coats of
Alclad II aluminum lacquer. Once dry (in about 10 minutes) I masked the
exhaust shields with Tamiya tape until painting was complete. Alclad
stands up very well to masking, and it goes on incredibly smooth.
 Next I applied pre-shading to panel lines as well as some randomly
chosen panels on the underside. Using Polly Scale acrylics I painted the
exterior surfaces freehand in a standard late-war Russian camouflage
scheme of light gray (F505330 - Haze Gray) and dark gray (505232 - USSR
dark topside gray) over light blue (505226 USSR underside blue, mixed
with some RLM65 to simulate fading). The nose was masked and painted
with Model Master Insignia Red. The spinner was painted Model Master
RLM04 yellow. Next I applied pre-shading to panel lines as well as some randomly
chosen panels on the underside. Using Polly Scale acrylics I painted the
exterior surfaces freehand in a standard late-war Russian camouflage
scheme of light gray (F505330 - Haze Gray) and dark gray (505232 - USSR
dark topside gray) over light blue (505226 USSR underside blue, mixed
with some RLM65 to simulate fading). The nose was masked and painted
with Model Master Insignia Red. The spinner was painted Model Master
RLM04 yellow.
Prior to the addition of decals I sprayed a coat of Future floor wax
over the model. The decals that came with the kit are among the best I
have ever used (perfect register, great color, thin, and they did not
silver). A coat of Polly Scale clear flat and clear satin (1:1 mixture)
was sprayed over the model once the decals had dried.
I kept weathering to a minimum. Exhaust stains were added by spraying
highly thinned black paint to the metal exhaust shields. I tried doing
this before adding the final dull coat but the paint did not adhere to
the polished Alclad. Once the dull coat was added the exhaust stains
went on the metallic surfaces without a problem.
Antenna Wire
The antenna wire was made from stretched sprue. I
find the dark gray styrene that comes with some of the later Accurate
Miniatures kits (e.g., Dauntless, Avenger, Yaks) makes the best antenna
wires because it stretches much thinner (sometimes too thin to work
with) than styrene from other kits. The downside for me is that I have
an unbuilt Accurate Miniatures Yak 1b that has very little sprue
remaining around its parts.
Photographs
All images were taken outdoors with a SONY digital
camera set at its highest picture resolution (2048 x 1536 pixels). Other
camera settings were as follows: 200 ISO film speed (what can I say -
it's an option on my digital camera), 1/600th sec shutter speed, F-stop
8.0, and fixed focus distance of either 20 or 30 cm. Images were cleaned
up using Adobe Photoshop 6.0 for the Macintosh.

Specifically, the interface between the base and
background were merged using the software's "blur" tool, and edges in
some photographs were sharpened using the "sharpen edges" tool.
Sharpening images in such a way helps to restore some of the clarity
lost during image compression.
The Gavia kit is by far the best 1/48 La-7 on the
market.
Despite some minor shortcomings, I would not
hesitate to build another. The later three-gun version has just been
released by Gavia (as a Profipack) and includes a resin cowl replacement
for the new gun configuration; however, it sells for about $10 more than
the original two-gun Profipack version.
If you are going to buy just one La-7, I'd
recommend the cheaper two-gun original (regular or Profipack). Now I
just wish that Gavia or some other company would release an La-5,
La-5FN, and while they're at it, a LaGG-3. These aircraft have been
ignored by the higher-end companies for too long.
Click on the thumbnails
below to view larger images:
Model, Images and Text Copyright ©
2003 by Ian Robertson
Page Created 21 January, 2003
Last Updated 17 March, 2004
Back to HyperScale
Main Page
|
 Home |
What's New |
Features |
Gallery |
Reviews |
Reference |
Forum |
Search
Home |
What's New |
Features |
Gallery |
Reviews |
Reference |
Forum |
Search