|
Lublin R-XIIID
by Mike Dobrzelecki
|
|
|
Lublin R-XIIID
No. 26, Eskadra, 2nd Air Regiment, Armia Krakow |
images by
Tom Reavely & Bob Hester

Mirage Hobby's
1/48 scale Lublin R-XIIID
is available online from Squadron.com for less than USD$8.00
The standard liason/army cooperation type used by the Lotnictwo
Wojkowe (LW) (or 'Frontal Aviation', as the Polish Air Force was
officially known) in September 1939 was the Lublin R-XIII two-seat
parasol wing monoplane. In fact, in the middle of the 1930's it
constituted a fifth of the operational strength of the Polish Air Force.
As the Germans cut across telephone, telegraph lines and roads at the
start of the war, the R-XIII and other liason aircraft provided the only
means of communication between Polish units. A shortage of aircraft
forced the the R-XIII to also be employed in reconnaissance missions
behind enemy lines, a task it was ill-suited to perform. With a max
speed of only 121.5 mph, the R-XIII's suffered very high losses during
the September Campaign. Although a number of R-XIII's escaped from
Poland at the end of the September Campaign to countries like Romania,
none are known to survive today.
Mirage Hobby's 1/48
Scale Lublin R-XIIID Origins
Fast-forwarding to 1988, around the same time as I was planning for
the "Poland Invaded" exhibit, the first in a series commemorating the
50th Anniversary period of WWII, aboard the Intrepid Sea-Air-Space
Museum in New York City, an upstart Polish model company, known as
Spojnia, released their first 1/48th scale kit, the Lublin R-XIII.
Friends in Poland sent me two of the kits before they were available in
the States and I was not disappointed when I opened the box. The kit
provides parts and markings to build either a Lublin R-XIIID land
version ( of which, 95 entered service) or a Morskie Dyon Lotnicze (
Polish Naval Aviation Squadron ) R-XIII ter/hydro floatplane, of which
20 were constructed, including the improved R-XIIIG model. I built both
versions for the exhibit.
Before the company's demise, Spojnia also released an RWD 8 Polish
trainer in 1/48th scale to add to the Lublin and the 1/35th scale 7TP
Polish light tank, based on the Vickers 6 ton chassis. The molds were
taken over by Mirage Hobby, who continue to offer all three models with
improved instructions, better decals and great box art. The Spojnia kits
sported a bizarre range of colored plastic - white, bright green, light
blue and others, obviously reflective of using whatever color plastic
happened to be most readily available at the time. Happily, my Lublins
were in white plastic. Mirage Hobby appears to have standardised the
color plastic now being used on the kits under their name.
Three sprues provide all the requisite parts needed for the kit. -
one has the wing sections; another the floats, struts and wheels, and
the 3rd holds the fuselage, tail surfaces and everything else. A small
clear sprue provides two windscreens.
A quick examination of the parts breakdown revealed some issues -
most notably the multi-section wing breakdown - two for the upper
surface and two for the lower surface with a join at the center that
-sure enough - proved to be a problem later in construction.
The surface of the main parts can be described as mildly 'grainy' in
texture and some sanding to reduce this effect should be anticipated.
The rest of the molding was pretty conventional, some parts
heavy-handed, others more finely molded.
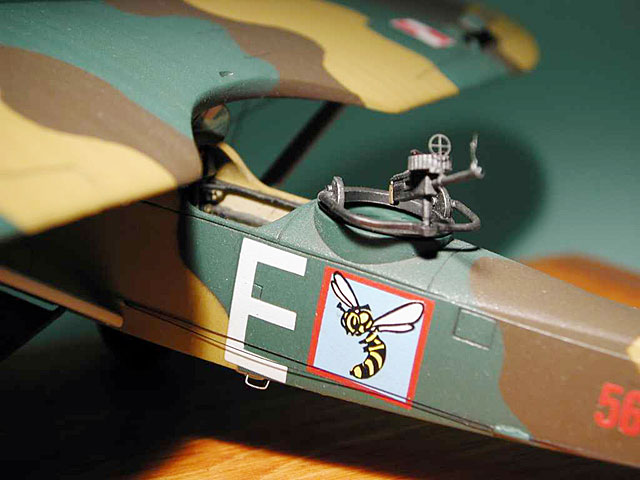
On the upside, the observer's Vickers gun was pretty nice, as was the
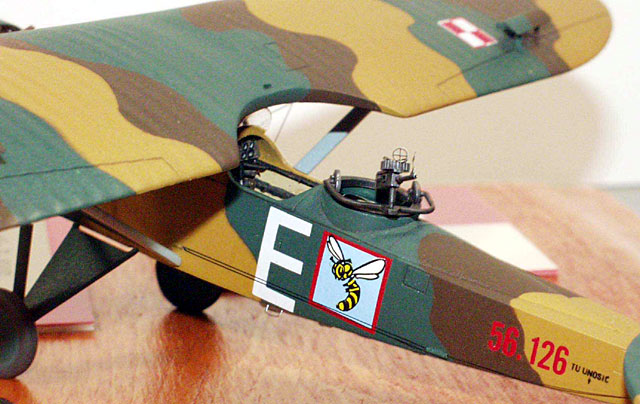
delicate prop. The Spojnia release of the kit provides markings for 3
aircraft - two wheeled versions - Lublin R-XIIID, Aircraft "E", serial
56-126, under wing designation "K" 15 from No.26 Eskadra, 2nd Air
Regiment, Krakow; Lublin R-XIIID, Serial No. 56-114, under wing
designation "N" 24, of No.13 Reconnaissance Squadron 1st Air Regiment,
Warsaw, its fuselage sporting a red & white diagonally segmented shield,
reminiscent of the type often found on early Polish armor and soft-skin
vehicles and, finally, one floatplane - a Lublin R-XIII ter/hydro,
'White 710' of the Polish Naval Aviation Regiment based at Puck on the
Baltic.
Cockpit
Back in those heady days when Solidarnosc and the Poles were just
putting the finishing touches on the overthrow of the Communist Regime
in Poland, I did not have the luxury of having the Part photo-etch (PE)
interior/exterior set available today to improve the kit. The situation
with references on the Lublin was somewhat sparse, as well, the choices
being limited at the time to the English Profile No.231 ( thank God for
Jerzy Cynk back in those days ) and the Polish language TBiu No. 65
Polish Profile, the latter of which, although printed on lousy paper
with horrible photo reproduction, nevertheless provided tantalizing
supplemental details missing in Cynk's tome. Between the two main
references and some supplemental material in the now defunct Polish Aero
Magazine, I came up with a reasonable approximation of what the interior
needed, as well as, other small details for the exterior.
It was not totally a question of stepping back to 1970's Neanderthal
detail modeling techniques, because I had Fotocut's WWI photo-etch
sheets available. Based on Harry Woodman's pioneering work in adapting
the technique of producing delicate aircraft parts from the technology
used to produce printed circuit boards, the sheets offered a plethora of
specific items, such as propeller boss plates, gunsights, bomb racks,
throttle quadrants, pitots, bezels, Spandau and Vickers gun jackets and
a myriad of other shapes that could be adapted for a 'bazillion' uses. I
understand from Fred Hutberg that these sheets are no longer available,
whch is a shame, but if you happen on one, I heartily recommend you snap
it up. Fotocut uses a different technique in photo-etching. The parts
are not on PE sprues, but rather are produced as "free-floating" pieces
stuck on a rubber backing. It is recommended that one cut out around the
part first, then try to pry off the part from the sheet, the other
technique being an application of lacquer thinner, which works, but also
results in curling the rubber and the part along with it, on occassion.
I added additional steel tube interior structure from plastic rod, wire
bracing, PE throttle, scratch-built cylindrical hand pump, rudder bar,
control column rocker bar from plastic rod, control wires, PE seat belts
buckles on masking tape belts, additional ammo drums from a Smer DH-2
dressed up with masking tape straps, a cockpit floor ( easier then
filling and sanding an inside seam ) and a front bulkhead 'firewall'
from plastic sheet stock. The 3 dimensional instrument panel was
constructed from sheet plastic using a Waldron punch & die ( one of my
most invaluable model tools ) with Waldron instruments, Fotocut's bezels
and a sheet of clear plastic trapped under the main panel for the gauge
glasses. The kit's Vickers gun has sink marks on both sides of the gun
body, which were filled in and sanded. Miscellaneous PE parts were added
to the body to dress it up and Fotocut PE gun sights finished it off.
The gun mount was cleaned up and installed later with the Vickers, after
painting, decaling and rigging.
The instruction sheet indicates that the interior should receive a coat
of silver dope, but I ignored that for some reason and used a fabric
color for the interior. The floor was painted to simulate wood with some
grain dry-brushed on. The interior structure tubing was painted in a
steel color as was the throttle and other attachments and controls. The
instrument panel was painted silver with black bezels, seats are brown
leather with a wash of black and various parts picked out in other
colors.
Fuselage
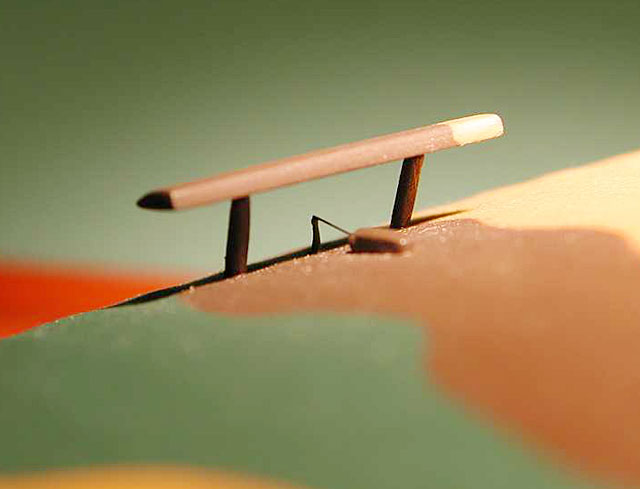
Looking at the references, I cleaned up the cockpit openings a bit,
drillled out openings for the side pipe on the fairing on the bottom
edge of the front fuselage and the pipe to be added to upper deck of the
fuselage between the cowling and the cabane struts. Stainless steel
tubing was inserted for these items. The large indentations for the
pilot's foot step was filled in and sanded flush and new holes drilled
out for a step made from wire for a better scale-appearance.
After preliminary surgery, drilling, filling and sanding, the
interior was installed and the control column and rudder bar positioned
to match the repositioned rudder and elevators.
The fuselage halves were assembled and some minor sink holes and
bumps resulting from molded interior details filled and sanded along
with the seams. Control wire guides mounted on the outside of the rear
fuselage were made from half-sections cut from thin aluminum tube and
installed in the appropriate position.The control cabling for the tail
surfaces was later threaded through the openings in the half-section
tube guides. holes for rigging were pre-drilled after sanding was
completed.
The kit's windscreen, although well-shaped and clear, was replaced
with a vacuformed thinner duplicate using the kit part as a master. A
piece of 600 grit sandpaper was wrapped around the top of the fuselage
in front the cockpit and the contour of bottom edge of the rough
vacuform canopy was blended to the contour of the kit using the shape of
that area as the sanding master. This technique of using the kit's own
shape as a basis for sanding to reduce gaps between parts that are
butt-fitted is a technique that has many applications, but is especially
effective for canopies and windscreens.
Wings
After taping the kit's four wing sections together, it was pretty
evident that one side had a deeper wing section than the other, so I
sanded the back sides until the eccentricity was eliminated. To be fair,
other modelers have reported no problems with their Lublin kits, so it
may be pertinenet only to the two examples I built. The sections were
then glued together and clamped to keep the assembly straight and avoid
the dreaded 'model wing-flapping effect'.
There is no reason that the wing should not have been molded in two
pieces - top and bottom halves. The trailing edges were thinned down and
the grainy surface effect reduced in the process. The control wire horns
were reduced in thickness and drilled out to later accept wires.
Another test fit revealed that the holed for the main struts were too
far out and I drilled new holes in about 3-4mm after filling and sanding
the old hole locations. Locations for rigging were pre-drilled.
The cabane struts were replaced with plastic rod. A rear view mirror
was fashioned using the Waldron punch and die set, a Fotocut bezel and
some aluminum foil for the mirror surface. The mirror was mounted to the
rear left cabane strut with a section of plastic rod.
Tail Surfaces
Repositioned flight surfaces make for a more interesting model. The
rudder and elevators were separated and the leading and trailing edges
thinned down. Using a technique I learned from Bill Devins, notches were
cut into the elevators and rudder and matching notches cut into the
horizontal stabs and fin for the hinges. Hinges were cut from sections
of Evergreen Plastic strip stock. The hinges are installed and blended
into the surface of the stabs and fin with sand paper. The leading edges
of the rudder and elevators were rounded off. The result is very clean
and installation fairly rigid - almost a snap-tight fit. Leave the gap
between the tail surfaces and the fuselage alone. That's the way the
real Lublins appeared.
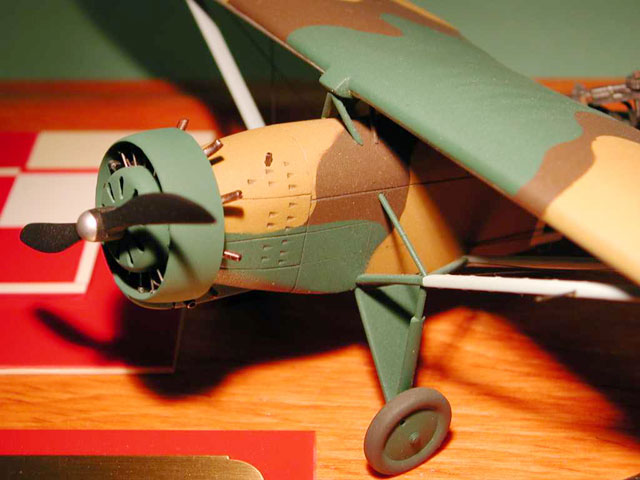
Engine
I probably should have looked for a better substitute for the kit's
engine, which on the real aircraft was a Skoda-built copy of the 220hp
Wright Whirlwind J5, the same radial that carried Lindbergh to Paris,
but decided to use what I had in the kit - after all, if it was good
enough for 'Lucky Lindy", it was good enough for me. I cleaned up the
mold lines on the engine and test fitted it in the Townend cowling
which, revealed that the diameter of said engine would have to be
reduced ever so slightly in order to fit into the one-piece cowling.
Light sanding accomplished the mission. The push rods were replaced with
piano wire. Ignition wires were added from copper fuse wire.
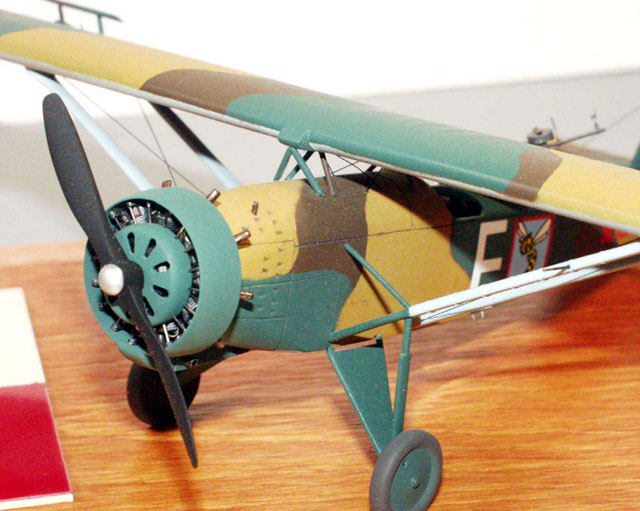
Many of the kit's exhaust stacks were marred by a mis-aligned mold
and had to be replaced with plastic rod that was gently curved and
drilled out. I wanted to open the cooling slots on the engine cowling
aerodynamic face plate, so I first thinned it down from the backside,
made an initial slit cut in the slot shapes with a hobby knife, then
carefully widened the holes, finishing it up with a combination of round
files and a flexi-file - the sanding strip, for which, was first reduced
in thickness by cutting it lengthwise, so it will fit into the slot
openings. The trailing edges of the Townend ring was thinned down. The
end result in dressing up the front end the model was worth the effort.
Struts
Mold lines were removed from the struts and the leading and trailing
edges cleaned up a bit and thinned down. Steel pins were added to beef
up the attachment points A pitot tube from stainless steel micro tubing
as added to the port wing strut later, after painting, decaling and
rigging
Wheels
The kit wheels were flattened to simulate weight of the aircraft and
installed in a slightly canted-out manner to match the original stance
of the aircraft. The tires were painted using Polly Scale Grimy Black.
This color has a more scale appearance than flat black, which I rarely
use straight out of the bottle these days, because it is too dark in my
opinion for use on models for most applications.
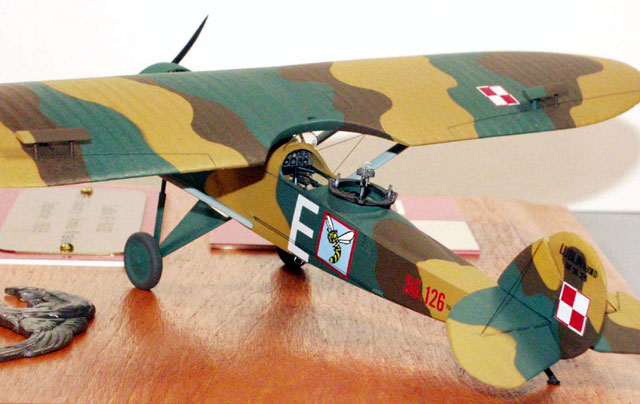
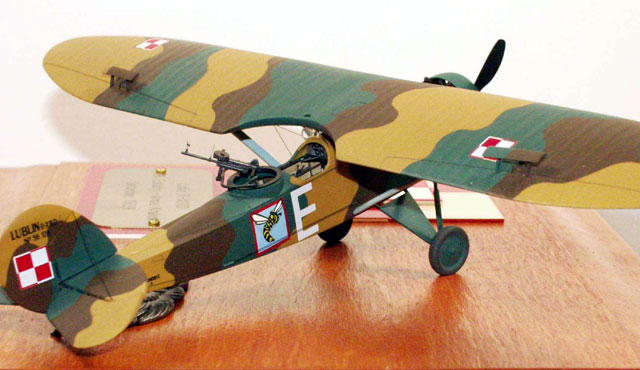
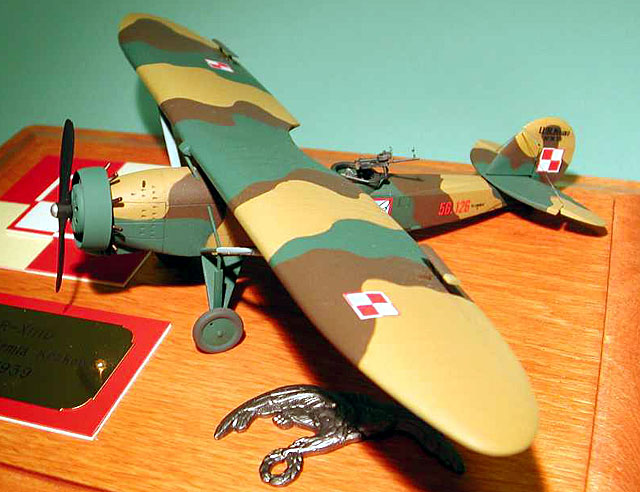
Paint
Using my limited references as a guide, I used Polly Scale's acrylic
Middlestone, one of their dark greens (can't remember which) and an old
bottle of Pactra enamel Brown for the top surfaces and Polly Scale RLM
65 for the under surfaces. The instruction sheet also allows the under
surfaces to be rendered in silver dope and, for awhile, after I finished
the model there was some debate in Polish aviation circles as to whether
the Light Blue was ever used, but apparently the latest information
points to the light blue as being accurate for, at least, some Lublins.
All-in-all, very colorful camouflage scheme for my R-XIIID.
Final Assembly
After painting was completed, the wing and tail surfaces were
assembled to a fuselage using a simple jig. This final assembly was
facilitated by lining up everything on a sheet of graph paper, another
of my favorite modeling tools. It is easy to get alignment right using
the graph paper as a reference guide.I have both 8 1/2" x 11" and 11' x
17" paper pads for small and large projects. After the wing was set, I
filled some minor gaps between the strut fairings and the wings with
white glue and gave it a localised quick shot with the underside blue
for a near-perfect blend of strut to wing.
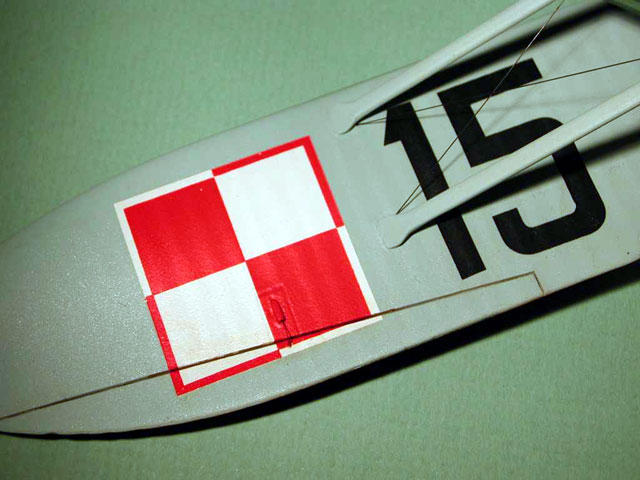
Decals
As nice as the markings choices are, the Spojnia decals are out of
register and transluscent. Another friend, Pat Sparks, who is a
professional modeler, came to my rescue by producing custom-made rub-on
decals using the kit's sheet as a guide. The items replaced include the
Polish chessboards, No.26 Eskadra badge, the serial number - in red -
and the black "K" 15. Pat's artwork is impeccable in its finesse and
detail. After prepping the surface with Tamiya clear-coat, the custom
decals were first mounted to clear decal stock and applied to the model.
I applied the rub-on serial number straight from its backing onto the
model. I used the kit's black Lublin factory and aircraft type
designator for the rudder and the Polish language "Lift Here" stencil .
I used the tried-and-true Micro Set/Sol solutions during decal
application and made sure to wash off the decal glue and setting
solution mineral deposits from the model both right after application of
the decals and, later, once again, after the decals had dried. I
finished the kit off with a coat of Polly Scale Flat, the best flat coat
in my humble opinion.
3lb Maxima brand finishing line was used for the main rigging wires and
2lb for the control wires. The line was first run through the tip of a
black Tamiya paint pen and allowed to dry. The rigging wire was attached
using CA and CA accelerator. Small parts were added as indicated in the
previous narrative.
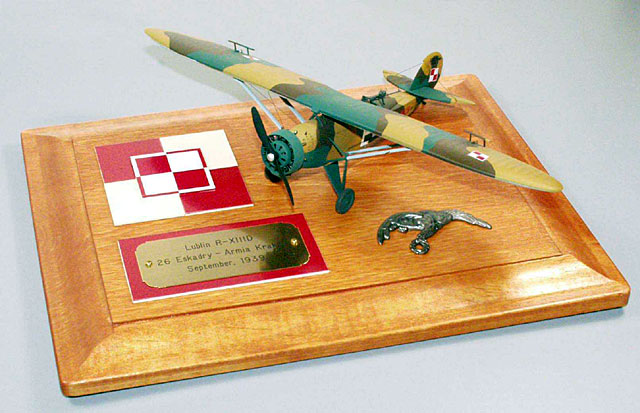
A simple wood base was purchased at a craft store and finished with a
rich light-to-medium wood stain. Many modelers use a stain that's too
dark and the model disappears against the base, especially if the model
is painted in a dark color to begin with. The chessboard is made from
sheets of pre-colored pastic cut to size, incuding the borders. The
Polish pilot's wings were purchased at a militaria show in the USA.
SO what would I do differently in the 21st Century?
Buy the Mirage Hobby release of the same R-XIII kit - No. 48-301. The
decals are much nicer and provide different markings.
Get the Part PE set No.S480001 for the Lublin R-XIIID. It provides
accurate interior and exterior detail that I could only 'guestimate'.
See if you can get your hands on the out-of-print Polish-language R-XIIID
book ( No.1 ) published by Wydawnictwo Militaria. Even if you do not
speak Polish, the drawings and photos in this publication go along way
in solving some of the mysteries I could not resolve back in 1988-1989,
especially the detail and configuration of the fuselage underside of the
R-XIII. There are panels and all kinds of detail on the underside that
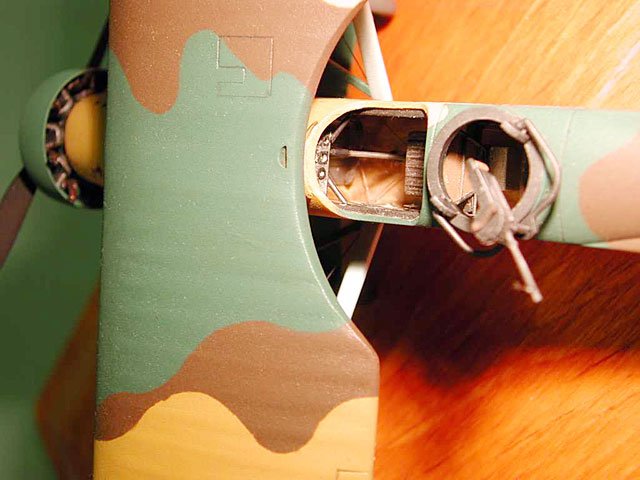
is not present on my 14 year old model. One example is : For the life of
me, I could not get a straight answer as to the function of the
oblong-shaped fairing, kit part no. 25, that goes on the bottom of the
fuselage offset to the starboard side (in planview from the bottom). The
Spojnia instruction sheet describes it as "Fuselage Part'. The part has
4 rectangular bumps on it and one Polish aviation buddy told me it was
part of a hook-like message pick-up system, but nothing definitive came
to light back in 1989. To add interest to the parton my model, I opened
the rectangular holes and gave it a wash.
Paint the interior in a silver dope finish. This was a standard practice
used by the Poles for many of their 1930's era aircraft, including the
PZL P.11 & P.23.
Find a better 1/48th Wright Whirwind J5 radial engine.
Use slightly different shades from the colors I chose and consider
silver doped undersides for the flying surfaces. Although my R-XIIID
looks striking, it could use some scale reduction of the intesity of the
colors. I would do some more research on the matter, but there was an
intriguing article in the Polish model magazine "Model Hobby", (14) 4 in
late 2002 ( the one with the "Crash Test" review of the Mirage PZL P.11c
) covering a scratch-built 1/24th scale wood model of a R-XIIID that was
supposedly made back in the 1930's by a pilot serving in the Polish Air
Force. It supposedly was painted using the exact same paints used on the
real aircraft. The top surface colors are very different than indicated
in most references, as well as those on my model. Generally, they can be
described as muted in intensity. It appears to have silver doped
undersurfaces and the silver dope extends onto the undersides of the
landing gear fairings. If this model is authentic, it is in remarkable
condition, having survived through the 2-3 invasions that criss-crossed
Poland during WWII.
Add a rear brace to the wire step.
I have the first three items covered to make a better R-XIIID the next
time around and will hunt for the others. In the future I'll post an
article on my Polish Navy float-equipped Lublin R-XIIID. It currently
languishes in one of my model hangars awaiting replacement of the floats
and struts, the original assembly on the finished model having been
marred by out of alignment struts and floats. I started fixing them, but
never finished the repair.
As always, all HyperScalers, especially Polish aviation buffs, are
invited to post comments to this Feature in the Forum. That's how we all
learn more about these things with wings.
Click the thumbnails below
to view larger images:
Model and Text Copyright © 2003 by
Mike Dobrzelecki
Images Copyright © 2003 by Tom Reavely & Bob Hester
Page Created 14 September, 2003
Last Updated 17 March, 2004
Back to HyperScale
Main Page
|
 Home |
What's New |
Features |
Gallery |
Reviews |
Reference |
Forum |
Search
Home |
What's New |
Features |
Gallery |
Reviews |
Reference |
Forum |
Search